I have seen numerous articles about the transom, and making sure it is installed correctly, so I won't be taking it lightly. Thanks for the warningRegarding your transom piece, it is different than my own MS2130 kit where I had to fashion the transom/deadwood our of a solid block of wood. Take another look at your plans and instructions to understand how this area will be executed in your kit. I know that it needs to be solid and not moving around. Rich
-

Win a Free Custom Engraved Brass Coin!!!
As a way to introduce our brass coins to the community, we will raffle off a free coin during the month of August. Follow link ABOVE for instructions for entering.
-

PRE-ORDER SHIPS IN SCALE TODAY!
The beloved Ships in Scale Magazine is back and charting a new course for 2026!
Discover new skills, new techniques, and new inspirations in every issue.
NOTE THAT OUR FIRST ISSUE WILL BE JAN/FEB 2026
You are using an out of date browser. It may not display this or other websites correctly.
You should upgrade or use an alternative browser.
You should upgrade or use an alternative browser.
Bluenose II Build (Artesania Latina) 1:75 by Nomad [Completed Build]
When installing the frames to the keel, I use a square to ensure they are correct in the direction from bow to stern, doing one frame at a time starting from the bow. Then I use a piece of wood (square strip) and glue to the frame and bulkhead looking from the top, to keep the frames square to the keel (side to side). I use wood glue in the frame to keel joint, and then CA on the square strip to set that quickly after squaring front to back. Hope that makes sense.
Yes that does make sense, thanks for sharing. Can I ask, once you've squared a single bulkhead, do you then apply the glue and fix it into place permanently before going on to the next frame? And do you then do the fairing of the frames once they are all in place and immovable? As for soaking the deck in hot water, how long do you leave it submerged in the water, and should it be dry again before gluing it into position? Excuse all the questions, but this stuff certainly isn't in the instructionsWhen installing the frames to the keel, I use a square to ensure they are correct in the direction from bow to stern, doing one frame at a time starting from the bow. Then I use a piece of wood (square strip) and glue to the frame and bulkhead looking from the top, to keep the frames square to the keel (side to side). I use wood glue in the frame to keel joint, and then CA on the square strip to set that quickly after squaring front to back. Hope that makes sense.
One last thing, the char on the outside edge of the frame should be left alone until you fair the hull. This involves using a file or sanding block to average the curve across the frame for the hull planks. That way, as you fair the hull, you can visually see what you have not sanded. 
Yes, do one frame. Use wood glue, which has slower curing time. Then when it’s square front to back, add the square strip to square side to side with CA glue, which cures very quickly. At that point, you can move to the next frame while the wood glue is curing on the previous one, because the CA glue joint of the square block will lock it into place in both directions.Yes that does make sense, thanks for sharing. Can I ask, once you've squared a single bulkhead, do you then apply the glue and fix it into place permanently before going on to the next frame? And do you then do the fairing of the frames once they are all in place and immovable?
- Thanks
And yes, only once all frames are in place and the deck is installed should you fair the hull. You want to wait until you are about to plank the hull prior to fairing. This ensures all the frames are rigid as possible.
I had already removed the 'burnt' edges from the bulkhead frames unfortunately, so I guess my fairing job when I get round to it might be just tad bit more challenging. I was wondering what method I could use to keep each frame square and stable though, and your suggestion to use small square strips of wood makes sense, thanksAnd yes, only once all frames are in place and the deck is installed should you fair the hull. You want to wait until you are about to plank the hull prior to fairing. This ensures all the frames are rigid as possible.
As far as how long to soak the deck sheet, there are variables in play, like thickness of wood, type of wood and water temperature. So I typically put about an inch of scalding hot water in the tub, put the deck sheet in, put something on it to push it down into the water. Then after about 5 minutes take out and carefully try to bend. If it doesn’t want to bend easily, put back in and check again in another 5 minutes. If you hear any cracking, stop immediately…lol.
After it will bend enough to be installed, I wipe it down with a towel, so it’s still a little damp, but not soaking wet. That way it actually gives you more working time before the glue sets up. Which is an advantage, because deck sheets have a lot of area that has to be glued and clamped.
Hope that helps. Instructions assume you have some general wood working knowledge…sigh. We learn these things that hard way, and not everyone does it the same way. But this works for me!
No worries, you can use a pencil or paint the edge. Whatever you do, you will sand it off anyway.I had already removed the 'burnt' edges from the bulkhead frames unfortunately, so I guess my fairing job when I get round to it might be just tad bit more challenging. I was wondering what method I could use to keep each frame square and stable though, and your suggestion to use small square strips of wood makes sense, thanks
At the larger scale, 1:64, of my MS2130 I placed longitudinal pieces outboard but inside of fairing planes to stabilize the bulkheads more securely than a piece along the keel board as that still provided more rotation at the outer faces than I found acceptable. A second difference between the kits if that in MS2130 there was no solid sheet/subdeck on top of the bulkheads so the deck planking was in more of a fragile and floating condition. As I recall the smaller YQ kit had a stamped deck piece which I do not think that Dean used for his own individual planking approach. For me squareness and then stability of those parts is essential for fairing the longer lines of the hull and deck with long files and sanding methods. Just some thoughts. Rich (PT-2)No worries, you can use a pencil or paint the edge. Whatever you do, you will sand it off anyway.
I saw an example where the modeller had inserted small dowels between the bulkhead frames, closer to the ends of the frames than the keel. It looked very stable visually, but I can't imagine the amount of precise measuring that went on to get that rigged up. Still, based on the examples I have seen I am starting to appreciate the necessity of a square and robust hull assembly!At the larger scale, 1:64, of my MS2130 I placed longitudinal pieces outboard but inside of fairing planes to stabilize the bulkheads more securely than a piece along the keel board as that still provided more rotation at the outer faces than I found acceptable. A second difference between the kits if that in MS2130 there was no solid sheet/subdeck on top of the bulkheads so the deck planking was in more of a fragile and floating condition. As I recall the smaller YQ kit had a stamped deck piece which I do not think that Dean used for his own individual planking approach. For me squareness and then stability of those parts is essential for fairing the longer lines of the hull and deck with long files and sanding methods. Just some thoughts. Rich (PT-2)
What is your take on the use of pins to hold the deck and planking in place? I notice some use pins and leave them in permanently, others remove them once the glue is set, and some don't use pins at all. The AL BN II instructions advocate pins, but there doesn't seem to be a really clear directive on their lifespan.
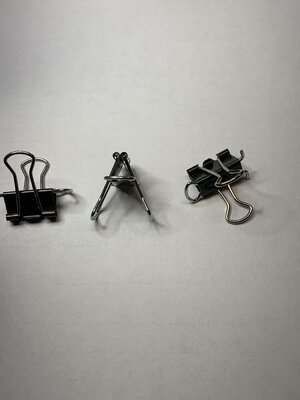
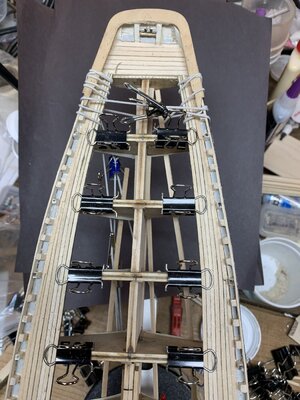
Pins tight against the side of a plank at an angle can hold it until the glue is dry. I prefer to use clips which pinch the bulkhead and at the same time hold the plank in place. Numbers of these are necessary placed at each bulkhead and can be made by reassembling small binder clips. Here arfe some photos of those:I saw an example where the modeller had inserted small dowels between the bulkhead frames, closer to the ends of the frames than the keel. It looked very stable visually, but I can't imagine the amount of precise measuring that went on to get that rigged up. Still, based on the examples I have seen I am starting to appreciate the necessity of a square and robust hull assembly!
What is your take on the use of pins to hold the deck and planking in place? I notice some use pins and leave them in permanently, others remove them once the glue is set, and some don't use pins at all. The AL BN II instructions advocate pins, but there doesn't seem to be a really clear directive on their lifespan.
Tale two clips and remove the two pinching arms and then insert one of those into the back side (inside face) of the other making a planking clip. Here are three different views:
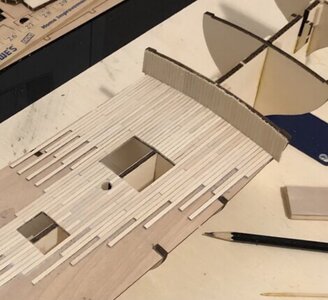
Here is a view of using them for deck planks at the transom port quarter
and one more on the port foredeck
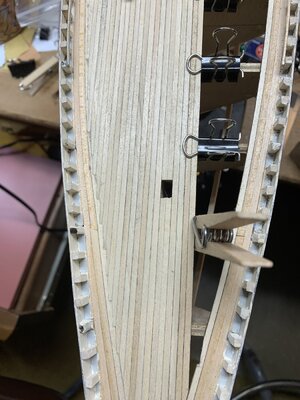
You can also see the temporary additional bracing pieces below to stabilize the outer edges of the bulkheads. It may be a challenge to make the first couple of clamps but when you have a sequence in place they go very quickly. Rich (PT-2)
At this stage, everything is clear. And when the clamps no longer fit, what will be the technology for securing the deckboards?
When things are too narrow for the metal clips I shift to small wood cloths pins and then using the legs apart for a wedge device. Those can be filed or sanded down to small sizes. Or you could go back to using the pin method at the very end. Just my thoughts and as used by me as conditions demanded. Rich PT-2)At this stage, everything is clear. And when the clamps no longer fit, what will be the technology for securing the deckboards?
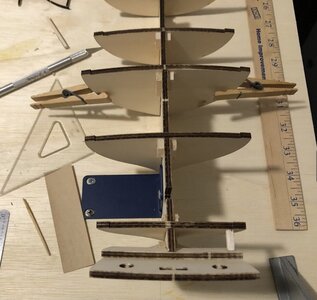
Here is a photo of modifying a wooden clothes pin by taking it apart, sanding the inside faces flat to a point and then reassembling around the spring in a now inside out manner. You can also narrow down the end for smaller spaces.When things are too narrow for the metal clips I shift to small wood cloths pins and then using the legs apart for a wedge device. Those can be filed or sanded down to small sizes. Or you could go back to using the pin method at the very end. Just my thoughts and as used by me as conditions demanded. Rich PT-2)
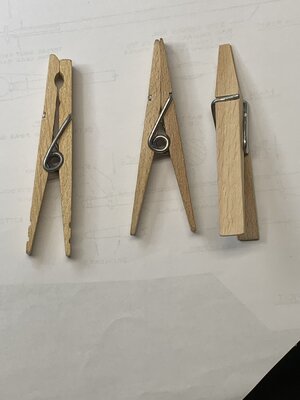
You may have to experiment with some to get what you need. Rich
Thanks. I'll take it on board. 

Yes, me too. I can see I'm going to have to do a lot of thinking outside the square going forwardThanks. I'll take it on board.

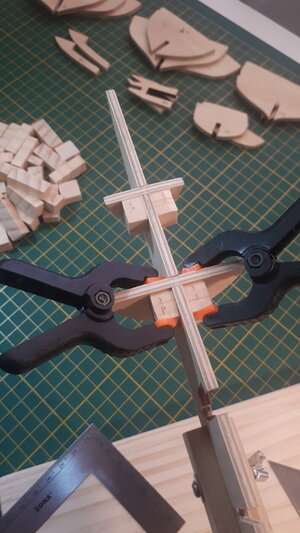
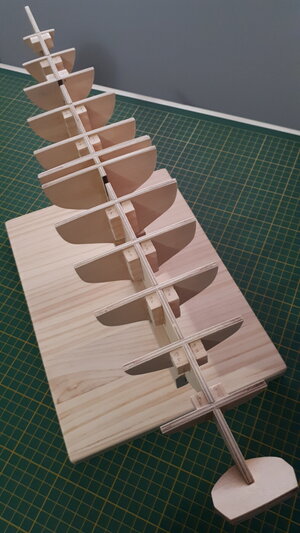
Very slow progress, but progress all the same. The message I got was to ensure that all bulkhead frames are square to the keel and stable, so I reinforced most of them with small blocks of wood which I hope will not hamper anything down the line. I noticed the false keel was not perfectly straight, although I'm told this won't matter much if the frames are square at the time the false deck is installed. I don't know much about glues either, and used what I assumed to be a white carpenter variety by Gorilla, which was easy to apply and set like cement after a couple of minutes. I did not apply any CA glue to the frame which seems to be popular with some modellers.
