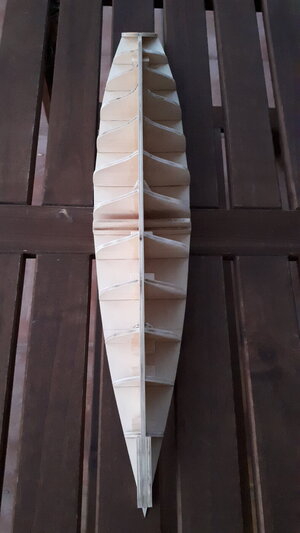
Looking good!! The blocks will not be in the way of anything, because there is nothing below the deck on the version you are building.Very slow progress, but progress all the same. The message I got was to ensure that all bulkhead frames are square to the keel and stable, so I reinforced most of them with small blocks of wood which I hope will not hamper anything down the line. I noticed the false keel was not perfectly straight, although I'm told this won't matter much if the frames are square at the time the false deck is installed. I don't know much about glues either, and used what I assumed to be a white carpenter variety by Gorilla, which was easy to apply and set like cement after a couple of minutes. I did not apply any CA glue to the frame which seems to be popular with some modellers.
View attachment 248044View attachment 248045
-

Win a Free Custom Engraved Brass Coin!!!
As a way to introduce our brass coins to the community, we will raffle off a free coin during the month of August. Follow link ABOVE for instructions for entering.
-

PRE-ORDER SHIPS IN SCALE TODAY!
The beloved Ships in Scale Magazine is back and charting a new course for 2026!
Discover new skills, new techniques, and new inspirations in every issue.
NOTE THAT OUR FIRST ISSUE WILL BE JAN/FEB 2026
You are using an out of date browser. It may not display this or other websites correctly.
You should upgrade or use an alternative browser.
You should upgrade or use an alternative browser.
Bluenose II Build (Artesania Latina) 1:75 by Nomad [Completed Build]
You may be past the point of trying to straighten out the deviation in the keel but I recommend always to keep everything as in line as you are able. If the keel piece does have some deformation and you have the bulkheads set, that may be a problem to work with when you plank the hull. Do what you can and address other problems as they arise. Hopefully you will be able to file and sand our irregularities when you fair the hull and do not have to resort to pasting in low areas which will limit your hull finishing options.Looking good!! The blocks will not be in the way of anything, because there is nothing below the deck on the version you are building.
Dean sets a high bar for us to track in his precise building which from what I know is primarily by hand tools, filing, sanding, and very limited use of powered tools. He is a fast builder so the rest of us have to proceed at our own paces as this is not a race but a hobby to be able to look back upon and say that our time was well spent. Just some thoughts. Rich (PT-2)
The deviation was very minor but I'll take on board what you suggest and make adjustments later if necessary. I noticed it too late I suppose, and will be careful next time. John Earl mentions in his practicum (part I) that a slightly warped keel can be overcome by aligning the frames and keel correctly, so I'll take a bit of heart from thatYou may be past the point of trying to straighten out the deviation in the keel but I recommend always to keep everything as in line as you are able. If the keel piece does have some deformation and you have the bulkheads set, that may be a problem to work with when you plank the hull. Do what you can and address other problems as they arise. Hopefully you will be able to file and sand our irregularities when you fair the hull and do not have to resort to pasting in low areas which will limit your hull finishing options.
Dean sets a high bar for us to track in his precise building which from what I know is primarily by hand tools, filing, sanding, and very limited use of powered tools. He is a fast builder so the rest of us have to proceed at our own paces as this is not a race but a hobby to be able to look back upon and say that our time was well spent. Just some thoughts. Rich (PT-2)
I'm going to try something that I picked up from a build log of the Bluenose II somewhere, to insert a thin piece of wire or pin into the base of masts and deck features as a way of securing them firmly in their support blocks and deck. A hole is drilled into the base of the mast or deck feature, the wire or pin inserted, a corresponding hole is drilled into the support block or deck and fitted and glued when the mast or deck feature is installed. Seemed like a good idea, and given that I'm not sure how easy it will be to access the base of the mast support blocks later on, it probably makes sense to prepare the holes now. I used a 0.7 or 0.8 mm bit which had a similar diameter to one of the pins supplied in the AL kit.
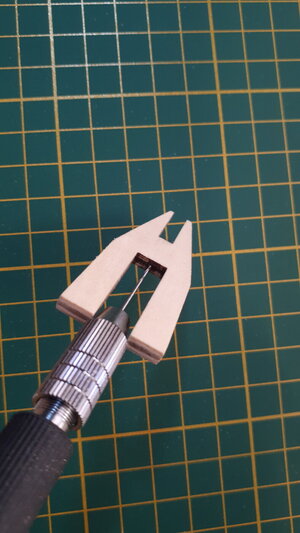
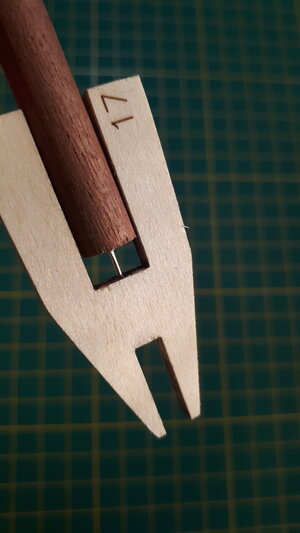


Last edited:
I appreciate the effort and technique, especially for deck items that will see tension from rigging. On the mast however, normally that area has a little play for adjustment.I'm going to try something that I picked up from a build log of the Bluenose II somewhere, to insert a thin piece of wire or pin into the base of masts and deck features as a way of securing them firmly in their support blocks and deck. A hole is drilled into the base of the mast or deck feature, the wire or pin inserted, a corresponding hole is drilled into the support block or deck and fitted and glued when the mast or deck feature is installed. Seemed like a good idea, and given that I'm not sure how easy it will be to access the base of the mast support blocks later on, it probably makes sense to prepare the holes now. I used a 0.7 or 0.8 mm bit which had a similar diameter to one of the pins supplied in the AL kit.
View attachment 248237View attachment 248238
First, when putting the mast through the hole in the deck, it’s hard enough to find the lower support by feel as you will not be able to see it. If you have to find a tiny pin hole…yikes!
Second, the mast normally have a certain rake forward or aft, this is usually very minimal. But it means the mast is not 90 degrees to the ship or the base. The rake information for each mast should be on the ships rigging plans hopefully. Some use an angle finder and level to adjust this. A pre-drilled hole forces a location without the possibility of adjustment. In fact, if the hole in the deck is not perfectly lined up it could force a rake that may be undesirable.
And finally, some people don’t glue the mast in place, but rather let the shroud lines and stays secure it. I’m not in favor of this approach as you can’t really set your rake and trust it to stay.
So that technique of pinning, is a good method for deck furnishings and other components, but I would advise against it on the mast for the aforementioned reasons.
I like that you are thinking ahead and looking for better ways to do things! That’s a great first step in being a better ship model builder! Keep up the good work.
Thanks for the reply Dean. Yes, what you say makes sense, and I had wondered whether pinning the mast was the best option. I would probably never have found the tiny bored hole anyway lol. Ok, so I'll not apply it to the masts. The deck furnishings however, they won't get away so easilyI appreciate the effort and technique, especially for deck items that will see tension from rigging. On the mast however, normally that area has a little play for adjustment.
First, when putting the mast through the hole in the deck, it’s hard enough to find the lower support by feel as you will not be able to see it. If you have to find a tiny pin hole…yikes!
Second, the mast normally have a certain rake forward or aft, this is usually very minimal. But it means the mast is not 90 degrees to the ship or the base. Some use an angle finder and level to adjust this. A pre-drilled hole forces a location without the possibility of adjustment. In fact, if the hole in the deck is not perfectly lined up it could force a rake that may be undesirable.
And finally, some people don’t glue the mast in place, but rather let the shroud lines and stays secure it. I’m not in favor of this approach as you can’t really set your rake and trust it to stay.
So that technique of pinning, is a good method for deck furnishings and other components, but I would advise against it on the mast for the aforementioned reasons.
I like that you are thinking ahead and looking for better ways to do things! That’s a great first step in being a better ship model builder! Keep up the good work.
I see you asked about nails… some people use tiny nails for planking, and remove them once the glue dries. I don’t like the holes it leaves behind, unless you are going to add treenails there. And they can be difficult to remove. I have used nails on deck sheets prior to planking. It helps with holding the deck down without using clamps. So I glued and nailed the deck sheet. Then I used a punch to sink the nails below the deck sheet, and planked it once the glue dried. That way I didn’t have to remove the nails! 
Yes, I had come to a similar conclusion after browsing quite a few build logs. I thought nailing the false deck could be a valid option, especially given the camber of the deck toward the edges. Hull planking I'm not too sure; it seems you'd need a whole lot of nails to get it done. Again, I'll take your advice on board and perhaps only use nails when I have no other real option, and leave as few holes in the structure as possible. As it is, I still need to develop a technique for pushing the pins into the wood. I bought a small nailer, which I guess is like a manual punch, but I'm aware that a small slip while applying pressure could lead to bigger problems. Working in miniature is for me still a work in progressI see you asked about nails… some people use tiny nails for planking, and remove them once the glue dries. I don’t like the holes it leaves behind, unless you are going to add treenails there. And they can be difficult to remove. I have used nails on deck sheets prior to planking. It helps with holding the deck down without using clamps. So I glued and nailed the deck sheet. Then I used a punch to sink the nails below the deck sheet, and planked it once the glue dried. That way I didn’t have to remove the nails!
This is probably a lame question, but I'm exercising my right-of-ignorance as a newbie  When attaching the false deck to the keel, do you pin first and then glue, or apply glue before pinning? If you pin first, how is the glue applied now that the tops of the keel and bulkhead frames are concealed by the deck? Or do you simply apply the glue to the joints? Thank you

You apply glue first, to all surfaces the deck will sit on... and either clamp, pin or use tiny nails. Some people even use weights (not preferred). As mentioned previously, if you soak the deck sheet, to aid in bending, that will give you more time before the glue sets up, because the deck will still be damp. Because the deck is a large part with a lot of glue area, always practice a dry fit... and practice a dry run of how you are going to clamp the part. Nothing like having glue setting up when you then realize you have not thought out the most logical way to clamp your part. Even if you nail, you will want to clamp a few places, to hold it in place while you nail. Remove the clamps and add nails in their place as you get to that area. Hope that all makes sense!This is probably a lame question, but I'm exercising my right-of-ignorance as a newbieWhen attaching the false deck to the keel, do you pin first and then glue, or apply glue before pinning? If you pin first, how is the glue applied now that the tops of the keel and bulkhead frames are concealed by the deck? Or do you simply apply the glue to the joints? Thank you

It makes perfect sense, thanks DeanYou apply glue first, to all surfaces the deck will sit on... and either clamp, pin or use tiny nails. Some people even use weights (not preferred). As mentioned previously, if you soak the deck sheet, to aid in bending, that will give you more time before the glue sets up, because the deck will still be damp. Because the deck is a large part with a lot of glue area, always practice a dry fit... and practice a dry run of how you are going to clamp the part. Nothing like having glue setting up when you then realize you have not thought out the most logical way to clamp your part. Even if you nail, you will want to clamp a few places, to hold it in place while you nail. Remove the clamps and add nails in their place as you get to that area. Hope that all makes sense!

As a side note regarding mast rake: I found rake dimensions given at a particular height, raking the mast forward which was about half a foot so that the aft tension of the sails when full would pull the mast to a vertical alignment. (Fore mast 5" at 64 ft and Main mast 2'-4" at 70 ft, both above the deck.) This "rake" was different for the fore and main masts due to their different heights and sail areas creating the aft tension. It really doesn't matter with our scale Bluenoses as a vertical mast looks best as the BN had not designed aft rake like some other schooners. This rake and sail tension issue would only apply when the model is built with sails and in a sailing presentation. If you want a bare spars presentation then the rake could be included. Just an observation . . . Rich (PT-2)It makes perfect sense, thanks Dean
That is interesting. I quite like the bare spars look, so I'll bear all that in mindAs a side note regarding mast rake: I found rake dimensions given at a particular height, raking the mast forward which was about half a foot so that the aft tension of the sails when full would pull the mast to a vertical alignment. (Fore mast 5" at 64 ft and Main mast 2'-4" at 70 ft, both above the deck.) This "rake" was different for the fore and main masts due to their different heights and sail areas creating the aft tension. It really doesn't matter with our scale Bluenoses as a vertical mast looks best as the BN had not designed aft rake like some other schooners. This rake and sail tension issue would only apply when the model is built with sails and in a sailing presentation. If you want a bare spars presentation then the rake could be included. Just an observation . . . Rich (PT-2)
Onwards and upwards. I attached the false deck to the keel and bulkheads using all the generous advice I'd received earlier. I soaked the deck for several minutes until it was pliable, attached it with Gorilla glue and bound it fast with rubber bands and clamps. I used a drill bit to create small countersink indentations for the tiny nails that I applied along the centre and edges of the deck. I was pleased to see that the slight deviation in the keel was now gone, which was the outcome John Earl's practicum said to expect if you line everything up properly 
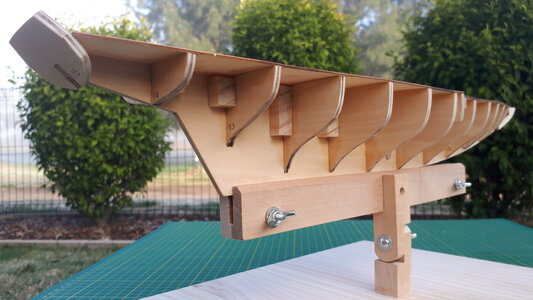
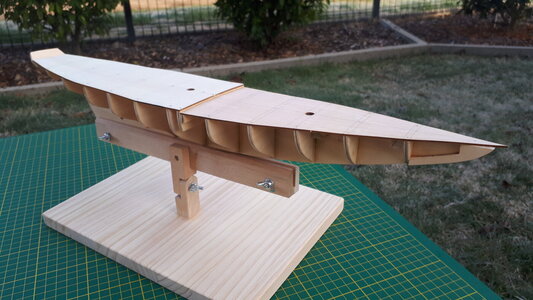
I noticed that the edge of the foredeck has three faint, yet distinct sections that make up the curve from beam to stern. Seems I'll need to sand this into a continuous curve before adding the outer deck planking, which follows this curve.


I noticed that the edge of the foredeck has three faint, yet distinct sections that make up the curve from beam to stern. Seems I'll need to sand this into a continuous curve before adding the outer deck planking, which follows this curve.
Last edited:
That false subdeck will save you a lot of challenges as you will not have floating deck planks' ends which I had with my POB MSN2130 kit which does not include those. You are doing well. Keep the slow pace as you proceed while thinking ahead. RichOnwards and upwards. I attached the false deck to the keel and bulkheads using all the generous advice I'd received earlier. I soaked the deck for several minutes until it was pliable, attached it with Gorilla glue and bound it fast with rubber bands and clamps. I used a drill bit to create small countersink indentations for the tiny nails that I applied along the centre and edges of the deck. I was pleased to see that the slight deviation in the keel was now gone, which was the outcome John Earl's practicum said to expect if you line everything up properly
View attachment 248500View attachment 248501View attachment 248502
I noticed that the edge of the fore deck has three faint, yet distinct sections that make up the curve from beam to stern. Seems I'll need to sand this into a continuous curve before adding the outer deck planking, which follows this curve.
Looking good! Careful work on the foundation (keel and frames) will ensure a proper hull. You’re on your way to building a good ship!Onwards and upwards. I attached the false deck to the keel and bulkheads using all the generous advice I'd received earlier. I soaked the deck for several minutes until it was pliable, attached it with Gorilla glue and bound it fast with rubber bands and clamps. I used a drill bit to create small countersink indentations for the tiny nails that I applied along the centre and edges of the deck. I was pleased to see that the slight deviation in the keel was now gone, which was the outcome John Earl's practicum said to expect if you line everything up properly
View attachment 248500View attachment 248501View attachment 248502
I noticed that the edge of the fore deck has three faint, yet distinct sections that make up the curve from beam to stern. Seems I'll need to sand this into a continuous curve before adding the outer deck planking, which follows this curve.
Dean is right as if the "foundation" is not true that what is laid upon it will also be untrue. Use a long file or sanding sticks when you do the longitudinal fairing, working across several with a rolling motion working the frames and your false deck into true long curved lines without depressions or high ridges. You will be following the hull planking with another phase of fairing and trueing it up. Your goal is to not resort to spakeling fillers to fill in the depressions. Slow and double checking work is the course to follow. Rich (PT-2)Looking good! Careful work on the foundation (keel and frames) will ensure a proper hull. You’re on your way to building a good ship!
In that case I am very thankful for the false deck, Rich, I need all the extra help I can get at this stageThat false subdeck will save you a lot of challenges as you will not have floating deck planks' ends which I had with my POB MSN2130 kit which does not include those. You are doing well. Keep the slow pace as you proceed while thinking ahead. Rich
Thanks Dean, yes that is the message that has come across very clearly in all the build logs and practicums I have seen so far. It makes perfect sense of course, getting everything lined up properly, but adds a bit of stress to the first-time builder to get things right from the word go especially as we don't quite know what is coming nextLooking good! Careful work on the foundation (keel and frames) will ensure a proper hull. You’re on your way to building a good ship!
Yes, I feel the fairing effort is going to be an interesting phase for me. The foremost half of the false deck certainly does not have a true curve, but a series of three distinct edges, a bit like one half of a hexagon so to speak. I'm not sure why AL cut it this way as the long bulwark strips will surely only lie flush against a smooth and continuous curve? One of the forward frames also lifts the foredeck a little higher than it should it one spot, giving the deck a slightly wavy effect. I'm hoping I can get away with this, but I suspect I'll need to do some or other modification there as wellDean is right as if the "foundation" is not true that what is laid upon it will also be untrue. Use a long file or sanding sticks when you do the longitudinal fairing, working across several with a rolling motion working the frames and your false deck into true long curved lines without depressions or high ridges. You will be following the hull planking with another phase of fairing and trueing it up. Your goal is to not resort to spakeling fillers to fill in the depressions. Slow and double checking work is the course to follow. Rich (PT-2)
Last edited:


