Faring everything out in all three axis planes is essential for smooth surfaces/curves. File and sand and then step back to look at the model from as many different views as you can. That will bring out items that are not obvious or visible from other directions. It is hard to go slow and patiently as I well know and have had to back up several times for prior rushes. Rebuilds are a pain in the transom!!! I am now doing my third set of foremast shrouds/ratlines as the prior two were not acceptable for what I wanted. Some Swedes are slow learners it seems and that is too much of my ancestry. Rich (PT-2)Yes, I feel the fairing effort is going to be an interesting phase for me. The foremost half of the false deck certainly does not have a true curve, but a series of three distinct edges, a bit like one half of a hexagon so to speak. I'm not sure why AL cut it this way as the long bulwark strips will surely only lie flush against a smooth and continuous curve? One of the forward frames also lifts the fore deck a little higher than it should it one spot, giving the deck a slightly wavy effect. I'm hoping I can get away with this, but I suspect I'll need to do some or other modification there as well
-

Win a Free Custom Engraved Brass Coin!!!
As a way to introduce our brass coins to the community, we will raffle off a free coin during the month of August. Follow link ABOVE for instructions for entering.
-

PRE-ORDER SHIPS IN SCALE TODAY!
The beloved Ships in Scale Magazine is back and charting a new course for 2026!
Discover new skills, new techniques, and new inspirations in every issue.
NOTE THAT OUR FIRST ISSUE WILL BE JAN/FEB 2026
You are using an out of date browser. It may not display this or other websites correctly.
You should upgrade or use an alternative browser.
You should upgrade or use an alternative browser.
Bluenose II Build (Artesania Latina) 1:75 by Nomad [Completed Build]
I would advise reading up on fairing the hull, and hull planking. These are two critical areas many struggle with. There are YouTube videos and books available. Taking the time to learn proper technique, that will payoff now and in future builds. When I built my first ship, I ordered books on ship building, they saved me from getting lost back then. There was no online build logs to reference! 
Good advise as reading and studying things are a basic part of my nature and in what I do. RichI would advise reading up on fairing the hull, and hull planking. These are two critical areas many struggle with. There are YouTube videos and books available. Taking the time to learn proper technique, that will payoff now and in future builds. When I built my first ship, I ordered books on ship building, they saved me from getting lost back then. There was no online build logs to reference!
My progress is slow unfortunately, and quite sporadic. Lots of time taken up by ... well, life really. But I have made a modest start at fairing the hull. I thought I'd do that before planking the deck, just for some confidence. One thing puzzled me; I thought each batten would be the full length of the hull, stem to stern, but realised that this is not the case. So I'll assume that the longest sections will require two planks, to be joined somewhere around midships perhaps. Or maybe I'll stagger the joins at different bulkheads, just because it seems like a good idea 
Last edited:
A few references…My progress is slow unfortunately, and quite sporadic. Lots of time taken up by ... well, life really. But I have made a modest start at fairing the hull. I thought I'd do that before planking the deck, just for some confidence. One thing puzzled me; I thought each batten would be the full length of the hull, stem to stern, but realised that this is not the case. So I'll assume that the longest sections will require two planks, to be joined somewhere around midships perhaps. Or maybe I'll stagger the joins at different bulwark frames, just because it seems like a good idea
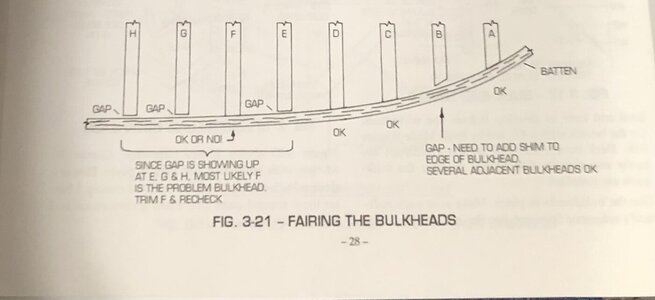
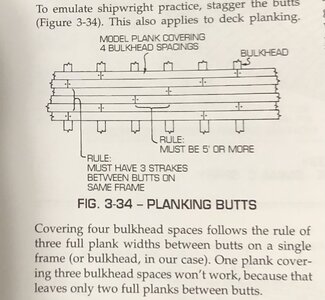
Keep in mind I try to use a scale board length that falls on the frames. So it could be 4, 5 or 6 frames in length. The longer the length, the better, as it averages the curve around the hull better.
Excellent, thanks for that Dean. It's one thing to make assumptions but another altogether to have it confirmed in writing. For novices, it would be good if they included these nuggets of information in the instructions. Also following your 1:64 POF build by the way. It looks superb so farA few references…
View attachment 250208View attachment 250209
Keep in mind I try to use a scale board length that falls on the frames. So it could be 4, 5 or 6 frames in length. The longer the length, the better, as it averages the curve around the hull better.

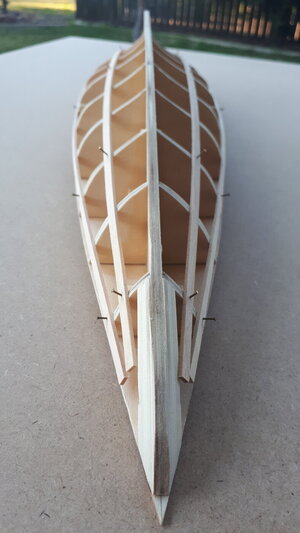
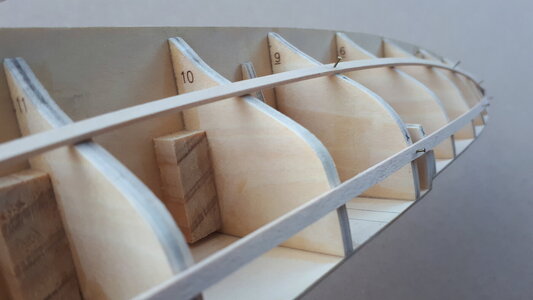
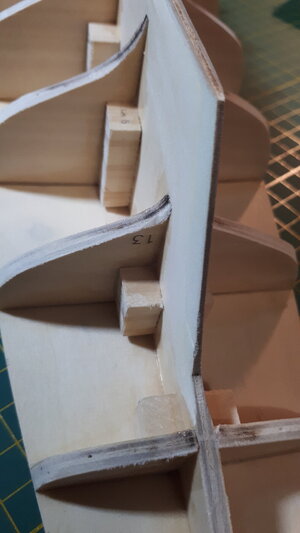
I was cautioned to take the fairing exercise slowly and seriously and I can see why. It feels like shaping a cube into a round ball with all the three-dimensional angles going on. I pinned two pilot battens on either side of the hull which gave me a fair idea of the bulkheads that required work. I saw some improvement after one pass of sanding and filing, but I can see I'll need to do more. The AL instructions also called for the width of the false keel's stern-end to be reduced to 1.5mm (from 4mm). I gather this is to allow the lower-aft planking to lay flush against the keel.


Last edited:
You may have seen the posting, by my old brain doesn't recall from whom, that planks were between 35 to 40 feet long on BN. You can scale that into your own with butt ends centered over a bulkhead and vertically separated by two in-between. The fairing will pay large dividends for those shorter planks. You are doing well. Rich (PT-2)I was cautioned to take the fairing exercise slowly and seriously and I can see why. It feels like shaping a cube into a round ball with all the three-dimensional angles going on. I pinned two pilot battens on either side of the hull which gave me a fair idea of the bulkheads that required work. I saw some improvement after one pass of sanding and filing, but I can see I'll need to do more. The AL instructions also called for the width of the false keel's stern-end to be reduced to 1.5mm (from 4mm). I gather this is to allow the lower-aft planking to lay flush against the keel.
View attachment 250220
View attachment 250221
View attachment 250222
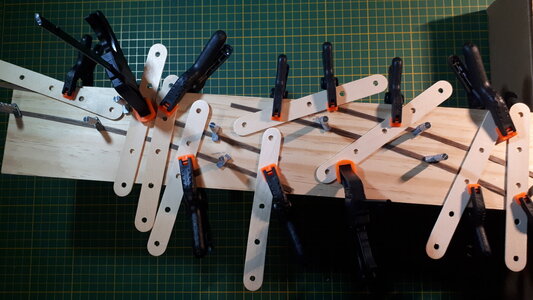
On to the deck planking, waterways first. I traced the curves of the hull on a wooden board and prepared a set of planking clamps accordingly. Bending wood laterally was something of a new experience. I soaked the waterways (walnut) for about twenty minutes in warm water, clamped them into position on the board and left them to dry overnight. Ever the sceptic, I was mildly surprised the next morning when I released them and saw that they had indeed held their shape. Preparing a template of the required curves worked a treat, and I could simply transfer the waterways from the template and glue them to the deck.

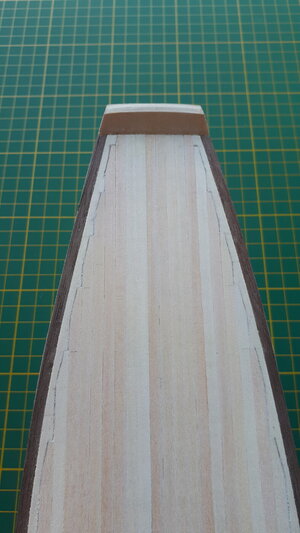
Planking the deck itself was a bit of fun. I started on the quarter deck first, working from the centreline outwards, two planks at a time. The first six (three a side) required no modification. After that it got interesting, the process of 'nibbing' the deck planks into the waterways. It was an exercise in symmetry and patience, and I think I probably could have done better, but was reasonably satisfied with the outcome all the same. Doing two planks at a time, one on either side of the centreline, enabled me to keep track of where the nibbing would occur to both planks and in that way maintain the symmetry. The picture below is a first cut. I need to think of how to caulk it, and then sand and varnish.

Last edited:
Hi Mark,Planking the deck itself was a bit of fun. I started on the stern deck first, working from the centreline outwards, two planks at a time. The first six (three a side) required no modification. After that it got interesting, the process of 'nibbing' the deck planks into the waterways. It was an exercise in symmetry and patience, and I think I probably could have done better, but was reasonably satisfied with the outcome all the same. Doing two planks at a time, one on either side of the centreline, enabled me to keep track of where the nibbing would occur to both planks and in that way maintain the symmetry. The picture below is a first cut. I need to think of how to caulk it, and then sand and varnish.
View attachment 251096
That turned out to be a nice deck. Nibbling is not the simplest form of deck planking.
Regards, Peter
Last edited:
Nicely executed deck plank nibbing. It will look very well when the finish is applied. Rich (PT-2)Hi Nomad,
That turned out to be a nice deck. Nibbling is not the simplest form of deck planking.
Regards, Peter
Great job! It should look very nice stained.Planking the deck itself was a bit of fun. I started on the stern deck first, working from the centreline outwards, two planks at a time. The first six (three a side) required no modification. After that it got interesting, the process of 'nibbing' the deck planks into the waterways. It was an exercise in symmetry and patience, and I think I probably could have done better, but was reasonably satisfied with the outcome all the same. Doing two planks at a time, one on either side of the centreline, enabled me to keep track of where the nibbing would occur to both planks and in that way maintain the symmetry. The picture below is a first cut. I need to think of how to caulk it, and then sand and varnish.
View attachment 251096
Thanks Peter. You're right, it was a bit of a challenge. But in a good way. I've yet to do the foredeck, but I can at least tackle that with more confidence nowHi Nomad,
That turned out to be a nice deck. Nibbling is not the simplest form of deck planking.
Regards, Peter
Last edited:
Thanks Rich. Can I ask how you approach the caulking of the deck on your BN build? In my searches I've seen examples that vary from painting the false deck black to simply using a ruler and pencil to emulate the effect. Many seem to pencil the plank edges before installing them on the deck. I suppose their are many ways to kill this cat ...
Last edited:
Thanks Dean. Mind you, when I see the progress of your build then I feel like I've barely begun yetGreat job! It should look very nice stained.
I rub the edges of each plank piece and then if I find problems with the carpenters glue soaking in a very light Passover with my fingers removes the loose graphite before I glue and clamp the plank in place. Each graphite edge shows up very well without any additional scribing of the joint. If the deck is scraped or later sanded some of the more broad edge joints will narrow down a bit. This is the only method that I have tried but I know that there are many others out there. You may want to experiment with some to decide upon your own best course. Rich (PT-2)Thanks Rich. Can I ask how you approach the caulking of the deck on your BN build? In my searches I've seen examples that vary from painting the false deck black to simply using a ruler and pencil to emulate the effect. Many seem to pencil the plank edges before installing them on the deck. I suppose their are many ways to kill this cat ...
Thanks for sharing Rich, that does seem like a sound approach. I have already glued the deck planks unfortunately, but will try scribing after a light sand. This is as per AL's instructions, although I think I'd have preferred to do it prior to gluing. Next timeI rub the edges of each plank piece and then if I find problems with the carpenters glue soaking in a very light Passover with my fingers removes the loose graphite before I glue and clamp the plank in place. Each graphite edge shows up very well without any additional scribing of the joint. If the deck is scraped or later sanded some of the more broad edge joints will narrow down a bit. This is the only method that I have tried but I know that there are many others out there. You may want to experiment with some to decide upon your own best course. Rich (PT-2)
I recommend a 2B as the hardest and get an artists sketching pencil which has a very large diameter lead core making rubbing the plank edges easier. RichThanks for sharing Rich, that does seem like a sound approach. I have already glued the deck planks unfortunately, but will try scribing after a light sand. This is as per AL's instructions, although I think I'd have preferred to do it prior to gluing. Next time
Will do, thanks againI recommend a 2B as the hardest and get an artists sketching pencil which has a very large diameter lead core making rubbing the plank edges easier. Rich


