And upside down they will remain
-

Win a Free Custom Engraved Brass Coin!!!
As a way to introduce our brass coins to the community, we will raffle off a free coin during the month of August. Follow link ABOVE for instructions for entering.
-

PRE-ORDER SHIPS IN SCALE TODAY!
The beloved Ships in Scale Magazine is back and charting a new course for 2026!
Discover new skills, new techniques, and new inspirations in every issue.
NOTE THAT OUR FIRST ISSUE WILL BE JAN/FEB 2026
You are using an out of date browser. It may not display this or other websites correctly.
You should upgrade or use an alternative browser.
You should upgrade or use an alternative browser.
Bluenose II Build (Artesania Latina) 1:75 by Nomad [Completed Build]
- Joined
- Sep 3, 2021
- Messages
- 5,190
- Points
- 738

That's what you get from Down Under.And upside down they will remain

- Joined
- Oct 17, 2020
- Messages
- 1,691
- Points
- 488

Good morning Nomad, mine was just a technical observation.And upside down they will remain
Hi Mark. Looking impressive those 3 sails. Indeed, it’s getting busy with lines there on the bowsprite.The three foremost sails are now rigged. These jib sails, as I understand from the instructions, are in order from foremast to prow called the fore topmast staysail, headsail, and flying jib. Each of these sails are installed in a similar fashion, with hanks along the longest edges supported by a stays running from foremast to bowsprit, sails suspended vertically by halyards that are reeved through foremast blocks and belayed on deck below, and downhaul ropes that hang loosely along the longest edges and tie off on sets of belaying pins.
View attachment 292818
The bowsprit has a fair share of lines and ropes to support the three jib sails.
View attachment 292823
The instructions weren't clear on where some of the lines are belayed, particularly the halyards, although I'm sure I'll find some room on the many pin-rails and belaying pins on the deck below. For now though they'll simply hang free until I am sure they won't be in the way of the shrouds and other standard rigging that I have yet to install
View attachment 292824
Regards, Peter
Hi Mark, I am probably late on this topic, but here is a pic from my BN…Mark,
According to AL's instructions you've got it right, no doubt about that!
However... The jib's boom is attached at both front- and rear ends of the boom, in accordance with AL's instructions. Although the jib itself has rigging, which allow minimal freedom, it's the jib's boom basically limiting any sail displacement either to port or starboard.
If you look at the extract from the Saga you see that the jib's lower edge ís attached to the jib's boom. The boom's sheet is guided through blocks and a rail, allowing to either release or tighten the sheet, thus allowing the skipper to set the jib to the wind. The AL solution gives a rigid jib without possibilities for adjustment.
Kind regards,
Johan
View attachment 291587
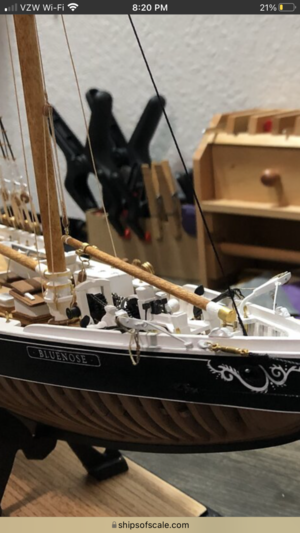
As you can see the jib boom is free to pivot port to starboard, and the pivot point is towards the bow. Same as all of the booms. This is to be able to put the sails into the wind. The gaffs just opened and closed the sails.
Anyway, sorry for being late on this. But at this point you might as well leave it the way it is. It will be our secret. Most viewers, unless they know anything about sailing vessels, will not know its incorrect!
Hi Dean, thanks for the pictures, that does clarify Johan's earlier point about the boom being fixed at the foremast. I have looked at several examples of completed Bluenose models to confirm this, and while the YuanQing kit (yours and Rich's) follows this assembly correctly, the Artesania Latina examples all show the foremast boom fixed at both ends as per their instructions. I would never have known, to be honest, and while there is little chance of me changing anything now (that would take quite a bit of customization) I do appreciate the clarification and now consider myself one step wiser in the art of sailingHi Mark, I am probably late on this topic, but here is a pic from my BN…
View attachment 293633
As you can see the jib boom is free to pivot port to starboard, and the pivot point is towards the bow. Same as all of the booms. This is to be able to put the sails into the wind. The gaffs just opened and closed the sails.
Anyway, sorry for being late on this. But at this point you might as well leave it the way it is. It will be our secret. Most viewers, unless they know anything about sailing vessels, will not know its incorrect!
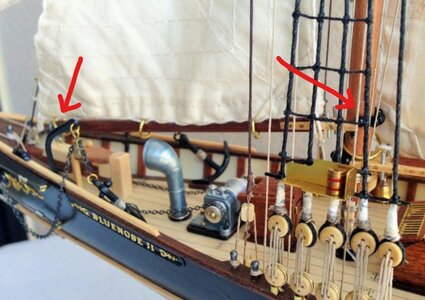
Here's an example of another AL model (from Model Ship World), showing the jib boom fixed at both ends. I'm not sure why they spec'd it this way, maybe purely for the sake of simplicity?
Last edited:
Good morning Mark. I’m with you here. It always amazes me how each kit manufacturer has their own interpretation of a ship. Hardly ever see a model built exactly the same. Sometimes even the research books differ. Lucky we have our own license to play as we choose.Hi Dean, thanks for the pictures, that does clarify Johan's earlier point about the boom being fixed at the foremast. I have looked at several examples of completed Bluenose models to confirm this, and while the YuanQing kit (yours and Rich's) follows this assembly correctly, the Artesania Latina examples all show the foremast boom fixed at both ends as per their instructions. I would never have known, to be honest, and while there is little chance of me changing anything now (that would take quite a bit of customization) I do appreciate the clarification and now consider myself one step wiser in the art of sailing
Here's an example of another AL model (from Model Ship World), showing the jib boom fixed at both ends. I'm not sure why they spec'd it this way, maybe purely for the sake of simplicity?
View attachment 293965

YQ had many misleading things as well. So the truth is, if you want a nice model to look at, don’t worry about it. But if you decide to try to duplicate the actual ship, then you have to do a lot of research, which as you mention can be just as conflicting. Some people enjoy the research and find it interesting. I do a little research, then I take a few liberties here and there…lol. But they are educated liberties! Mostly cosmetic. I try to make the functional aspects of the ship as correct as possible, given my limited knowledge.Good morning Mark. I’m with you here. It always amazes me how each kit manufacturer has their own interpretation of a ship. Hardly ever see a model built exactly the same. Sometimes even the research books differ. Lucky we have our own license to play as we choose.
Hey Dean. Yep that is how I have learned to go. Sorry Mark taking over your log here- I have decided for next ship tho to research first, buy literature and try understand the ship prior to opening the box. I also think researching the kit will also help. This is a crazy and interesting hobby! However that being said - it is the artists canvass and We paint how we choose. Thank goodness for thatYQ had many misleading things as well. So the truth is, if you want a nice model to look at, don’t worry about it. But if you decide to try to duplicate the actual ship, then you have to do a lot of research, which as you mention can be just as conflicting. Some people enjoy the research and find it interesting. I do a little research, then I take a few liberties here and there…lol. But they are educated liberties! Mostly cosmetic. I try to make the functional aspects of the ship as correct as possible, given my limited knowledge.
 . Apologies again Mark- how you doing down under? Cheers Grant
Grant please don't apologize for adding your thoughts and opinions on my blog, surely that's what a blog is for? I don't own it anyway, it's just a random bit of disk space on a server in cyberspace after allHey Dean. Yep that is how I have learned to go. Sorry Mark taking over your log here- I have decided for next ship tho to research first, buy literature and try understand the ship prior to opening the box. I also think researching the kit will also help. This is a crazy and interesting hobby! However that being said - it is the artists canvass and We paint how we choose. Thank goodness for that. Apologies again Mark- how you doing down under? Cheers Grant

I totally agree with your and Dean's sentiments though. I've come to accept that how you travel through this ship modelling journey is entirely up to you, historically accurate, micro-detailed, pleasing to the eye, whatever. I am seriously impressed by the amount of research some people put into their work, very admirable, and also the huge departure others take from the original kit with all kinds of customizations and parts built from scratch. I can barely find time for a few hours a week on my model and to catch up on other blogs of interest, let alone pour over research material or agonise over a block or dead-eye installed back-to-front. It's a grand old hobby, and it would surely be boring if we all did it the same way
Agreed Mark, enjoy the hobby! If you enjoy research and detail, then that's what you do. If you don't, forget about it!Grant please don't apologize for adding your thoughts and opinions on my blog, surely that's what a blog is for? I don't own it anyway, it's just a random bit of disk space on a server in cyberspace after all
I totally agree with your and Dean's sentiments though. I've come to accept that how you travel through this ship modelling journey is entirely up to you, historically accurate, micro-detailed, pleasing to the eye, whatever. I am seriously impressed by the amount of research some people put into their work, very admirable, and also the huge departure others take from the original kit with all kinds of customizations and parts built from scratch. I can barely find time for a few hours a week on my model and to catch up on other blogs of interest, let alone pour over research material or agonise over a block or dead-eye installed back-to-front. It's a grand old hobby, and it would surely be boring if we all did it the same way
The way I see it, it is your money, your time, and your choice! No one can tell you what's right for you!
I have been told many times that something I did is not historically correct. And I thank people for educating me, then I decide if I want to do anything about it. Most often not, I just take that knowledge forward into the next build.
Reef points. These were not specified in the kit instructions but after understanding their purpose, and simply liking the look of them, I decided to add them to my sails.
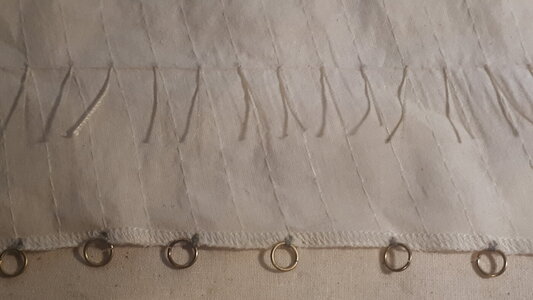
Of course it never occurred to me that the rope should pass through both sides of the sail. If I flip the sail over it merely shows the reef knot and nothing else, and after a lot of effort it is apparent that I have only completed half the job
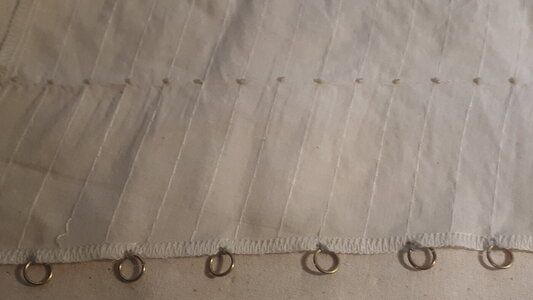

Of course it never occurred to me that the rope should pass through both sides of the sail. If I flip the sail over it merely shows the reef knot and nothing else, and after a lot of effort it is apparent that I have only completed half the job

Last edited:
Oops, another learning experience.Reef points. These were not specified in the kit instructions but after understanding their purpose, and simply liking the look of them, I decided to add them to my sails.
View attachment 294263
Of course it never occurred to me that the rope should pass through both sides of the sail. If I flip the sail over it merely shows the knot of the reef dangling on the other side, and after a lot of effort it is apparent that I have only completed half the job
View attachment 294264
I pulled out all the reef knots I had created, which I had to do with the surgical precision of a dentist extracting teeth and not damage the sail, and started again. This time I cut each length of rope a little longer (about 50mm) and tied a knot in the middle of each one.
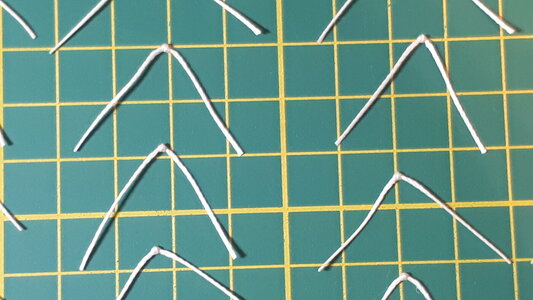
Each length of rope was then dragged through the sail with a needle, and a dab of super glue added at the point where the knot meets the sail.
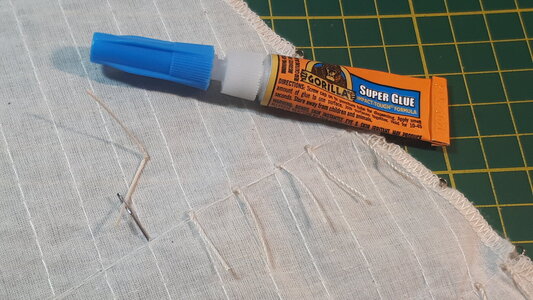

Each length of rope was then dragged through the sail with a needle, and a dab of super glue added at the point where the knot meets the sail.

There are probably more scientific ways to add reef knots to a sail, but the end result of this effort was quite satisfactory and at least the rope ties are now available on both sides of the sail.
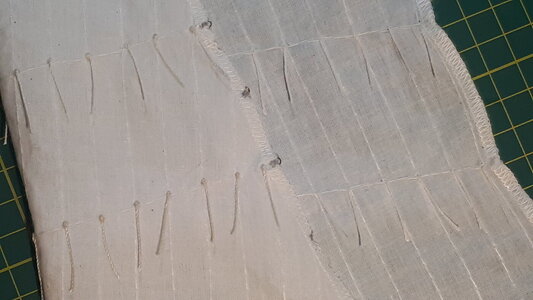
These reef knots were installed on the mainsail, and I am going to have to repeat the process on the foresail later on. I had bought a lightweight sewing machine (Singer) to create the horizontal thread across the face of the sail, and for other sail adjustments yet to come, but it broke down within minutes of first use. I remember a time (in my Mom's day) when you could throw a Singer sewing machine off a cliff, dust it off, and carry on sewing, but sadly those days are gone. I returned the machine for a refund and quickly learnt how to sew a straight-line thread by hand. Well mostly straight anyway
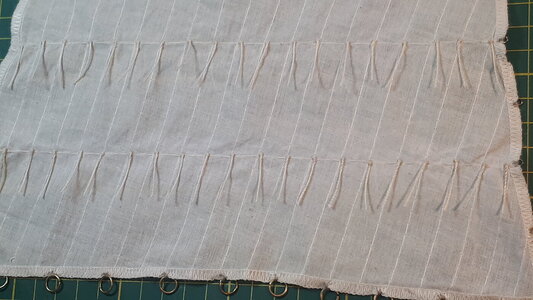

These reef knots were installed on the mainsail, and I am going to have to repeat the process on the foresail later on. I had bought a lightweight sewing machine (Singer) to create the horizontal thread across the face of the sail, and for other sail adjustments yet to come, but it broke down within minutes of first use. I remember a time (in my Mom's day) when you could throw a Singer sewing machine off a cliff, dust it off, and carry on sewing, but sadly those days are gone. I returned the machine for a refund and quickly learnt how to sew a straight-line thread by hand. Well mostly straight anyway

Last edited:
Well done, Mark. That is a nice looking scratch build sail. And what you scratch build, gives to most fulfilment!There are probably more scientific ways to add reef knots to a sail, but the end result of this effort was quite satisfactory and at least the rope ties are now available on both sides of the sail.
View attachment 294270
These reef knots were installed on the mainsail, and I am going to have to repeat the process on the foresail later on. I had bought a lightweight sewing machine (Singer) to create the horizontal thread across the face of the sail, and for other sail adjustments yet to come, but it broke down within minutes of first use. I remember a time (in my Mom's day) when you could throw a Singer sewing machine off a cliff, dust it off, and carry on sewing, but sadly those days are gone. I returned the machine for a refund and quickly learnt how to sew a straight-line thread by hand. Well mostly straight anyway
View attachment 294271
Regards, Peter
- Joined
- Sep 23, 2021
- Messages
- 260
- Points
- 168

Hi,
Nice progress. I see that you have come across some of the A-L "quirks" in the instructions! There is no correct representation because the ship has undergone many refits and changes over time. I looked at some images from her latest refit and the deck structures have been completely changed from the pictures I was using from the mid 80's as reference. One note regarding fitting the sails, I see you have added some rings to attach the sails. On the BN II the sails are directly lashed onto the booms and gaffs (lots of lashings!), something to consider.
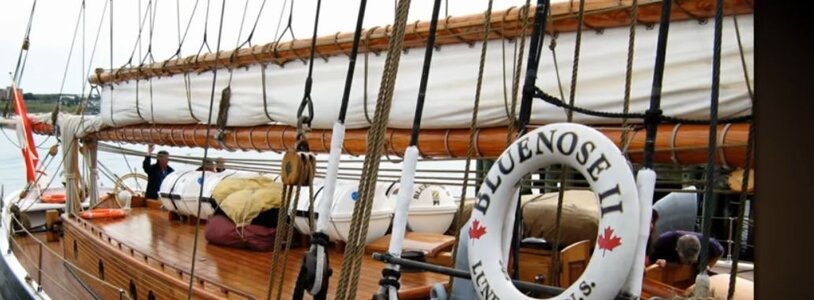

Nice progress. I see that you have come across some of the A-L "quirks" in the instructions! There is no correct representation because the ship has undergone many refits and changes over time. I looked at some images from her latest refit and the deck structures have been completely changed from the pictures I was using from the mid 80's as reference. One note regarding fitting the sails, I see you have added some rings to attach the sails. On the BN II the sails are directly lashed onto the booms and gaffs (lots of lashings!), something to consider.


Hi DomCee, thanks for checking in again. Indeed I am discovering many of the quirks of AL's rigging advice, which is sadly out of step with their detailed instructions for the hull and deck assembly. Attaching the sails has exposed many of these flaws, particularly the ill-fitting sails and the types and locations of some of the blocks. That said, I am trying to stick to the original instructions as much as possible in case my alterations lead to even bigger issues down the road. I kept with the supplied rings for the booms and gaffs, for instance, only I added a lot more than were specified as too few rings made it look, to my uneducated eye at least, out of scale. I often refer to the pictures in your blog for inspiration, as well as several others who have built from the same kit, taking some comfort in the fact they they too have come across the same snags that we didHi,
Nice progress. I see that you have come across some of the A-L "quirks" in the instructions! There is no correct representation because the ship has undergone many refits and changes over time. I looked at some images from her latest refit and the deck structures have been completely changed from the pictures I was using from the mid 80's as reference. One note regarding fitting the sails, I see you have added some rings to attach the sails. On the BN II the sails are directly lashed onto the booms and gaffs (lots of lashings!), something to consider.
View attachment 294710View attachment 294711
Thanks PeterWell done, Mark. That is a nice looking scratch build sail. And what you scratch build, gives to most fulfilment!
Regards, Peter

I have now installed the mainsail on my ship. This was a delicate and tricky bit of work that required steady hands and all sorts of patience. I attached the sail to the mainmast, boom and gaff with far more rings than were supplied in the kit, which in my mind made it look more to scale and also gave the mainsail, which was probably a bit bigger than it should have been, a better trim.
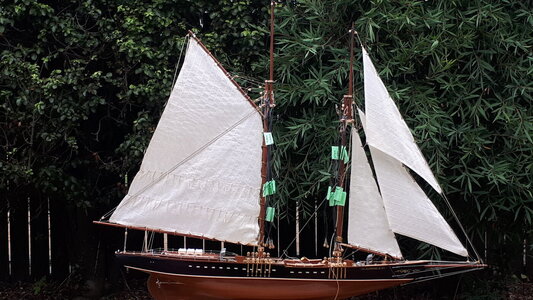
The rigging of the main gaff was probably the trickiest of all, and made more complicated by the position of some of the blocks which simply did not work. I was obliged to relocate some blocks higher up the mast, and in one instance change the order of the halyards completely.
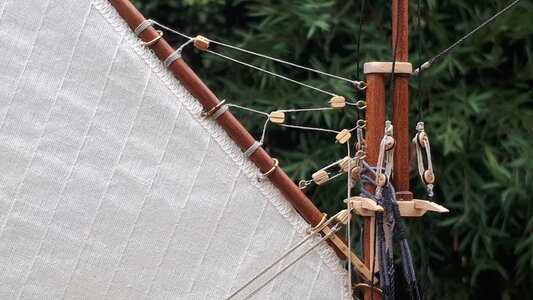
I attached all the mainsail rigging quite loosely to start with, and once the sail was attached to the spars I slowly tightened all the ropes to achieve a uniform tension and to get as much surface area out of the sail as possible.
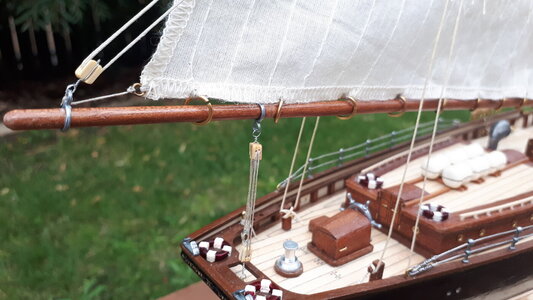
Belaying the ropes to their respective tie-offs took a bit of practice, and patience, and it is amazing how many things your hands will drop, displace or simply knock over when all you want to do is tie a simple knot on a belaying pin without losing tension in the rigging
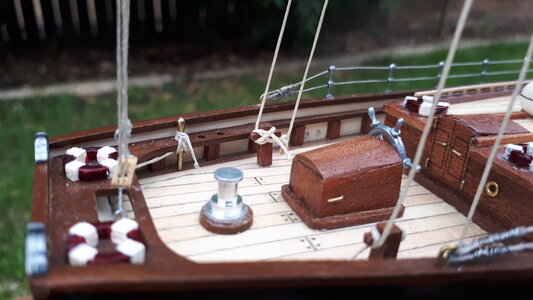

The rigging of the main gaff was probably the trickiest of all, and made more complicated by the position of some of the blocks which simply did not work. I was obliged to relocate some blocks higher up the mast, and in one instance change the order of the halyards completely.

I attached all the mainsail rigging quite loosely to start with, and once the sail was attached to the spars I slowly tightened all the ropes to achieve a uniform tension and to get as much surface area out of the sail as possible.

Belaying the ropes to their respective tie-offs took a bit of practice, and patience, and it is amazing how many things your hands will drop, displace or simply knock over when all you want to do is tie a simple knot on a belaying pin without losing tension in the rigging

Last edited:
