Bluenose II Build (Artesania Latina) 1:75 by Nomad [Completed Build]

You now have built up ‘experience’ with these ratlines. It looks neat and tidy. Watch out, it's getting faster and faster. What you posted yourself about the ratlines by Dean and Rich: on the next picture it is done. :)
Thanks Peter, but be careful what you wish for. I will post a picture of each and every ratline knot just to help share the pain ROTF
 
I completed all the shroud rigging on the foremast's starboard side to make sure I could get through a complete set without too many mistakes, and to develop a system that I can apply to the remaining three sets of shrouds. Each set includes lower, futtock and topmast shrouds and all those nasty little ratlines in between. The futtock shrouds were the easiest of these, and I maintained the same 6mm spacing between ratlines that I applied to the lower shrouds.

0935_20220408_bluenose_II_build.jpg

The 6mm spacing also applied to the topmast shrouds, which yielded a total of twenty-one ratlines. Getting the ratlines installed correctly is a cinch once you get the hang of it, but maintaining a constant tension across the ropes is another story. Tie just one ratline too tight and your outer shroud lines are out of joint, and likely to collapse the tension in ratlines already installed. I tried rattling up and rattling down but found no real advantage either way. Ultimately, I think it just requires a lot of patience and tolerance :confused:

0940_20220408_bluenose_II_build.jpg

With one set of shrouds complete I can reflect on a few lessons learnt, and hopefully carry them forward to the remaining sets. Unfortunately AL does not provide enough .15mm black thread for this exercise, especially as I am creating twice as many ratlines as stipulated (thanks Johan and Sasha ROTF) and most of the local hobby shops are out of stock. So it may be a little while before I can crack on with the remaining shrouds, but in the meantime I might start work on the display stand that will eventually hold the completed ship. Even this wasn't as straightforward as I thought, and some fellow SOS modellers set me right in a thread I started called Display Base and Pedestals :)

0945_20220408_bluenose_II_build.jpg
 
Last edited:
I completed all the shroud rigging on the foremast's starboard side to make sure I could get through a complete set without too many mistakes, and to develop a system that I can apply to the remaining three sets of shrouds. Each set includes lower, futtock and topmast shrouds and all those nasty little ratlines in between. The futtock shrouds were the easiest of these, and I maintained the same 6mm spacing between ratlines that I applied to the lower shrouds.

View attachment 301263

The 6mm spacing also applied to the topmast shrouds, which yielded a total of twenty-one ratlines. Getting the ratlines installed correctly is a cinch once you get the hang of it, but maintaining a constant tension across the ropes is another story. Tie just one ratline too tight and your outer shroud lines are out of joint, and likely to collapse the tension in ratlines already installed. I tried rattling up and rattling down but found no real advantage either way. Ulimately, I think it just requires a lot of patience and tolerance :confused:

View attachment 301264

With one set of shrouds complete I can reflect on a few lessons learnt, and hopefully carry them forward to the remaining sets. Unfortunately AL does not provide enough .15mm black thread for this exercise, especially as I am creating twice as many ratlines as stipulated (thanks Johan and Sasha ROTF) and most of the local hobby shops are out of stock. So it may be a little while before I can crack on with the remaing shrouds, but in the meantime I might start work on the display stand that will eventually hold the completed ship. Even this wasn't as straightforward as I thought, and some fellow SOS modellers set me right in a thread I started called Display Base and Pedestals :)

View attachment 301265
Always happy to help. Contact
 
I completed all the shroud rigging on the foremast's starboard side to make sure I could get through a complete set without too many mistakes, and to develop a system that I can apply to the remaining three sets of shrouds. Each set includes lower, futtock and topmast shrouds and all those nasty little ratlines in between. The futtock shrouds were the easiest of these, and I maintained the same 6mm spacing between ratlines that I applied to the lower shrouds.

View attachment 301263

The 6mm spacing also applied to the topmast shrouds, which yielded a total of twenty-one ratlines. Getting the ratlines installed correctly is a cinch once you get the hang of it, but maintaining a constant tension across the ropes is another story. Tie just one ratline too tight and your outer shroud lines are out of joint, and likely to collapse the tension in ratlines already installed. I tried rattling up and rattling down but found no real advantage either way. Ultimately, I think it just requires a lot of patience and tolerance :confused:

View attachment 301264

With one set of shrouds complete I can reflect on a few lessons learnt, and hopefully carry them forward to the remaining sets. Unfortunately AL does not provide enough .15mm black thread for this exercise, especially as I am creating twice as many ratlines as stipulated (thanks Johan and Sasha ROTF) and most of the local hobby shops are out of stock. So it may be a little while before I can crack on with the remaining shrouds, but in the meantime I might start work on the display stand that will eventually hold the completed ship. Even this wasn't as straightforward as I thought, and some fellow SOS modellers set me right in a thread I started called Display Base and Pedestals :)

View attachment 301265
She does look beautiful, doesn't she?
 
She does look beautiful, doesn't she?
When I ignore all the flaws that only I know about then yes, it is beautiful ROTF

Still going with the ratlines though. Lower and futtock shrouds all done, just the topmast shrouds to go. Keeping an even tension is a constant challenge for me, and your words ....

I think I didn't do more than 10 ratlines at any time. After that my concentration started to fade... Took me about three weeks to get them done.

.... really did come back to haunt me! I thought you were joking about the 'three weeks to get them done' but I absolutely get it now Redface
 
When I ignore all the flaws that only I know about then yes, it is beautiful ROTF
That's exactly it, isn't it, only you know about the "flaws" or imperfections.
When I'm sitting at our dining table I can see my father's Bluenose sitting in the window. There are a lot of flaws in my work on her, but I still think she's a beauty, even with or maybe because all these imperfections.
 
I completed all the shroud rigging on the foremast's starboard side to make sure I could get through a complete set without too many mistakes, and to develop a system that I can apply to the remaining three sets of shrouds. Each set includes lower, futtock and topmast shrouds and all those nasty little ratlines in between. The futtock shrouds were the easiest of these, and I maintained the same 6mm spacing between ratlines that I applied to the lower shrouds.

View attachment 301263

The 6mm spacing also applied to the topmast shrouds, which yielded a total of twenty-one ratlines. Getting the ratlines installed correctly is a cinch once you get the hang of it, but maintaining a constant tension across the ropes is another story. Tie just one ratline too tight and your outer shroud lines are out of joint, and likely to collapse the tension in ratlines already installed. I tried rattling up and rattling down but found no real advantage either way. Ultimately, I think it just requires a lot of patience and tolerance :confused:

View attachment 301264

With one set of shrouds complete I can reflect on a few lessons learnt, and hopefully carry them forward to the remaining sets. Unfortunately AL does not provide enough .15mm black thread for this exercise, especially as I am creating twice as many ratlines as stipulated (thanks Johan and Sasha ROTF) and most of the local hobby shops are out of stock. So it may be a little while before I can crack on with the remaining shrouds, but in the meantime I might start work on the display stand that will eventually hold the completed ship. Even this wasn't as straightforward as I thought, and some fellow SOS modellers set me right in a thread I started called Display Base and Pedestals :)

View attachment 301265
Step by step and line by line she is getting well rigged masts! She is looking more and more impressive and the lines have a nice contrast with the sails.
Regards, Peter
 
Mark, patience is a virtue and none more so than with rigging. The advantage is that you exactly how the rigging should look and what line goes where. The time that it takes to get it done right, is neither here nor there. It has taken me two days to make two simple little clamps for a knight's head, but that 's how long I took before I was satisfied. In the end, you have to be happy with it and therefore it is worth the while to take the extra time. And about "flaws and imperfections" - please do not think for one moment that original ships were built flawlessly.
 
When I ignore all the flaws that only I know about then yes, it is beautiful ROTF

Still going with the ratlines though. Lower and futtock shrouds all done, just the topmast shrouds to go. Keeping an even tension is a constant challenge for me, and your words ....


.... really did come back to haunt me! I thought you were joking about the 'three weeks to get them done' but I absolutely get it now Redface
Good morning Mark- ahh yes our flaws... I always view them as a reminder that “I built this.” Without them we would not have our personal “stamp” on our ship.

Ratlines...hmm I don’t feel sorry for you- I have 60 shrouds and approx 138 lines- Im guessing I have over a 1000 knots?

Great job it is a stunning Bluenose.

Cheers
Grant
 
Step by step and line by line she is getting well rigged masts! She is looking more and more impressive and the lines have a nice contrast with the sails.
Regards, Peter
Thanks Peter, I can see light at the end of the tunnel now. I'd better hurry up as well before you catch up with me :p
 
Mark, patience is a virtue and none more so than with rigging. The advantage is that you exactly how the rigging should look and what line goes where. The time that it takes to get it done right, is neither here nor there. It has taken me two days to make two simple little clamps for a knight's head, but that 's how long I took before I was satisfied. In the end, you have to be happy with it and therefore it is worth the while to take the extra time. And about "flaws and imperfections" - please do not think for one moment that original ships were built flawlessly.
Spot on Heinrich, I have to keep reminding myself. It kinda goes against the way life works, where everything is a hurry and needs to be completed yesterday. Like when I was supposed to mow the lawn. Amongst so many other things, ship modelling has certainly taught me a lot of patience. And is still teaching me. I've lost count of how many times I've nearly cut through shroud lines when snipping away the excess ends of my ratlines Redface

As I keep telling myself ... when eating an elephant, just take one bite at a time :)
 
Good morning Mark- ahh yes our flaws... I always view them as a reminder that “I built this.” Without them we would not have our personal “stamp” on our ship.

Ratlines...hmm I don’t feel sorry for you- I have 60 shrouds and approx 138 lines- Im guessing I have over a 1000 knots?

Great job it is a stunning Bluenose.

Cheers
Grant
Thanks Grant, much appreciated Thumbsup

138 lines!!! I'd keep your fridge well stocked when you get to that phase of your model :p
 
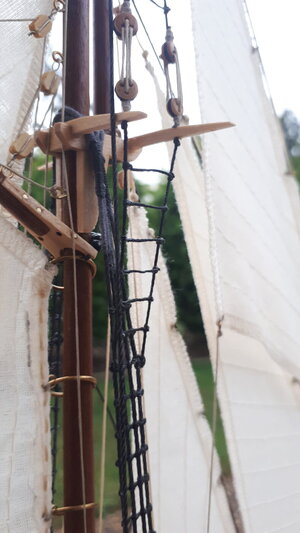
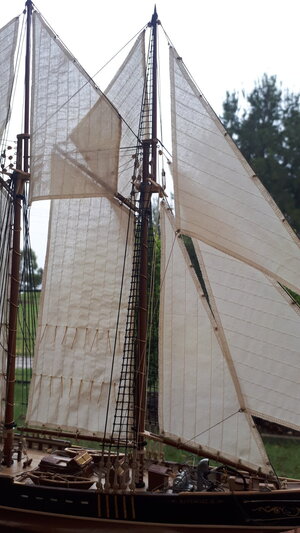
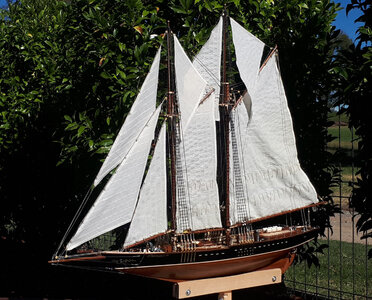
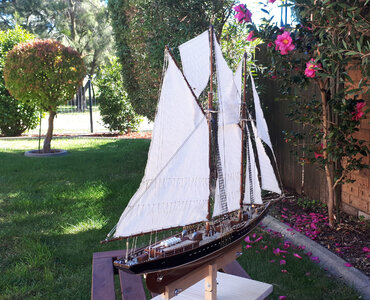
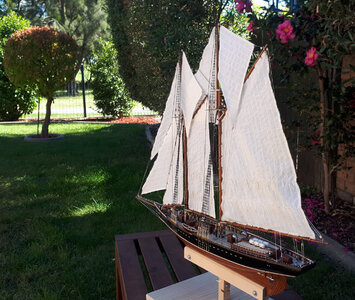
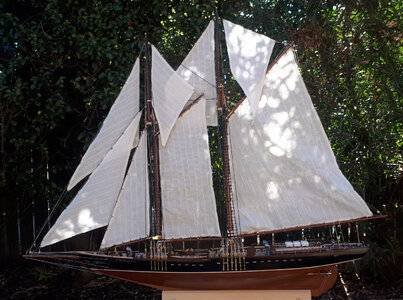
And just like that, after the better part of a year, my Bluenose II build finally came to an end. It was something of an anticlimax really, and it is strange to think that I no longer have anything on the ship to tinker around with. Perhaps it really is all in the journey :)

0950_20220424_bluenose_II_build.jpg

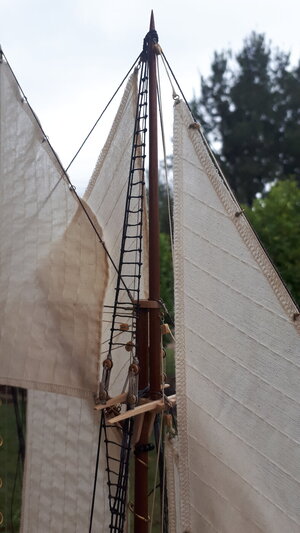
The ratlines kept me busy for at least a couple of weeks, and while I don't think I got them altogether correct, and had to re-do some of them more times than I care to remember, I'm glad they finally came to an end. All that remained was a dash of clear varnish to all the numerous blocks and dead-eyes around the ship, and, last of all, the coup de grâce, to affix two small wooden trucks to the very top of the masts.

0955_20220424_bluenose_II_build.jpg

I still need to create a stand for the ship as the one supplied in the kit is very flimsy and unreliable, and will either attempt to mount it on a wooden base with pedestals, or simply fashion a new stand based on the same design as the supplied one.

0960_20220424_bluenose_II_build.jpg

It has been a most rewarding experience building the Bluenose II schooner, and I recommend it highly for anyone starting out with this hobby. It has also been a great pleasure conversing with like-minded people on this SOS forum and I hope that it will continue in future builds. A big thank you to all those who took and interest in my build and kept me on the straight and narrow, your help and assistance is much appreciated :)

0965_20220424_bluenose_II_build.jpg

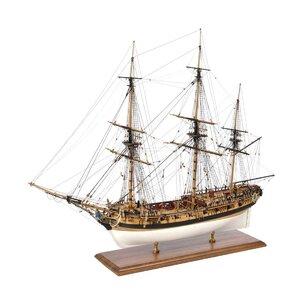
I am assuming that most ship modellers can't wait to begin their next model and in this I am no exception. I ordered Amati's HMS Fly from a hobby shop somewhere in Cornwall in the UK a few weeks ago, and, for the sake of keeping focused on the final stages of the Bluenose, resisted every urge and temptation to open the box just yet. Hopefully I can start a new build log with this magnificent ship in due course as well :D

hms_fly.jpg
 
Last edited:
And just like that, after the better part of a year, my Bluenose II build finally came to an end. It was something of an anticlimax really, and it is strange to think that I no longer have anything on the ship to tinker around with. Perhaps it really is all in the journey :)

View attachment 304818

The ratlines kept me busy for at least a couple of weeks, and while I don't think I got them altogether correct, and had to re-do some of them more times than I care to remember, I'm glad they finally came to an end. All that remained was a dash of clear varnish to all the numerous blocks and dead-eyes around the ship, and, last of all, the coup de grâce, to affix two small wooden trucks to the very top of the masts.

View attachment 304819

I still need to create a stand for the ship as the one supplied in the kit is very flimsy and unreliable, and will either attempt to mount it on a wooden base with pedestals, or simply fashion a new stand based on the same design as the supplied one.

View attachment 304820

It has been a most rewarding experience building the Bluenose II schooner, and I recommend it highly for anyone starting out with this hobby. It has also been a great pleasure conversing with like-minded people on this SOS forum and I hope that it will continue in future builds. A big thank you to all those who took and interest in my build and kept me on the straight and narrow, your help and assistance is much appreciated :)

View attachment 304821

I am assuming that most ship modellers can't wait to begin their next model and in this I am no exception. I ordered Amati's HMS Fly from a hobby shop somewhere in Cornwall in the UK a few weeks ago, and, for the sake of keeping focused on the final stages of the Bluenose, resisted every urge and temptation to open the box just yet. Hopefully I can start a new build log with this magnificent ship in due course as well :D

View attachment 304835
Good morning Mark. Well done! She is a model you can be proud of for sure. Thanks for sharing your journey with us. It has been a pleasure to follow your progress to this end point.

HMS Fly...welcome to the family of building a British ship from the late 1700’s. I do think she sank ? Looking forward to your log.

Cheers Grant
 
Congratulations Mark - what a super build and a result to be proud of.! One of my favorite poems is Ithaca/Ithaka by Paul Cavafy in which he relates Odysseus's return journey back from Troy to Ithaca. The essence of the poem is that you must hope the journey is long as that will give you the opportunity to explore new things and to enrich yourself. Once you actually reach Ithaca, you may feel disappointed and cheated - but it's not that Ithaca has cheated you - she has given you the reason to undertake the journey.

Generally speaking, I do not like British ships, but I do make an exception when it comes to HMS Speedy and HMS Fly. Fly is a beautiful ship with some of the most intricate rigging as well - right up your alley! I will be in the front row when you start her.
 
And just like that, after the better part of a year, my Bluenose II build finally came to an end. It was something of an anticlimax really, and it is strange to think that I no longer have anything on the ship to tinker around with. Perhaps it really is all in the journey :)

View attachment 304818

The ratlines kept me busy for at least a couple of weeks, and while I don't think I got them altogether correct, and had to re-do some of them more times than I care to remember, I'm glad they finally came to an end. All that remained was a dash of clear varnish to all the numerous blocks and dead-eyes around the ship, and, last of all, the coup de grâce, to affix two small wooden trucks to the very top of the masts.

View attachment 304819

I still need to create a stand for the ship as the one supplied in the kit is very flimsy and unreliable, and will either attempt to mount it on a wooden base with pedestals, or simply fashion a new stand based on the same design as the supplied one.

View attachment 304820

It has been a most rewarding experience building the Bluenose II schooner, and I recommend it highly for anyone starting out with this hobby. It has also been a great pleasure conversing with like-minded people on this SOS forum and I hope that it will continue in future builds. A big thank you to all those who took and interest in my build and kept me on the straight and narrow, your help and assistance is much appreciated :)

View attachment 304821

I am assuming that most ship modellers can't wait to begin their next model and in this I am no exception. I ordered Amati's HMS Fly from a hobby shop somewhere in Cornwall in the UK a few weeks ago, and, for the sake of keeping focused on the final stages of the Bluenose, resisted every urge and temptation to open the box just yet. Hopefully I can start a new build log with this magnificent ship in due course as well :D

View attachment 304835
Congratulation Mark, with this beautiful build Bluenose. You can be pround of this result. The sails made her more impressive.
Regards, Peter
 
Back
Top