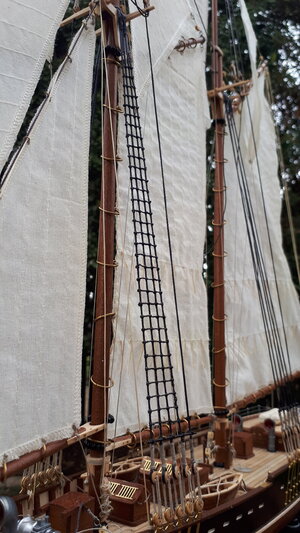
Bluenose II Build (Artesania Latina) 1:75 by Nomad [Completed Build]

It seems that the process of rigging a ship begins with the masts, so I gathered together some of the bits and bobs that attach to the mainmast, foremast and their respective topmasts.

View attachment 274496

Assembling the trestletrees was easy enough, and probably a good place to start as part of their function is to link the lower and topmasts together.

View attachment 274497

It seems there are many ways to taper masts by way of lathes, drills, wood planes, files and sandpaper. I invested in a small hobby plane at the start of this build but don't trust my skill in using it properly yet, and resorted to tapering the masts by hand using fine sandpaper instead. I followed the same technique as Artesania demonstrate in a video that came with the kit. They break down the area to be tapered into equidistant sections and start by planing the end section first, then the second last section as well as the end section just planed, and so on until all sections are complete. This effectively creates a taper from the final section to the first (top of the mast) section. I emulated the technique with sandpaper and it seemed to work out ok :p (wipes brow)

View attachment 274498

I have now completed the first of Artesania's instruction booklets that covers the hull and deck. I will assume that I am now roughly halfway with this model and at liberty to move on to the second booklet, into the dark and unfamiliar art of masting and rigging :cool:

View attachment 272782
Many thanks for this log. I'm at this point on the same build and also found the second booklet to be a head scratcher. I've only the Phantom under my belt and can't believe you're doing this well on a first build; mine isn't nearly as good but I'm having fun doing it anyway. Your log is a terrific reference I'll be using to help clarify the instructions, or lack of them. Thanks again for the extra effort to document.
 
The lower shrouds of the main and foremast are installed by reeving the dead-eyes at the end of each shroud line with the dead-eyes attached to the chainplates. Maintaining an even tension in the ropes seems to be the name of the game here, while at the same time keeping the rows of dead-eyes in as straight a line as possible. There were twenty-two shroud lines in total and they weren't as difficult to install as I first supposed. I had seized the dead-eyes a long while ago when seizing was a new thing for me, and in my enthusiasm made the seized portion a bit longer than it probably needed to be, but I left it as is and was satisfied with the overall look all the same :)

View attachment 299149

The bar running across the top of the seizings is a brass rod painted black, and once lashed in place it provides the entire shroud assembly with a good deal of stability. I started to cement each knot with super glue to start with, but it tended to leave an ungainly residue after drying and I switched to white carpenter glue instead, which did the same job as the CA and also dried to a satisfyingly transparent clear colour.

View attachment 299150
These shrouds looks great! With beautiful pictures to!.
About the ratlines.
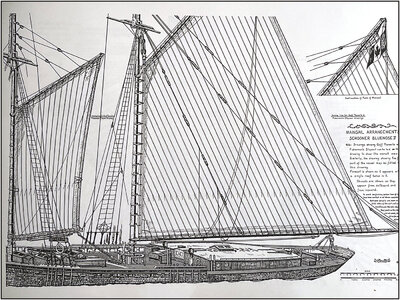
Here is a picture of a drawing of L.B. Jenson on pag. 29 of The Sage.
For the main mast, he draw 42 ratlines. On the fore mast 40. If I have counted right:
Ratlines.jpg
The 12 on top of the main mast are "triple".

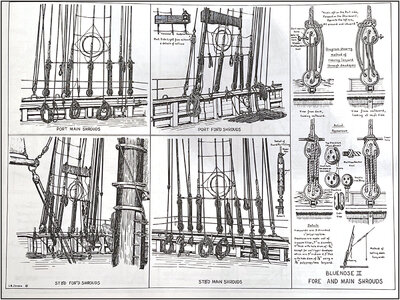
And perhaps is this drawing also interesting for you. It's on pag. 35:
Ratline2.jpg
The start of the 2 rows above the bars.

Regards, Peter
 
These shrouds looks great! With beautiful pictures to!.
About the ratlines.
Here is a picture of a drawing of L.B. Jenson on pag. 29 of The Sage.
For the main mast, he draw 42 ratlines. On the fore mast 40. If I have counted right:
View attachment 299359
The 12 on top of the main mast are "triple".

And perhaps is this drawing also interesting for you. It's on pag. 35:
View attachment 299363
The start of the 2 rows above the bars.

Regards, Peter
Thanks Peter :). Well ok then, I think you and Sasha have talked me into reducing the gap between the ratlines. Maybe 7-8mm. Of course that means I'll need to create even more of them now Redface. And Sasha .... no, I was not able to climb a step of 80cm high, maybe you need sea legs for that? ROTF

Thanks for posting these diagrams Peter. I think Artesania Latina took a great many liberties with their design of the Bluenose II, as has been pointed out to me throughout this build. The ratlines in the picture above, for instance, only span three ropes, whereas AL's model spans four on the foremast and five on the mainmast. Again, more ratline knots for me :confused:

For a first build I was never going to venture far from the kit instructions though. As with most products, I'd assumed you simply followed the instructions that come with them. I had no idea of the amount of in-depth research and bespoke modifications some modellers do for the sake of correctness and historical accuracy. That has been something of a revelation. Maybe I'll get there one day :)

- Cheers, Mark
 
Many thanks for this log. I'm at this point on the same build and also found the second booklet to be a head scratcher. I've only the Phantom under my belt and can't believe you're doing this well on a first build; mine isn't nearly as good but I'm having fun doing it anyway. Your log is a terrific reference I'll be using to help clarify the instructions, or lack of them. Thanks again for the extra effort to document.
Thanks Mitch! I appreciate the compliment and it has gone some way to restoring my confidence. Most of the Bluenose II builds on this forum are not Artesania Latina and the differences have often been brought to my attention. There are many more builds of this AL kit on the ModelShipWorld forum and I have referred to them frequently throughout this build. There is one in particular that appears to have followed the AL kit instructions to a tee, and whose photos have helped me through many of the grey areas. Click here to see his build. Also, on this (SOS) forum we have DomCee, who gave me helpful advice along the way, and who completed this kit in three separate build logs Part I, Part II and Part III. His AL build is next-level stuff, but a great example of how appropriate modifications can be made to this kit by someone who knows how :)

I certainly have made a fair share of mistakes along the way and even now am hoping to come out the other side with my sanity somewhat intact. But I have also learnt quite a bit along the way so please feel free to ask any questions you might have about this build, I'll be more than happy to help if I can Thumbsup

- Mark
 
Last edited:
For a first build I was never going to venture far from the kit instructions though. As with most products, I'd assumed you simply followed the instructions that come with them. I had no idea of the amount of in-depth research and bespoke modifications some modellers do for the sake of correctness and historical accuracy. That has been something of a revelation. Maybe I'll get there one day :)

- Cheers, Mark
With every construction, you have to feel comfortable with it yourself. And whatever falls within your capabilities. As for 'historical accuracy': with regard to the BN-II, more has been documented. For the original, we have some more AL-FI.
But your BN will soon be in your area that you look at. When you get visitors, they see a beautiful ship and they really don't stand next to it with reference material to see if it is correct.
Thanks to your build log, which I respect a lot, we can watch and give you our input, but you decide what you make.
Regards, Peter
I agree whole-heartedly Peter. And I must admit that when I sat down last night to have a crack at these ratline knots, the spacing between each ratline on my template did look too wide. So I reduced the gap to just 6mm now, half of AL's recommended width, effectively forming squares and not rectangles, and straight up I can see the difference it makes to our visible perception of scale. Criticism is certainly valuable, and welcome, especially good criticism :)
 
Hmmm, I'm not sure I understand all the maths, but I'm assuming the suggestion is that the ratlines should be spaced closer together? The kit recommends 12mm, which looked a bit too wide, so I settled on 10mm which at least looks 'about right' ;)
I did 7mm (=455mm in real life) on the 1:65 Billing Boats Bluenose. Still slightly too large, but not overly so that it starts attracting attention.
The 6mm pitch for your ratlines you're now incorpoating will look great !
 
I did 7mm (=455mm in real life) on the 1:65 Billing Boats Bluenose. Still slightly too large, but not overly so that it starts attracting attention.
The 6mm pitch for your ratlines you're now incorpoating will look great !
Hi Johan. Yes, I am glad I was made to think about scale as it certainly does make a difference. Now I just need to get to grips with Sasha's complex mathematical formulae to determine other scale features in the future :p
 
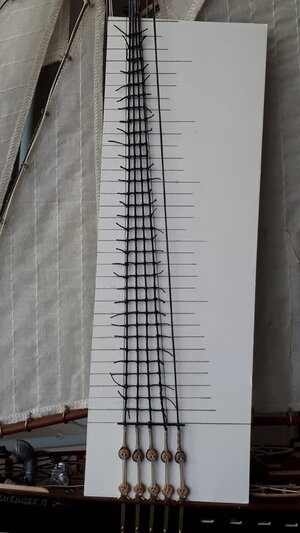
After a few false starts I finally managed to rattle down one set of foremast shrouds on the port side. A white card backdrop gives much-needed visual clarity to the process, with spacer markings measured at 6mm apart.

0920_20220404_bluenose_II_build.jpg

I persisted with the cow-hitch / clove-hitch / cow-hitch knotting system for each ratline, although I suspect a simple overhand knot at this scale would suffice. Dabbed each knot with CA and cut the excess thread at either end.

0925_20220404_bluenose_II_build.jpg

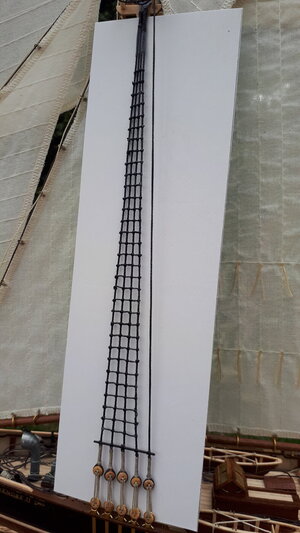
The 6mm spacing yielded a total of 32 rows on the foremast shroud. I expect the mainmast will have a few more. It certainly is a time-consuming exercise, although like most of the repetitive tasks in model ship building you tend to speed up after establishing a system that works for you :)

0930_20220404_bluenose_II_build.jpg
 
After a few false starts I finally managed to rattle down one set of foremast shrouds on the port side. A white card backdrop gives much-needed visual clarity to the process, with spacer markings measured at 6mm apart.

View attachment 300629

I persisted with the cow-hitch / clove-hitch / cow-hitch knotting system for each ratline, although I suspect a simple overhand knot at this scale would suffice. Dabbed each knot with CA and cut the excess thread at either end.

View attachment 300630

The 6mm spacing yielded a total of 32 rows on the foremast shroud. I expect the mainmast will have a few more. It certainly is a time-consuming exercise, although like most of the repetitive tasks in model ship building you tend to speed up after establishing a system that works for you :)

View attachment 300631
You have a steady hand to be able to tie off your ratlines on the shrouds in the vertical installed condition. With my old hands and poor eyesight I had to do those off of the mast on a template laid flat can then attach them top and bottom. That made a challenge to get the deadeyes in level uniform lines. Well done!!! Rich (PT-2)
 
After a few false starts I finally managed to rattle down one set of foremast shrouds on the port side. A white card backdrop gives much-needed visual clarity to the process, with spacer markings measured at 6mm apart.

View attachment 300629

I persisted with the cow-hitch / clove-hitch / cow-hitch knotting system for each ratline, although I suspect a simple overhand knot at this scale would suffice. Dabbed each knot with CA and cut the excess thread at either end.

View attachment 300630

The 6mm spacing yielded a total of 32 rows on the foremast shroud. I expect the mainmast will have a few more. It certainly is a time-consuming exercise, although like most of the repetitive tasks in model ship building you tend to speed up after establishing a system that works for you :)

View attachment 300631
I installed the ratlines on my father's Bluenose with simple overhand knots, after trying both the historical more appropriate knots and the simplified knots. To me it was not worth the extra effort.
I also used CA to lock the knots, after trying some textile glue first, with disastrous results.
Your efforts and patience do pay off; very crisp looking shrouds, deadeyes and ratlines. Thumbs-Up
 
You have a steady hand to be able to tie off your ratlines on the shrouds in the vertical installed condition. With my old hands and poor eyesight I had to do those off of the mast on a template laid flat can then attach them top and bottom. That made a challenge to get the deadeyes in level uniform lines. Well done!!! Rich (PT-2)
Hi Rich, nice to hear from you again. Yes it was a bit of a challenge I must admit, especially when you aren't sure what the overall outcome will be. It must be torturous with poor eyesight. When I followed your and Dean's YQ builds it seemed to me that you both breezed through the ratlines - one picture they weren't there, next picture they were - leading me into a false sense of security and thinking I could knock them off quickly :p

Anyway I still have three sets of shrouds to do and can now at least measure the pain that lies ahead. I still refer to your BN build for guidance, even though it is quite different to AL, just to make sure I'm still on the right track. Have you any plans for your next model yet?

- Mark
 
Anyway I still have three sets of shrouds to do and can now at least measure the pain that lies ahead.
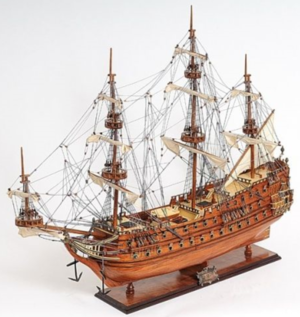
I think I didn't do more than 10 ratlines at any time. After that my concentration started to fade... Took me about three weeks to get them done. I don't want to think about doing ratlines on "de Zeven Provinciën" for instance...:eek:
 
I think I didn't do more than 10 ratlines at any time. After that my concentration started to fade... Took me about three weeks to get them done. I don't want to think about doing ratlines on "de Zeven Provinciën" for instance...:eek:
Johan, thanks for sharing, I feel a lot better now. Ten ratlines at a times seems like a reasonable limit. I found my arms and shoulders aching after about five, and had to remind myself to step away every now and again or the admiral would soon be obliged to call an ambulance ROTF

I had to look up 'de Zeven Provinciën', and yes, totally agree; lots of painful arms and shoulders for the modellers who take that on!

1649055015996.png
 
Last edited:
After a few false starts I finally managed to rattle down one set of foremast shrouds on the port side. A white card backdrop gives much-needed visual clarity to the process, with spacer markings measured at 6mm apart.

View attachment 300629

I persisted with the cow-hitch / clove-hitch / cow-hitch knotting system for each ratline, although I suspect a simple overhand knot at this scale would suffice. Dabbed each knot with CA and cut the excess thread at either end.

View attachment 300630

The 6mm spacing yielded a total of 32 rows on the foremast shroud. I expect the mainmast will have a few more. It certainly is a time-consuming exercise, although like most of the repetitive tasks in model ship building you tend to speed up after establishing a system that works for you :)

View attachment 300631
Nice one Mark. Came out well...cheers Grant
 
After a few false starts I finally managed to rattle down one set of foremast shrouds on the port side. A white card backdrop gives much-needed visual clarity to the process, with spacer markings measured at 6mm apart.

View attachment 300629

I persisted with the cow-hitch / clove-hitch / cow-hitch knotting system for each ratline, although I suspect a simple overhand knot at this scale would suffice. Dabbed each knot with CA and cut the excess thread at either end.

View attachment 300630

The 6mm spacing yielded a total of 32 rows on the foremast shroud. I expect the mainmast will have a few more. It certainly is a time-consuming exercise, although like most of the repetitive tasks in model ship building you tend to speed up after establishing a system that works for you :)

View attachment 300631
You now have built up ‘experience’ with these ratlines. It looks neat and tidy. Watch out, it's getting faster and faster. What you posted yourself about the ratlines by Dean and Rich: on the next picture it is done. :)
 
Back
Top