• SUBSCRIBE TO SHIPS IN SCALE TODAY!

    The beloved Ships in Scale Magazine is back and charting a new course for 2026!
    Discover new skills, new techniques, and new inspirations in every issue.

    NOTE THAT OUR NEXT ISSUE WILL BE MARCH/APRIL 2026
  • Win a Free Custom Engraved Brass Coin!!!
    As a way to introduce our brass coins to the community, we will raffle off a free coin during the month of August. Follow link ABOVE for instructions for entering.

Bluenose Schooner 1921 - Model Shipways 1:64 by TexBilly

Joined
Jan 29, 2026
Messages
19
Points
28

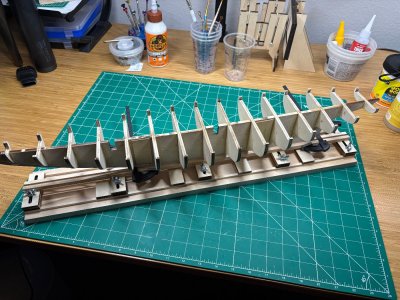
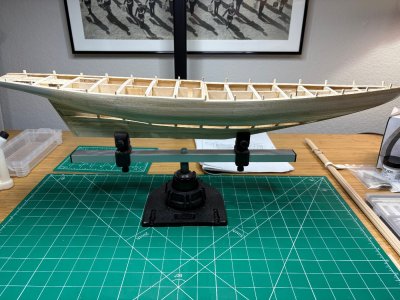
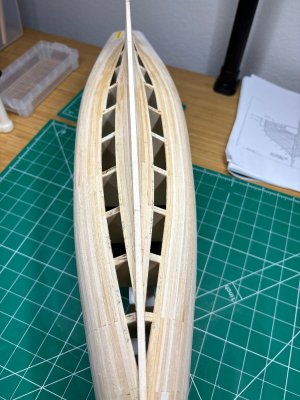
Hi Folks, this is my first "big" build and log. Starting off oddly as I'm well into the journey but a ton of work still lies ahead with many challenges to conquer.

For my own good (and perhaps other rookies like me) I'll soon post a summary of lessons learned and positives that have quickly added to my education. I started about 3 months ago, a few hours during most evenings, more on the weekends. For now, sharing a handful of build photos (limited in the early stages I'm afraid).

Along the way...

IMG_0981.jpegIMG_1013.jpegIMG_1012.jpegIMG_1028.jpegIMG_1031.jpegIMG_1054.jpeg

Today....

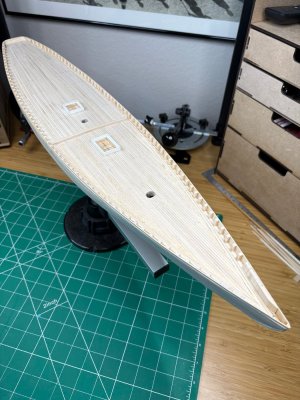
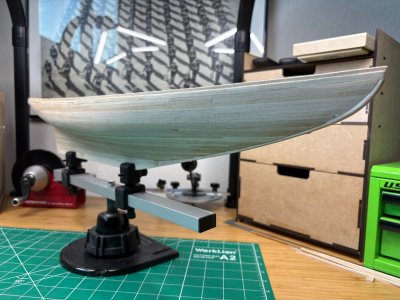
IMG_1066.jpegIMG_1065.jpeg
 
Ha! I clearly don't know the ins and outs of thread titles or perhaps proof reading!

Reads:

Bluenose Schooner 1021 - Model Shipways 1:64 Build log

But I thought I typed/meant it to read as:

1921 Bluenose Schooner Build Log - Model Shipways 1:64

Perhaps an Admin can update? Thanks!
 
Hi Folks, this is my first "big" build and log. Starting off oddly as I'm well into the journey but a ton of work still lies ahead with many challenges to conquer.

For my own good (and perhaps other rookies like me) I'll soon post a summary of lessons learned and positives that have quickly added to my education. I started about 3 months ago, a few hours during most evenings, more on the weekends. For now, sharing a handful of build photos (limited in the early stages I'm afraid).

Along the way...

View attachment 606625View attachment 606640View attachment 606639View attachment 606641View attachment 606642View attachment 606643

Today....

View attachment 606645View attachment 606644
I think the planking of the hull looks incredibly sharp. My compliments!
 
Welcome aboard from Connecticut. I am also doing the Bluenose, on and off when I visit my second home. I have found this blog and this you tube site to be very valuable for tips and insight.

Rob


Thank you all for the kind words.
Welcome aboard from Connecticut. I am also doing the Bluenose, on and off when I visit my second home. I have found this blog and this you tube site to be very valuable for tips and insight.

Rob


Rob, thanks for this! I'm pretty sure I've come across Jeff's build log more than once during searches. I'll also take a look at the youtube as well. Thanks again.
 
Last edited:
:) I have to say it's therapeutic to write down part of my journey over the last few months - let's hope I apply all of this going forward. :rolleyes: Thanks for allowing me to share...

I had chosen the Bluenose as my step up project based on several recommendations that mentioned the relatively simple hull. In that respect, I'd agree its hull is a nice introduction to bulkhead framing and planking without having to cut your teeth with 90 degree bends and complex curves! Still, the model has challenged me in many other ways - some unique to the Bluenose, others common to many models.

Keel rabbeting
This process went pretty smoothly and my bearding line layout proved to be decently accurate when I planked. However, what I thought was a rabbet that was deep enough at the keel later proved to be too shallow in places. Luckily, some minor rabbet clean up and/or plank beveling gave me decent results.

Installing the bulkheads
I left a few joints too tight at glue up and a couple bulkheads were difficult to square - just when I thought they were square, they would drift due to uneven forces. I also admit I relied on my eye a little too much and this bit me on two bulkheads, which I had to remove, clean up and reinstall. I soon switched to ensuring each joint was loose enough to accept glue but firm enough to stay relatively square, plus I used generic lego blocks/small bar clamps to lock them in place. On the bright side, I utilized the tip of gradually brushing the joint with 99% IPA to loosen the glue (lower concentration IPA doesn't work) - this and some patience made removal much easier.

Bulkhead-to-bearding line
Although the plans show otherwise, some bulkheads didn't fit anywhere close to the bearding line - my bearding line was pretty close to plan so not much I can do about that. Other bulkheads overlapped the bearding line and I shaved their sides where needed. I was a bit concerned that the BHs that were far from the line would give me problems during planking but overall, I didn't sense any big issues - though I suppose my hull's curvature might be different than the ideal.

Fairing
I used long homemade sanding blocks to fair much of the hull but did decide to utilize my detail sander to "move things along" (the full size tool, not the mini hobby versions). Overall this was effective and I did check curvature along the way with planks. However, I later discovered I had sanded too deeply here and there and had to glue thin shims to two bulkheads to even things out. Even then, once I reached those points during planking, I still had to adjust relative thickness, even sanding down the shims I earlier installed. Hey, it's a process.

Plank clamping and gluing
For much of the hull, where bulkheads were still exposed, I used the familiar modified binder clip trick to hold the planks in place. Later during the process I came to enjoy using map pins (the ones with the ball heads) to secure them with pretty consistent results (I found the pin diameter of standard push pins to be too large). I rarely needed to push through the planks but instead inserted them on the sides of the planks. In some cases I'd need to push in the pin at an angle, if the plank was on a curve for instance. In most cases, I simply pressed the plank tight next to its neighbor and added a pin on its side. As for gluing, I only used wood glue and quite a lot of it. By this I mean I glued all edges and would generally mop down all joints with a damp brush, rinse the brush, repeat, etc. This method also closed many thin gaps that I might have missed or might later require filler. The down side is I use a lot of glue!

Hull planking
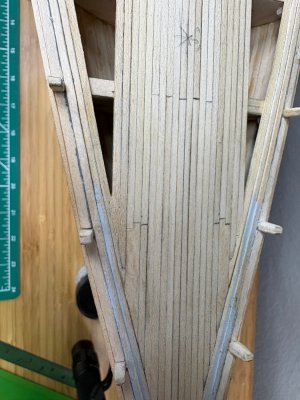
Overall, I was pretty happy with the results and only the tight complex curves at the stern required some minor rework. I regularly used the water soak/clamp/dry method to shape those curvy planks with overall good results. Some planks required beveling as well. I didn't have any major gaps to fill, thank goodness. As for those joints requiring custom stealers, mine were a mix. In some cases I was able to cut a nice overlapping joint per best practices, in other cases, I chose to cut long, mitered planks, and one or two of those didn't end over a bulkhead. But, I'm happy with the overall result.

Smoothing the hull
For most of the convex surfaces, I used a mini block plane set at a very shallow depth to shave the surfaces, with good results. For the complex curves, I relied on progressive sanding sponges to get it shaped to where it stands today. I'm holding off on finish sanding until I'm ready to prime and paint. Which brings me to a decision rattling around in my head....

What are ya'll's thoughts on the order of painting the hull and finishing/painting the deck? I see pros and cons either way. And I still need to decide whether to paint the waterways....

More soon...
 
Last edited:
Always nice to see the starts of the build of another Bluenose, Bill. The hull and deck are looking very nice.
In post #1 of this link —> BN-list <— you can find a excel-sheet with in the 2nd half some other build-log’s of MS. In column ‘E’ the hyperlinks to those log’s.
I will ad yours to that list.
Regards, Peter
 
More "looking back"...

Waterway planks
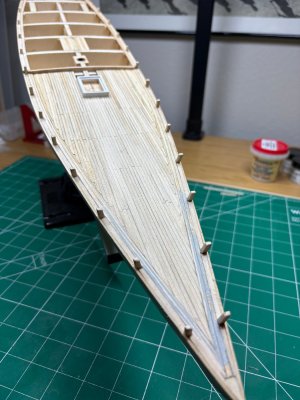
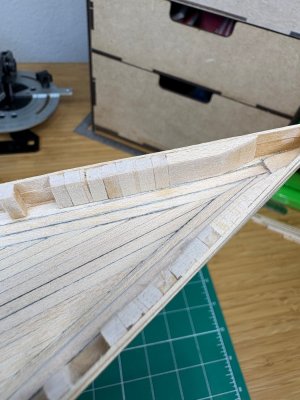
Failed to mention in the context of hull planking that I followed the common process of adding short supports between each bulkhead, then fitting 3/32" waterway planks in between. At the fore deck, I added the 2nd and 3rd 3/32" waterway planks. For all deck planks, I followed the practice of darkening the edges with pencil lead to simulate caulking. Nothing too dramatic up to this point.

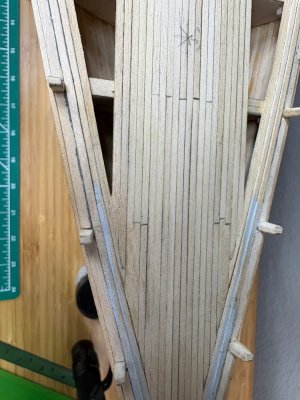
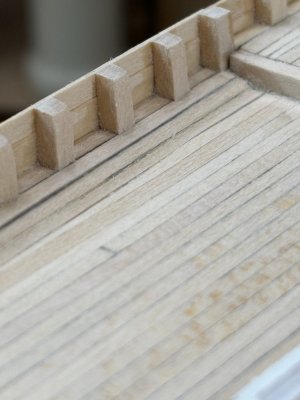
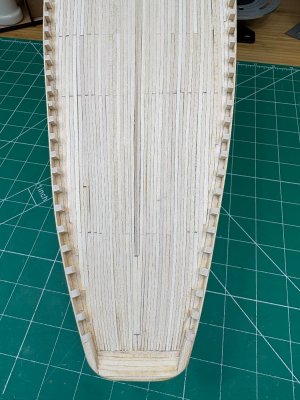
Planking the fore deck
Right away, my focus was on maintaining the small drop/bevel from the the thicker 3/32" waterway planks down to the 1/16" thick main deck. This proved problematic here and there and looking back, I question whether I should have just let it land where it was going to land. But i didn't :rolleyes:.

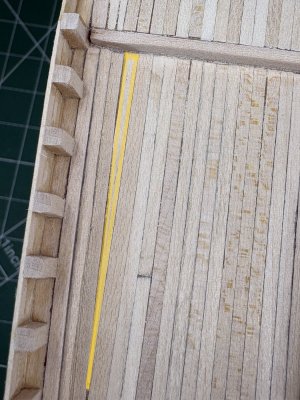
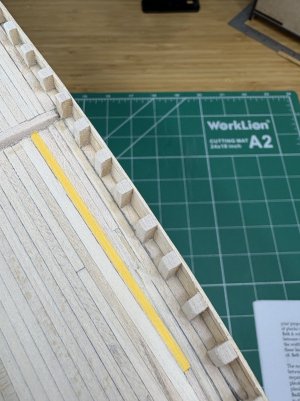
The drop from the 3rd waterway plank to the deck is only 1/32" on paper. In practice, it turned out to be a bit more. I suspect the main culprit was because of my own bulkhead sanding, so the height of the outer ends were inconsistent from around bulkhead D aft to the great beam. I sure wish I had taken photos! I needed to gradually sand or shim to meet the 3rd waterway plank and maintain that drop. It took quite a bit of tinkering, but I finally got it looking respectable. As I completed the fore deck, as expected, a mitered filler plank was required alongside the starboard nibbing strake. The port side was where I had to adjust/rework for the 3rd waterway so a narrow plank finished that area.

I didn't really follow any established plank pattern standard but did try to maintain some consistency.

I'm adding some "after" pics in case they help make sense of any of this. In the end, I think the overall look came out pretty good, even if it isn't exactly to plan.

IMG_1028.jpegIMG_1067.jpegIMG_1070 Highlight.jpegIMG_1069 Highlight.jpeg
 
Last edited:
I used generic lego blocks/small bar clamps to lock them in place.

I simply pressed the plank tight next to its neighbor and added a pin on its side. As for gluing, I only used wood glue and quite a lot of it. By this I mean I glued all edges and would generally mop down all joints with a damp brush, rinse the brush, repeat, etc. This method also closed many thin gaps that I might have missed or might later require filler. The down side is I use a lot of glue!

For most of the convex surfaces, I used a mini block plane set at a very shallow depth to shave the surfaces, with good results.

What are ya'll's thoughts on the order of painting the hull and finishing/painting the deck? I see pros and cons either way. And I still need to decide whether to paint the waterways....

More soon...
I learned recently you can also use binder clips to keep the bulheads at 90º. I have to admit it's easier than Legos! I like your idea of map pins next to the planks, and using a mini plane to smooth the hull. I never would have thought of that.

My own idea would be to deal with the deck, then mask that to deal with the hull. I did that on my current build. the Model Shipways Lobster Smack. But I think you could do either approach. How are you planning to finish the deck?

Tom
 
I learned recently you can also use binder clips to keep the bulheads at 90º. I have to admit it's easier than Legos! I like your idea of map pins next to the planks, and using a mini plane to smooth the hull. I never would have thought of that.

My own idea would be to deal with the deck, then mask that to deal with the hull. I did that on my current build. the Model Shipways Lobster Smack. But I think you could do either approach. How are you planning to finish the deck?

Tom
Hey Tom, I can easily picture how binder clips can be used to square, will have to give that a try! I like your thinking on the order of finishing. My mind also goes to "do the hull as late as possible" to avoid wear from handling, vise clamping, etc. I've already tested a stain I like (Varathane Golden Oak) and plan to seal it with Minwax semi gloss wipe-on poly. If I paint the waterways (leaning yes), I can stain/finish the deck, then paint over any overage. Waterways = Gray, fake stanchions = white unless I go crazy.
 
Planking the quarter deck
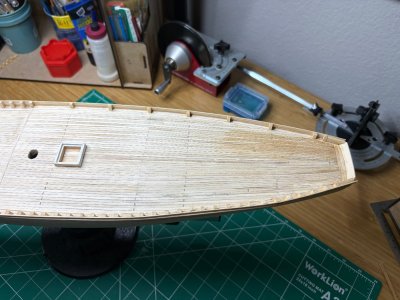
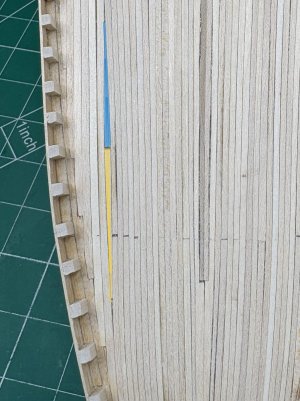
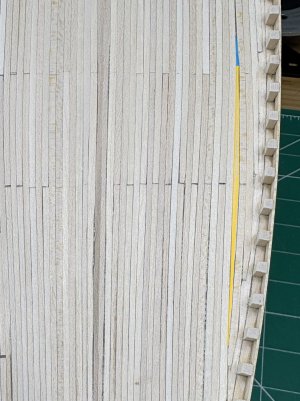
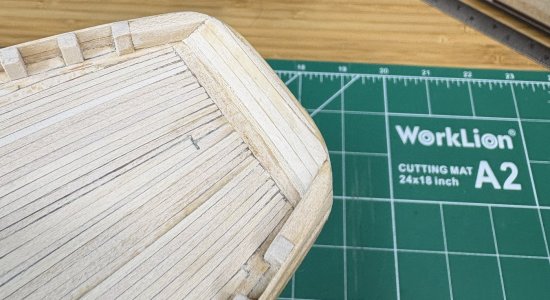
The obvious challenge on the quarter deck is the tapering of the planks going aft. I hand cut the first six planks - two down the centerline then the four notched planks ending at the transom's cross planks (I had preinstalled those after shaping the filler blocks, more on the transom later).

For the rest of the tapered planks, I used my mini block plane and started the tapers about 6" from the end, then gradually planed closer and closer to the aft end (about 4-5 total strokes). Not every taper ended the same width but the general stack up turned out ok. I found this easier and more consistent than cutting with a knife, with no sanding required. Similar to the fore deck, I did have to custom fit four planks to fill in the converging angles (highlighted in yellow and blue). Not text book but they did the job.

Despite my apprehension going into it, the quarter deck was much simpler than the fore deck (which was self-induced I'm sure LOL).

IMG_1078.jpegIMG_1080.jpegIMG_1079.jpeg

Waist planks
I experimented adding scuppers using a small diameter gouge and did install one waist plank with them. I soon decided my method wasn't consistent enough and was not to scale. I removed the plank and reinstalled without scuppers. I recall one of the scale modeling rules of "can you see it at scale?" (in this case 1/64" x 3/64" slots) and decided that was good enough for me!

I guess I wasn't paying attention when I installed the waist planks because I did leave some small gaps between the planks (I probably should have wet shaped them). Nothing a bit of filler won't hide but it was a miss on my part.

Transom
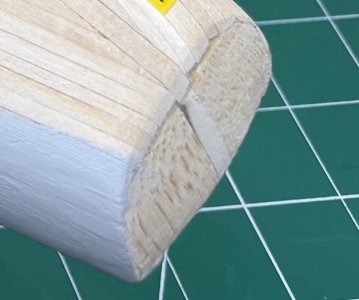
Back at the framing stage, I installed the filler blocks without much trouble. I roughed the shape in the garage using small hand saws, then got closer with my oscillating spindle sander. After gluing them in, I hand sanded as close to the plan profiles as I could. Once I started on the stern blocks and transom framing/planking, I fine tuned the filler block profiles.

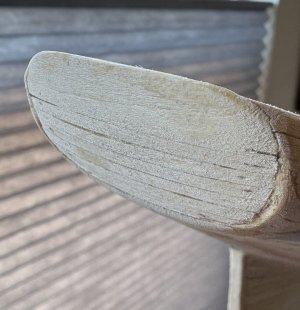
Now for the biggest rework I've created so far. Soon after hull planking was done, I absentmindedly trimmed the planks flush to the filler blocks, ignoring how to transition with the transom planks! Only when I started work on the transom did I realize this. Also notice where I had sanded a few planks down to the filler block! :oops: I later carved fake plank joints and brushed on some primer. Big lesson learned, especially when I build a natural finish hull.

IMG_1019 closeup.jpeg
I played with shaping a curved filler piece to serve as a joint between the hull and transom planks but abandoned that idea. I then decided to go big and carve out the filler blocks to allow transom planks to butt up against the now exposed hull planks. This took some time but with the help of my carving knives, I was able to get it pretty smooth. Yeah, I effectively shortened the stern but I'm good with it and the profile seems to look ok.

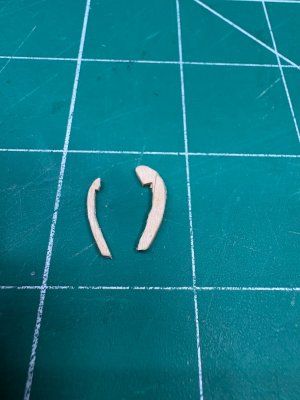
Starting at the bottom, I then shaped and installed six thin planks and was able to tuck them in reasonably well so the hull planks overlap. Instead of installing the support pieces called out on the plan, I decided to shape and install a wider strip near the top, which will also support the planking on the deck side. I'll likely carve out some fake joints across the wide strip. I'll continue sanding/filling soon but given the wrong turn I took earlier, I'm happy with the fix. Oh yeah, I started to shape "fashion pieces" called out at the transom, in case I can make heads or tails on how they fit! So far, I haven't found an example!

IMG_1087 Zoomed.jpegIMG_1082.jpegIMG_1088.jpeg

I then shaped and installed transition blocks between the last fake stanchions and the that wide strip. I then installed the interior planks and shaped everything to resemble the profile on the plan.

IMG_1083.jpeg

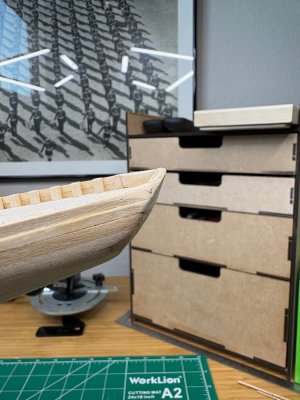
Back at the bow, I installed my interpretation of the hawse timbers and knighthead using using 1/8" stock. I still need to install the chafe block.

IMG_1084.jpeg

Fake stanchions
I forgot to mention these. Like others, I thought I'd be able to utilize the bulkhead extensions but once I installed the first fake stanchons, it was obvious they would not do! Oddly shaped, varying thicknesses - just battered LOL. They definitely served a purpose during the install and I cut them off along the way. After all of the stanchions were in place, I went back and sliced a bit off most of the fronts so they fell even with the waterways - especially on the quarter deck. This way the painted stanchions will be even with the waterway (likely painted as well) and not the main deck planks.

Ok, I think I hit the major areas so it's time to move forward!

 
The quater/aft deck with the tapered planking looks very nice, Bill.
Regards, Peter
That is high praise indeed, Peter as I've begun looking at some of your own work. Your Yuanqing Bluenose build is as impressive as it is inspiring! Outstanding! Ship-1
 
Last edited:
Planking the quarter deck
The obvious challenge on the quarter deck is the tapering of the planks going aft. I hand cut the first six planks - two down the centerline then the four notched planks ending at the transom's cross planks (I had preinstalled those after shaping the filler blocks, more on the transom later).

For the rest of the tapered planks, I used my mini block plane and started the tapers about 6" from the end, then gradually planed closer and closer to the aft end (about 4-5 total strokes). Not every taper ended the same width but the general stack up turned out ok. I found this easier and more consistent than cutting with a knife, with no sanding required. Similar to the fore deck, I did have to custom fit four planks to fill in the converging angles (highlighted in yellow and blue). Not text book but they did the job.

Despite my apprehension going into it, the quarter deck was much simpler than the fore deck (which was self-induced I'm sure LOL).

View attachment 606933View attachment 606935View attachment 606934

Waist planks
I experimented adding scuppers using a small diameter gouge and did install one waist plank with them. I soon decided my method wasn't consistent enough and was not to scale. I removed the plank and reinstalled without scuppers. I recall one of the scale modeling rules of "can you see it at scale?" (in this case 1/64" x 3/64" slots) and decided that was good enough for me!

I guess I wasn't paying attention when I installed the waist planks because I did leave some small gaps between the planks (I probably should have wet shaped them). Nothing a bit of filler won't hide but it was a miss on my part.

Transom
Back at the framing stage, I installed the filler blocks without much trouble. I roughed the shape in the garage using small hand saws, then got closer with my oscillating spindle sander. After gluing them in, I hand sanded as close to the plan profiles as I could. Once I started on the stern blocks and transom framing/planking, I fine tuned the filler block profiles.

Now for the biggest rework I've created so far. Soon after hull planking was done, I absentmindedly trimmed the planks flush to the filler blocks, ignoring how to transition with the transom planks! Only when I started work on the transom did I realize this. Also notice where I had sanded a few planks down to the filler block! :oops: I later carved fake plank joints and brushed on some primer. Big lesson learned, especially when I build a natural finish hull.

View attachment 606936
I played with shaping a curved filler piece to serve as a joint between the hull and transom planks but abandoned that idea. I then decided to go big and carve out the filler blocks to allow transom planks to butt up against the now exposed hull planks. This took some time but with the help of my carving knives, I was able to get it pretty smooth. Yeah, I effectively shortened the stern but I'm good with it and the profile seems to look ok.

Starting at the bottom, I then shaped and installed six thin planks and was able to tuck them in reasonably well so the hull planks overlap. Instead of installing the support pieces called out on the plan, I decided to shape and install a wider strip near the top, which will also support the planking on the deck side. I'll likely carve out some fake joints across the wide strip. I'll continue sanding/filling soon but given the wrong turn I took earlier, I'm happy with the fix. Oh yeah, I started to shape "fashion pieces" called out at the transom, in case I can make heads or tails on how they fit! So far, I haven't found an example!

View attachment 606941View attachment 606938View attachment 606951

I then shaped and installed transition blocks between the last fake stanchions and the that wide strip. I then installed the interior planks and shaped everything to resemble the profile on the plan.

View attachment 606939

Back at the bow, I installed my interpretation of the hawse timbers and knighthead using using 1/8" stock. I still need to install the chafe block.

View attachment 606940

Fake stanchions
I forgot to mention these. Like others, I thought I'd be able to utilize the bulkhead extensions but once I installed the first fake stanchons, it was obvious they would not do! Oddly shaped, varying thicknesses - just battered LOL. They definitely served a purpose during the install and I cut them off along the way. After all of the stanchions were in place, I went back and sliced a bit off most of the fronts so they fell even with the waterways - especially on the quarter deck. This way the painted stanchions will be even with the waterway (likely painted as well) and not the main deck planks.

Ok, I think I hit the major areas so it's time to move forward!

Nice work!

Rob
 
Back
Top