
Nice catch. That would have become increasingly difficult to correct.

-

SUBSCRIBE TO SHIPS IN SCALE TODAY!
The beloved Ships in Scale Magazine is back and charting a new course for 2026!
Discover new skills, new techniques, and new inspirations in every issue.
NOTE THAT OUR NEXT ISSUE WILL BE July/August 2026 -

Win a Free Custom Engraved Brass Coin!!!
As a way to introduce our brass coins to the community, we will raffle off a free coin during the month of August. Follow link ABOVE for instructions for entering.
You are using an out of date browser. It may not display this or other websites correctly.
You should upgrade or use an alternative browser.
You should upgrade or use an alternative browser.
Bonhomme Richard - Pear Cross section kit (with scratch duplicate using alder) Unicorn Model

Much rainy-day progress! Recap below:
1. It's amazing how far one can progress without glueing the decks in place. Still dry-fitting and checking heights to gunports, alignment, etc. Everything is tight and lining up vertically (the cannon w/o wheels is about 1mm low in the gunport, so perfect)!! I finished the plankingscheme and there will be plenty of planking to support both cannons on this level and keep sightlines open into the holds.


2. A couple up-close shots of the interior cabins and bulkheads.


3. I began looking at the main mast partners (parts - 309/310) that have been problematic in other builds, because they interfere with the ships pumps AND/OR the mast shims. See photo below for where the interference is. My solution is to thin the long horizontal piece on both sides, as shown in green, then move the two pieces out, so the interference is alleviated.


Sorry for all the long post but I'm hoping to help first time builders with the little details and procedures.
1. It's amazing how far one can progress without glueing the decks in place. Still dry-fitting and checking heights to gunports, alignment, etc. Everything is tight and lining up vertically (the cannon w/o wheels is about 1mm low in the gunport, so perfect)!! I finished the plankingscheme and there will be plenty of planking to support both cannons on this level and keep sightlines open into the holds.
2. A couple up-close shots of the interior cabins and bulkheads.
3. I began looking at the main mast partners (parts - 309/310) that have been problematic in other builds, because they interfere with the ships pumps AND/OR the mast shims. See photo below for where the interference is. My solution is to thin the long horizontal piece on both sides, as shown in green, then move the two pieces out, so the interference is alleviated.
Sorry for all the long post but I'm hoping to help first time builders with the little details and procedures.
Referring the deck planking of the lower decks
I am making also often some small campfering of the edges - with the small shaddow the planks are looking better (personal taste)
I am not sure, and I guess, that on the lower decks there was no caulking between the planks - why these decks should be water tight
-> I would not make any caulking in the lower decks
your work is looking very good

Looking superb Brad, and a great correction on your deck construction
For anyone trying to do deck treenails for the first time. Below are the steps I used:
1. I place scotch tape over the beam where the row of nails will go and make pin holes to guide the drill. Usually two rows per beam, staggered. If there is a joint between planks, there would be four guide holes made with a needle.

2. Next, use a small battery powered drill, with a bit slightly smaller than the nails you plan to drive in.

3.
a. I place half a toothpick in a small clamp vice mounted in a hand drill and spin the tip in a draw plate hole, just a hair wider than the holes I drilled. (trial and error on which hole in the draw plate).
b. Keep going larger until the treenail goes in easily but snugly and tight, without damaging the plank.
a. b.
b. 
4. I then clip the treenail as close to flush, with nail clippers. I've tried cutting them flush with a sharp chisel, but this sometimes pulls the nail out.

5. Once all the nails are clipped, I sand with a small block until they feel almost flush. To ensure they are flush, without sanding the plank thinner, I use a sharp chisel to shave the top of the treenail flush with the existing deck.
.jpg")
6. The final result for the main gun deck of the Bonhomme Richard.

It still has hatch covers and mast reinforcement to build. Then I will add the final shades of WATCO wood oil (clear, light walnut, medium walnut and dark walnut) to make certain items stand out.
Hopefully this rather long post helps someone trying to treenail for the first time. For those more experienced than I, my guess is you didn't get this far but if so, thanks for your interest and patience.
1. I place scotch tape over the beam where the row of nails will go and make pin holes to guide the drill. Usually two rows per beam, staggered. If there is a joint between planks, there would be four guide holes made with a needle.
2. Next, use a small battery powered drill, with a bit slightly smaller than the nails you plan to drive in.
3.
a. I place half a toothpick in a small clamp vice mounted in a hand drill and spin the tip in a draw plate hole, just a hair wider than the holes I drilled. (trial and error on which hole in the draw plate).
b. Keep going larger until the treenail goes in easily but snugly and tight, without damaging the plank.
a.
b. 4. I then clip the treenail as close to flush, with nail clippers. I've tried cutting them flush with a sharp chisel, but this sometimes pulls the nail out.
5. Once all the nails are clipped, I sand with a small block until they feel almost flush. To ensure they are flush, without sanding the plank thinner, I use a sharp chisel to shave the top of the treenail flush with the existing deck.
6. The final result for the main gun deck of the Bonhomme Richard.
It still has hatch covers and mast reinforcement to build. Then I will add the final shades of WATCO wood oil (clear, light walnut, medium walnut and dark walnut) to make certain items stand out.
Hopefully this rather long post helps someone trying to treenail for the first time. For those more experienced than I, my guess is you didn't get this far but if so, thanks for your interest and patience.
Nice tutorial Brad!
very good result - many thanks for sharing your method in detail with us
Good evening Brad. Thanks for this. I’m going to give it a try. The clippers and chisel sound like a fine plan. Cheers GrantFor anyone trying to do deck treenails for the first time. Below are the steps I used:
1. I place scotch tape over the beam where the row of nails will go and make pin holes to guide the drill. Usually two rows per beam, staggered. If there is a joint between planks, there would be four guide holes made with a needle.
View attachment 448266
2. Next, use a small battery powered drill, with a bit slightly smaller than the nails you plan to drive in.
View attachment 448267
3.
a. I place half a toothpick in a small clamp vice mounted in a hand drill and spin the tip in a draw plate hole, just a hair wider than the holes I drilled. (trial and error on which hole in the draw plate).
b. Keep going larger until the treenail goes in easily but snugly and tight, without damaging the plank.
a. View attachment 448271b. View attachment 448272
4. I then clip the treenail as close to flush, with nail clippers. I've tried cutting them flush with a sharp chisel, but this sometimes pulls the nail out.
View attachment 448275
5. Once all the nails are clipped, I sand with a small block until they feel almost flush. To ensure they are flush, without sanding the plank thinner, I use a sharp chisel to shave the top of the treenail flush with the existing deck.
View attachment 448277
6. The final result for the main gun deck of the Bonhomme Richard.
View attachment 448278
It still has hatch covers and mast reinforcement to build. Then I will add the final shades of WATCO wood oil (clear, light walnut, medium walnut and dark walnut) to make certain items stand out.
Hopefully this rather long post helps someone trying to treenail for the first time. For those more experienced than I, my guess is you didn't get this far but if so, thanks for your interest and patience.
Been busy prepping the camper for 6 months on the road with the shipyard aboard!
Small progress on the Bonhomme Richard, while changing brake pads, wheel bearings, oil, etc.
Still dry fitting, only the mast riders glued in place.
I was able to complete the lower-level hatch (see two photos below):


I was also able to start on the Ships oven. Unfortunately, the Superintend of Construction stopped by. He had planned a Friday Pizza Party, using the oven. I had not been informed or I would have authorized overtime!! Anyway, I was sent to buy pizza for the entire construction crew, all out of my own pocket! I did place a guard on the beer cask before leaving!

Small progress on the Bonhomme Richard, while changing brake pads, wheel bearings, oil, etc.
Still dry fitting, only the mast riders glued in place.
I was able to complete the lower-level hatch (see two photos below):
I was also able to start on the Ships oven. Unfortunately, the Superintend of Construction stopped by. He had planned a Friday Pizza Party, using the oven. I had not been informed or I would have authorized overtime!! Anyway, I was sent to buy pizza for the entire construction crew, all out of my own pocket! I did place a guard on the beer cask before leaving!
The Superintendent should be happy...bread oven is completed.

I used the provided "wood bricks", added no wood oil, and rubbed a very small amount of char sawdust. The bricks look like modern firebricks (see below). Not sure if this would be the color of 18th century oven bricks but I'm happy with the effect.

I used the provided "wood bricks", added no wood oil, and rubbed a very small amount of char sawdust. The bricks look like modern firebricks (see below). Not sure if this would be the color of 18th century oven bricks but I'm happy with the effect.
Good morning Brad. Yep a stunning oven- Pizza time. Cheers GrantThe Superintendent should be happy...bread oven is completed.
View attachment 449468
I used the provided "wood bricks", added no wood oil, and rubbed a very small amount of char sawdust. The bricks look like modern firebricks (see below). Not sure if this would be the color of 18th century oven bricks but I'm happy with the effect.
View attachment 449469
Lovely work. Enjoying the build very much . Great detail
This is really interesting, thank you for your posts. Everything I have read previously was that biscuit/hard tack was always made in commercial bakeries at or near the dock yards because stored flour could not be kept on board as it would go rancid and be bug ridden in short order. Hard biscuit and the bakeries on shore that made it were really born out of necessity and it turned out to be a means of food preservation. If it was prepared and stored properly it would last for a year or more..bread oven is completed.
Allan
Allan, I think you are correct... large quantities of hardtack was loaded. But for a short time, fresh bread might have been made. I also believe the oven was used for much more than bread. We had a pizza oven in our last house, and I used if to cook full dinners, in addition to great pizza's!This is really interesting, thank you for your posts. Everything I have read previously was that biscuit/hard tack was always made in commercial bakeries at or near the dock yards because stored flour could not be kept on board as it would go rancid and be bug ridden in short order. Hard biscuit and the bakeries on shore that made it were really born out of necessity and it turned out to be a means of food preservation. If it was prepared and stored properly it would last for a year or more.
Allan
This has always been an interesting subject to me starting with the first time I sailed aboard ship nearly 60 years ago. For the 16th century to the early 19th century I can find various descriptions and drawings of the furnaces and stoves as well as the kinds of foods found on board, but nothing yet about ovens for baking
bread (or pizza") ) Darn it, now I'm hungry..............
) Darn it, now I'm hungry..............
bread (or pizza
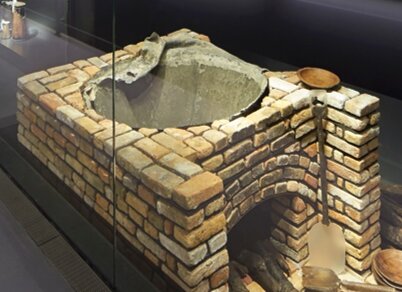
) Darn it, now I'm hungry..............Here is a link with a photo of an oven on Mary Rose circa 1511, and HMS Victories two ovens circa 1765 and Warrior circa 1860.This has always been an interesting subject to me starting with the first time I sailed aboard ship nearly 60 years ago. For the 16th century to the early 19th century I can find various descriptions and drawings of the furnaces and stoves as well as the kinds of foods found on board, but nothing yet about ovens for baking
bread (or pizza
3 ovens/stoves link
Obviously, the Mary Rose oven in 1860 is closest to the one in the BH kit. I find it odd that the BH Kit oven is enclosed in wood (fire hazard!!!). I built my old pizza oven in California and NEVER would have enclosed it in wood. I smoothed mortar over the firebricks to hold everything together and contain the heat. This seems like a more likely way, than wood, to contain the fire and anchor the oven bricks in sea-states.
Both the later stoves/ovens had water desalination capabilities, which is something I didn't realize was available. I thought fresh water was only in casks/barrels.
Shipyard got the heavy ropes and tackle in place and finally placed the main rider!! Glue will set overnight and tomorrow the shipyard will become mobile for six months!

Shipyard leaves Tuesday from Colorado, to Utah, Wyoming, Idaho, Oregon, Washington, then cross into Canada and British Columbia, Alberta, Saskatchewan, and Manitoba, then back to Colorado for elk season, through the Dakotas. It will be totally green (solar powered) except for the few times we pull into a developed campground to refill water and dump waste tanks.
I made a cradle that conforms to the hull, so the dry-dock will be stable through all the mountain and gravel roads. It is lined with tanned deerskin, so it should be very gentle on the outer hull through all the vibrations of the six-month road trip!
Thanks for the link Brad. Who knows what was actually on the Bonhomme Richard, no two ships or captains were exactly the same. You may find the following interesting as well.Here is a link with a photo of an oven on Mary Rose circa 1511, and HMS Victories two ovens circa 1765 and Warrior circa 1860.
The race to preserve the oven bricks of the Tudor warship the Mary Rose
After hundreds of years submerged in sea water, marine archaeological objects are complex materials due to degradation and inclusion of foreign compounds from the surrounding environment. When excavated and exposed to air these can transform to damaging products which can destroy material, and...
Thanks Allan, interesting article about a complex process after salvaging items that have been submerged for centuries!
Shipyard has been at 6,040ft on Flaming Gorge Lake, running on solar power for the last seven days. Below shows progress that was made between boating, swimming and fishing (last photos).
1. The three sets of knees on that tie into the three main beams supporting the lower deck. One beam sits on the Main Rider, so I had to shorten that knee significantly. Bolts are 20 gauge wire which equals 1.5" in scale.

2. A picture from both sides, showing the riders stained and in place. Note the shortened knee on the main rider in the photo on the right.


3. A picture of the ladder and monkey poles into the shot locker and mast step. Note the small handholds in the backside of the monkey poles and also the ladder, so the sailors had something to grip while climbing.

4. The forward hatch and Monkey Pole (with/without) the hatch cover. This pole required no hand holds because it was not against a wall.


5. The shipyard on the right, with the model in the vastness of the high desert surrounding Flaming Gorge. Yes, that is snow on the far 10,000ft ridges!

6. The benefits of a mobile shipyard...a stringer of four Rainbow/one Lake Trout. The Lake Trout was delicious hot off the grill and the hungry shipyard workers enjoyed it immensely!!!


Shipyard will remain here for 5 more days and then move to Wyoming for a 3-day Archery Competition.
1. The three sets of knees on that tie into the three main beams supporting the lower deck. One beam sits on the Main Rider, so I had to shorten that knee significantly. Bolts are 20 gauge wire which equals 1.5" in scale.
2. A picture from both sides, showing the riders stained and in place. Note the shortened knee on the main rider in the photo on the right.
3. A picture of the ladder and monkey poles into the shot locker and mast step. Note the small handholds in the backside of the monkey poles and also the ladder, so the sailors had something to grip while climbing.
4. The forward hatch and Monkey Pole (with/without) the hatch cover. This pole required no hand holds because it was not against a wall.
5. The shipyard on the right, with the model in the vastness of the high desert surrounding Flaming Gorge. Yes, that is snow on the far 10,000ft ridges!
6. The benefits of a mobile shipyard...a stringer of four Rainbow/one Lake Trout. The Lake Trout was delicious hot off the grill and the hungry shipyard workers enjoyed it immensely!!!
Shipyard will remain here for 5 more days and then move to Wyoming for a 3-day Archery Competition.