-

Win a Free Custom Engraved Brass Coin!!!
As a way to introduce our brass coins to the community, we will raffle off a free coin during the month of August. Follow link ABOVE for instructions for entering.
-

PRE-ORDER SHIPS IN SCALE TODAY!
The beloved Ships in Scale Magazine is back and charting a new course for 2026!
Discover new skills, new techniques, and new inspirations in every issue.
NOTE THAT OUR FIRST ISSUE WILL BE JAN/FEB 2026
You are using an out of date browser. It may not display this or other websites correctly.
You should upgrade or use an alternative browser.
You should upgrade or use an alternative browser.
Chaperon 1884 Stern Wheeler
- Thread starter Pathfinder65
- Start date
- Watchers 35
-
- Tags
- chaperon model shipways
Thanks for the compliment. I'm learning as I go. No frustration, just a lot of trial and errors to get the right look.I am very happy that you found the solution Jan. Those bends look A1.
Jan
Last edited:
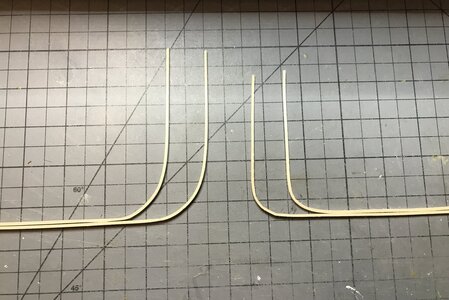
The bent pieces look great! RichThe Bends:
View attachment 274369
I'll never admit how many tries it took. But I think I've got it.
Jan
Practice makes perfect, they say! Good job!The Bends:
View attachment 274369
I'll never admit how many tries it took. But I think I've got it.
Jan
Maybe if not perfect . . . hopefully better in my case. RichPractice makes perfect, they say! Good job!
The Bumblers Notebook:
Off and on I’ve been working on the Boiler deck structure. All the “battens” are glued on and the painting started. Now for the “AHA” moment. Spray painting with the rattle can results in very uneven coverage, I think it might be the close spacing of the “battens”. I don’t have or know how to use an airbrush so I’ll be sanding the pieces and repaint using a brush.


The Hurricane deck structure after two passes painting with the rattle can . I’m not proficient enough to get a good result with this method.
A quick dry fit of the long walls this morning highlighted a major NOVICE error. . The section of the wall towards the bow is supposed to bend at 90 degrees and fit against a wall that sits across the deck.
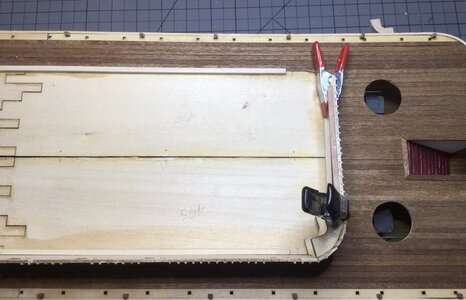
I managed to get the starboard section right but buggered up the port side. I starTed the bend on the port side about 1/4 inch or so late. You can see the corner braces supplied in kit in the picture above under the black spring clip. The port panel has the same braces glued top and bottom and I’m going to try to salvage them and rebuild the bend.
Another episode in the long list of “do overs”.
Jan
Off and on I’ve been working on the Boiler deck structure. All the “battens” are glued on and the painting started. Now for the “AHA” moment. Spray painting with the rattle can results in very uneven coverage, I think it might be the close spacing of the “battens”. I don’t have or know how to use an airbrush so I’ll be sanding the pieces and repaint using a brush.

The Hurricane deck structure after two passes painting with the rattle can . I’m not proficient enough to get a good result with this method.
A quick dry fit of the long walls this morning highlighted a major NOVICE error.

I managed to get the starboard section right but buggered up the port side. I starTed the bend on the port side about 1/4 inch or so late. You can see the corner braces supplied in kit in the picture above under the black spring clip. The port panel has the same braces glued top and bottom and I’m going to try to salvage them and rebuild the bend.
Another episode in the long list of “do overs”.
Jan
If you can do the starboard side correctly, then you can do the port side correctly. It may not take the same number of attempts (or be as easy as the other one), but I have no doubt you will succeed.
Indeed, I have a solution in mind and will give a try. Stay tuned.
Jan
Bumblers Notebook continued:
The Port side of the Boiler deck structure is finally ready to be set in place except for the curved section at the bow. It's a "do over" since I misinterpreted the directions, had to take sections apart, etc. The soaking technique to unglue the parts worked well, but also left the long section of the structure a bit warped. My unorthodox method for fixing that, was wet the piece, place it between parchment paper, place that between pieces of 1 X 2 boards and use every clamp that I own and let it sit for a couple of days.
The result.
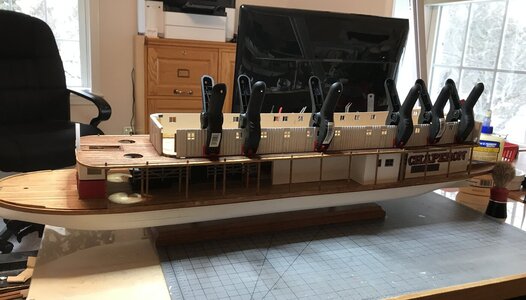
The fix worked out well and the piece has been set in and glued. Fortunately I had ordered and received a couple sets of spring clamps a couple of days ago.
The next piece of the puzzle was to repair the damage my enthusiasm caused to the piece that fits the curved section missing in the gap that shows in the above picture.
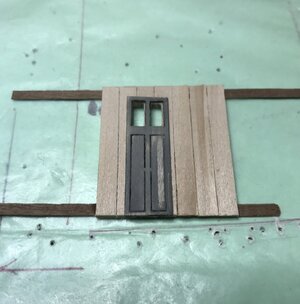
I glued the required number of vertical pieces to two scrap 1 X 4mm mahogany planking pieces. Marked the location of the the door and cut in in the door windows.
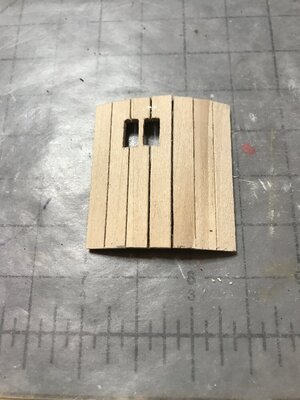
Step two of the process was to score in-between the boards top and bottom and use a pair of needle nose pliers to cause a break in the 1 X 4mm pieces so the assembly could be bend into a curved shape.
Next step is to fit that piece, prime it and then add the battens before the final paint job.
It feels like I've been working on this part for the last two years, I'm looking forward to moving on to the Hurricane deck build portion.
Jan
The Port side of the Boiler deck structure is finally ready to be set in place except for the curved section at the bow. It's a "do over" since I misinterpreted the directions, had to take sections apart, etc. The soaking technique to unglue the parts worked well, but also left the long section of the structure a bit warped. My unorthodox method for fixing that, was wet the piece, place it between parchment paper, place that between pieces of 1 X 2 boards and use every clamp that I own and let it sit for a couple of days.
The result.

The fix worked out well and the piece has been set in and glued. Fortunately I had ordered and received a couple sets of spring clamps a couple of days ago.
The next piece of the puzzle was to repair the damage my enthusiasm caused to the piece that fits the curved section missing in the gap that shows in the above picture.

I glued the required number of vertical pieces to two scrap 1 X 4mm mahogany planking pieces. Marked the location of the the door and cut in in the door windows.

Step two of the process was to score in-between the boards top and bottom and use a pair of needle nose pliers to cause a break in the 1 X 4mm pieces so the assembly could be bend into a curved shape.
Next step is to fit that piece, prime it and then add the battens before the final paint job.
It feels like I've been working on this part for the last two years, I'm looking forward to moving on to the Hurricane deck build portion.
Jan
Last edited:
Hi Jan.Bumblers Notebook continued:
The Port side of the Boiler deck structure is finally ready to be set in place except for the curved section at the bow. It's a "do over" since I misinterpreted the directions, had to take sections apart, etc. The soaking technique to glue parts worked well, but also left the long section of the structure a bit warped. My unorthodox method for fixing that, was wet the piece, place it between parchment paper, place that between pieces of 1 X 2 boards and use every clamp that I own and let it sit for a couple of days.
The result.
View attachment 279620
The fix worked out well and the piece has been set in and glued. Fortunately I had ordered and received a couple sets of spring clamps a couple of days ago.
The next pice of the puzzle was to repair the damage my enthusiasm caused to the piece that fits the curved section missing in the gap that shows in the above picture.
View attachment 279621
I glued the required number of vertical pieces to two scrap 1 X 4mm mahogany planking pieces. Marked the location of the the door and cut in in the door windows.
View attachment 279622
Step two of the process was to score in-between the boards top and bottom and use a pair of needle nose pliers to cause a break in the 1 X 4mm pieces so the assembly could be bend into a curved shape.
Next step is to fit that piece, prime it and then add the battens before the final paint job.
It feels like I've been working on this part for the last two years, I'm looking forward to moving on to the Hurricane deck build portion.
Jan
Despite the obstacles, it is good to see that you still manage to find a solution.
And about the ‘two years’: time flies. But soon your are going up to the Hurricane.
Regards, Peter
Hi Peter, a year ago I would have given up and let the build collect dust on a shelf. But now, following all the great build logs, admiring the variety of techniques used to overcome build problems and also getting a lot of help, suggestions and encouragement from SOS members, I’ve gained a lot of confidence. I’ve managed to bumble my way through four builds, each one requiring a different technique, many “do overs”, but all were completed. I think I’ve reached the stage of looking at a build step from different angles and thinking about what’s required versus just dabbing on a glob of glue and moving on to the next step. This build is a bit more complicated than my last but hopefully a good skill builder for build number six (The Duyfken) .Despite the obstacles, it is good to see that you still manage to find a solution.
Jan
Last edited:
Hi Heinrich,my advice is just to buckle down, finish that piece, mount it and then its onwards and upwards! Don't overthink the process too much!
Great advice. I managed to flunk plan reading 101 on this step. I had to unglue the bungled pieces and figure out a fix. Unfortunately the curved section of the long Port wall was completely mangled in the “ungluing” process.
Jan
Many thanks to all of you who are following my build log.
A happy, healthy and prosperous New Year to all of you.
Jan
A happy, healthy and prosperous New Year to all of you.
Jan
Bumblers Notebook... A temporary set back.
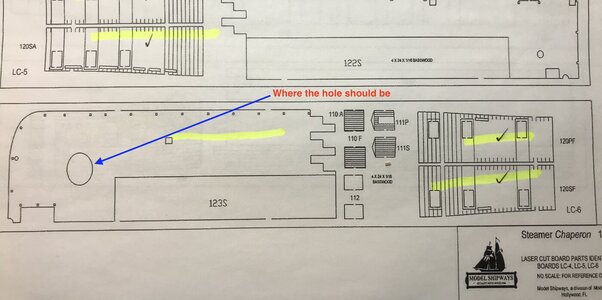
The work for today was to add the "roof" to the Boiler deck structure. After separating the pieces from the laser cut sprue I noticed the "RO-OH" moment.
The detail sheet included with the build plan.
The piece that should correspond with the plan sheet.

The "RO-OH" moment when fitting the Port and Starboard pieces together.
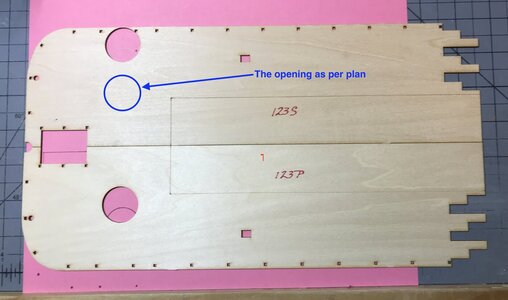
So there you have it.
I'll have to occupy my time with other tasks while I try to get a replacement.
Jan
The work for today was to add the "roof" to the Boiler deck structure. After separating the pieces from the laser cut sprue I noticed the "RO-OH" moment.
The detail sheet included with the build plan.

The piece that should correspond with the plan sheet.

The "RO-OH" moment when fitting the Port and Starboard pieces together.

So there you have it.
I'll have to occupy my time with other tasks while I try to get a replacement.
Jan
My thoughts exactly!That is not cool. Does that section get planked over? In other words, can you not make the hole in the correct place and simply plank over the incorrect one?
Use the correct side as a template to mirror the hole location. Cut out hole, fill in incorrect hole location, then plank or veneer the deck. Problem solved…no need to wait!
That is not cool. Does that section get planked over? In other words, can you not make the hole in the correct place and simply plank over the incorrect one?
This section of the build is the roof of the boiler deck or the floor of the hurricane deck. I think the idea is to paint or cover the area with roofing material.
My thoughts exactly!
Use the correct side as a template to locate the correct hole location. Cut out hole, fill in incorrect hole location, then plank or veneer the deck. Problem solved…no need to wait!
Right on, that’s the plan. I was trying to figure out how hide the joints of the four pieces and was contemplating covering the area with silkspan to simulate roofing. But I think your suggestion is the best alternative. Now I need to order planking material to make the fix.
Jan
I think Peter used black sandpaper to simulate roofing material. It looked very good IMO. And it can be painted if you wish. A fine grade would probably be best for scale. Maybe 220 grit.This section of the build is the roof of the boiler deck or the floor of the hurricane deck. I think the idea is to paint or cover the area with roofing material.
Right on, that’s the plan. I was trying to figure out how hide the joints of the four pieces and was contemplating covering the area with silkspan to simulate roofing. But I think your suggestion is the best alternative. Now I need to order planking material to make the fix.
Jan


