I like that idea.I think Peter used black sandpaper to simulate roofing material. It looked very good IMO. And it can be painted if you wish. A fine grade would probably be best for scale. Maybe 220 grit.
Jan
 |
As a way to introduce our brass coins to the community, we will raffle off a free coin during the month of August. Follow link ABOVE for instructions for entering. |
 |
 |
The beloved Ships in Scale Magazine is back and charting a new course for 2026! Discover new skills, new techniques, and new inspirations in every issue. NOTE THAT OUR FIRST ISSUE WILL BE JAN/FEB 2026 |
 |
I like that idea.I think Peter used black sandpaper to simulate roofing material. It looked very good IMO. And it can be painted if you wish. A fine grade would probably be best for scale. Maybe 220 grit.
Unbelievable what they have done with that sheet!Bumblers Notebook... A temporary set back.
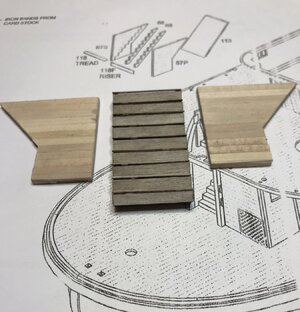
The work for today was to add the "roof" to the Boiler deck structure. After separating the pieces from the laser cut sprue I noticed the "RO-OH" moment.
The detail sheet included with the build plan.
View attachment 280118
The piece that should correspond with the plan sheet.
View attachment 280121
The "RO-OH" moment when fitting the Port and Starboard pieces together.
View attachment 280122
So there you have it.
I'll have to occupy my time with other tasks while I try to get a replacement.
Jan
I used anthracite (waterproof) sandpaper800, but The Lee is 1:96.I think Peter used black sandpaper to simulate roofing material. It looked very good IMO. And it can be painted if you wish. A fine grade would probably be best for scale. Maybe 220 grit.
The advantage of the waterproof paper is that you can glue it with regular woodglue. It does not absorb moisture and therefore does not wrinkle. Let it dry under pressure.Hi Peter,
Your method is worth considering, since the hurricane deck and pilot house roofs should probably have the same treatment.
Years ago I used tissue paper stippled with white glue and then painted flat black for roof covering on my HO scale buildings. But those were 1/87 scale and relatively small surfaces.
I will have to experiment with some different grits of sandpaper to get an idea of how your method will work.
Jan


Hi Jan,Bumblers Notebook - The Hurricane deck.
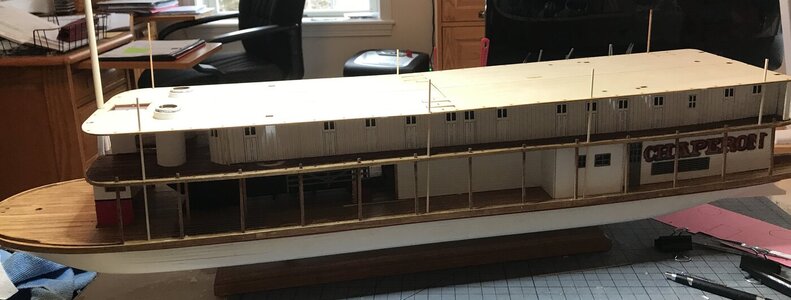
Well we have snow but we also have bitter cold. Yesterday the outside temperature with wind chill was -7F/-13C, so I spent some time finishing the Boiler deck portion. This morning I pieced together the Hurricane deck and tried a dry fit.
View attachment 282424
Everything seems to line up. I need to figure out if I should glue all four pieces together and then do the roof covering or glue the pieces to the Boiler deck structure and then cover the roof. The problem is covering the markings for placing the skylight, all stanchion holes and the boiler stack holes. So it's off to do some odd things while the ideas percolate.
Jan


Would that be like selecting the easy low hanging fruit to keep the harvest progressing? RichThat looks superb Jan.
Act as if your only choice is gluing the roof now. Then that is done and you are forced to work around your decision. That way you ensure you make real progress and do not spend too much time thinking. Both choices have their respective pros and cons, so choose one and carry on.

Not at all Rich - more like selecting which HIGH-hanging fruit to go for first. But unless you make an effort to go for one of them, you will end up the whole day just staring at the both of them.Would that be like selecting the easy low hanging fruit to keep the harvest progressing? Rich
I like that theory. The hope is no matter the method that the dozens of stanchion holes line up for the final placement.Would that be like selecting the easy low hanging fruit to keep the harvest progressing? Rich
Excellent input. It’s the four dovetail joints that are the bother.Not at all Rich - more like selecting which HIGH-hanging fruit to go for first. But unless you make an effort to go for one of them, you will end up the whole day just staring at the both of them.

Once covered on one side can you turn the piece over and use a needle to punch through the still exposed holes on the bottom up through the top covering???Excellent input. It’s the four dovetail joints that are the bother.
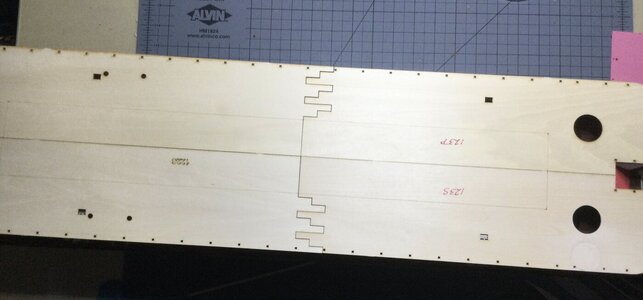
View attachment 282531
The scribed rectangle is for the location of the next structure. The dovetail joints adjacent are the cause of my thinking exercise, “how to cover or fill them in”. Adding to that is the hole movement in the lower right corner, that needs to be “covered/filled”. No matter the method I decide on, there are the stanchion holes and other punch outs that need to be retained.
Jan
Indeed that can be done, all the stanchion holes are 1/16 inch squares. The other guide holes are either round or small rectangles. My preference at this point is to as much as I can before mounting the piece. It's the roof of the Boiler deck structure as well as the floor of the Hurricane deck.Once covered on one side can you turn the piece over and use a needle to punch through the still exposed holes on the bottom up through the top covering???
Rich

