Chaperon 1884 Stern Wheeler

Colleagues, we give examples of the size of a deck board for ships. Pathfinder 65 assembles a paddle steamer for the river. I'm not sure, but maybe the size of the deck board was different for this type of vessel. I don't have an answer to this question yet. I'll try to ask our colleagues in Russia.
Thank you for your help and the research you are doing.

Jan
 
I think you're right. Now I'll have work on sources. My normal go to Hobby dealer closed his doors in April, so now it's internet shopping time. I can get Boxwood or Mahogany from a dealer upstate, but not until late September maybe :)(). Oh well will soldier on.

BTW: We have been waiting almost six months for a delivery of lumber to finish the overhaul of our back deck. A while back I remarked to the Admiral that "prices seem to be going up, the quantity and quality of the product seems to be less and the delivery is questionable". :confused:

Jan
I used Ramin on my last two ships for the deck. It is very tight grained and light, this means it looks more to scale on a model and you can choose between a light or dark board depending on what stain you use.
 
I used Ramin on my last two ships for the deck. It is very tight grained and light, this means it looks more to scale on a model and you can choose between a light or dark board depending on what stain you use.
Thank you, that’s great to know. My knowledge of wood types is as close to zero as it gets. The SOS Forum is a great Encyclopedia.

Jan
 
Some fun stuff while waiting for ordered material:

Planking ordered, Cherry Base ordered, one inch high Brass Pedestals ordered. I don't have a clue when the the order will arrive. Seems the favorite term is "back ordered", allow 15 to 20 working days to complete the order, etc.

So in the meantime.

The puzzle:

Looking at the plans, looking in the kit box for the appropriate parts.

3CF97536-3ED4-4D1E-819F-090476D5921B_1_201_a.jpeg

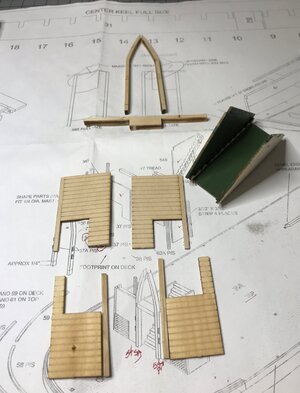
The pieces:

All the parts located. Some assembled and painted .


81052EA0-E22B-4CCD-B0DC-94E761520892_1_201_a.jpeg

Now thinking about how to assemble the pieces.

To be continued:
 
Aha, Rookie mistake, I’ve flunked plan reading 101 again:

140A1471-F7BC-469C-A696-26C8E38DE552.jpegD

Not only did I do it once, but I did three more times.

HINT: The glued wall brace vs the drawing on the plan.

Jan
 
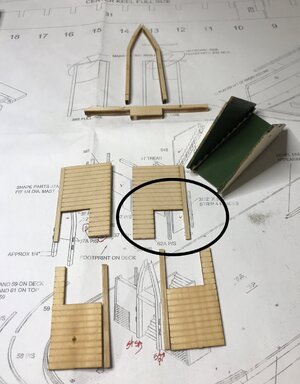
Jan, I can't figure out where and what you ruined. Swap the bottom elements in the photo in places, from the left to the right. And everything seems to fall into place
 
Jan, I can't figure out where and what you ruined. Swap the bottom elements in the photo in places, from the left to the right. And everything seems to fall into place
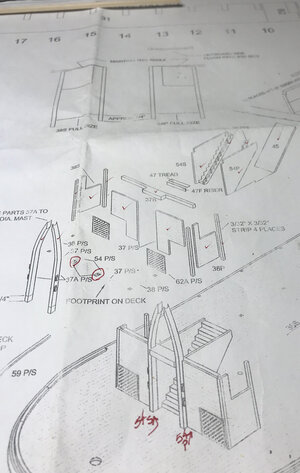
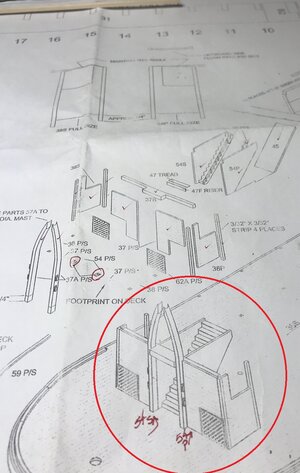
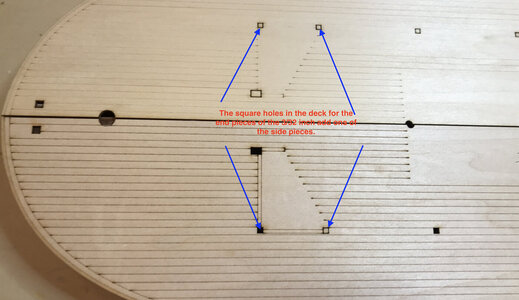
I had to add 3/32 X 3/32 inch pieces to the ends of the walls as shown on the plan. The pieces I added were cut to be the same length as the walls. When I looked at the deck to make sure that I wou have a good fit, I noticed four sets of prepunched square holes. That was the ##@# moment. If you look at the circled item on the plans you can almost see that those 3/32 pieces should have been a wee bit longer so that they would fit into the deck.
 
Well I do not know.
Jan, judging by this drawing, 3x32 brooks are exactly the same length as the decksView attachment 251404

You are absolutely correct . I think that is what threw me off.


I think the following picture explains what I'm talking about. The 3/32 square piece needs to be long enough to fit into the deck to have the build come out right.

E4D692B7-AEEA-453E-B179-654C8DBF05F0_1_201_a.jpeg

Jan
 
Now just remember!!! - if you are going to plank the deck, your 3/32 piece will have to be even longer so that it compensates for the extra deck height.
Indeed the planking will be interesting. The length of the deck is over thirty inches. Planking from Stem to Stern should not be a problem. Also a good percentage of the deck will be covered by “structures”. There is one thing in my favor, my HP printer suffered a power spike and I was able to replace it with a newer version that has multiple trays. The big boon is to be able to make 11 X 17 inch copies. I’ve copied the four deck pieces in the kit at full size. The plan is to make a clear template from the copies to overlay on the deck once it’s planked.

Jan
 
A question for Peter:

Before I fall off the deep end and have to start over.
The start of the deck. First a picture of the deck dry fitted.

View attachment 250783

The deck is in four pieces. The individual planks show up well on two but aren't clearly defined on the other two pieces.

View attachment 250784

Do I use a pencil or a fine point Sharpie to highlight them? Is worth the Herculean effort to punch in and imitate the treenails?
My plan is to stain this deck in Min Wax Light Oak.

Jan
Hi Jan.
Sorry for the late response. Is was a bit busy with my sawing work.
To make the seams on my Lee I use a blunt knife. Who made an impression and didn't cut. Then drawn in with a pencil, sanded and put in the lacquer.
But I redd later in you log, you are going to plank the deck. That would be more nice!
Regards, Peter
 
Just a quick question, Jan, before you start building the structures on the deck.
Does the Main Deck and/or the other decks, have a sheer? Over the entire length or on the front and back?
What I see in your post #37, a little bit on the front, and on the aft, post #51.
Make sure that the walls, uprights, chimneys, masts etc. are all vertical to the waterline. And not perpendicular to the deck.
Regards, Peter
 
Last edited:
Hi Jan.
Sorry for the late response. Is was a bit busy with my sawing work.
To make the seams on my Lee I use a blunt knife. Who made an impression and didn't cut. Then drawn in with a pencil, sanded and put in the lacquer.
But I redd later in you log, you are going to plank the deck. That would be more nice!
Regards, Peter
Hi Peter,

Thank you for the reply. A good technique to keep in mind.

Jan
 
Just a quick question, Jan, before you start building the structures on the deck.
Does the Main Deck and/or the other decks, have a sheer? Over the entire length or on the front and back?
What I see in your post #37, a little bit on the front, and on the aft, post #51.
Make sure that the walls, uprights, chimneys, masts etc. are all vertical to the waterline. And not perpendicular to the deck.
Regards, Peter
Hi Peter,

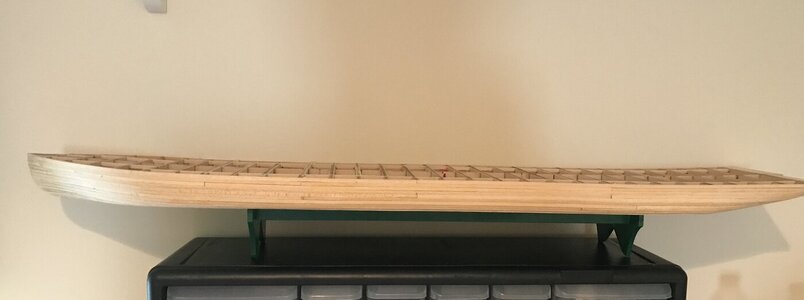
The main deck is flat from side to side but there is a slight curve upward at the stem and stern. I thank you for the your post, I would have never figured out that one on my own.


0D717BCC-733E-41D8-BE6A-F376BDA9576F_1_201_a.jpeg


Jan
 
Last edited:
I am a little late joining in. Beautiful work on the hull. Now that is some very tight twisting planking at the bow. Not sure how you did it, but it does look good.
 
I am a little late joining in. Beautiful work on the hull. Now that is some very tight twisting planking at the bow. Not sure how you did it, but it does look good.
Hi Donnie,

I think I used your method to bend the planks. I held them under the hot water faucet for a minute or so and then pinned and let them dry in place. A slow process but it worked out very well.

Jan
 
Hi Peter,
The main deck is flat from side to side but there is a slight curve upward at the stem and stern. I thank you for the your post, I would have never figured out that one on my own.
View attachment 251654
Jan
The hull looks great, Jan.
It is correct, the main deck is flat from side to side. The decks above get there camber (from side to side).
I am curious if this is also the case with this model of the Chaperon.
Regards, Peter
 
Back
Top