Chaperon 1884 Stern Wheeler

Musings and thinking while the planking glue dries:

Looking ahead on the plans and deciding what steps to do next I found a couple of curiosity items.

View attachment 257439

Me thinks it would be nice to have some sort of wall here to complete the structure. If one were to squint from the bow towards the boiler, or from either side towards to stern I think the opening would be visible. Hmm --- an opportunity for a Jan touch?

View attachment 257440

Another opportunity to make a slight change. I think 1:1 scale passengers would be hard put to squeeze by this small landing to get from the Boiler deck up to the Hurricane deck.

Ok. Guys chime in and tell me what you think.

Jan
I have seen others put a wall where you are suggesting as well. I have not researched the ship for pictures of this area but I can see how it would finish the area. I also can see how leaving it open makes sense as other equipment was likely behind the boiler and needed space as well. It’s all about the aesthetic look you prefer captain.
On the stair case you bring up a great point. I would suggest leaving that one alone though.
 
Jan, I have no knowledge whatsoever of this kind of ship or what was done in the day. Here I take a backseat and watch.
Heinrich, it's a first for me also, but there seems to be a lot of information available on line. Right now I'm in the "what if stage", surfing the net for information while the glue sets during the planking stage.

I stroke on the PVA with a stiff brush, set the plank in place, wipe the plank with a very damp cloth, press the plank firmly against the previous plank, run the tip of a toothpick along the exposed edge to get rid of the squeezed out glue, put weights on the plank and set my timer for forty minutes. I spend the wait time on the computer looking for answers my many questions.

I also spend a lot of time looking at the 3D video of Chaperon. Trying to get a good visual picture of how the various decks look. The kit plans are great but I can see where I should probably add additional reinforcements just to help keep everything square. There are a couple of places that are to be strengthened using epoxy. That is not for me since I'm allergic to the fumes so I've resorted to mechanical means for that part of the build. Once again another " what if".

Jan
 
Planking 101:

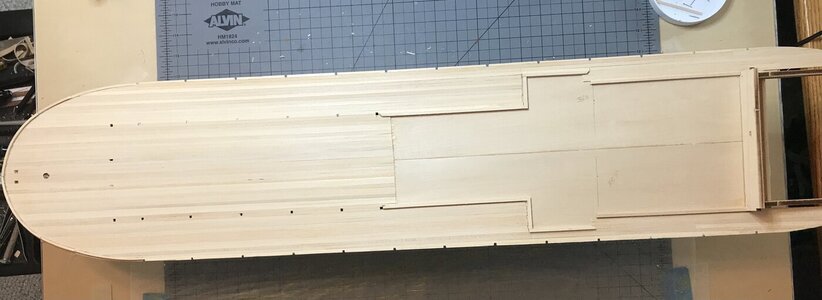
I've surprised myself with the result of my effort, I've achieved the result I was hoping for. There was very little trimming required for the final hull edge planks. However I did have to redo the cutouts for the Deck Stationaries that support the Boiler deck. Next step is sanding and :( painting the main deck.

CF255369-133C-45C1-B7EE-1F829ACF23C3_1_201_a.jpeg

I think I need to get up on a step ladder to get a better picture of this long hull. :)

Jan
 
Planking 101:

I've surprised myself with the result of my effort, I've achieved the result I was hoping for. There was very little trimming required for the final hull edge planks. However I did have to redo the cutouts for the Deck Stationaries that support the Boiler deck. Next step is sanding and :( painting the main deck.

View attachment 257892

I think I need to get up on a step ladder to get a better picture of this long hull. :)

Jan
Looks very good! I like it. ;)
 
@Dean62, @Lologaditano, @dockattner. Thanks for stopping by and looking at my rambling build. I'm having a great time with this build, working on the main deck has been great time consumer. I ordered 70 (1/32 X 1/8 inch ) planks for that little project, other than pieces that had to be trimmed off I have four full length (24 inch) planks left.

I haven't decided yet if I want to plank the Boiler deck, I'll figure that out once I get to that part of the build. The next great leap is putting together the main deck structure. The neurons are firing and the imagineering is in progress for that part. :D

Jan
 
Thunderstorms and electrical power loss.

Sundays start of day was different. Early morning Thunderstorm cells travelled through with a lot of rain and high winds. Subsequently we lost our commercial electrical power, fortunately we had a generator installed many years ago and could make our morning coffee. The best part was that the work in the Pathfinder shipyard could continue without interruption.

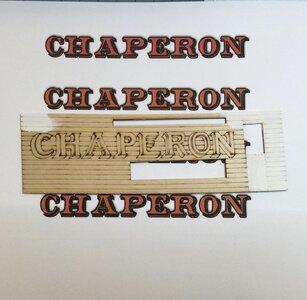
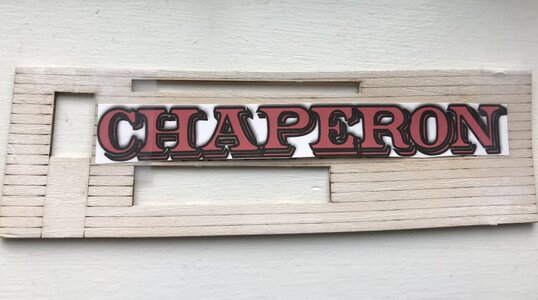
I was at a decision point. There are two pieces of the main deck structure that have the Chaperon name “inscribed”. One piece shows the name clearly but on the other piece the name is barely discernible. Argh, the name has to highlighted by painting, using markers, etc. I was now faced with several problems. 1) Big fumble fingers, 2) tired old eyes and 3) PATIENCE. I needed an alternative.

While the imagineering process was going on I was replacing a relay on my RR Layout and noticed a loose decal on one of structures. That was a lightbulb moment. ”Decal”. So….

33D8F308-C9D4-4149-9438-32D23C919602.jpeg

A bit of fiddling with Pages on my iMac and I think I’ve solved my dilemma. Viola a Decal master that I can print with my HP InkJet. Not to worry the proposed change has been endorsed by a “ I like it” from my Admiral.

Jan
 
That looks like a great solution Jan and one that should yield excellent results!
 
Eye sight versus the micro photo:

I could learn to hate my iPhone camera, but then again a picture is worth a thousand …….


A test fit of the companion way pieces looked pretty good until I decided to take a picture.

4C9E35E2-1B94-4A3E-A51F-D8F7506159DB.jpeg

Well it’s obvious that a little more work is required on this step on the other hand the deck finish came out better than expected. Two coats of Minwax light Oak 320 stain , sanded between coats, then two coats of Minwax Satin light Oak 312, sanded with 0000 Steel Wool between layers and after the last layer.

Jan
 
Jan, if the question is in fitting these elements to the deck, then you can do the following: put sandpaper in the place where these elements are installed on the deck with the grain up. Adjust the elements by sliding them over the emery. This is how I adjust the deck hatches.
 
Planking 101:

I've surprised myself with the result of my effort, I've achieved the result I was hoping for. There was very little trimming required for the final hull edge planks. However I did have to redo the cutouts for the Deck Stationaries that support the Boiler deck. Next step is sanding and :( painting the main deck.

View attachment 257892

I think I need to get up on a step ladder to get a better picture of this long hull. :)

Jan
That is a beautifull planked main deck, Jan. Chapeau! You could not have wished for a better result.
Regards, Peter
 
Jan, if the question is in fitting these elements to the deck, then you can do the following: put sandpaper in the place where these elements are installed on the deck with the grain up. Adjust the elements by sliding them over the emery. This is how I adjust the deck hatches.
Thanks for that idea. I'm going have to try that.

Jan
 
That is a beautifull planked main deck, Jan. Chapeau! You could not have wished for a better result.
Regards, Peter
I really enjoyed planking the deck. I found that taking my time, fitting, sanding and finally gluing give a great result versus "close enough" approach. The current imagineering effort is directed at the companionway. I've built several sets of steps and still haven't come up with a final set that I'm willing to use.

Jan
 
Thunderstorms and electrical power loss.

Sundays start of day was different. Early morning Thunderstorm cells travelled through with a lot of rain and high winds. Subsequently we lost our commercial electrical power, fortunately we had a generator installed many years ago and could make our morning coffee. The best part was that the work in the Pathfinder shipyard could continue without interruption.

I was at a decision point. There are two pieces of the main deck structure that have the Chaperon name “inscribed”. One piece shows the name clearly but on the other piece the name is barely discernible. Argh, the name has to highlighted by painting, using markers, etc. I was now faced with several problems. 1) Big fumble fingers, 2) tired old eyes and 3) PATIENCE. I needed an alternative.

While the imagineering process was going on I was replacing a relay on my RR Layout and noticed a loose decal on one of structures. That was a lightbulb moment. ”Decal”. So….

View attachment 258331

A bit of fiddling with Pages on my iMac and I think I’ve solved my dilemma. Viola a Decal master that I can print with my HP InkJet. Not to worry the proposed change has been endorsed by a “ I like it” from my Admiral.

Jan
There are a few other build logs that went with decals as well. They do look clear and well defined.
 
There are a few other build logs that went with decals as well. They do look clear and well defined.
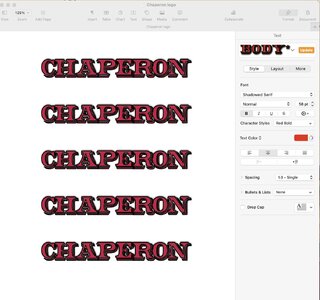
A screen shot of the document that I set up in Pages on my iMac.

C8A60F0F-94A8-40EE-9386-5255A2BAA1C1.jpeg

The settings, ie. Font, color, size and spacing of the lettering are in the right hand column.

E8A6F305-1C88-4DA8-847C-549D2F19FEE6.jpeg
The decal fit looks good. So it’s on to the next step. Seal and prime, sand and paint and then mount the decal.:rolleyes::rolleyes:

Jan
 
The walls go up, the walls go down, the walls go up ….

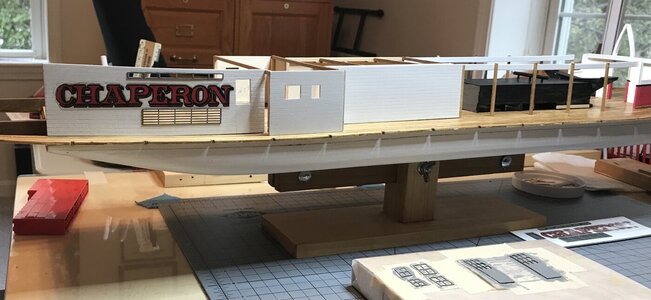
Another Northeast rainy day. So the Pathfinder shipyard is in full operation. The goal was to complete everything on Plan 1 and move on to Plan 2.

BUT, while I was in the kitchen getting a fresh cup of coffee, Mr. Murphy and his Gremlin pals invaded my shipyard. I had primed, painted and sanded all the panels that make up the back structure on the Main deck. It seemed that a good dry fit of the parts would give me an idea of how the structure would look. Oh boy, as I set the parts in place it was obvious that Mr. Murphy and his buddies had been there. The damp weather of the past week and accompanying high humidity and (I think) the effect of several coats of paint had an adverse effect on the panels. All of them were bowed both vertically and horizontally.

Ugh,Ugh,Ugh!!

So……

It was off to basement to look at the wood supply left over from past builds. Surprise, surprise I found a bundle of 1/8 inch square mahogany pieces that I had completely forgotten about.

The bowed fix was simple, add 1/8 inch square pieces to the ends, middle, top and bottoms of every panel. Set and glue the panel in place, once the Port and matching Starboard panels were placed I added a 1/8 inch “beam” at the tops to hold everything square.

So I finally got to this point by late afternoon.

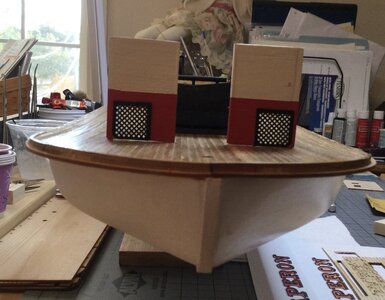
A68CED8F-E2FC-4E57-8016-D5C7117B0C49.jpeg

As I sit and type this I’m wondering what other surprises Mr. Murphy and buds have in mind. In retrospect I did have a good time figuring out the fix.

Jan
 
The walls go up, the walls go down, the walls go up ….

Another Northeast rainy day. So the Pathfinder shipyard is in full operation. The goal was to complete everything on Plan 1 and move on to Plan 2.

BUT, while I was in the kitchen getting a fresh cup of coffee, Mr. Murphy and his Gremlin pals invaded my shipyard. I had primed, painted and sanded all the panels that make up the back structure on the Main deck. It seemed that a good dry fit of the parts would give me an idea of how the structure would look. Oh boy, as I set the parts in place it was obvious that Mr. Murphy and his buddies had been there. The damp weather of the past week and accompanying high humidity and (I think) the effect of several coats of paint had an adverse effect on the panels. All of them were bowed both vertically and horizontally.

Ugh,Ugh,Ugh!!

So……

It was off to basement to look at the wood supply left over from past builds. Surprise, surprise I found a bundle of 1/8 inch square mahogany pieces that I had completely forgotten about.

The bowed fix was simple, add 1/8 inch square pieces to the ends, middle, top and bottoms of every panel. Set and glue the panel in place, once the Port and matching Starboard panels were placed I added a 1/8 inch “beam” at the tops to hold everything square.

So I finally got to this point by late afternoon.

View attachment 259422

As I sit and type this I’m wondering what other surprises Mr. Murphy and buds have in mind. In retrospect I did have a good time figuring out the fix.

Jan
Wow! Moving along quickly!
 
Back
Top