D805 Piet Hein, ex HMS Serapis, WW2 S class destroyer

This is all looking very interesting Marco, seeing how complicated this looks I was wondering whether it would it be easier or more difficult to break down the component pieces into smaller units? As you know I know nothing about 3D printing, but in my head I imagine that with smaller units you would have less 'nooks and crannies' and therefore be able to print each part in more detail. Again are there resins with different characteristics available? For example do some resins trade off sharpness of printing against brittleness of finish? Going to have to read up on this. What I can say for sure is what you have drawn most certainly looks like a 'S' class bridge, well done.

Cheers JJ..
 
Looking at the drawings and lots of images of a typical destroyer bridge, I designed this to my best capabilities. Feel free to point out mistakes.

It looks the part in Fusion, but I will let it rest overnight as I'm sure I made a few slips. It will be close to what I want and what it should be.

The hard part will be the printing, with all those nooks and crannies. For that reason I made some parts thicker than "to scale", as I have some experience with too thin walls: 0.7mm is doable. I hope. And I will have to think about how to position it on the print bed. Best would be so it can easily drain superfluous resin. On the other hand I don't want all kinds of little nibs of supports. Oh well. we'll see.

Once this is printed, I will add all kinds of details like floor planking, cables, curtains and whatnot.

Fun!

View attachment 501778

View attachment 501779
A complex part of design and printing, Marco. Interesting how you think to build this up.
Regards, Peter
 
First @all thanks for all the support. Appreciated!

About printing in parts
I could and probably should break her up for printing. But it’s too much fun trying to see what’s possible. Most important is to ensure all resin that was not UV hardened (so the overall “bath”) can drain at each “dip” the plate makes. And even more important is to make absolutely sure no uncured resin is encapsulated. Remember the issues I had with the first (1/96 scale) version of this ship? At some point the uncured encapsulated resin will expand …

Anyone starting out with resin printing: I’ll gladly support. It’s not hard, but there are a few things that can turn into a nasty surprise.

I will probably position it with the bottom side to the print plate. That way all supports - better: the little nibs that stay behind - will be hidden after placing that bridge on the deck.

About resins
I use Siraya Tech Fast grey for my models. It sits at the sweet spot between durability, brittleness, sharpness and can stand a little wear and tear you might encounter handling a model. It prints well to 0.2 mm for parts that are somehow supported by thicker material. Think rails, nuts, etc. And it will do 0.5 when you keep that part small, like a handle on a door. As from 1 mm you can create a hull or so.
 
Just out of interest Marco approximately how much does the process cost in consumables?
 
Just out of interest Marco approximately how much does the process cost in consumables?
Colin hi

Actually not a lot. I’d have to check, but top of my mind something like 70 grams. Thickest wall is 1mm (bottom), rest 0.7mm. So looks bulky, but weighs nothing.
 
I don’t know how that works for you, but seeing all those magnificent examples of craftsmanship on the forum puts me on my toes. I look back at my own creation and think “meh, that is not up to par”. Which is good: I really like measuring myself against higher levels. Not to win, but as I’m convinced that’s the only way to become a master at something.

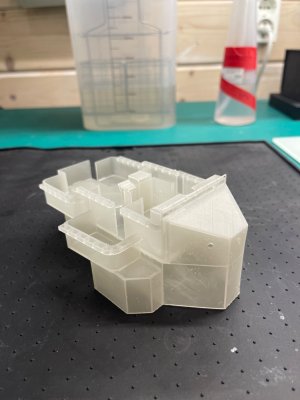
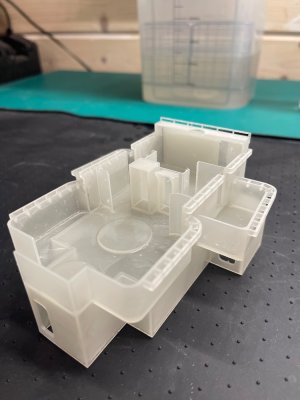
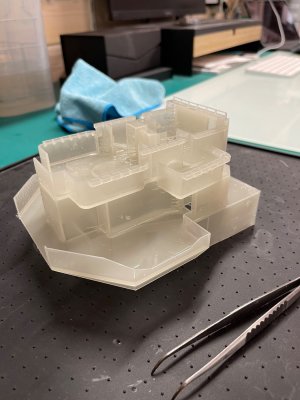
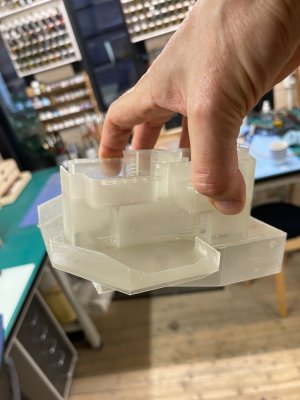
So after looking at some of your work - intricate woodwork, superb model building - I couldn’t resist returning to that bridge. It was OK, but after glueing it on the deckhouse and fiddling with small details, I knew I could do better. So back to the drawing board (Fusion) and pushing for a combined deckhouse and bridge, with some details already in situ.

This is about the max I can do in my printer. It barely fits.

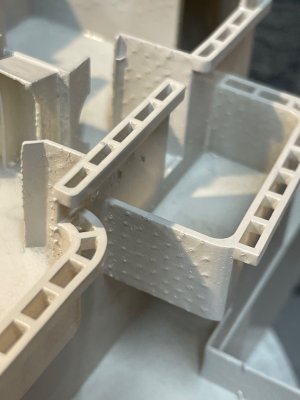
You see the finished rear end hanging from the print plate. The thin filaments are printing supports: as you raise the model layered layer out of that bath, you must ensure that ALL is somehow connected. You can’t print something as an island in thin air. So it looks weird, but is perfectly alright.

And guess what? The end result is to that higher expected level. Me: happy man!

IMG_6077.jpeg

IMG_6079.jpeg

IMG_6080.jpeg
 
That is really impressive Marco, the detail stands out very well. Great progress, can't wait to see it all together.

Regards JJ..
 
I don’t know how that works for you, but seeing all those magnificent examples of craftsmanship on the forum puts me on my toes. I look back at my own creation and think “meh, that is not up to par”. Which is good: I really like measuring myself against higher levels. Not to win, but as I’m convinced that’s the only way to become a master at something.

So after looking at some of your work - intricate woodwork, superb model building - I couldn’t resist returning to that bridge. It was OK, but after glueing it on the deckhouse and fiddling with small details, I knew I could do better. So back to the drawing board (Fusion) and pushing for a combined deckhouse and bridge, with some details already in situ.

This is about the max I can do in my printer. It barely fits.

You see the finished rear end hanging from the print plate. The thin filaments are printing supports: as you raise the model layered layer out of that bath, you must ensure that ALL is somehow connected. You can’t print something as an island in thin air. So it looks weird, but is perfectly alright.

And guess what? The end result is to that higher expected level. Me: happy man!

View attachment 502927

View attachment 502928

View attachment 502929
It is nice to read that there are trigger points that stimulate you to make improvements, Marco. 'Striving for better' within healthy limits. And that you have succeeded in getting an even better version out of your printer. Hats off.
PS: Upcoming September also in Amsterdam with your models?
Regards, Peter
Thanks Peter. And yes, aim to be there with at least one model.
 
Well, closer inspection after a thin layer of primer shows a LOT of support damage. I’ll sleep a night on it, but first thought is I’m going to reprint in a different positioning.

Sanding looks like an option, but there are a lot of nooks and crannies I will not be able to crawl into.

Hmmm.

But that’s how it is. And it’ll be alright.

IMG_6081.jpeg
 
I now understand what went wrong. I let myself be pushed in a position, because the thing would otherwise not fit in the print bed. I have 218x122 mm to okay with (and 260 height, but that’s not an issue).

I really want to position it so that all / most supports will be on bottom sides, out of sight.

Solution: cut off a bit of width. Now in Fusion, tomorrow in print.

For now: basta. Somebody is making eyes …

IMG_6073.jpeg
 
Hmm. After all the struggle to get that hull in some kind of shape and correcting the deckhouse resin issues, I need a few days "off" ship models. Luckily I have another great hobby and get some energy back. Nothing to worry about, just a few days off "ship building calm". And I know that the detailing is going to be super fun.

About that other hobby ... that's pretty techie as well. But also very creative. Taken from my backyard, about three nights worth of imaging ... the neighbours at 2 million lightyears distance.

View attachment 496097
Hi Marco,

Great picture you made, amazed by the quality as taken from a Dutch backyard with most probably plenty of light polution.
What is the telescope you use? Is it one of these new smart telescopes you plug in to your pc?
I do have a small 6" newtonian telescope on which I can mount a Canon SLR, nice for the Orion Nebula and some simple stacking but for this you most probably need a huge amount of stacking.
Maarten hi,

That one was done with an Askar 107PHQ on an AM5 mount ... almost 24 hours worth of 3 minute images, stacked and processed in PixInsight.

Background: I am a member of two observatories and through them have learned how to ...
 
Well, that worked out A-Okay. Any nibs are hidden on undersides, edges are straight, looks good. The little you see is actually shining through, as the walls are 0.7mm thick. So top side is smooth.

Here still drying from the IPA bath after printing. So no primer yet.

IMG_6089.jpeg

IMG_6088.jpeg
 
Maarten hi,

That one was done with an Askar 107PHQ on an AM5 mount ... almost 24 hours worth of 3 minute images, stacked and processed in PixInsight.

Background: I am a member of two observatories and through them have learned how to ...
I was already afraid for that ROTF
Amazing work.
 
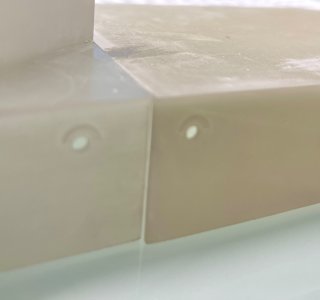
Things are not going as planned. First the bridge was too wide and after cutting it up, the result was hum ho. But I kept going, printed the front side ... which turned out 1 mm wider than the rear side. That is a printing issue, as the model was simply cut in two in Fusion. So now I have to decide on printing it again in resin, maintaining detail, or simply accept that these big structure will come from the FDM printer. So with less detail.

From afar it looks great. From close up ... no, that is not what I am going to proceed with. A gap could have been filled, but to somehow get rid of a 1mm ridge on a 0.7 mm thick wall is impossible.

Oh well. As long as it is resin I'm throwing away and not good whisky ...

IMG_6093.jpeg

IMG_6092.jpeg
 
Back
Top