-

Win a Free Custom Engraved Brass Coin!!!
As a way to introduce our brass coins to the community, we will raffle off a free coin during the month of August. Follow link ABOVE for instructions for entering.
-

PRE-ORDER SHIPS IN SCALE TODAY!
The beloved Ships in Scale Magazine is back and charting a new course for 2026!
Discover new skills, new techniques, and new inspirations in every issue.
NOTE THAT OUR FIRST ISSUE WILL BE JAN/FEB 2026
You are using an out of date browser. It may not display this or other websites correctly.
You should upgrade or use an alternative browser.
You should upgrade or use an alternative browser.
Thank you Mirek.
I plan to do a similar nailing job on the hull planking as well.
I plan to do a similar nailing job on the hull planking as well.
An impressive effort Herman. I think your trenails look just about perfect. Congratulations!
Hi Herman. The treenails looks great. A very subtle look.I must have made about 2500 nails and have been nailing the deck.
View attachment 366983
About halfway completed.
View attachment 366984
The full deck has been nailed, about 1250 nails have been inserted.
View attachment 366986
View attachment 366987
View attachment 366988
Regards, Peter
Your tree nails look great and match the color perfectly, very harmonious.
Beautiful work! And a very interesting method of building the hull. 
good and accurate work - Bravo!
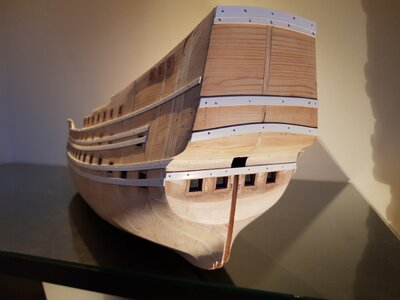
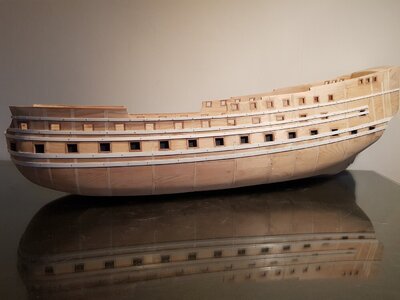
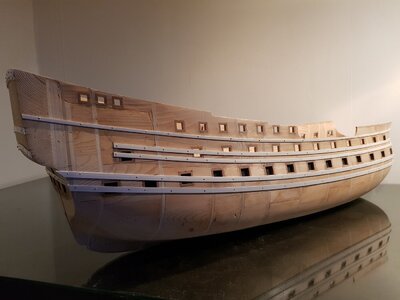
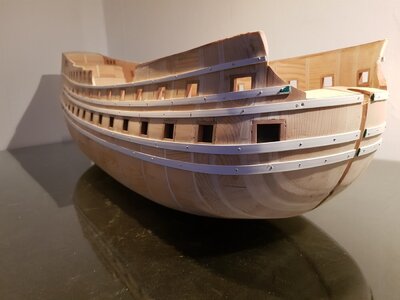
Before I start planking the hull I have installed false plastic wales. The plastic strips are easy to bend and therefore it is simpler to make the right curvature with these plastic strips instead of with wooden wales. The curvature of the wales is so defining for the model that it is essential to get them exactly right. The first one is the most critical as all the wales run parallel to each other as per the drawings of Otte Blom.
Further benefit of those plastic strips is the fact that they are thinner than the planking of the hull. Therefore it will be possible to scrape/sand and even give the hull a finish, if desired, before the final wales will be installed.
After the hull is planked the plastic strips will be removed and replaced by the wooden wales. These wooden wales can now be brought to shape to fit in between the hull planking. The planking will enclose them and therefore they will 'automatically' receive the correct curvature.
I plan to make the wales darker than the hull planking. This can be done before installing them between the planking of the hull making it possible to give them different finishes without interfering with each other.
Ps.
The wooden walls of the hull have now also been adjusted to the correct height. This has improved the overall look of the model.
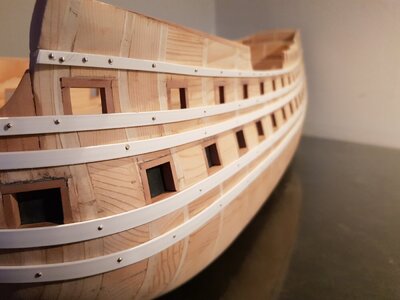


Brilliant Herman! This is a unique build with a unique construction approach. I love learning from you!
Thank you Paul. It might be an uncommon approach, but I copied the idea from Drazen Caric, who has achieved a wonderful result using this technique.Brilliant Herman! This is a unique build with a unique construction approach. I love learning from you!
Hi Herman
Your temporary plastic Wales really show the beautiful lines of your hull off.
Don't know why more builders don't adopt the temporary plastic wale approach. If you have any depression or irregularity in the hull profile, these will show it up immediately. Corrective measures can then be taken prior to laying the finish layer of planks.
Kind Regards
Nigel
I agree it is brilliant, copied or not, and the execution is looking very good!Thank you Paul. It might be an uncommon approach, but I copied the idea from Drazen Caric, who has achieved a wonderful result using this technique.
a very good way to get the correct curves and locations - very informative for the planking job
good work my friend
good work my friend
- Joined
- Jan 9, 2020
- Messages
- 10,540
- Points
- 938

Wow! This required some serious catching up on my part. That hull looks so good, Herman and the plastic wales show off the hull curvature perfectly - just like Nigel said. I love the ingenuity that you are employing in this build - and it all works to great effect!
- Joined
- Oct 15, 2017
- Messages
- 1,190
- Points
- 443

Herman, I love unique approach using the plastic wales as temporary placeholders. I am currently using painters tape to map my wales, but being basically two dimensional they don't provide the complete function I was looking for.The stern of the ship has also been provided with plastic strips. Planking will start here as the planking of the stern is enclosed by the planking of the hull. These plastic strips define the areas that will be planked, the area of the windows, galleries and ornamentation.
View attachment 368792
Would you tell us what what plastic material you are using and where you found it. I'd like to do a proof of concept with that material if I can get a hold of it.
Once again, your results are very impressive.
Thank you.


