First build Minicraft 1/350 Titanic (11320)

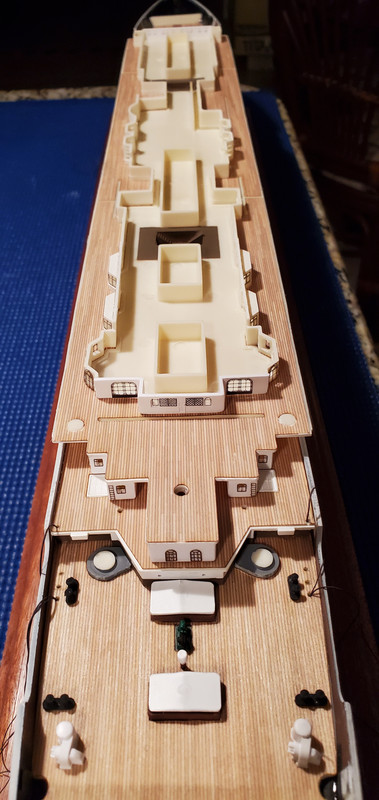
The instructions say to build the upper decks off the ship and then attach as an assembly. I have thought about it and can't see any good reason for this. It is a problem trying to attach all these warped parts in midair so I attached the promenade deck to the ship. This has at least taken some of the warping out of at least this deck. Now at least I have something somewhat straight and solid to work on. I guess I'll find out later if failure to follow instructions comes back to bite me lol.
 
Thanks. Well I got one warped boat deck wall on the ship and it fit pretty well. I have to tie everything together when I get the other one on and then get the boat deck on. I have to admit I had a sigh of relief that this went on straight. Once I get the wood deck on the boat deck and attach it progress will really slow down. Lots of things to do up top as far as photo etch etc. 42 Boat Deck Wall 1.jpg
 
Today was a day of setbacks and mistakes. This top deck is the flimsiest of them all and I messed up trying to get the wood decks on it. The wood decks need a lot of trimming and I thought I had it set to go. I applied the glue and it wouldn’t sit right. So I’m trying to nudge it over while the whole deck is flopping around and I somehow got a tiny bit of glue on my thumb and smudged the printing on the wood deck. It is going to have to stay that way as I think whatever I could try would just make it worse. Unfortunately this is the top deck. Wouldn’t you know all the decks that are now covered are pretty much perfect.

I also forgot to sand off the raised lines on the plastic deck underneath the wood which I think may come back to bite me in the future if the wood starts to lift. Finally, I cut back the edges of the wood deck needlessly in certain spots as there is no channel on part of this deck for it to have to fit in. So the most visible deck is the one with the most errors by me. It was also not able to clamp it down as I have been because it is so thin that just it being elevated by the clamps was bending it like a piece of spaghetti causing the wood to lift. It was just one of those days.

I said it was going to be a practice/learning project and I just have to accept it as that and learn from my mistakes. Time to move on and not let it upset me too much. It’s like a new car that gets a scratch though, my eye goes to it whenever I am looking at it! Maybe I’ll stick a bench over the smudge or something.43 Setback Smudge.jpg
 
I’m preparing to prime the funnels. I had purchased an old used kit on ebay that was made by Entex for a very cheap price to use for spare parts as I was sure I would mess some things up. The only thing that was done on this used kit was that someone had painted the hull. It looks like they messed up the gold stripe that I couldn’t figure out how to mask and gave up. All the sprues were intact. The Entex kit was released in 1976.

The updated Minicraft kit which has some new parts I am currently building (11320) was released in 2017. I have noticed that the parts of the older kit are much, much cleaner with way less warping and especially much less excess plastic around the small parts. I guess that can be attributed to the forms they have been using wearing out over time? In retrospect I probably should have built the older kit and just used the parts that were updated from the new kit.

This model kit has been around a long time in its various forms from different companies that have received the rights to manufacture it and it shows in the deterioration of the parts quality. Anyway, I just thought that was something kind of interesting and surprising being that I have the two to compare. I have read that some that know more than I stated they cleaned up the manufacturing process on the newer one but I haven’t found that to be the case for the most part in my experience with this model.

I have one more old kit I plan on building after this, Lusitania, and then I will give my best effort on the brand new tooled 1/200 Titanic. I am looking forward to that one as I am hoping I can concentrate on just building the model and not wrestling with the parts from decades old design technology. The other thing I am happy about in relation to the 1/200 is that it was designed in conjunction with the company that will be releasing the photo etch and the wood decks. The 1/350 has been a challenge for me who is new at this to retrofit some of the aftermarket detail parts on a model that was not originally designed with PE and wood decks in mind. That being said I am still enjoying the process and hopefully dealing with these issues will improve my skills for the next one.

With all that’s going on today, being stuck in the house, I’m glad I have these models to take my mind off all the troubles we are dealing with…..at least for a little while each day!53 Funnel Prep.jpg
 
Thanks. I would say 95% airbrush, 4% spray can for some small items that I need to do one offs quickly (white items), and 1% brush for things I absolutely cant mask. I've been using Tamiya Acrylic Flat bottles for the air brush, Tamiya For Plastics spray cans , and Vallejo Model Color for the brushing. I'm not including priming in that though, I have just used Tamiya Fine Surface Primer spray cans for all that.
 
Some of this lifeboat photo etch is super tiny and delicate. I tried using low tack masking tape with paper behind it to cover the parts I don't want to paint at the moment. I am thinking without doing that removing the masking tape might bend up these delicate pieces. Seems to be working out.

I think the lifeboats, especially the davits are going to be by far the hardest part of building this model. I made 32 chocks by cutting the kits plastic benches which I won't be using into approximately 1mm wide pieces and filing them down. There needs to be more final filing/sanding as I attach them to either the deck first, or more probably the boats themselves. There are no reference points as to where to put all this on the model so that will be a challenge. Also, they will all have to be uniformly placed and shaped so as not to have boats sitting next to each other at different angles and heights.

Assembling the davits poses the same uniformity issue in addition to the davits themselves consisting of many tiny parts that I'm sure will pose problems gluing together while trying to keep them straight at all angles. I am keeping the plastic davits safe as I may have to resort to them if I don't have the skill to put this together looking somewhat decent.

Next in line for difficulty I think will be the railings and rigging. Everything so far has been quite easy to do in comparison to what's coming up. This is going to be where the rubber meets the road for this model. I'm hoping I can get it done looking reasonably well but of that I am not certain!! It's going to take a LONG time. I'm sure I will learn something though for the next one through the process.
54 PE Masking.jpg55 Chocks.jpg
 
The chocks I made aren't going to work out. They are too inconsistent in appearance. I think I'll try to modify the kit chocks. I also am not sure I'm up to using the photo etch davits. It took me a long time to put the first one together and I'm not sure if I have the skill to make them all look the same. I'll try a few more and make a decision. I would rather use the plastic davits if they will look better than what I can do with the photo etch.56 PE Davit.jpg
 
I would be willing to put the time in if I were confident I could make them look uniform. Actually there are more parts that I didn't even get to yet on this one!. You need to cut a piece of stranded wire and use it as a pin to hold it all together....there are a lot of parts to it and they are tiny. You also have to use a template to bend them all to the same curve. That's my biggest issue, that I'll take crazy time to put the whole bunch of them together and then find the plastic ones look better. I'll try a few more and see if I get better and faster at it and then make a decision.pepenny.jpg
 

Attachments

  • pepenny.jpg
    pepenny.jpg
    90.7 KB · Views: 5
YAY!! You doing a great job on these! Those tiny PE parts makes the model looking sharp! ...and the more you do, the easiest will be the next one. You will outline the repeticion process e.g. prebend parts first, then assemble\glue. But this is what actually makes our hobby interesting, isn't it?
 
Thanks. I'm trying to get some uniformity in bending the arms. The first one I did as a one off. I am now trying to keep bending the same type parts one after another to try and get some sort of system going. They all sit in close proximity to each other so variations would be very obvious. I also have the issue of running out of parts as I have messed up the first few learning how to construct them and don't know what the availability of getting another set is with our current situation.
There is a tiny, and I mean tiny little ring at the ends of the arms that I have broken off of a few which are pointed to in the photo. After everything is bent that ring needs to be twisted 90 degrees. It's fragile and I really don't know what I'm doing lol, so a few have just disintegrated. When these have broken off I can't even find them and there's no way I could reattach anyway...too small. In my case I really needed a practice set to mess up before putting them on the ship!!! I will continue to give my best effort though and see how they look.57 Davits.jpg
 
Back
Top