-

Win a Free Custom Engraved Brass Coin!!!
As a way to introduce our brass coins to the community, we will raffle off a free coin during the month of August. Follow link ABOVE for instructions for entering.
-

PRE-ORDER SHIPS IN SCALE TODAY!
The beloved Ships in Scale Magazine is back and charting a new course for 2026!
Discover new skills, new techniques, and new inspirations in every issue.
NOTE THAT OUR FIRST ISSUE WILL BE JAN/FEB 2026
You are using an out of date browser. It may not display this or other websites correctly.
You should upgrade or use an alternative browser.
You should upgrade or use an alternative browser.
HM Cutter Lady Nelson 1803 - Scale 1:64, Victory Models by Glbarlow [COMPLETED BUILD]
- Joined
- Mar 2, 2012
- Messages
- 112
- Points
- 103

Continuing on with the world’s least read build log:
Since I’ve decided to take on my first scratch build project with the Cutter Cheerful a log of my remaining Nelson build will include trying new things, which if done right will be of benefit to Nelson. One example was the companionway, the next is the hatch covers. First off I started by ripping a 2x3mm of cherry I have on had, I’m abandoning the brittle kit wood wherever I can.
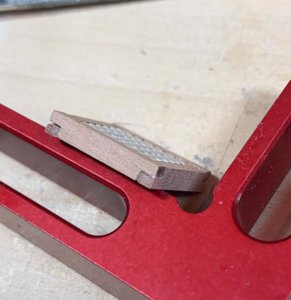
The easy way is to just over lap the edges or nor much harder make them 45 degree mitered joints but the real way they were done is lap joints. It seems pretty easy but I had to be very precise with the cuts.
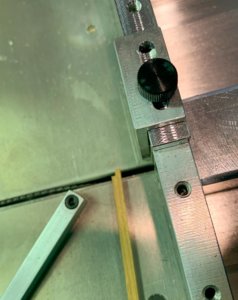
My latest addition is the sliding table to go with my Byrnes saw. I’m already wondering how I did without it. I cut the 4 sides of the hatch the exact same length - determined not by the opening but by the completed hatch crossing pieces - plus the width of two sides. Then I set the blade the width of one side and half the height of the board - I knocked out the resulting notch with my #11 blade.
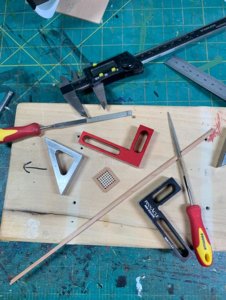
Then its filling and sanding to get the over lapping joints to fit perfectly, be perfectly square, and have the completed hatch crossing perfectly fit inside the resulting box. Then rounding out the edges after I spent all that time getting it square. All my various squares. rulers, and calipers all placed a part.
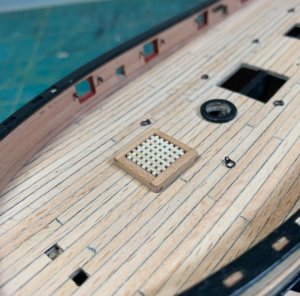
I did great with this first of three, but then rushed the next one and as a result I’m throwing it away and starting all over with it. I’m so happy with the finished cherry I’m not going to paint or put poly on it - just let it be proud. I know from my Pegasus that Cherry just looks better and better as it ages.
So two more hatches to go.
Since I’ve decided to take on my first scratch build project with the Cutter Cheerful a log of my remaining Nelson build will include trying new things, which if done right will be of benefit to Nelson. One example was the companionway, the next is the hatch covers. First off I started by ripping a 2x3mm of cherry I have on had, I’m abandoning the brittle kit wood wherever I can.

The easy way is to just over lap the edges or nor much harder make them 45 degree mitered joints but the real way they were done is lap joints. It seems pretty easy but I had to be very precise with the cuts.

My latest addition is the sliding table to go with my Byrnes saw. I’m already wondering how I did without it. I cut the 4 sides of the hatch the exact same length - determined not by the opening but by the completed hatch crossing pieces - plus the width of two sides. Then I set the blade the width of one side and half the height of the board - I knocked out the resulting notch with my #11 blade.

Then its filling and sanding to get the over lapping joints to fit perfectly, be perfectly square, and have the completed hatch crossing perfectly fit inside the resulting box. Then rounding out the edges after I spent all that time getting it square. All my various squares. rulers, and calipers all placed a part.

I did great with this first of three, but then rushed the next one and as a result I’m throwing it away and starting all over with it. I’m so happy with the finished cherry I’m not going to paint or put poly on it - just let it be proud. I know from my Pegasus that Cherry just looks better and better as it ages.
So two more hatches to go.
Hi Glenn, I for one enjoy your log. Thanks for doing it, please keep it coming! Great Work.
Glen! Please continue with your log. I found it very interesting and educational! I love building small vessels, specifically cutters!
Your log was already viewed 2.500 times so this sounds different.
It is interesting to follow and I would be happy, if you would show us more often some progress from your workbench
Keep going....
It is interesting to follow and I would be happy, if you would show us more often some progress from your workbench
Keep going....
- Joined
- Mar 2, 2012
- Messages
- 112
- Points
- 103

Thanks for asking.
Mine are metal rings (that i had on hand) bend open then closed back on a standard eyelet. I use a product called Blacken-It for the “aging.” I’ve also made them with annealed black wire and round nosed pliers.
I’m not sure how Jim makes them, here I just adapted some kit parts.
Mine are metal rings (that i had on hand) bend open then closed back on a standard eyelet. I use a product called Blacken-It for the “aging.” I’ve also made them with annealed black wire and round nosed pliers.
I’m not sure how Jim makes them, here I just adapted some kit parts.
Last edited:
- Joined
- Dec 3, 2018
- Messages
- 2,451
- Points
- 538

Since I have only built kits in the past, I do not have much experience in making such parts myself, which is why I continue to learn
Such techniques, I have already tried Brass Black, very good, the next exercise will be silver soldering of different materials.
Jim has made a nice thread on this topic, (how to make ring bolts) it's on, what's new, right now.
Regards-
Such techniques, I have already tried Brass Black, very good, the next exercise will be silver soldering of different materials.
Jim has made a nice thread on this topic, (how to make ring bolts) it's on, what's new, right now.
Regards-
- Joined
- Mar 2, 2012
- Messages
- 112
- Points
- 103

It took my building five to get three I liked, the hatches are completed and installed. It takes precision to get eight notches the right height and depth to make lap joints, not to mention for each of the boards to come together for the right interior measurements. Even building the “box” after measuring the completed hatch material is a nice challenge.
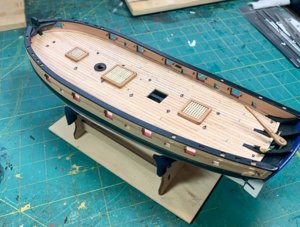
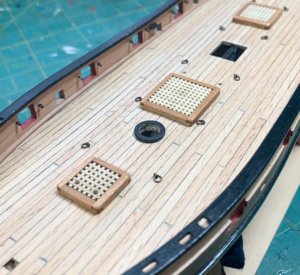
The end result is worth it, they look good and I’m happy with how they turned out. So much better with cherry than walnut. I ended up adding wipe on poly to the covers and the tiller, probably the only place I’ll use it on the ship. I also added holes not mentioned in the plans for the hawser rope, also not included with the kit - but I have lots of different sizes, opted for 1.6mm. I used a round file to slowly make the holes, drilling would have shattered the fragile strips.


The end result is worth it, they look good and I’m happy with how they turned out. So much better with cherry than walnut. I ended up adding wipe on poly to the covers and the tiller, probably the only place I’ll use it on the ship. I also added holes not mentioned in the plans for the hawser rope, also not included with the kit - but I have lots of different sizes, opted for 1.6mm. I used a round file to slowly make the holes, drilling would have shattered the fragile strips.
- Joined
- Mar 2, 2012
- Messages
- 112
- Points
- 103

I turned my attention to my next scratch built piece, the catheads. While I wanted to do this in order to make the “pulleys” it was an easy call given the poor quality of the kit supplied part. The plans just have this mounted with no ropes so its a very brittle and flimsy piece of walnut.
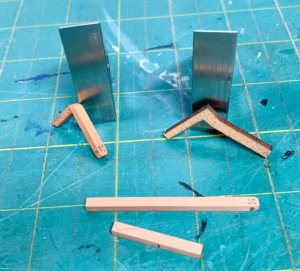
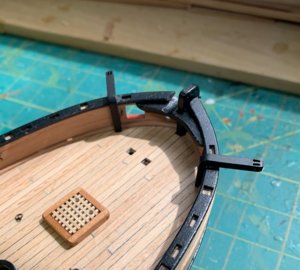
Here you can see it beside my near final product. I used Swiss Pear in this instance as I’ll paint it black before installing it. I made it in two parts, the upper leg is long just to make it easier to handle while cutting the two notches. It was also easier having the lower part a little long in order to properly fit it against the bulwarks, it took a little work to fit it tight including a notch at the bottom to cover my added curved waterway.
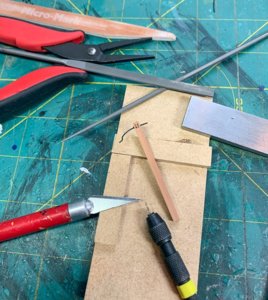
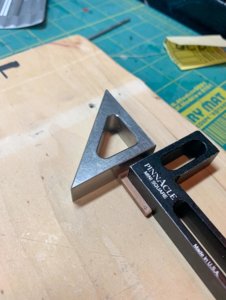
I built a little jig as a working surface and to help hold the piece steady while cutting the notches. I started by measuring and marking basically a tick-tac-toe layout. From there I drilled four holes then used my #11 blade, a round file, and some 24 gauge annealed wire to work open the notches between two holes on both sides. I tried several different methods, none of which worked and I ended up coming back to just carefully “digging it out.” The challenge is not to do one, it's to do 4 (on two catheads) that are near the same size and look. It took more than one attempt but I think I got there.
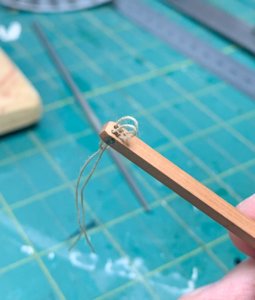
Once I had the notches then I drilled the hole through the side, managing not to crush the notches, and glued my “pulley” through the center - a strip of 24 gauge wire glued through. I cut off both ends, filed it down just enough so it still shows. The final test was passing rope through all four of the resulting slots which I’ll later rig for the anchors.
Now let’s see what else I can scratch build. So far I haven’t used any of the kit parts on the deck other than the grids for the hatch.

Here you can see it beside my near final product. I used Swiss Pear in this instance as I’ll paint it black before installing it. I made it in two parts, the upper leg is long just to make it easier to handle while cutting the two notches. It was also easier having the lower part a little long in order to properly fit it against the bulwarks, it took a little work to fit it tight including a notch at the bottom to cover my added curved waterway.


I built a little jig as a working surface and to help hold the piece steady while cutting the notches. I started by measuring and marking basically a tick-tac-toe layout. From there I drilled four holes then used my #11 blade, a round file, and some 24 gauge annealed wire to work open the notches between two holes on both sides. I tried several different methods, none of which worked and I ended up coming back to just carefully “digging it out.” The challenge is not to do one, it's to do 4 (on two catheads) that are near the same size and look. It took more than one attempt but I think I got there.

Once I had the notches then I drilled the hole through the side, managing not to crush the notches, and glued my “pulley” through the center - a strip of 24 gauge wire glued through. I cut off both ends, filed it down just enough so it still shows. The final test was passing rope through all four of the resulting slots which I’ll later rig for the anchors.
Now let’s see what else I can scratch build. So far I haven’t used any of the kit parts on the deck other than the grids for the hatch.
I liked too! What paint do you use?Here are the catheads installed. I like how they turned out.


