• Win a Free Custom Engraved Brass Coin!!!
    As a way to introduce our brass coins to the community, we will raffle off a free coin during the month of August. Follow link ABOVE for instructions for entering.

HMS Alert [1777] 1:48 POF by serikoff. (Two hulls: skeleton and fully rigged)

Thanks Sergei. I am not disappointed, but was a little surprised that cutters would be built differently. I did some more research and confirm your information based on at least one drawing of a cutter of about 1763. It is clear that the wale stands proud of the rabbet. :) As with so many things on these vessels of ours, there are few things that are absolutes. A great day for me learning something new. THANK YOU, greatly appreciated!


Allan
1756061294128.jpeg
 
Last edited:
Thanks Sergei. I am not disappointed, but surprised that cutters would be built differently, A great day for me learning something new. THANK YOU!
There is a very good proverb: truth is born in discussion. I also always like to learn something new and by the way I was very surprised a long time ago that such a narrowing was done. To be honest, I even wanted to ignore the drawings and make this narrowing, but to do it qualitatively and very accurately is very difficult. It seems simple. But this narrowing should take into account grinding after fixation and it will be difficult to make it absolutely symmetrical. That is why I think few people do it even when necessary. That is why I changed my mind, because I am lazy and did not want to redo it if I made a defect. But I saw how experienced modelers implemented it and it was beautiful.
 
Hey Sergey,

I can't believe this sentence came out of your mouth: "That's why I changed my mind, because I'm lazy and didn't want to repeat it when I made a mistake."

What you're showing here is anything but lazy. I take my hat off to that. Chapeau! Like Alan and Paul, I find the discussions refreshing and it's always great fun to learn something new. :D Thumbsup

What else can I say about your work? It's like being on another planet !! Thank you for not being so lazy!

Best regards Ship-1

Günther
 
Excellent discussion, gentlemen. My thanks for the courtesy you have shown throughout.
That's why I like this forum, where you can communicate normally. I can say for sure that it's not like that everywhere. Even on my forum there were skirmishes, which my moderators stopped, and I, as an administrator, finally resolved them if someone completely crossed the line. Therefore, it is also very important for me to resolve everything peacefully, as it happens on this forum and I really like it.

Hey Sergey,

I can't believe this sentence came out of your mouth: "That's why I changed my mind, because I'm lazy and didn't want to repeat it when I made a mistake."

What you're showing here is anything but lazy. I take my hat off to that. Chapeau! Like Alan and Paul, I find the discussions refreshing and it's always great fun to learn something new. :D Thumbsup

What else can I say about your work? It's like being on another planet !! Thank you for not being so lazy!

Best regards Ship-1

Günther
Thank you for the kind words, Gunther. Regarding laziness, there are two sides to the coin... You need to find a balance. On the one hand, laziness should not affect the result and not worsen it, but if laziness can lead to finding an easy way to implement certain tasks, then this is a positive aspect. Especially if it concerns speeding up work without losing quality.
 
That's why I like this forum, where you can communicate normally. I can say for sure that it's not like that everywhere. Even on my forum there were skirmishes, which my moderators stopped, and I, as an administrator, finally resolved them if someone completely crossed the line. Therefore, it is also very important for me to resolve everything peacefully, as it happens on this forum and I really like it.


Thank you for the kind words, Gunther. Regarding laziness, there are two sides to the coin... You need to find a balance. On the one hand, laziness should not affect the result and not worsen it, but if laziness can lead to finding an easy way to implement certain tasks, then this is a positive aspect. Especially if it concerns speeding up work without losing quality.
Ну привет, строгий админ !
Как оно - ничего ?
Не ушел, смотрю из... моделизма...оно как болото - не отпускает...
Я вот тоже - копчу потихоньку...не смотря на то, что линия размежевания уже в сотне километров от дома...
Не помню - сообщал я на Серикове про окончание работы на своей шхуной (давно это было), а последние пару лет пытаюсь строить испанский галеон по уложениям (орденансам) 1618 года. Завис на этапе корпуса - наделал ошибок и надо было просто начать с нуля, но я тоже ленивый, потому все исправляю и улучшаю...но вот уже вышел на завершения черновой обшивки и тогда можно будет хоть что-то показать...
Рад встрече...жаль только, что читать приходится через переводчик на телефоне...
Привет, привет, рад видеть. Ну я на сайте своем и дальше продолжаю выкладывать обзоры построек своих моделей. Но там я выкладываю набегами по многу (все что накопилось), и потом опять пропадаю. А здесь, я выкладываю в реальном времени. И ты давай выкладывася здесь. Здесь люди очень приветливые и много могут чем помочь, а перевод - это дело привыкаеммое. Если что, пиши в личные сообщения, а то, в ветках нужно переводить на англ. чтобы все могли понимать о чем идет речь.
P.S. да, ты прав, спустя ровно 10 лет перерыва я все же вернулся к хобби, война заставила. Как говорится не было бы хорошего, если бы плохое не помогло... но ну его такое плохое. Так что если надо помощь - пиши в личные, могу помочь с освоением на форуме.
 
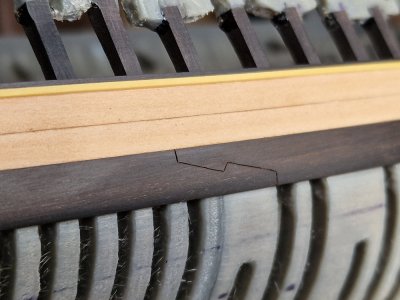
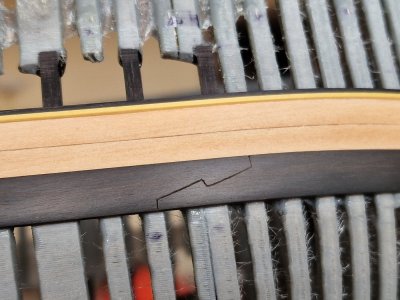
There are not many updates, but not a little work has been done.
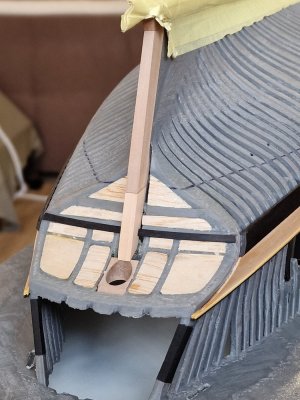
I made two castles on the rubbing piece (imitation).

Alert 1208.jpg

Alert 1209.jpg

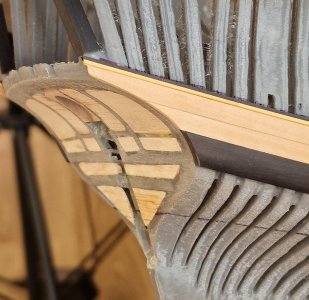
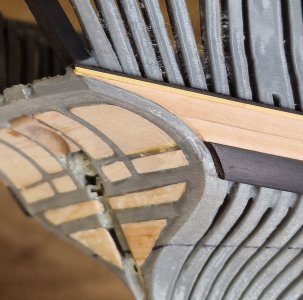
He also prepared a place for the closing part.

Alert 1210.jpg

Alert 1211.jpg

It was very difficult to do this with great risk of spoiling an already attached part... but as long as it is not the final resurfacing, it will be when that part (crescent) is ready.

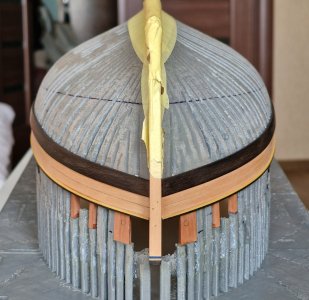
Well, the most important thing is that I glued the second rubbing piece, and naturally trying to do everything symmetrically.

Alert 1212.jpg

Further work will be carried out under the stern. There will be black hornbeam and pear boards...

... in the meantime, I'm glad everything is perfectly symmetrical. (although from the perspective of the photo it seems that it is not quite :p )

Alert 1213.jpg
 
Thank you FRIENDS for your interest in my review and today I have something for you to show.

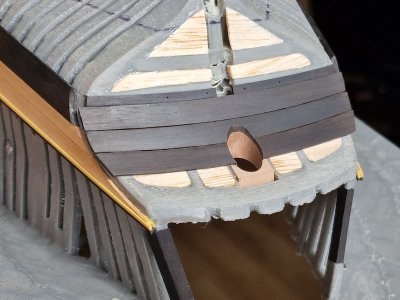
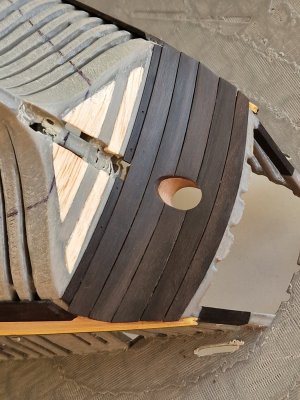
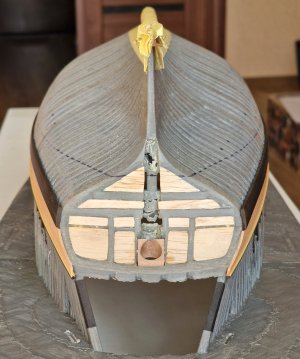
Planking under the stern.

Today I got straight high from what was happening. Working with a black hornbeam is one love! And although it is very capricious and very difficult to work with, but the color after grinding is just something unreal!

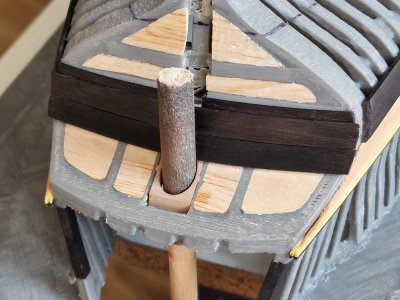
First of all, I glued the basis for the figured rail. This basis is thinner than the boards that will be nearby and after fixing them in this recess, I will glue the figured slats.
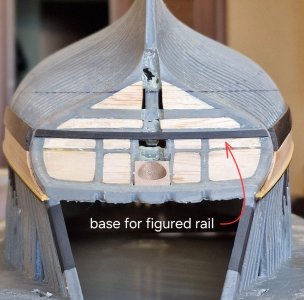
Alert 1214.jpg

The board-basis has its own bend (it is not even).
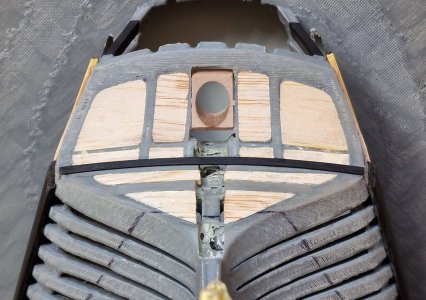
Alert 1215.jpg

Therefore, I glued it whole, and then cut it into a meter for trying on the stern post.
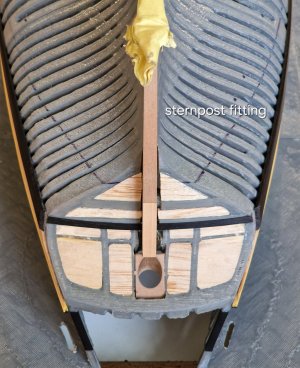
Alert 1216.jpg

Alert 1217.jpg

Then I bent the pre-soaked board in hot water with the same iron to give it the right curvature.

First belt.
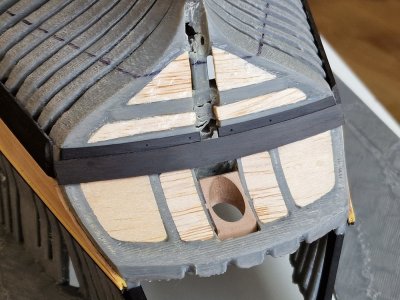
Alert 1218.jpg

Second belt.

Alert 1219.jpg

To create the right hole, I used such a homemade device.
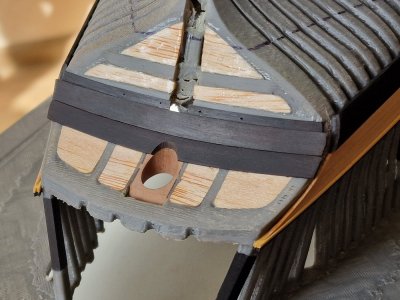
Alert 1220.jpg

Third belt.

Alert 1221.jpg

Oh yes, the boards tapered at the ends. From 7.2 mm (in the middle) to 6.5 mm at the edges.
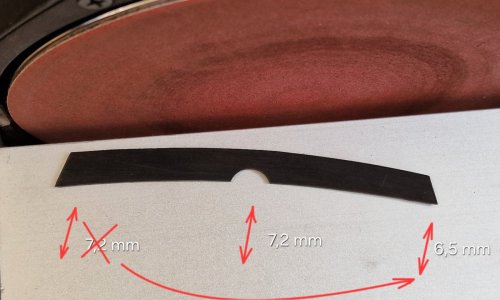
Alert 1222.jpg

Fourth belt.

Alert 1223.jpg

Fifth belt.

Alert 1224.jpg

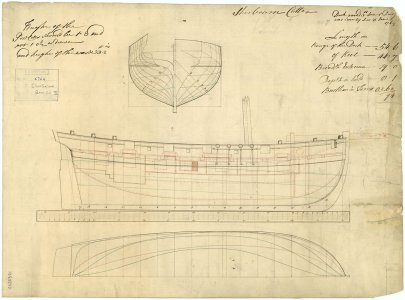
Although the drawings from the anatomy show that there are 4 belts, but having calculated this space, I realized that this was most likely a mistake, because then the board should have been 9 mm, which is very doubtful, because below the board is 6 mm.

I then sanded the surface with sandpaper (320) wrapped around the cylinder.
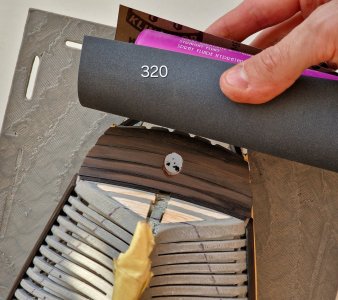
Alert 1225.jpg

And then he calibrated the gaps between the boards with a needle. I do this in order to better express the joints. Otherwise, with a perfect fit, it will look like one.
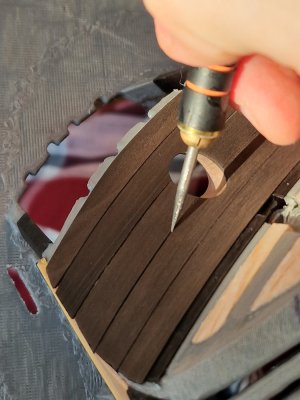
Alert 1226.jpg

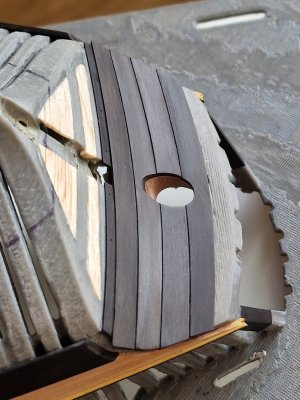
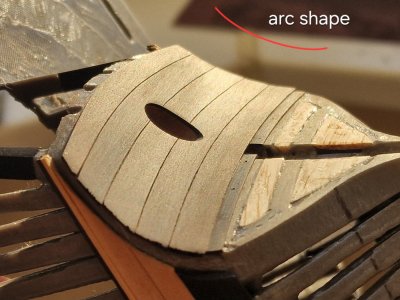
The result is this arched shape...

Alert 1227.jpg

... which is often not performed, and this spoils the look a little with its angularity.

Well, a couple more angles:
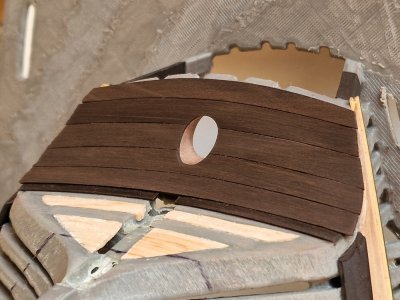
Alert 1228.jpg

What a pity that the model will not be seen from this angle, but only in what is below in the photo.
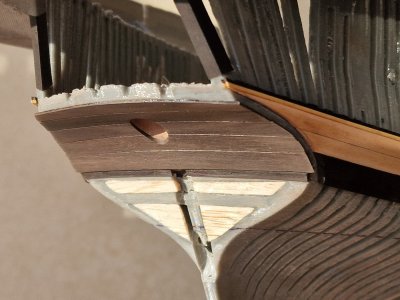
Alert 1229.jpg

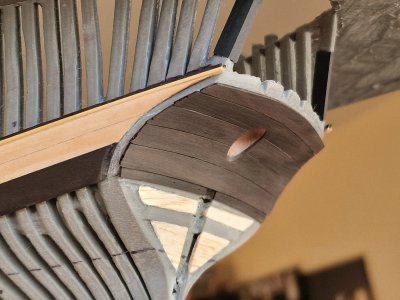
Well, a couple of macro photos of the steering wheel hole.
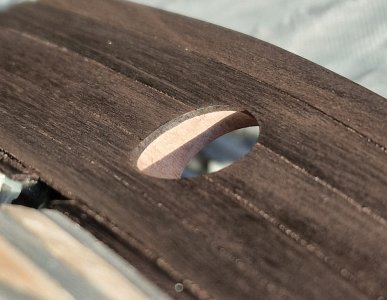
Alert 1230.jpg

I specially made an element of a different color inside to highlight the boards well against its background.
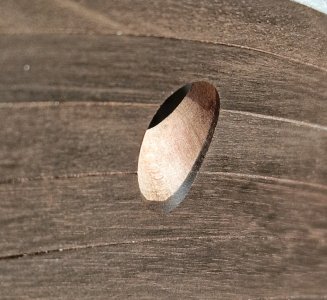
Alert 1231.jpg

I really liked how it turned out...

Alert 1232.jpg

The edges of the boards have not yet been decorated. They will still need to be rounded correctly and glued there with an arc part that will connect the sides and the rear. Plus, you need to make a slot for the stern... But before that, I think I will make the skin below, from a pear, which will go diagonally.
 
Hey Sergej,

always the same with you!!! Perfect, perfect, perfect ... I don't even have a reason to complain ...
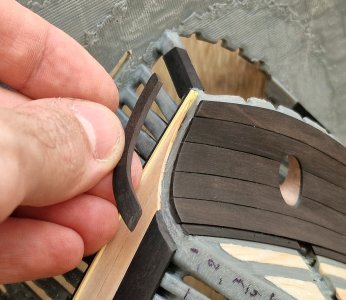
This is amazing ... Question: How did you get hold of the wood? It's so fantastically beautiful? Can you also order it there?

Best regards

Günther Ship-1
 
Beautiful work!
ditto. Very, very nice!
Exceptional work Sergey, perfection at its best. Your photos and explanations are very helpful and educational.
Stay safe.
I love your attention to detail ! It is beautiful !

Thank you, friends and your reviews, interest and likes, it is very motivating!


Hey Sergej,

always the same with you!!! Perfect, perfect, perfect ... I don't even have a reason to complain ...

This is amazing ... Question: How did you get hold of the wood? It's so fantastically beautiful? Can you also order it there?

Best regards

Günther Ship-1
Thank you very much. I am sure that in your country you can find black hornbeam. I bought it in a local store near my home. But black hornbeam can be different. There is well-painted and sometimes there are veins, you need to check. Although after coating with oil this is partially smoothed out, but it is better to take the blackest. Write "black hornbeam handle blank for a cue" and I think there will be results, because I am afraid that they will not be able to send it abroad from the store where I bought it.
 
Last edited:
Thanks friends for your comments and likes.
Today is a very small update. Not much work has been done, but its complexity, despite its appearance, is very large. To be honest, I didn't think it would work out that way.

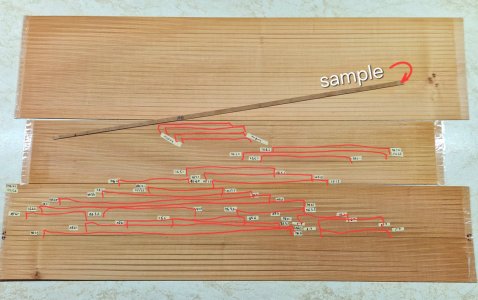
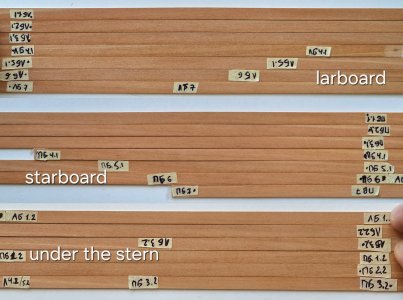
But at the beginning I wanted to show how I assembled a puzzle from boards. For cladding to the waterline, I will use a light pear and at least this area is not large, but the prepared pear was barely enough for it. I previously wrote that due to the wrong cut of the log - the boards turned out to be all striped due to the difference in fiber colors. For several hours I selected the length and order of the boards so as to bypass these stripes and maximize the uniformity of the surface.

Alert 1233.jpg

To understand how much will go into the trash, but the main thing for me is that all of this is at least enough for the lining to the waterline.

Alert 1234.jpg

In the photo, I tweaked the saturation to check again the coincidence of shades. Where there are color transition lines - there the boards narrow and these fragments will be cut off, so everything is extremely Western, and there is no room for error at all!!! So I prepared the boards to continue the plating under the stern...

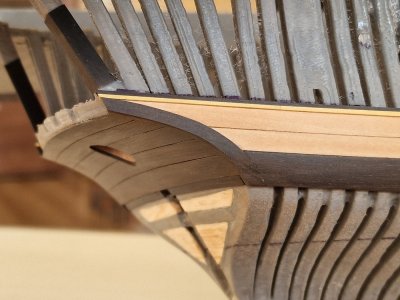
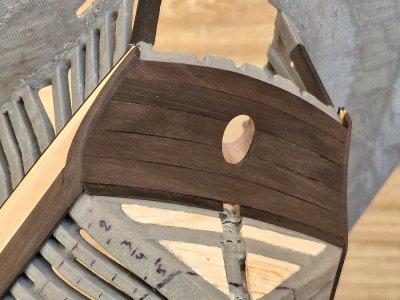
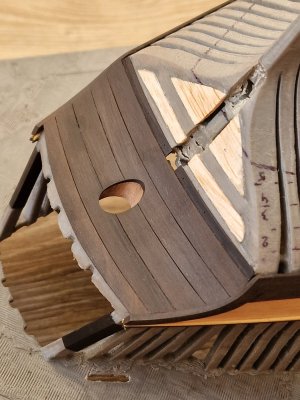
In the meantime, I finished the upper section under the stern, which I mentioned at the beginning.

Alert 1235.jpg

The hardest part is to make those parts that do not have exact dimensions... And which need to be adjusted in place. I did these two arched details for several hours...

Alert 1236.jpg

But I was delighted with the result... I was sure that it would not be possible to marry everything like that (sides and stern)... but I got it!

Alert 1237.jpg

Alert 1238.jpg

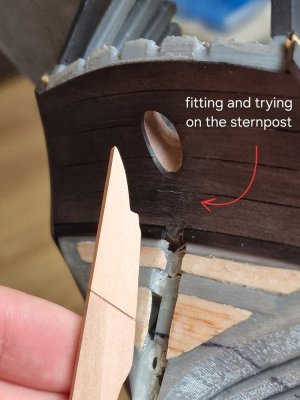
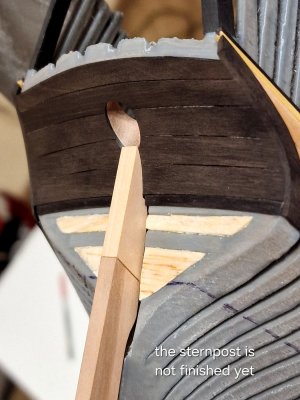
Under the impressions, I decided to fit and try on the sternpost to its place.

Alert 1239.jpg

I decided not to cut the boards, but, on the contrary, to cut off the excess at the sternpost (by the way, I haven't finished it yet, I still need to form an angle).

Alert 1240.jpg

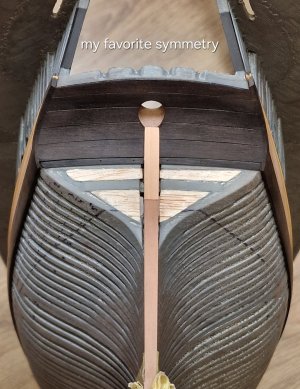
Well, of course, where without symmetry photos ;)


Alert 1241.jpg

Next in line is the diagonal filling under the stern with a light pear, I can't wait...


P.S. In gratitude to all those who not only watch, but also read my review - I want to tell another life hack. Today this happened to me, and I remembered how to fix it and decided to share it with you. So, if you accidentally knock something hard on the ship or vice versa, accidentally hit something on the hull and, for example, a dent appears on the keel, then do not be discouraged, this damage can be easily removed. Just place a drop of water (so that it does not spread, but takes a ball) on this damage and wait. After a minute or two, the wood will absorb moisture and swell a little and the dent will level out. Use it! The main thing is that this dent or scratch is not big, otherwise it may not help. (but as a rule, such damage due to carelessness is not serious, but they catch your eye, but you can get rid of them so easily!
 
Last edited:
Thanks friends for your comments and likes.
Today is a very small update. Not much work has been done, but its complexity, despite its appearance, is very large. To be honest, I didn't think it would work out that way.

But at the beginning I wanted to show how I assembled a puzzle from boards. For cladding to the waterline, I will use a light pear and at least this area is not large, but the prepared pear was barely enough for it. I previously wrote that due to the wrong cut of the log - the boards turned out to be all striped due to the difference in fiber colors. For several hours I selected the length and order of the boards so as to bypass these stripes and maximize the uniformity of the surface.

View attachment 540794

To understand how much will go into the trash, but the main thing for me is that all of this is at least enough for the lining to the waterline.

View attachment 540795

In the photo, I tweaked the saturation to check again the coincidence of shades. Where there are color transition lines - there the boards narrow and these fragments will be cut off, so everything is extremely Western, and there is no room for error at all!!! So I prepared the boards to continue the plating under the stern...

In the meantime, I finished the upper section under the stern, which I mentioned at the beginning.

View attachment 540796

The hardest part is to make those parts that do not have exact dimensions... And which need to be adjusted in place. I did these two arched details for several hours...

View attachment 540797

But I was delighted with the result... I was sure that it would not be possible to marry everything like that (sides and stern)... but I got it!

View attachment 540798

View attachment 540799

Under the impressions, I decided to fit and try on the sternpost to its place.

View attachment 540801

I decided not to cut the boards, but, on the contrary, to cut off the excess at the sternpost (by the way, I haven't finished it yet, I still need to form an angle).

View attachment 540802

Well, of course, where without symmetry photos ;)


View attachment 540803

Next in line is the diagonal filling under the stern with a light pear, I can't wait...


P.S. In gratitude to all those who not only watch, but also read my review - I want to tell another life hack. Today this happened to me, and I remembered how to fix it and decided to share it with you. So, if you accidentally knock something hard on the ship or vice versa, accidentally hit something on the hull and, for example, a dent appears on the keel, then do not be discouraged, this damage can be easily removed. Just place a drop of water (so that it does not spread, but takes a ball) on this damage and wait. After a minute or two, the wood will absorb moisture and swell a little and the dent will level out. Use it! The main thing is that this dent or scratch is not big, otherwise it may not help. (but as a rule, such damage due to carelessness is not serious, but they catch your eye, but you can get rid of them so easily!
again, beautiful work and thanks for the tip. :)
 
Thanks friends for your comments and likes.
Today is a very small update. Not much work has been done, but its complexity, despite its appearance, is very large. To be honest, I didn't think it would work out that way.

But at the beginning I wanted to show how I assembled a puzzle from boards. For cladding to the waterline, I will use a light pear and at least this area is not large, but the prepared pear was barely enough for it. I previously wrote that due to the wrong cut of the log - the boards turned out to be all striped due to the difference in fiber colors. For several hours I selected the length and order of the boards so as to bypass these stripes and maximize the uniformity of the surface.

View attachment 540794

To understand how much will go into the trash, but the main thing for me is that all of this is at least enough for the lining to the waterline.

View attachment 540795

In the photo, I tweaked the saturation to check again the coincidence of shades. Where there are color transition lines - there the boards narrow and these fragments will be cut off, so everything is extremely Western, and there is no room for error at all!!! So I prepared the boards to continue the plating under the stern...

In the meantime, I finished the upper section under the stern, which I mentioned at the beginning.

View attachment 540796

The hardest part is to make those parts that do not have exact dimensions... And which need to be adjusted in place. I did these two arched details for several hours...

View attachment 540797

But I was delighted with the result... I was sure that it would not be possible to marry everything like that (sides and stern)... but I got it!

View attachment 540798

View attachment 540799

Under the impressions, I decided to fit and try on the sternpost to its place.

View attachment 540801

I decided not to cut the boards, but, on the contrary, to cut off the excess at the sternpost (by the way, I haven't finished it yet, I still need to form an angle).

View attachment 540802

Well, of course, where without symmetry photos ;)


View attachment 540803

Next in line is the diagonal filling under the stern with a light pear, I can't wait...


P.S. In gratitude to all those who not only watch, but also read my review - I want to tell another life hack. Today this happened to me, and I remembered how to fix it and decided to share it with you. So, if you accidentally knock something hard on the ship or vice versa, accidentally hit something on the hull and, for example, a dent appears on the keel, then do not be discouraged, this damage can be easily removed. Just place a drop of water (so that it does not spread, but takes a ball) on this damage and wait. After a minute or two, the wood will absorb moisture and swell a little and the dent will level out. Use it! The main thing is that this dent or scratch is not big, otherwise it may not help. (but as a rule, such damage due to carelessness is not serious, but they catch your eye, but you can get rid of them so easily!
Nice to see how new techniques worked together with old fashion handwork, Sergey.
Regards, Peter
 
again, beautiful work and thanks for the tip. :)
I am glad to help, if I remember something else interesting, I will definitely write. Thank you.

Nice to see how new techniques worked together with old fashion handwork, Sergey.
Regards, Peter
Yes, this is really very interesting and practical. First he built a skeleton, and then he printed a new case from its scan. I don't know for sure, but I don't seem to have seen this anywhere else, so I'm checking the technology.
 
Back
Top