Very nice joinery Shota. I hope your relative recovers fully!
-

Win a Free Custom Engraved Brass Coin!!!
As a way to introduce our brass coins to the community, we will raffle off a free coin during the month of August. Follow link ABOVE for instructions for entering.
-

PRE-ORDER SHIPS IN SCALE TODAY!
The beloved Ships in Scale Magazine is back and charting a new course for 2026!
Discover new skills, new techniques, and new inspirations in every issue.
NOTE THAT OUR FIRST ISSUE WILL BE JAN/FEB 2026
- Home
- Forums
- Ships of Scale Group Builds and Projects
- HMS Alert 1777 1:48 PoF Group Build
- HMS Alert 1777 1:48 Group Build Logs
You are using an out of date browser. It may not display this or other websites correctly.
You should upgrade or use an alternative browser.
You should upgrade or use an alternative browser.
HMS ALERT 1777 cutter POF by shota70 [COMPLETED BUILD]
- Joined
- Apr 20, 2020
- Messages
- 6,257
- Points
- 738

thank you very much my dear friendVery nice joinery Shota. I hope your relative recovers fully!
- Joined
- Apr 20, 2020
- Messages
- 6,257
- Points
- 738

thank you very much my dear friend for the compliment and the supportYour wales are looking good, Shota, I like the finish you applied.
I wish your friend a speedy recovery.
- Joined
- Apr 20, 2020
- Messages
- 6,257
- Points
- 738

good evening dear friends
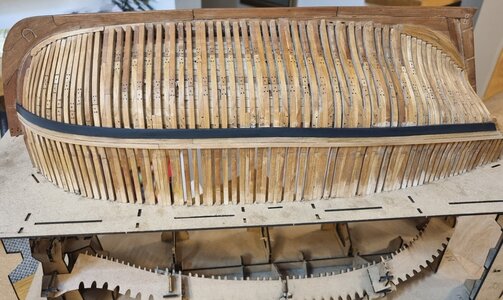
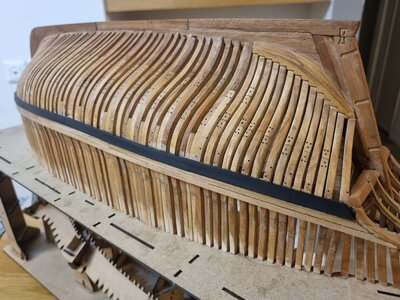
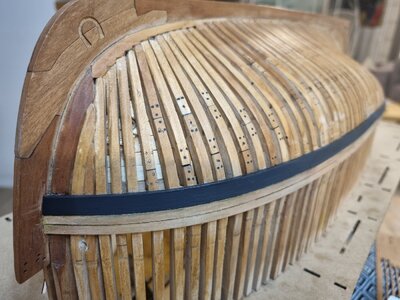
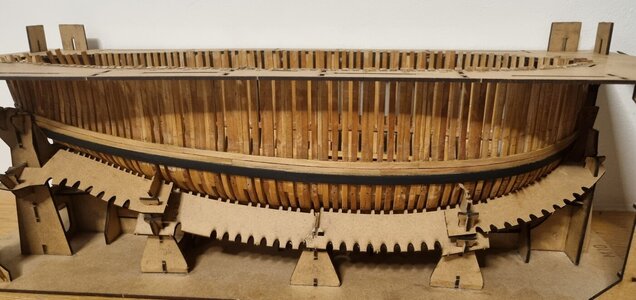
There is not much to update, I finished installing the other side of the wale, painted black and yellow. The black paint was based on water/acrylic, while the yellow paint was oil based.
Unfortunately, I did not like the yellow color both in tone and texture, after it dried.
That's why I removed it and tomorrow I will repaint it with yellow acrylic paint (tomorrow is a holiday eve , and luckily the stores are open for a few hours, so I can buy it).
Good night to all of us


- Joined
- Jan 9, 2020
- Messages
- 10,566
- Points
- 938

My dear Friend. I urge you to re-think this cutting idea very carefully and when you have done so, think again. It is not a necessary requirement for a model to be cut in order to be a successful model. Both Maarten and Peter have incorporated the idea of cutting their models, very early on in their builds and I know that Peter, in particular, has made certain changes in his build to accommodate that. Please think carefully if you really want to do it.
- Joined
- Apr 20, 2020
- Messages
- 6,257
- Points
- 738

good evening dear friends
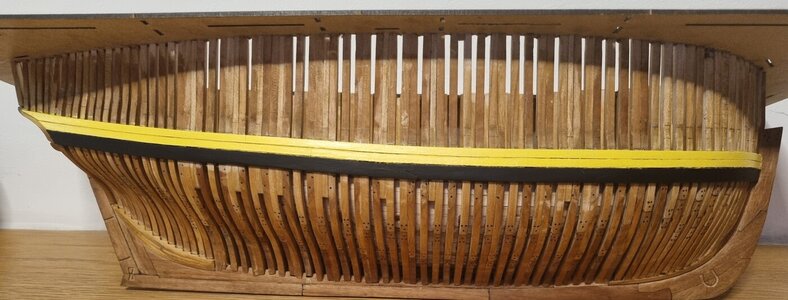
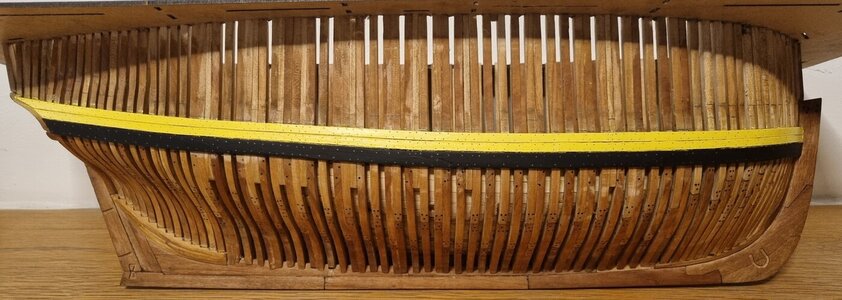
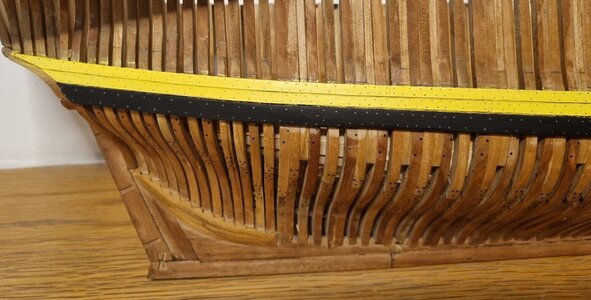
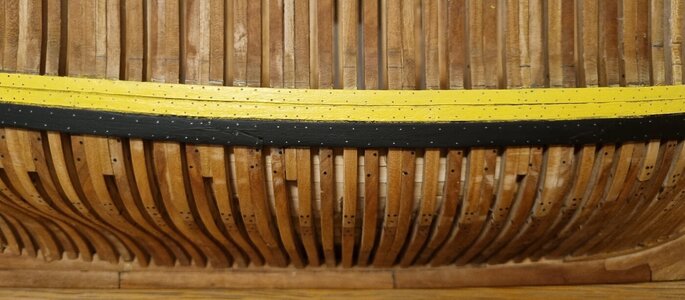
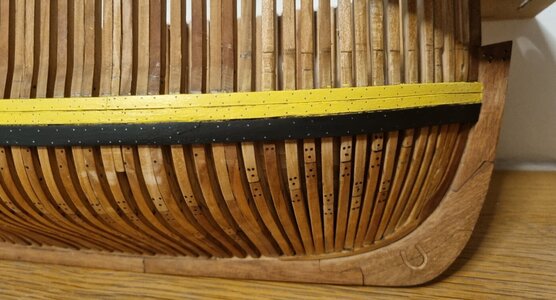
In the last two days I continued to creat+paint the wale.
It was a challenging and even a little frustrating, because the first attempt at painting (acrylic paint, 4 layers) did not turn out in the quality I wanted to achieve and even worse. I had to scrape off all the paint and sand the wood panels.
today I sat down and repainted everything. I must confess that the difference between the two attempts is in the degree of patience and pauses between each layer of paint as well as the use of thin paint brushes. After I achieved the desired result, I also worked on treenailing the planks.
I have not yet finished cleaning the small paint residues left on the frames, I will do so in the coming days.
meantime have fun from the pictures, hoping that you will like the result.
Good night friends


- Joined
- Apr 20, 2020
- Messages
- 6,257
- Points
- 738

my dear friend HeinrichMy dear Friend. I urge you to re-think this cutting idea very carefully and when you have done so, think again. It is not a necessary requirement for a model to be cut in order to be a successful model. Both Maarten and Peter have incorporated the idea of cutting their models, very early on in their builds and I know that Peter, in particular, has made certain changes in his build to accommodate that. Please think carefully if you really want to do it.
thank you very much for your words, I promise to consider your request
Good morning Shota. Excellent….oh boy I cannot imagine doing that many tree nails and this is just the wale. Cheers Grantgood evening dear friends
In the last two days I continued to creat+paint the wale.
It was a challenging and even a little frustrating, because the first attempt at painting (acrylic paint, 4 layers) did not turn out in the quality I wanted to achieve and even worse. I had to scrape off all the paint and sand the wood panels.
today I sat down and repainted everything. I must confess that the difference between the two attempts is in the degree of patience and pauses between each layer of paint as well as the use of thin paint brushes. After I achieved the desired result, I also worked on treenailing the planks.
I have not yet finished cleaning the small paint residues left on the frames, I will do so in the coming days.
meantime have fun from the pictures, hoping that you will like the result.
Good night friends
View attachment 334912View attachment 334913View attachment 334914View attachment 334915View attachment 334916View attachment 334917
- Joined
- Apr 20, 2020
- Messages
- 6,257
- Points
- 738

thanks my friend, it's not easyGood morning Shota. Excellent….oh boy I cannot imagine doing that many tree nails and this is just the wale. Cheers Grant
Very good progress, Shota
I don't know, how it looks in real but the photos show some gaps between the planks and a disturbing shine of the yellow color.
To avoid the gaps, a smooth background is necessary. The planks must also have a relative thickness (Minimum 1,5 mm) and a good preparation.
If there is still some misbehaviour of the material, some tools are helpful: Special needles to press the wooden parts to the right direction with some force. I also used these clamps to pull the planks together: Hatagane clamps.
For the colors I would recommend flat colors. For some types of colors its necessary to stir them very well to avoid shining.
Cheers, Alexander
- Joined
- Apr 20, 2020
- Messages
- 6,257
- Points
- 738

Dear AlexanderVery good progress, Shota
I don't know, how it looks in real but the photos show some gaps between the planks and a disturbing shine of the yellow color.
To avoid the gaps, a smooth background is necessary. The planks must also have a relative thickness (Minimum 1,5 mm) and a good preparation.
If there is still some misbehaviour of the material, some tools are helpful: Special needles to press the wooden parts to the right direction with some force. I also used these clamps to pull the planks together: Hatagane clamps.
For the colors I would recommend flat colors. For some types of colors its necessary to stir them very well to avoid shining.
Cheers, Alexander
thank you very much for the issues you highlighted, I will look into them
Great work and detail. Love the hingesgood evening dear friends
Today I continued working on the sail room, it's almost completely ready.
Today I worked on the hinges - bending the edges into a circle into which the hinge was inserted, blackening the brass, fitting the door and windows and installing them stably. After that I prepared the fabrics for the sails which were placed on the shelves. In addition, making a rack on which blocks were installed/hung.
This is a concise description for long hours of creation.
What remains for me to make are the door and window locks, they will be in the form of a hook that goes down into a gap (a simple locking mechanism).
Good night everyone
View attachment 332159
View attachment 332160
View attachment 332161
View attachment 332162
View attachment 332163
View attachment 332164
View attachment 332165
View attachment 332166
View attachment 332167
View attachment 332168
View attachment 332169
View attachment 332170
View attachment 332171
- Joined
- Apr 20, 2020
- Messages
- 6,257
- Points
- 738

thank you very much my dear friend, I appreciate your wordsGreat work and detail. Love the hinges
Did you use them in this way? (red is the frame, green three planks)Very good progress, Shota
I don't know, how it looks in real but the photos show some gaps between the planks and a disturbing shine of the yellow color.
To avoid the gaps, a smooth background is necessary. The planks must also have a relative thickness (Minimum 1,5 mm) and a good preparation.
If there is still some misbehaviour of the material, some tools are helpful: Special needles to press the wooden parts to the right direction with some force. I also used these clamps to pull the planks together: Hatagane clamps.
For the colors I would recommend flat colors. For some types of colors its necessary to stir them very well to avoid shining.
Cheers, Alexander
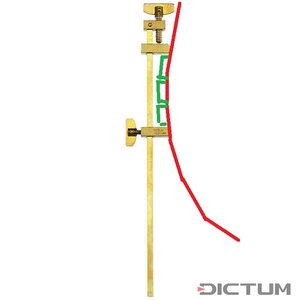
Otherwise I have my doubts, that the long element of the clamp is fitting in between two frames
Hallo Shota, I have now found a little time to follow your beautiful work more closely. You have really made fantastic progress and your execution is very, very good. I like it extraordinarily.
Thank you for this fine drawing, Uwe. This is exactly the way I used the Hatagane clamps. Of course it only works, if the planks are not too weak.Did you use them in this way? (red is the frame, green three planks)
View attachment 335488
Otherwise I have my doubts, that the long element of the clamp is fitting in between two frames
Cheers Alexander
Last edited:
- Joined
- Apr 20, 2020
- Messages
- 6,257
- Points
- 738

thank you very much my dear friend, I appreciate your
 I will order this clamps
thank you very much my dear friend, I appreciate your adviceDid you use them in this way? (red is the frame, green three planks)
View attachment 335488
Otherwise I have my doubts, that the long element of the clamp is fitting in between two frames
- Joined
- Apr 20, 2020
- Messages
- 6,257
- Points
- 738

thank you very much my dear friend, I appreciate your kind wordsHallo Shota, I have now found a little time to follow your beautiful work more closely. You have really made fantastic progress and your execution is very, very good. I like it extraordinarily.
- Joined
- Mar 1, 2022
- Messages
- 702
- Points
- 308

Did you use them in this way? (red is the frame, green three planks)
View attachment 335488
Otherwise I have my doubts, that the long element of the clamp is fitting in between two frames
Good idea!Did you use them in this way? (red is the frame, green three planks)
View attachment 335488
Otherwise I have my doubts, that the long element of the clamp is fitting in between two frames


