The bottom line is that you don't afraid to re-do! It is not an optimal way to learn things, but it is the proven one. When re-do, you build up your skills and establish your own 'acceptance level'! I applaud you, it does look better. 
-

Win a Free Custom Engraved Brass Coin!!!
As a way to introduce our brass coins to the community, we will raffle off a free coin during the month of August. Follow link ABOVE for instructions for entering.
-

PRE-ORDER SHIPS IN SCALE TODAY!
The beloved Ships in Scale Magazine is back and charting a new course for 2026!
Discover new skills, new techniques, and new inspirations in every issue.
NOTE THAT OUR FIRST ISSUE WILL BE JAN/FEB 2026
- Home
- Forums
- Ships of Scale Group Builds and Projects
- HMS Alert 1777 1:48 PoF Group Build
- HMS Alert 1777 1:48 Group Build Logs
You are using an out of date browser. It may not display this or other websites correctly.
You should upgrade or use an alternative browser.
You should upgrade or use an alternative browser.
HMS ALERT 1777 cutter POF by shota70 [COMPLETED BUILD]
- Joined
- Apr 20, 2020
- Messages
- 6,257
- Points
- 738

In my book, that is a huge improvement. Well done my friend.
I like it, that you learned to put yourself to a higher level and redo things because of that. The result is way better.
Thank you very much dear friends, your words give me satisfaction and encouragement.The bottom line is that you don't afraid to re-do! It is not an optimal way to learn things, but it is the proven one. When re-do, you build up your skills and establish your own 'acceptance level'! I applaud you, it does look better.
I try to improve my skills step by step
Good evening Shota. Wow the difference is significant. You must be very happy with that redo. Cheers Grantgood evening dear friends
Today I made progress in creating the wale from boxwood. Initially, I cleaned the remaining glue left on the frames and the black board and also painted with a fine brush the black board in the areas where the paint had worn off.
I then installed the new boards I had made as well as applied madung wax to them. I still need to make the screws/nails.
View attachment 341295View attachment 341296View attachment 341297View attachment 341298View attachment 341299View attachment 341300View attachment 341301View attachment 341302
I wish you all a pleasant and enjoyable weekend
- Joined
- Apr 20, 2020
- Messages
- 6,257
- Points
- 738

thank you very much my friend, I appreciate your opinionGood evening Shota. Wow the difference is significant. You must be very happy with that redo. Cheers Grant

Very nice work Shota. Love the boxwood, big improvement.
- Joined
- Apr 20, 2020
- Messages
- 6,257
- Points
- 738

good evening dear friends
Today I took the last step to create the wale. I made the nails/pegs that fastened the wooden boards of the wale to the frames.
The way I chose to create the pegs/
nails was by burning a round mark. In our forum I saw more than once that the members soldered a needle of a syringe to a soldering iron.
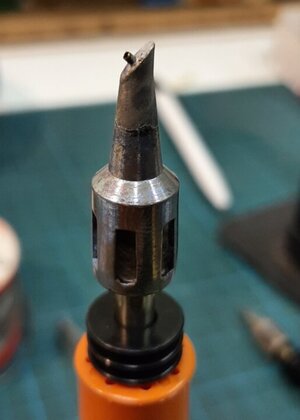
I chose a similar way, to mill and engrave the head of a soldering iron so that at the end a short cylinder is formed whose inner diameter is 0.9 mm and the outer one of the ring 1.15 mm.
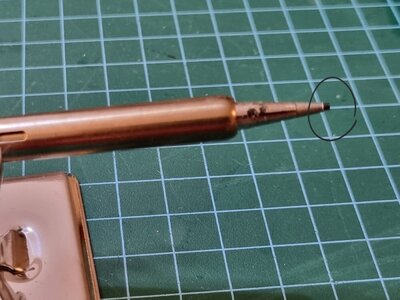
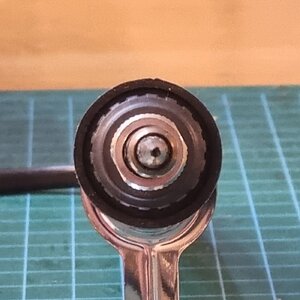
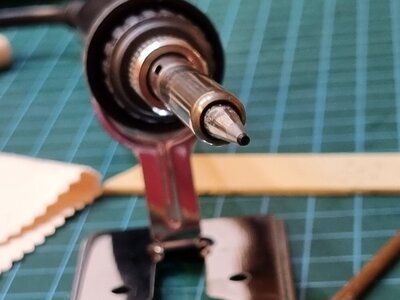
Before performing the burning operation, I performed an experiment on a small panel of boxwood to make sure that the configuration of the circle comes out as I would like and fits the size of the panel in wale.
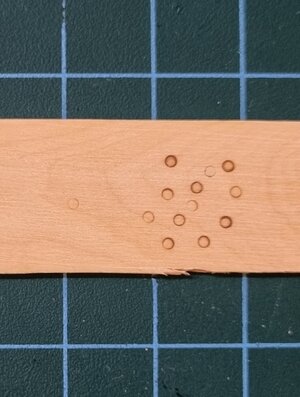
First I burned the connection areas between the panels and then according to the appropriate printer for connection with the frames.
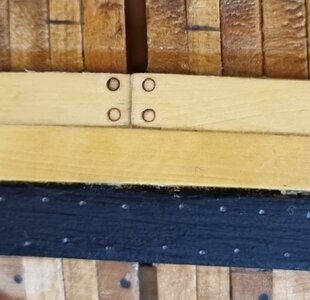
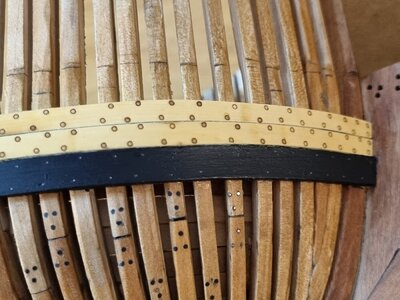
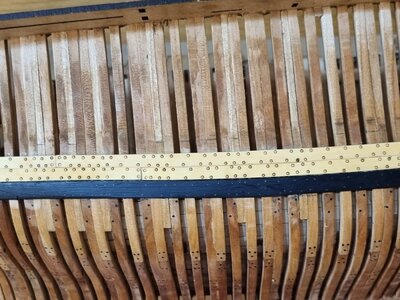
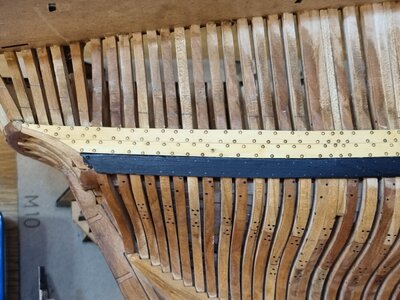
Later I also did this on the black board and finally I applied wax dong again on the wale.
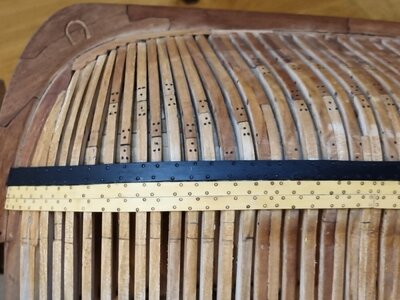
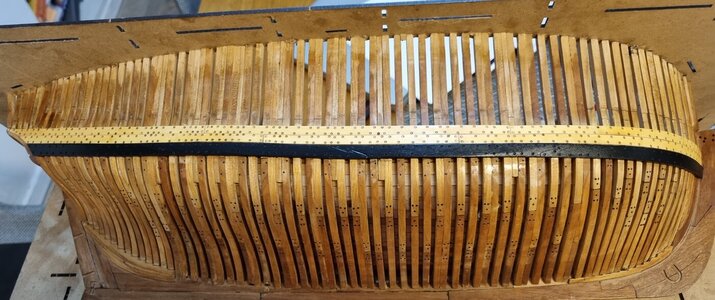

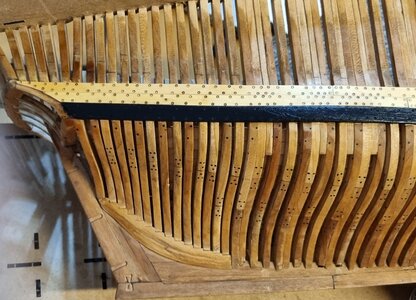
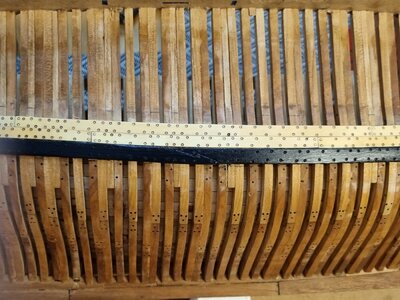
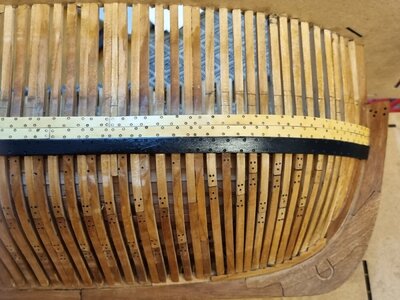
In my humble opinion the result is better than the point of the pencil I created about a month ago.
I would love to hear your opinion Good night and happy World Cup holiday

Today I took the last step to create the wale. I made the nails/pegs that fastened the wooden boards of the wale to the frames.
The way I chose to create the pegs/
nails was by burning a round mark. In our forum I saw more than once that the members soldered a needle of a syringe to a soldering iron.

I chose a similar way, to mill and engrave the head of a soldering iron so that at the end a short cylinder is formed whose inner diameter is 0.9 mm and the outer one of the ring 1.15 mm.


Before performing the burning operation, I performed an experiment on a small panel of boxwood to make sure that the configuration of the circle comes out as I would like and fits the size of the panel in wale.

First I burned the connection areas between the panels and then according to the appropriate printer for connection with the frames.


Later I also did this on the black board and finally I applied wax dong again on the wale.


In my humble opinion the result is better than the point of the pencil I created about a month ago.
I would love to hear your opinion Good night and happy World Cup holiday
Last edited:
- Joined
- Jan 9, 2020
- Messages
- 10,566
- Points
- 938

My friend, you did say that you would like to hear our opinion - so here it is, straight and honest as always. I think the number of simulated trennels makes the wale looks perforated. But then again ... that is just me.
- Joined
- Apr 20, 2020
- Messages
- 6,257
- Points
- 738

Dear Heinrich, My Dear friendMy friend, you did say that you would like to hear our opinion - so here it is, straight and honest as always. I think the number of simulated trennels makes the wale looks perforated. But then again ... that is just me.
I appreciate your honesty, when it is comments on the professional level. it will help us to improve professional skills and achievements.
you won't be surprised to hear that your comment touches on subject that I was also debating - did the proportions of the scorch of the holes/nails indeed compatible and as you said from the many scorch marks the beauty of the boxwood boards is dimmed.
One of the moves I made is to produce a new scorch head with an inner diameter of 0.5 mm and the outer diameter of the burning circle 0.8 mm.
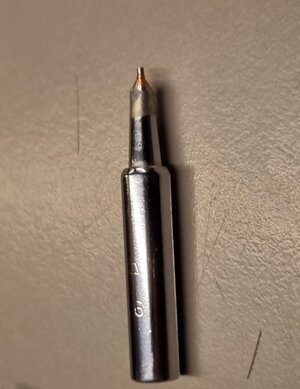
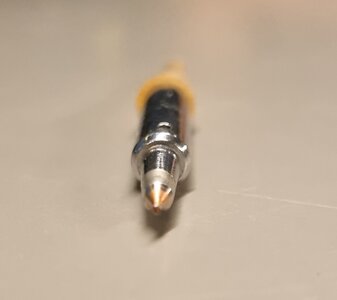
I will have to examine it in the coming days and decide how to proceed,based on the results.
- Joined
- Jan 9, 2020
- Messages
- 10,566
- Points
- 938

My dear friend. Thank you for reading my post in the way that it was intended. I know that I always appreciated it when our friends on SOS pointed out something in my build that did not look right to them. I will continue to support you and await your results with the smaller "needle" anxiously.
Hi Shota,
For the tree nails of Alert I used a 0,6 mm seringe which is +/- a 1" treenail at scale 1:48.
After burning the treenails are very prominent but when you sand them this will be less.
I would first sand the boxwood which most probably will give the result you are aiming.
For the tree nails of Alert I used a 0,6 mm seringe which is +/- a 1" treenail at scale 1:48.
After burning the treenails are very prominent but when you sand them this will be less.
I would first sand the boxwood which most probably will give the result you are aiming.
- Joined
- Apr 20, 2020
- Messages
- 6,257
- Points
- 738

My dear friend. Thank you for reading my post in the way that it was intended. I know that I always appreciated it when our friends on SOS pointed out something in my build that did not look right to them. I will continue to support you and await your results with the smaller "needle" anxiously.
Hi Shota,
For the tree nails of Alert I used a 0,6 mm seringe which is +/- a 1" treenail at scale 1:48.
After burning the treenails are very prominent but when you sand them this will be less.
I would first sand the boxwood which most probably will give the result you are aiming.
Dear Friends
I am attaching here the results of the burning experiments. I tried on the board where I tried the burner of 1 mm in inner diameter. I also did a test simulating a board similar in size to the wale.
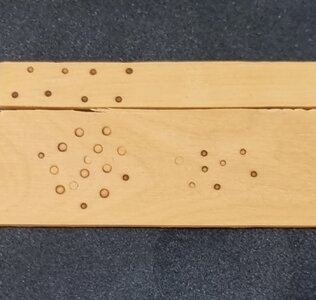
I will take the advice of our friend Maarten, make a new head with an inner diameter of 0.6-0.7 mm. In any case, I will have 3 different sizes of burners available for models of different sizes and standards.
I will be happy to read your opinion
- Joined
- Apr 20, 2020
- Messages
- 6,257
- Points
- 738

Hello dear DanielHi Shota
Would you be so kind to upload pictures of the process to do those soldering tips (heads) with different diameters. I would like to know if I can do the same.
Thanks !!
Daniel
Unfortunately, I did not document the creative process, but I will try to describe it briefly:
1. Milling the soldering head to the thickness of the outer diameter. The move creates a small tube 2 mm long
2. Drilling a hole with the required diameter for the inner circle.
3. Sand the burn tube with very fine sandpaper to make sure the burn lines come out nicely.
I would like to point out that the process was carried out in a professional milling machine that my friend allows me to work with.
hope that I helped you
Hello, my dear friend!I will be happy to read your opinion
My opinion will not bring much value because I am not a big proponent of this method. Using the torch cannot guarantee constant results because it depends on at least two variables: you cannot control the amount of heat and the pressure you do while touching the surface. If the amount of heat you can technically stabilize, the touching pressure cannot be set to a position where you can get equally made results, and excessive time\preasure may lead to a burn.
I know, my friend @Maarten will have objections saying that no two treenails are alike physically, also in position in planks. Shipwrights never measure the distance while keeping the pattern, and he will be 110% correct!! However, what is in the real size ship will be unnoticeable, on the model size, might be a spot to attract viewers. This is just my own subjective opinion.
Making the smaller needle should help but avoid burning and try touching (not pushing) lightly with the entire needle surface, so you will have an equally nice ring.
- Joined
- Apr 20, 2020
- Messages
- 6,257
- Points
- 738

I respect and understand your point ofview, dear Jimsky, the reasons are somewhat convincing, but on the other hand, the burning method also has some advantages.Hello, my dear friend!
My opinion will not bring much value because I am not a big proponent of this method. Using the torch cannot guarantee constant results because it depends on at least two variables: you cannot control the amount of heat and the pressure you do while touching the surface. If the amount of heat you can technically stabilize, the touching pressure cannot be set to a position where you can get equally made results, and excessive time\preasure may lead to a burn.
I know, my friend @Maarten will have objections saying that no two trenails are alike physically, also in position in planks. Shipwrights never measure the distance while keeping the pattern, and he will be 110% correct!! However, what is in the real size ship will be unnoticeable, on the model size, might be a spot to attract viewers. This is just my own subjective opinion.
Making the smaller needle should help but avoid burning and try touching (not pushing) lightly with the entire needle surface, so you will have an equally nice ring.With practice, you can grasp it!
Hello dear Daniel
Unfortunately, I did not document the creative process, but I will try to describe it briefly:
1. Milling the soldering head to the thickness of the outer diameter. The move creates a small tube 2 mm long
2. Drilling a hole with the required diameter for the inner circle.
3. Sand the burn tube with very fine sandpaper to make sure the burn lines come out nicely.
I would like to point out that the process was carried out in a professional milling machine that my friend allows me to work with.
hope that I helped you
Thank you Shota !!!
- Joined
- Sep 3, 2021
- Messages
- 5,199
- Points
- 738

Dear Shota, what a great idea, adding trennels the way you did.Dear Friends
I am attaching here the results of the burning experiments. I tried on the board where I tried the burner of 1 mm in inner diameter. I also did a test simulating a board similar in size to the wale.
View attachment 342130
I will take the advice of our friend Maarten, make a new head with an inner diameter of 0.6-0.7 mm. In any case, I will have 3 different sizes of burners available for models of different sizes and standards.
I will be happy to read your opinion
The size has already been addressed, so I won't add my two cents on that topic. But... To my personal taste your trennel representation is a bit too outspoken, especially in combination with the beautiful and here is my dilemma; you want them to be there, but not with a dominant presence. I did apply trennels in all my BN frames and you have to look careful in order to be able to spot them. For the planking I did not opt to add trennels, the first consideration was the scale and the second reason I forwent the trennels is that my efforts in the interior were not satisfactory in their visual appearance. Maybe, if your setup has the option to regulate the heat, it's an option to play around with the heat settings to see if that present you with less dominant trennels in the boxwood.
Johan
Hi Johan,Dear Shota, what a great idea, adding trennels the way you did.
The size has already been addressed, so I won't add my two cents on that topic. But... To my personal taste your trennel representation is a bit too outspoken, especially in combination with the beautiful and here is my dilemma; you want them to be there, but not with a dominant presence. I did apply trennels in all my BN frames and you have to look careful in order to be able to spot them. For the planking I did not opt to add trennels, the first consideration was the scale and the second reason I forwent the trennels is that my efforts in the interior were not satisfactory in their visual appearance. Maybe, if your setup has the option to regulate the heat, it's an option to play around with the heat settings to see if that present you with less dominant trennels in the boxwood.
Johan
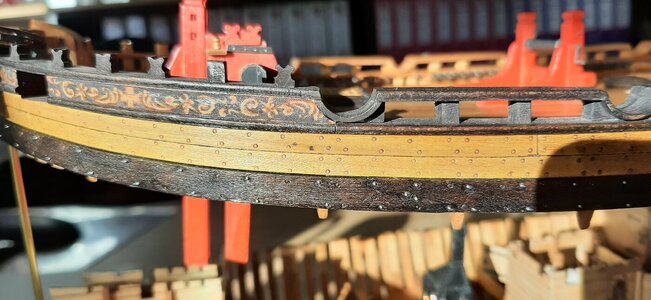
I use a gas operated solder iron for this and can control the heat. So yes this gives you several options in appearence of the treenails.
Guess you have seen my Alert during the show, this one was done with this methode.
- Joined
- Sep 3, 2021
- Messages
- 5,199
- Points
- 738

Hey Maarten, yes, your Alert was a real eye catcher in Duizel!Hi Johan,
I use a gas operated solder iron for this and can control the heat. So yes this gives you several options in appearence of the treenails.
Guess you have seen my Alert during the show, this one was done with this methode.
View attachment 342284
The trennels on your Alert are, from my perspective, rather convincing.
Fact remains that it's a very thin line between too little and too much, but above all, there's no arguing about taste.


