My congratulations of reaching this working step - for me, although not finished, already a beautiful model
-

Win a Free Custom Engraved Brass Coin!!!
As a way to introduce our brass coins to the community, we will raffle off a free coin during the month of August. Follow link ABOVE for instructions for entering.
-

PRE-ORDER SHIPS IN SCALE TODAY!
The beloved Ships in Scale Magazine is back and charting a new course for 2026!
Discover new skills, new techniques, and new inspirations in every issue.
NOTE THAT OUR FIRST ISSUE WILL BE JAN/FEB 2026
You are using an out of date browser. It may not display this or other websites correctly.
You should upgrade or use an alternative browser.
You should upgrade or use an alternative browser.
- Joined
- Jan 10, 2022
- Messages
- 860
- Points
- 403

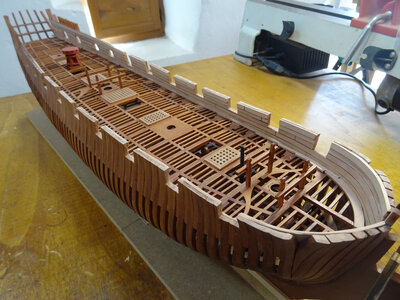
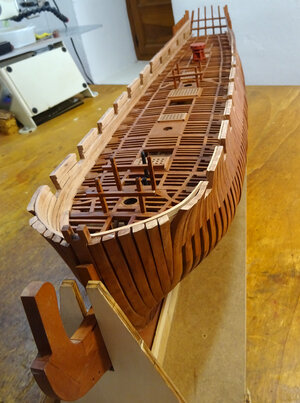
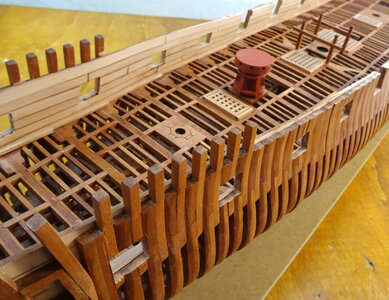
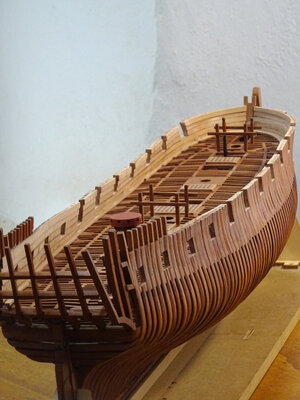
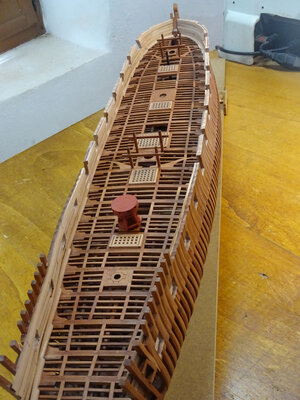
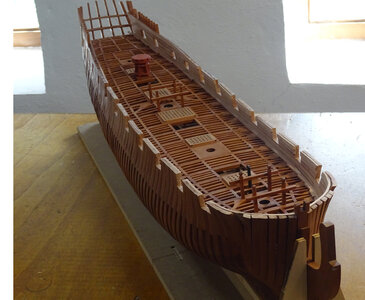
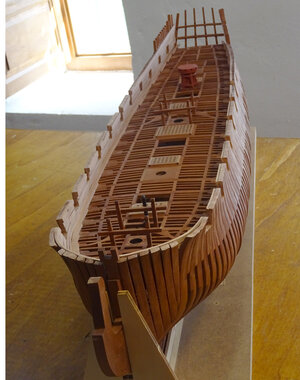
Inner bulwarks are now planked and waterways added, they just need a little cleaning up. l am definitely not going to plank any of the decking timbers and possibly not fit any of the outside hull planks. Still undecided on that one. The gratings have also been made up and fitted. 3 hatchways have been left open which will have ladders descending to the lower deck. There are some fittings to to be added to the bulwarks and when done l shall start to build the quarter deck and fore decks


Wow, thats a beauty. 
- Joined
- Jul 24, 2016
- Messages
- 540
- Points
- 188

and, of course, make sure you fit the capstan before close off the upper deck - great work again. Ive just built my capstan thought that middle white wood bit was the spindle but like you use a dowelThe capstan is now made up, painted and installed into the hull
View attachment 345622
View attachment 345623
View attachment 345624
View attachment 345625
View attachment 345626
View attachment 345628
View attachment 345630
View attachment 345631
View attachment 345632
- Joined
- Jul 24, 2016
- Messages
- 540
- Points
- 188

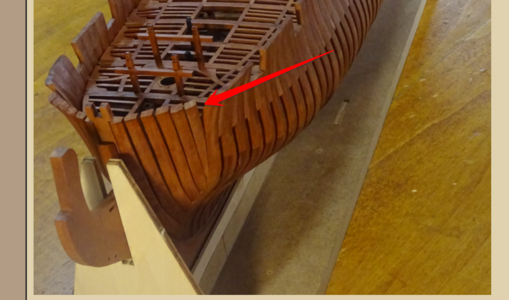
trying to fit the rear most hanging knee on the upper deck - i think it is mounted above like the rear lower kneesl have at last trimmed the frames of the hawse pieces to their correct heights and added the knightshead (l think that's what it's called) to the bow, completing that part of the build in readiness to take the hull from the cradle to fit the rudder. l think it looks a lot better at the front now
View attachment 349447
View attachment 349448
View attachment 349450
View attachment 349452
View attachment 349454
Rudder looks amazing on my Victory i used square spare wood to build it as per the original but yours looks great
- Joined
- Jul 24, 2016
- Messages
- 540
- Points
- 188

very helpful keef thanksl have at last trimmed the frames of the hawse pieces to their correct heights and added the knightshead (l think that's what it's called) to the bow, completing that part of the build in readiness to take the hull from the cradle to fit the rudder. l think it looks a lot better at the front now
View attachment 349447
It's been a busy week and today is the day Blandford left her cradle for a new, permanent, support which she fits into perfectly. We can now see the true shape of her hull and l can even fit the rudder without having to take her out, so now l can get on and finish the upper deck once the rudder is fitted.
View attachment 350390
View attachment 350391
View attachment 350392
View attachment 350393
View attachment 350394
View attachment 350395
View attachment 350396
View attachment 350397
View attachment 350398
View attachment 350399
View attachment 350400
View attachment 349448
View attachment 349450
View attachment 349452
View attachment 349454
still trying to find the sole of the rudder (the small piece at the bottom of the rudder that matches to false keel
how did you drill the holes for the pintles on the rudder - ive got 4 pieces of the rudder maybe there is a thin piece that covers the inner part of the rudder which allows a slot to be fitted in the shaped rudder part
- Joined
- Jul 24, 2016
- Messages
- 540
- Points
- 188

i am pretty certain there is a filler that goes between the bow piecs nd the 1st frameIt's been a busy week and today is the day Blandford left her cradle for a new, permanent, support which she fits into perfectly. We can now see the true shape of her hull and l can even fit the rudder without having to take her out, so now l can get on and finish the upper deck once the rudder is fitted.
View attachment 350390
View attachment 350391
View attachment 350392
View attachment 350393
View attachment 350394
View attachment 350395
View attachment 350396
View attachment 350397
View attachment 350398
View attachment 350399
View attachment 350400
may iv missed it
- Joined
- Jul 24, 2016
- Messages
- 540
- Points
- 188

have you worked out what the solid piece of wood between 6 and 7 with a hole in are for very strange doent "look" right on minel have gone as far as l can with the upper deck beams and timbers for the moment, as l now have to work on the rudder assembly, while there is still room for access. l have given the upper deck 2 coats of Xylandecor wood preservative. The sanded deck woodwork looked quite white and it took your eye away from everything below, but now it is the same colour as the rest of the model everything has settled down so to speak and it is much easier to view the lower deck work. There is no mention of the rudder assembly in the instruction manual, only a rough diagram showing the numbered parts (6 in all), so it's difficult to find the parts that make up the rudder from the remaining sheets. Once assembled l have compared it with the 'Anatomy of the Ship' and it is a perfect replica. The 'iron work' l made from cartridge paper, cut into 2 mm strips and coated with watered down white wood glue to give it a bit of strength. Once fitted a coat of semi-gloss acrylic varnish was applied to seal it. l don't think there are parts supplied for the tiller which goes between the decks, so will have to scratch build that part.
View attachment 349115
View attachment 349116
View attachment 349117
View attachment 349118
View attachment 349120
View attachment 349121
View attachment 349122
View attachment 349124
View attachment 349126
View attachment 349127
View attachment 349128
The Wang appears to have planked it with a hole
My little rectangle bits on the mast supports have dropped out - not sure which is correct
- Joined
- Jan 10, 2022
- Messages
- 860
- Points
- 403

The solid piece with the hole between beams 6 and 7 is the support for the sea mortar. You have the choice to either fit the piece and make up the mortar supplied or leave it open to make up and fit a grating. The kit supplies an extra one if you choose the grating instead of the mortar. Obviously if your hatch openings are not made square you are going to have problems fitting the gratings. l put a small amount of glue behind the mast partners before taking them out of the board to keep the tiny pieces together so they did not fall to bits. Not going to be easy now, if yours have dropped out. Once they are made up and framed by the carlings they are finehave you worked out what the solid piece of wood between 6 and 7 with a hole in are for very strange doent "look" right on mine
The Wang appears to have planked it with a hole
My little rectangle bits on the mast supports have dropped out - not sure which is correct
Last edited:
hello Keef, help needed! where did you get the positions for deck clamps and inner strakes? i cannot work it out !Deck clamps fitted and inner strakes in the process of fitting. 3 1/2 weeks work but not a lot to show for it. l had to improvise as l don't have clamps deep enough to reach the lower planks and as you can see the curves are pretty tight so the timbers have to be held securely while the glue dries. l came up with this idea using hair clips, bent to fit and it works surprisingly well
- Joined
- Jan 10, 2022
- Messages
- 860
- Points
- 403

Hi Lezzer. Have seen your question. Will get back to you in a few days. Tested positive for covid on Saturday and feeling a bit out out of it at the moment. Sorry for the inconveniencehello Keef, help needed! where did you get the positions for deck clamps and inner strakes? i cannot work it out !
Praying for a full and speedy recovery Keef.Hi Lezzer. Have seen your question. Will get back to you in a few days. Tested positive for covid on Saturday and feeling a bit out out of it at the moment. Sorry for the inconvenience
no problem Keef, get well soon.Hi Lezzer. Have seen your question. Will get back to you in a few days. Tested positive for covid on Saturday and feeling a bit out out of it at the moment. Sorry for the inconvenience
Get well soon Keith!
- Joined
- Aug 14, 2018
- Messages
- 825
- Points
- 403

Thinking about you Keef, get well soon.Hi Lezzer. Have seen your question. Will get back to you in a few days. Tested positive for covid on Saturday and feeling a bit out out of it at the moment. Sorry for the inconvenience
All the best JJ..
Get well soon, Keef!Hi Lezzer. Have seen your question. Will get back to you in a few days. Tested positive for covid on Saturday and feeling a bit out out of it at the moment. Sorry for the inconvenience
Your ship model can easily wait some days - important is only the health - get well soon
- Joined
- Jan 10, 2022
- Messages
- 860
- Points
- 403

Thank you Paul. That's really kind of youPraying for a full and speedy recovery Keef.


