-

Win a Free Custom Engraved Brass Coin!!!
As a way to introduce our brass coins to the community, we will raffle off a free coin during the month of August. Follow link ABOVE for instructions for entering.
-

PRE-ORDER SHIPS IN SCALE TODAY!
The beloved Ships in Scale Magazine is back and charting a new course for 2026!
Discover new skills, new techniques, and new inspirations in every issue.
NOTE THAT OUR FIRST ISSUE WILL BE JAN/FEB 2026
You are using an out of date browser. It may not display this or other websites correctly.
You should upgrade or use an alternative browser.
You should upgrade or use an alternative browser.
HMS Diana by Caldercraft
- Thread starter HMSFly
- Start date
- Watchers 37
-
- Tags
- caldercraft diana
- Joined
- Jan 26, 2017
- Messages
- 1,340
- Points
- 493

Hi Marc,Hello Mustafa!
How would you make the gun ports if the plans simply state that you have to draw the ports on the 1st planking and make the holes?
(unless I've misunderstood so far...)
Yes, many modelers make the ports as you say. That's what I would do if I were building a kit. There is no need to look for adventure.
You can make a full layout template and see layout 1st on model + check all match. Drawing by hand you need a jig1st for rib (of course).
If model has or if you can draw the curvature?
1 person draws the lines on the hull and then ….
Just do not drink and draw at the same time or movement shakes.
If model has or if you can draw the curvature?
1 person draws the lines on the hull and then ….
Just do not drink and draw at the same time
This one on my short list. Will watch , thank you.
To be honest I only had a quick look at the instructions when I purchased my kit a couple of years ago. I remember seeing that the gun ports had to be cut out, this is similar to my last model HMS Unicorn. I believe the Diana was one of the earlier Caldercraft designs the later ones used CNC cut plywood for the first planking around the gun ports. I was thinking of making a template to mark out the gun ports but until I start building I don't know for sure.Hey Tony,
Aan honor for me!
PS
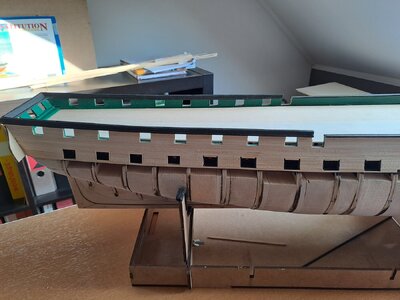
I already see some serious challenges such as creating the gun ports. There is no special method provided in the kit other than drilling holes and tinkering until you get a nice gun port... I am considering making a frame like in the Con.
So how to find an accurate method for this...
Looking forward to see your solution.
Tony
Hi Tony,
I am currently looking into the construction of the Hull. Such as the placement of the plank termination templates (20 & 21): no drawing is available... (just like the Stern counter frames etc..).
And indeed I still have to think about the gun ports, and as Mustafa said, not a too complicated construction.
As far as the plans are concerned, those of the Constitution are much clearer, but I'm not complaining...
On the other hand, I'm going to prepare the Keel with for example drilling holes etc...
Cheers
I ran through this log and must say the finishing work is EXTREMELY neat. But, not everything is as it should be. Two examples that really pop out.......the planking looks to be like many kits, it does not all end at the rabbet but rather, five strakes come to a point against the side of the wales. There are stops in the tops of the ports as well as the sides and bottom but the stops were only on the bottom sill and on the sides, not the top sill.
As to making the gun port frames, they were made up of the sides of frames, a top sill and a bottom sill. With POB of course there may not be enough frames but you can add fake hull frames/futtocks in the areas where there are to be ports then add the two sills. In the photo below I made enough bulkheads to act as frames for the gun ports, but if the bulkheads on your Diana are not a good fit to do the same, you can stiffen them with filler pieces of poplar, basswood, balsa as you did down low on your Constitution before the first layer of planking goes on. Then you cut the port openings before or after the first planking. I am sure there are other ways and means folks have found that work well.
Allan
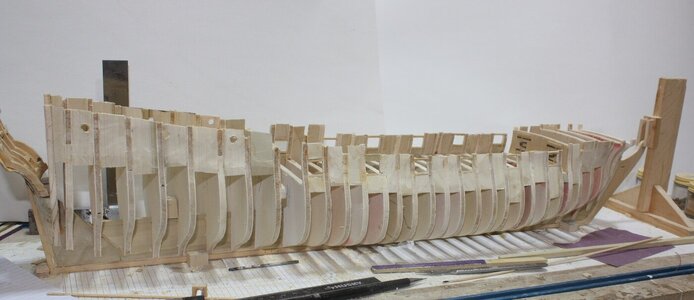
Last edited:
Dear Allen,
Thx for the feedback, especially the one for the gun ports making.
I will come back to this.
I'm not sure yet what the best method is. One thing is important to me: this time I'm going to try to match Tony's (TonyH) precision...and finishing tuch...so this will also play a role.
Thx for the feedback, especially the one for the gun ports making.
I will come back to this.
I'm not sure yet what the best method is. One thing is important to me: this time I'm going to try to match Tony's (TonyH) precision...and finishing tuch...so this will also play a role.
Hi MarcHi Tony,
I am currently looking into the construction of the Hull. Such as the placement of the plank termination templates (20 & 21): no drawing is available... (just like the Stern counter frames etc..).
And indeed I still have to think about the gun ports, and as Mustafa said, not a too complicated construction.
As far as the plans are concerned, those of the Constitution are much clearer, but I'm not complaining...
On the other hand, I'm going to prepare the Keel with for example drilling holes etc...
Cheers
I don't know what the termination templates are. I'll have a look at the instructions and plans and get back to you.
Tony
Please take also a look at the Artois class topic I prepared some time ago
Here you can find several of the drawings (and also models) Allan mentioned already - you will get a good overview
Here you can find several of the drawings (and also models) Allan mentioned already - you will get a good overview
ARTOIS class frigates - 38 gun Royal Navy frigates built to a 1793 design by Sir John Henslow - f.e. HMS Diana
The Artois class were a series of nine frigates built to a 1793 design by Sir John Henslow, which served in the Royal Navy during the French Revolutionary and Napoleonic Wars. Seven of these ships were built by contract with commercial builders, while the remaining pair (Tamar and Clyde) were...
shipsofscale.com
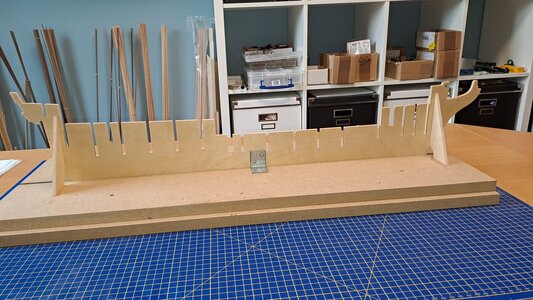
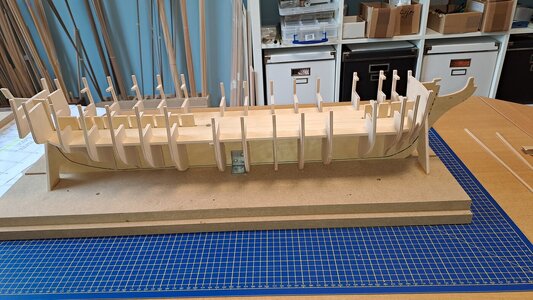
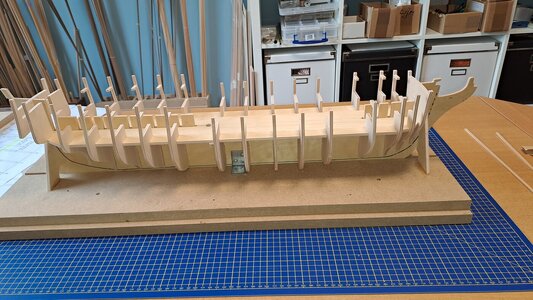
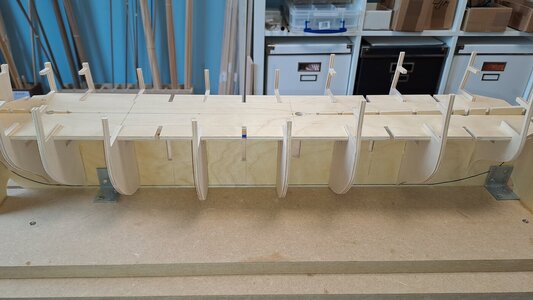
Yesterday (evening) and today I neatly sawed out the Bulkheads and sanded them neatly and carefully, a la Tony.
You will notice that I will only chamfer them later, in other words after gluing the Bulkheads to prepare the 1st planking.
because I filed in the past often too much...
In any case, I first prepared the Keel as much as possible, such as drilling the 1.5mm holes for the bobstays as well as drawing the termination lines of the primary planking....
The I dry fitted all Bulkheads and the Deck (18)....some filing was necessary....
And then gluing the Bulkheads...something that used to cause me problems in the past. After all, even though I did everything I could to glue them neatly at right angles, I later found that it did not fit...
This time I glued the even numbered Bulkheads to the Keel and temporarily placed the Deck to be 100% sure everything fits...Judge for yourself...when everything dries I do the same for the odd numbered Bulkheads...
Cheers
Marc
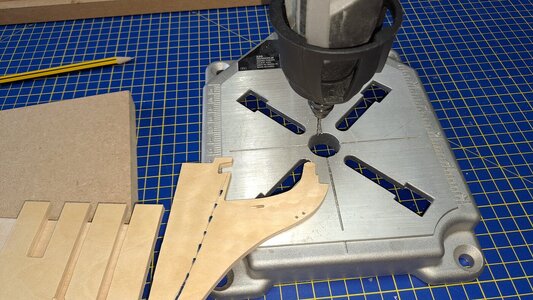
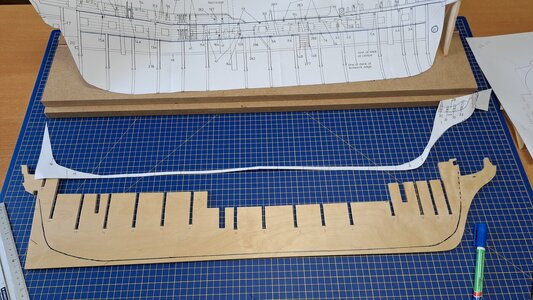
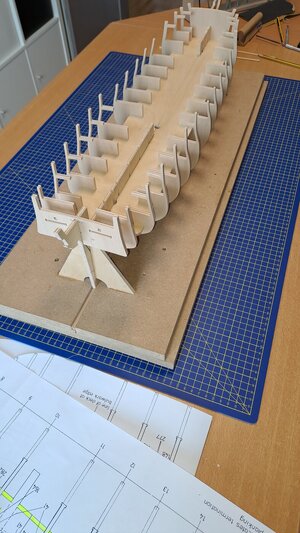


Very carefully done, Marc. Bravo!
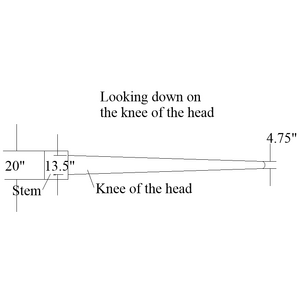
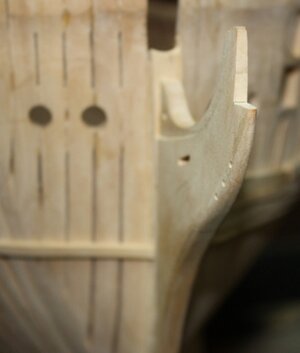
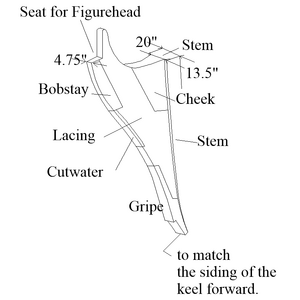
Regarding the knee of the head where you drilled the holes, did you taper it? (It is hard to tell from the photos) It is much easier to do this before assembling but can still be done now. The vast majority of kits ignore this major feature creating an overly thick knee at the seat of the figurehead causing it to look quite bowlegged. The drawing below gives dimensions for a 38 gun ship such as Diana (from David Steel's Elements and Practice of Naval Architecture)I first prepared the Keel as much as possible, such as drilling the 1.5mm holes for the bobstays as well as drawing the termination lines of the primary planking....
You can see that the taper is significant in the drawing below going from 13.5" to 4.75". It is hard to see the large amount of the taper is in the last photo of the Diana model at RMG but will get an idea of how thin it is at the foremost edge. It also tapers to match the width of the keel at the gripe.
Allan

Last edited:
Dear Allen,
I didn't taper the knee of the head as you described.
And this for following reasons:
The figurehead supplied in the kit is based on the width of the Keel (not tapered)...The gap between the 2 legs is 5mm which corresponds to the thickness of the Keel. So I would like to avoid problems by the assembling of the bow.
On the other hand, the width of the supplied copper plates is also +- 5mm, which allows the Keel to be neatly provided with these plates.
And I can't find any instructions for tapering the Keel anywhere in the manual.
Something I also noticed is that the kit does not include a false Keel at all, which is normally glued under the Keel to also provide a notch for the 1st planking...
With other words no extended tapering is required to allow the Hull planks to lay flat against the False Keel.
This got already my attention buth I don't know yet what I'm goin to do with this...
Cheers
Marc
Hi Marc
Regarding the knee of the head it is not unusual for kits to ignore this tapering. I know of only one that addresses this clearly and one other that describes it in the instructions as an option which makes no sense to me as it is so universal on at least British naval vessels. I realize cost is always an issue but there is no cost to explain with text and a drawing in the instructions. I also realize a lot of folks are unaware of this feature and will not notice so maybe not worth mentioning.
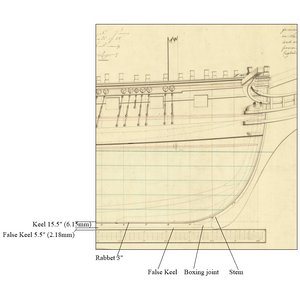
 . ) The planking stops inside the rabbet at the top of the keel. The false keel was stapled to the bottom of the keel so it could tear away in the event of a grounding so as to minimize damage to the keel. I suspect this is a translation or terminology thing so hopefully the sketch below will help. The dimensions from the original contract are below as well. On the drawing I also show the dimensions for 1:64 scale which I think is the Caldercraft kit scale.
Allan

Regarding the knee of the head it is not unusual for kits to ignore this tapering. I know of only one that addresses this clearly and one other that describes it in the instructions as an option which makes no sense to me as it is so universal on at least British naval vessels. I realize cost is always an issue but there is no cost to explain with text and a drawing in the instructions. I also realize a lot of folks are unaware of this feature and will not notice so maybe not worth mentioning.
This is confusing (at least to meSomething I also noticed is that the kit does not include a false Keel at all, which is normally glued under the Keel to also provide a notch for the 1st planking...
With other words no extended tapering is required to allow the Hull planks to lay flat against the False Keel.
Allan


Last edited:
Hello Allen,
I will apply extended tapering which is required to allow the Hull planks to lay flat against the "False" Keel.
However there is only 6 mm space for both the False Keel (2,18 mm) and Keel (6,15 mm).....
I need 5,4 mm for the copper plates means 1 mm for the "notch" for the 1st planking...?
I have to go more in detail and figure it out....
Marc
Hi MarcYesterday (evening) and today I neatly sawed out the Bulkheads and sanded them neatly and carefully, a la Tony.
You will notice that I will only chamfer them later, in other words after gluing the Bulkheads to prepare the 1st planking.
because I filed in the past often too much...
In any case, I first prepared the Keel as much as possible, such as drilling the 1.5mm holes for the bobstays as well as drawing the termination lines of the primary planking....
The I dry fitted all Bulkheads and the Deck (18)....some filing was necessary....
And then gluing the Bulkheads...something that used to cause me problems in the past. After all, even though I did everything I could to glue them neatly at right angles, I later found that it did not fit...
This time I glued the even numbered Bulkheads to the Keel and temporarily placed the Deck to be 100% sure everything fits...Judge for yourself...when everything dries I do the same for the odd numbered Bulkheads...
Cheers
Marc
View attachment 458137
View attachment 458138
View attachment 458139
View attachment 458140
View attachment 458141
View attachment 458142
Seeing your pictures makes me want to start mine but I'll resist the temptation. Did you find where the plank termination templates (20-21) go?
Tony
I am enjoying your log very much Marc. You clearly have an eye for the details and this will help you and me in my build.Yesterday (evening) and today I neatly sawed out the Bulkheads and sanded them neatly and carefully, a la Tony.
You will notice that I will only chamfer them later, in other words after gluing the Bulkheads to prepare the 1st planking.
because I filed in the past often too much...
In any case, I first prepared the Keel as much as possible, such as drilling the 1.5mm holes for the bobstays as well as drawing the termination lines of the primary planking....
The I dry fitted all Bulkheads and the Deck (18)....some filing was necessary....
And then gluing the Bulkheads...something that used to cause me problems in the past. After all, even though I did everything I could to glue them neatly at right angles, I later found that it did not fit...
This time I glued the even numbered Bulkheads to the Keel and temporarily placed the Deck to be 100% sure everything fits...Judge for yourself...when everything dries I do the same for the odd numbered Bulkheads...
Cheers
Marc
View attachment 458137
View attachment 458138
View attachment 458139
View attachment 458140
View attachment 458141
View attachment 458142
Please keep the pictures and your dialogue coming, I love it.
Michael


