-

Win a Free Custom Engraved Brass Coin!!!
As a way to introduce our brass coins to the community, we will raffle off a free coin during the month of August. Follow link ABOVE for instructions for entering.
-

PRE-ORDER SHIPS IN SCALE TODAY!
The beloved Ships in Scale Magazine is back and charting a new course for 2026!
Discover new skills, new techniques, and new inspirations in every issue.
NOTE THAT OUR FIRST ISSUE WILL BE JAN/FEB 2026
- Home
- Forums
- Ships of Scale Group Builds and Projects
- Modelship Dockyard PoF HMS Enterprize 1774 - 1/48
You are using an out of date browser. It may not display this or other websites correctly.
You should upgrade or use an alternative browser.
You should upgrade or use an alternative browser.
HMS ENTERPRISE 1774 by RichardJJS 1:48 scale. New Kit from M.D
- Thread starter richardjjs
- Start date
- Watchers 22
- Joined
- Jul 24, 2016
- Messages
- 540
- Points
- 188

thought i was being stupid but i see what you mean but it still doesnt say how far into the deadwod the taper goes is it jusr E18 and E15It's not mentioned in the instructions, but there are 2 templates. One goes on the bottom and one goes on the back and they will give you the taper.
They are L6-1 and L6-2
- Joined
- Jan 10, 2022
- Messages
- 860
- Points
- 403

The whole deadwood is tapered, top to bottom back to front using the parts L6 1 and 2 as a guide. Put L6 1 on the stern post and L6 2 along the bottom and sand to the lines showing the taperthought i was being stupid but i see what you mean but it still doesnt say how far into the deadwod the taper goes is it jusr E18 and E15
- Joined
- Jan 10, 2022
- Messages
- 860
- Points
- 403

The whole deadwood is tapered, top to bottom back to front using the parts L6 1 and 2 as a guide. Put L6 1 on the stern post and L6 2 along the bottom and sand to the lines showing the taper
- Joined
- Jul 24, 2016
- Messages
- 540
- Points
- 188

Great start, it's always exciting to start something new, good luck!
- Joined
- Jan 10, 2022
- Messages
- 860
- Points
- 403

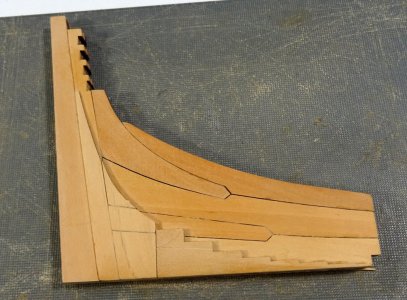
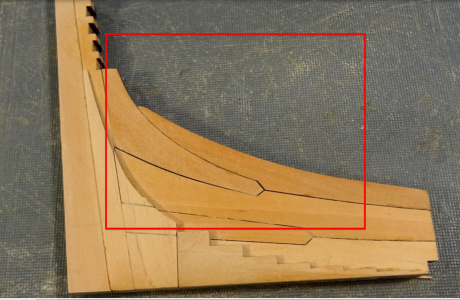
Look at my build log on SoS, post number 77 (page 4 of 11) there are pictures of the stern deadwood and also it shows the taper on the cutwater at the bow
- Joined
- Jul 24, 2016
- Messages
- 540
- Points
- 188

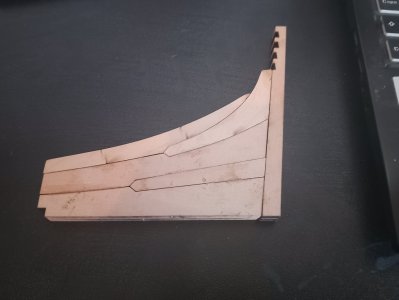
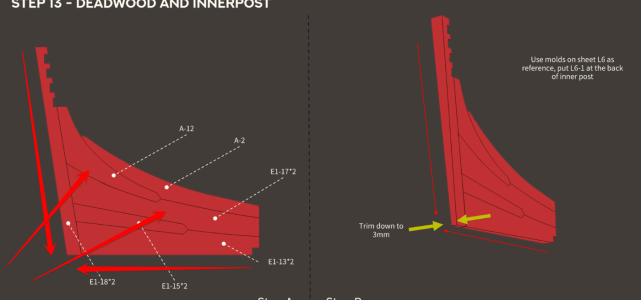
I do understand about the trimming this was not what i wanted its how far into the deadwood the tapering goes
Is it just that section ie E1-15 (2) and E1-13(2) or does it gradually go int dead wood
I presume its for the Planking to come down into the Rabbit I think its shown by the arrows Going into the Deadwood
Dificult to explain or am i being to perdantic and making something Easy Difficult
Same problem with Cutwater at Bow
Thanks


- Joined
- Jan 10, 2022
- Messages
- 860
- Points
- 403

Yes. It goes all the way into the deadwood from top to bottom and front to back. A very slight taper.I do understand about the trimming this was not what i wanted its how far into the deadwood the tapering goes
Is it just that section ie E1-15 (2) and E1-13(2) or does it gradually go int dead wood
I presume its for the Planking to come down into the Rabbit I think its shown by the arrows Going into the Deadwood
Dificult to explain or am i being to perdantic and making something Easy Difficult
Same problem with Cutwater at Bow
Thanks
View attachment 529687
View attachment 529688
- Joined
- Jul 24, 2016
- Messages
- 540
- Points
- 188

Will have a look at the other parts that go onto the tapperd DEadwood
only taper it with the parts shown in step 13. You will add more parts in the next step and put a slight taper into those as well.Will have a look at the other parts that go onto the tapperd DEadwood
- Joined
- Jul 24, 2016
- Messages
- 540
- Points
- 188

only taper it with the parts shown in step 13. You will add more parts in the next step and put a slight taper into those as well.
Quite Urgent My thoughts on this ARE
I have started the trimming was waiting for tomorrow (Its 0200 here )
Looking at step 36 it looks as though the REar Hawse pieces (A19, F2 A, B and C eventually Fit Flat on the dead wood so this must not be trimmed as we need the full 8mm
with G1, 8 and 10 the so that trimming really is in that area
However if you look at Y8 to Y1 (all approx)
Y8 at the top of slot is 8 mm and the bottom of the Slot is 5.0 mm
Y5 at the top of slot is 8 mm and the bottom of the slot is 6.5 mm
Y1 at the top of slot is 8 mm and the bottom of the slot is 8.0 mm
So the lower part of the DEadwood will need trimming up a bit
Am i Overthinking all this or do we need to assemble Y1 - Y8 to allow temporary fitting before we start fitting the other frames
I am just trying to avoid having to trim the Rear Deadwood after its fitted to the keel
(This is what i was trying to do with Forward Cutwater and deadwood)
THe parts G1 8 and 10 i guess need trimming including but NOT the top as the secure the FRames
It looks as though the Deadwood needs trimming from the keel (as we know - up to the top of the deadwood (Part A-2) which is 8 mm so the frames Y1 - Y8 slide down
SORRY IF I AM OVER THINKING just tying to get it right (Have any of us actually had this depth of detail in a POF Model (I know Keef has done 3 including Blandford which does not need the trimming )
Need you guys thoughts on this before i go further - Need to consider the Haws construction tomorrow)
- Joined
- Jan 10, 2022
- Messages
- 860
- Points
- 403

It's good to think ahead, but you are looking at things months away. At the moment, as long as Step 8 A,B,C and D (Fore Deadwood) and Step 13 A and B, Step 14 C and D (stern Deadwood) are completed correctly this is all you need worry about. Get the keel made and fitted into the jig, as long as the steps mentioned are good the frames and hawse pieces should fit (with maybe some fine tuning necessary to the base of the frames but you will only see that when you get to that point. RELAX and don't over thinkQuite Urgent My thoughts on this ARE
I have started the trimming was waiting for tomorrow (Its 0200 here )
Looking at step 36 it looks as though the REar Hawse pieces (A19, F2 A, B and C eventually Fit Flat on the dead wood so this must not be trimmed as we need the full 8mm
with G1, 8 and 10 the so that trimming really is in that area
However if you look at Y8 to Y1 (all approx)
Y8 at the top of slot is 8 mm and the bottom of the Slot is 5.0 mm
Y5 at the top of slot is 8 mm and the bottom of the slot is 6.5 mm
Y1 at the top of slot is 8 mm and the bottom of the slot is 8.0 mm
So the lower part of the DEadwood will need trimming up a bit
Am i Overthinking all this or do we need to assemble Y1 - Y8 to allow temporary fitting before we start fitting the other frames
I am just trying to avoid having to trim the Rear Deadwood after its fitted to the keel
(This is what i was trying to do with Forward Cutwater and deadwood)
THe parts G1 8 and 10 i guess need trimming including but NOT the top as the secure the FRames
It looks as though the Deadwood needs trimming from the keel (as we know - up to the top of the deadwood (Part A-2) which is 8 mm so the frames Y1 - Y8 slide down
SORRY IF I AM OVER THINKING just tying to get it right (Have any of us actually had this depth of detail in a POF Model (I know Keef has done 3 including Blandford which does not need the trimming )
Need you guys thoughts on this before i go further - Need to consider the Haws construction tomorrow)
I can't answer your question because I've not progressed to step 36. I'm just finishing up step 28.
Wood is easy to work with. If I need to make adjustments to make things fit later on, it's easy to do.
Wood is easy to work with. If I need to make adjustments to make things fit later on, it's easy to do.
- Joined
- Jul 24, 2016
- Messages
- 540
- Points
- 188

I used the idea of Selletape ove the joints quite useful
BUT I had problems with the joint not sticking properly
SO now ive gone cack to what i did on Blandford
Ive taken Photocopies of all 37 Sheets and put them in the sleeves that are used in Folders
A thick Cork Tiles under each sheet
Fix in each corner with a Map Pin
And then used excessive glue on each joint
AS Keef recommended fixed each separate piece and allowed to set
Although it takes a bit more time it really woks for me
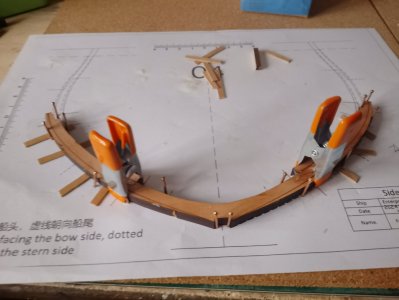
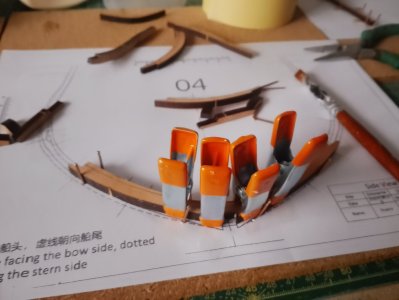
Since doing this ive really got going with the frames
Found some great clamps for the Frames
Been having problems with the Glue but have stopped Cleaning up the Joints and glue both parts and use Keef's idea of Sellotape then clamp
I am doing 1 pair of joints at a time and letting it set
Seems like its really strong
![IMG_20250806_113651[1].jpg IMG_20250806_113651[1].jpg](https://shipsofscale.com/sosforums/data/attachments/520/520064-cf48345a494b179e3a08950650525be0.jpg?hash=ET_fLZ1ywR)
BUT I had problems with the joint not sticking properly
SO now ive gone cack to what i did on Blandford
Ive taken Photocopies of all 37 Sheets and put them in the sleeves that are used in Folders
A thick Cork Tiles under each sheet
Fix in each corner with a Map Pin
And then used excessive glue on each joint
AS Keef recommended fixed each separate piece and allowed to set
Although it takes a bit more time it really woks for me
Since doing this ive really got going with the frames
Found some great clamps for the Frames
Been having problems with the Glue but have stopped Cleaning up the Joints and glue both parts and use Keef's idea of Sellotape then clamp
I am doing 1 pair of joints at a time and letting it set
Seems like its really strong


![IMG_20250806_113651[1].jpg IMG_20250806_113651[1].jpg](https://shipsofscale.com/sosforums/data/attachments/520/520064-cf48345a494b179e3a08950650525be0.jpg?hash=ET_fLZ1ywR)
Last edited:
- Joined
- Jul 24, 2016
- Messages
- 540
- Points
- 188

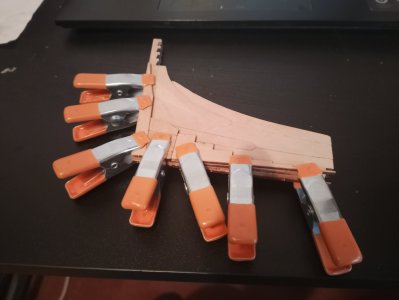
AS you know ive not been sure about the Stern Deadwood
I know i was not sure about how far into the deadwood i should trim the stern and deadwood
The frames Y1 - Y8 Must lie flat and as we get nearer the stern the gap between the top of Y frames is 8mm (is same as the Deadwood
but it narrows at the lower part the nearer the stern we get
Y8 is about 6mm so that part of the deadwood needs to be 6mm (Tapering up to 8mm
Took all this into consideration as i sandpapered the deadwood
Incidentally the 1 and 2 jigs are over 3mm and need a bit of triming
Ive tapered the keel and fitted the parts G1 G8 9 and waiting for it to dry
and then taper to 4 mm
It looks good so far

- Joined
- Jan 10, 2022
- Messages
- 860
- Points
- 403

Please stop what you are doing. This is wrong. Will explain in the morningFound some great clamps for the Frames
Been having problems with the Glue but have stopped Cleaning up the Joints and glue both parts and use Keef's idea of Sellotape then clamp
I am doing 1 pair of joints at a time and letting it set
Seems like its really strong
View attachment 530029
View attachment 530030
- Joined
- Jul 24, 2016
- Messages
- 540
- Points
- 188

Not sure if you are talking Stern or Frames
But its bit late now its all stuck
Note ive still got to lift the upper frames in and ive moved 04 (second picture ) down slighly so it lines up with the dashes
Its also too late for the stern as its also glued up
Could have given me a clue as i will not be able to sleep
But its bit late now its all stuck
Note ive still got to lift the upper frames in and ive moved 04 (second picture ) down slighly so it lines up with the dashes
Its also too late for the stern as its also glued up
Could have given me a clue as i will not be able to sleep

![20250701_132706[1].jpg 20250701_132706[1].jpg](https://shipsofscale.com/sosforums/data/attachments/513/513258-e5de6289c8019f25de459a50fef001e3.jpg?hash=p66xFT1roJ)
