Nice ! I'm a long way off from there. 
-

Win a Free Custom Engraved Brass Coin!!!
As a way to introduce our brass coins to the community, we will raffle off a free coin during the month of August. Follow link ABOVE for instructions for entering.
-

PRE-ORDER SHIPS IN SCALE TODAY!
The beloved Ships in Scale Magazine is back and charting a new course for 2026!
Discover new skills, new techniques, and new inspirations in every issue.
NOTE THAT OUR FIRST ISSUE WILL BE JAN/FEB 2026
- Home
- Forums
- Ships of Scale Group Builds and Projects
- Modelship Dockyard PoF HMS Enterprize 1774 - 1/48
You are using an out of date browser. It may not display this or other websites correctly.
You should upgrade or use an alternative browser.
You should upgrade or use an alternative browser.
HMS ENTERPRISE 1774 by RichardJJS 1:48 scale. New Kit from M.D
- Thread starter richardjjs
- Start date
- Watchers 22
- Joined
- Mar 1, 2022
- Messages
- 692
- Points
- 308

That' a bit annoying, mate. Did you check those parts number twice, at least?All going OK
Thought I would look at doing something completely different So Bought a 3D Printer Impressed so far
Lots of Naval bits to build (And Navel !!)
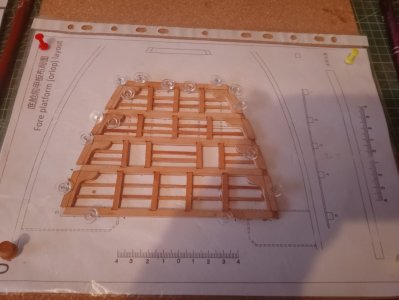
But also started the Fore Platform for a change
THe parts E2 2,3,4,5 all have 4 mm slots for the joining parts
It says use 4x3 But the parts are 4mm so It looks as though they should be 4x4
3mm Sideways is not right
Any body got that far
anythoughts while i get back to FRAMES
thanks
View attachment 540053
View attachment 540054
View attachment 540055
View attachment 540056
View attachment 540057
That's a bit annoying, mate. Did you check numbers of those carlings twice?
- Joined
- Jul 24, 2016
- Messages
- 540
- Points
- 188

Yes All parts are ttally right it says on the arrow going out to the left side 4 x 3 stripsThat' a bit annoying, mate. Did you check those parts number twice, at least?
And the Shaped frames are 4mm as well
All cutting is done on main E2 16 - 13
WAiting to see if anybody else has done it
Thanks
- Joined
- Mar 1, 2022
- Messages
- 692
- Points
- 308

Nothing to do but have them from scratch, then...Yes All parts are ttally right it says on the arrow going out to the left side 4 x 3 strips
And the Shaped frames are 4mm as well
All cutting is done on main E2 16 - 13
WAiting to see if anybody else has done it
Thanks
- Joined
- Jul 24, 2016
- Messages
- 540
- Points
- 188

Have you looked at thisAll going OK
Thought I would look at doing something completely different So Bought a 3D Printer Impressed so far
Lots of Naval bits to build (And Navel !!)
But also started the Fore Platform for a change
THe parts E2 2,3,4,5 all have 4 mm slots for the joining parts
It says use 4x3 But the parts are 4mm so It looks as though they should be 4x4
3mm Sideways is not right
Any body got that far
anythoughts while i get back to FRAMES
thanks
View attachment 540053
View attachment 540054
View attachment 540055
View attachment 540056
View attachment 540057
Very strange
The top 2 Pictures shoe a gap at the Top of the Platform And the Spar
The bottom two show a Gap between the Spar
Obviously Bottom is wrong
Instruction say use a 4 x3 But it looks like 4x4
- Joined
- Jul 24, 2016
- Messages
- 540
- Points
- 188

Just watched the 1:96 Video and YES there is a gap
On 1:96 the Frame is 2mm and the Carlings are 1.5 so that's correct with a gap at the top
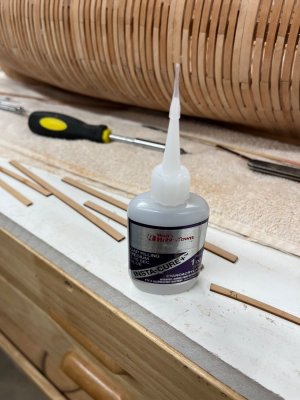
Interestingly he use thin CA Glue My Plans are all in sleeves that go in a binder so stop the glue sticking
Using Gorilla Wood Glue
as there is room and it is easy to adjust after its set with at Heat Gun
ONWARD AND UPWARD
Last edited:
- Joined
- Jul 24, 2016
- Messages
- 540
- Points
- 188

The 1/96 build not withstanding, everything I’ve ever seen indicates they should be level with beams.Just watched the 1:96 Video and YES there is a gap
On 1:96 the Frame is 2mm and the Carlings are 1.5 so that's correct with a gap at the top
Interestingly he use thin CA Glue My Plans are all in sleeves that go in a binder so stop the glue sticking
ONWARD AND UPWARD
IMHO, do NOT use thin CA, it migrates everywhere and makes a far weaker bond, use medium or even thick.
They stay where put, allow adjustment, and are gap filling.
I have extensive CA experience and actually am about 1/2 way along installing all of the deck clamps using medium and will do exterior planking with it as well. Just remember a little dab goes a long way. Also use it only with long thin extender tips allowing very precise application.


Looking very nice indeed. I'm part way throught the 1:96 boxwood version and would like to ask you how you faired the interior bow and stern frames once assembled, and whether you could get a flat and level transition from frame to frame?
Richard
Richard
- Joined
- Jul 24, 2016
- Messages
- 540
- Points
- 188

Not got that far yet Interesting to here how others dod itLooking very nice indeed. I'm part way throught the 1:96 boxwood version and would like to ask you how you faired the interior bow and stern frames once assembled, and whether you could get a flat and level transition from frame to frame?
Richard
Guess it wil be easier on 1:48 as there is more room
- Joined
- Jul 24, 2016
- Messages
- 540
- Points
- 188

Sorry I am talking about the Orlop For PLatformThe 1/96 build not withstanding, everything I’ve ever seen indicates they should be level with beams.
IMHO, do NOT use thin CA, it migrates everywhere and makes a far weaker bond, use medium or even thick.
They stay where put, allow adjustment, and are gap filling.
I have extensive CA experience and actually am about 1/2 way along installing all of the deck clamps using medium and will do exterior planking with it as well. Just remember a little dab goes a long way. Also use it only with long thin extender tips allowing very precise application.
View attachment 540857
View attachment 540858
Just wanted to do something different
Ive not used CA just said whet the guy doing the 1:98 used
Ive used Gorilla Wood Glue and Titebond
But will agre on CA Type
Not sure if that was directed at me, but it boils down to lots of sanding.Looking very nice indeed. I'm part way throught the 1:96 boxwood version and would like to ask you how you faired the interior bow and stern frames once assembled, and whether you could get a flat and level transition from frame to frame?
Richard
Most of it gets you pretty close using the Wen hand held belt sander that I posted an image of a while back, using finer belts( easy to go too far with a heavy hand, you have to keep it moving). It reduces effort substantially.
Your task is harder given you have a much smaller space and box is that much harder, just no substitute for time.
Thanks, I'll have to look into that. I've not tried belt sanders before.Not sure if that was directed at me, but it boils down to lots of sanding.
Most of it gets you pretty close using the Wen hand held belt sander that I posted an image of a while back, using finer belts( easy to go too far with a heavy hand, you have to keep it moving). It reduces effort substantially.
Your task is harder given you have a much smaller space and box is that much harder, just no substitute for time.
- Joined
- Jul 24, 2016
- Messages
- 540
- Points
- 188

- Joined
- Jul 24, 2016
- Messages
- 540
- Points
- 188

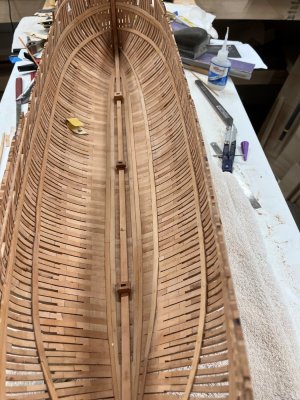
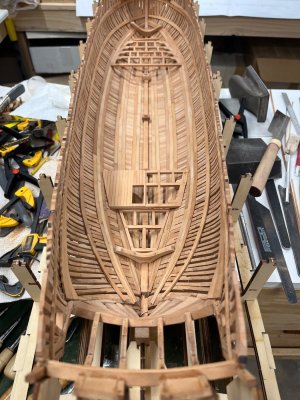
Starting on the FINAL FRAME
Cant say i am not relieved But did enjoy the journey
Note i find it easier to join the frames that are flat first And then liift them insert the Fillers And finalise the gluing
its only taken 56 frames !!!
And now to get them mounted
1-36 are fixed
X1 - x9 are fixed
Need to sand down Y1 - Y 10 and Fix those
Trying to source some Pear sheet in UK as there is NO REPLY from Victor
![IMG_20250902_094213[1].jpg IMG_20250902_094213[1].jpg](https://shipsofscale.com/sosforums/data/attachments/525/525421-3dd70f9ca30c77adb672ba2cd8d6833c.jpg?hash=gGOwZPSoQW)
![IMG_20250902_094204[1].jpg IMG_20250902_094204[1].jpg](https://shipsofscale.com/sosforums/data/attachments/525/525422-22ee3af31c448b6fb3ed114d3e7d00d1.jpg?hash=p9sSZOSYDB)
Couple guys building the 1/48 have bought the inexpensive Wen unit ant they love them.....real time saver.Thanks, I'll have to look into that. I've not tried belt sanders before.
Good morning Richard. Looking very nice indeed. Cheers GrantThe 1/96 build not withstanding, everything I’ve ever seen indicates they should be level with beams.
IMHO, do NOT use thin CA, it migrates everywhere and makes a far weaker bond, use medium or even thick.
They stay where put, allow adjustment, and are gap filling.
I have extensive CA experience and actually am about 1/2 way along installing all of the deck clamps using medium and will do exterior planking with it as well. Just remember a little dab goes a long way. Also use it only with long thin extender tips allowing very precise application.
View attachment 540857
View attachment 540858
Just realized your Orlop is built( as per instruction) upside down, all carlings level with surface.Sorry I am talking about the Orlop For PLatform
Just wanted to do something different
Ive not used CA just said whet the guy doing the 1:98 used
Ive used Gorilla Wood Glue and Titebond
But will agre on CA Type
Apologies for my error, Realized all as I got into their construction….moving along, carlings next.
P.S. everything done with medium CA.
P.P.S., For decking, I did not remove char, IMO results in very nice result.
Tim

Last edited:
The idea of thumb tacks holding the pieces in place on the drawing is great. Beats using weights for a few reasons that I can see and will give it a try, especially as I need to use PVA whenever possible and it takes longer to cure than CA so needs to be held in place. Thanks for the detailed photos.
Allan
Allan
Congrats on making it to the last frame !Starting on the FINAL FRAME
Cant say i am not relieved But did enjoy the journey
Note i find it easier to join the frames that are flat first And then liift them insert the Fillers And finalise the gluing
its only taken 56 frames !!!
And now to get them mounted
1-36 are fixed
X1 - x9 are fixed
Need to sand down Y1 - Y 10 and Fix those
Trying to source some Pear sheet in UK as there is NO REPLY from Victor
View attachment 541642
View attachment 541643
I'm working on the cant frames for the bow.


![IMG_20250902_094400[1].jpg IMG_20250902_094400[1].jpg](https://shipsofscale.com/sosforums/data/attachments/525/525419-48eaddd9de8dc8f4f2fbb552f2f90c10.jpg?hash=y6BZR-myIO)
![IMG_20250902_094412[1].jpg IMG_20250902_094412[1].jpg](https://shipsofscale.com/sosforums/data/attachments/525/525420-af009105d80d5f57914ce6dbd8ffc1d7.jpg?hash=Yd6S427qtO)

