• LUCZORAMA SHIPWRECK SCAVENGER HUNT GIVEAWAY. 4 Weeks of Fun • 1 Legendary Prize ((OcCre’s Fram Ship)) • Global Crew Welcome!
    **VIEW THREAD HERE**

HMS Enterprize 1/96 by Modelship Dockyard

Here's my $0.01 worth: Rather than laying the beams starting from the bow or from the stern, I suggest starting, with the beams in front of and behind each mast location - start at the foremast, main, and mizzen mast areas, then install the beams alternating bow-then stern from each mast location. This way, any errors are not additive, as Russ explains, especially if the errors affect the positioning of the masts; actually, should do the same approach with any structures such as capstans and anchor bits, that pierce several decks.

Alex R
 
Just my $0.02 worth, but in my opinion, you're better off matching the locations to the drawings like you were. The lodging knees look like they come from a laser cut sheet (if I'm seeing the sheet in the upper left of your photo correctly). That means that you are sanding them to clean up the char. This will introduce inconsistencies in the sizes of the knees. If you then use them to space your beams, the errors could accumulate and cause you more problems later, such as falling short by the time you get to the end or possibly crooked beams. If you place the beams according to the drawings, you can then adjust the size of the knees and carlings to fit.
That's a good thought, and basically what I'm doing now. Wasn't sure if that was the better way or not, I know it's not how the instructions mean for it to be done.
 
Here's my $0.01 worth: Rather than laying the beams starting from the bow or from the stern, I suggest starting, with the beams in front of and behind each mast location - start at the foremast, main, and mizzen mast areas, then install the beams alternating bow-then stern from each mast location. This way, any errors are not additive, as Russ explains, especially if the errors affect the positioning of the masts; actually, should do the same approach with any structures such as capstans and anchor bits, that pierce several decks.

Alex R
I don't have photos yet but I'm working on the pieces that cross multiple decks and they align so far, so I'll probably install those and build the beams around them
 
Appreciate that!

I will say the reason why I haven't updated in a bit is because I'm working on making some substitutions to the build, scratch building some of the parts they laser cut. I think it'll add some pop
I look forward to hearing about what you are replacing. :)
 
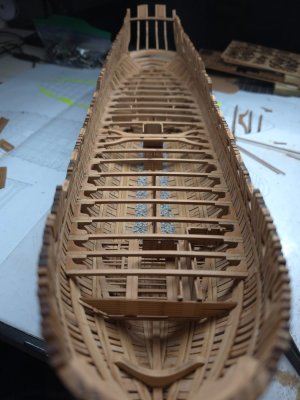
So I made a mistake when I did this. I tried to match the beam spacing to the floor plan below based upon the sheet that came with the kit. In fact, you'll see the beam spacing is determined by the pieces that fit between them. When I finally went to finish the flooring the knees and supports didn't fit perfectly because I didn't space them correctly. Really how it should be done is the beams should be installed at the same time as the knees.

View attachment 505093

See I had to adjust the spacing to make it fit. And you probably want to start from the bow and work backwards, instead of stern forward. The reason why is because the second floor must align to this floor and I think the way it's designed is that will happen if you space things correctly.
Yes. Thank you. That makes sense. I will take your advice and attempt it your way.
I appreciate your help and reply.
 
If you start at the bow end, what governs the first beam that you install ?
Sorry for being thick but I just can’t get my head around this bit yet. :confused:
 
If you start at the bow end, what governs the first beam that you install ?
Sorry for being thick but I just can’t get my head around this bit yet. :confused:

You're fine.

You would use the knees that go in-between the first beam and the bow. But there was a good point earlier that you may be better off using the drawings.

20241222_003358.jpg

The way I used the drawings was I picked a beam, found it on the drawing and saw where the beam was in relation frame. Like it's easy to look at a beam that aligns with a frame that has a gun port and make it align that way.
 
You're fine.

You would use the knees that go in-between the first beam and the bow. But there was a good point earlier that you may be better off using the drawings.

View attachment 505147

The way I used the drawings was I picked a beam, found it on the drawing and saw where the beam was in relation frame. Like it's easy to look at a beam that aligns with a frame that has a gun port and make it align that way.
Now it becomes clear. Thank you so much.
 
You do some awesome work. Like Corsair I am waiting on my 1:48 kit and am anxious to make the sawdust and chips fly. I’ve laid my keel in my mind a hundred times. Kudos on the great job you are doing
 
Here's my $0.01 worth: Rather than laying the beams starting from the bow or from the stern, I suggest starting, with the beams in front of and behind each mast location - start at the foremast, main, and mizzen mast areas, then install the beams alternating bow-then stern from each mast location. This way, any errors are not additive, as Russ explains, especially if the errors affect the positioning of the masts; actually, should do the same approach with any structures such as capstans and anchor bits, that pierce several decks.

Alex R
Alex has the right idea here. In real life boatbuilding you start amidship and work both toward the bow and the stern alternating as you go. This cuts the growth by half. By starting in two, three or four places along the length of the hull you keep the growth to a minimum but when laying out where you want to start, you must always start your measurements from The exact same place. There’s my nickels worth.
 
Thanks to all who have contributed to this blog. I purchased this kit a few months back and the comments being made will be of big help to my first build of a POF model. I have many years of experience with plastic/resin ship kits but never have built a real model :-). I look forward to the experience. Thank you again for taking the time to share on this thread.
 
Thanks to all who have contributed to this blog. I purchased this kit a few months back and the comments being made will be of big help to my first build of a POF model. I have many years of experience with plastic/resin ship kits but never have built a real model :-). I look forward to the experience. Thank you again for taking the time to share on this thread.
I also came from plastic/resin models, I enjoy wood significantly more, though it takes a lot more time. Look forward to you getting started!
 
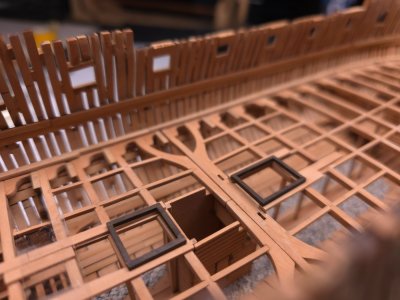
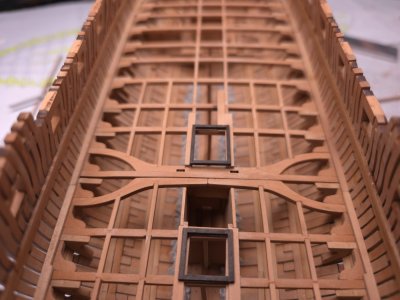
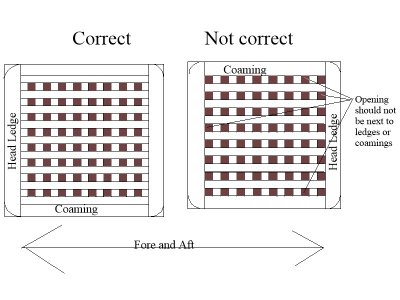
Using ebony instead of paint is great to see. They will contrast well with the gratings. Have you made the gratings already? It is far easier to make the grating as close to the right size as possible with no opening on the outer edges followed by making the head ledges and coamings to fit the grating rather than the other way around. If you make the coaming and head ledge assembly first, it is difficult at times to make the gratings fit properly and they often wind up with the openings instead of solid wood against the framework as on the sketch below.
Allan
1742207274847.jpeg
 
Last edited:
Using ebony instead of paint is great to see. They will contrast well with the gratings. Have you made the gratings already? It is far easier to make the grating as close to the right size as possible with no opening on the outer edges followed by making the head ledges and coamings to fit the grating rather than the other way around. If you make the coaming and head ledge assembly first, it is difficult at times to make the gratings fit properly and they often wind up with the openings instead of solid wood against the framework as on the sketch below.
Allan

View attachment 507994


You bring up an interesting I wasn't planning on doing the gratings for this deck because the plans don't call for it. Maybe I will for the top deck since they'll be viewable. I think if I do it would be ebony for the coamings and a different color for the gratings.
 
Back
Top