Good Morning Mark. You are owning this. Admiralty paints ( perfect colour ), beautiful wale and planking. Holding the SA flag high my friend.There was more to the inner bulwark planking than met the eye. Well my eye at least. The first bit was relatively straightforward, especially in the waist, stacking the 'quickwork' planks between the oar and portholes towards the top edge of the bulwarks.
View attachment 350319
Then I had to decide how high up the bulwarks to plank. Most examples I saw only went as far as the upper deck beam supports, and continued again after the upper decks had been installed. I opted to compete all the inner bulwark planking up front, although this required the bulkhead extensions to be trimmed to deck level in order to lay uninterrupted planks along the stern and bow sections.
View attachment 350333
Also, the support beam that marks the edge of the quarterdeck needed to be installed prior to planking all the way to the top. This beam is different from the others in that it extends into the bulwark planking, and would be awkward to fit with the planking already in place. Not to mention the rear main mast bit assembly, which sits directly beneath the support beam and needed to be fixed in position on deck before the beam was installed.
View attachment 350334
I couldn't think of any other deck parts that might be compromised by this process and continued planking to the top of the bulwarks, using a needle file to clean out and make as square as possible all of the oar and portholes.
View attachment 350335
Painting the inner bulwarks in red ochre was a relatively straightforward process, but lining the gun ports was not. The instructions did not call for the explicit lining of the gun ports, but I did notice it in many of the HMS Fly and Pegasus builds and thought I'd give it a go using strips of the Tanganyika deck planking wood, sanded, and pre-painted in red ochre.
View attachment 350336
The gun port linings, I discovered, are only as good as the extent to which the gun ports are made square, and the edges of the lining invariably had to be cut at an angle to accommodate the shape of the gun port in an undulating bulwark. I don't think I got it exactly right but it was a bit of fun all the same
View attachment 350337
So that's the inner bulwark planking done and dusted. With the outer and inner planking now complete the hull as a whole feels far more a solid and robust than it did previously. I find it interesting that with each separate phase of building a model ship you tend to develop a system for the task at hand, especially repetitive tasks such as the lining of 18 gun ports. And just when you have it down pat, which in my case is when there are only two or three left to go, the phase ends and you move on to the next one, which again requires a whole new system and modus operandi. Wash, rinse, repeat...
View attachment 350338
-

Win a Free Custom Engraved Brass Coin!!!
As a way to introduce our brass coins to the community, we will raffle off a free coin during the month of August. Follow link ABOVE for instructions for entering.
-

PRE-ORDER SHIPS IN SCALE TODAY!
The beloved Ships in Scale Magazine is back and charting a new course for 2026!
Discover new skills, new techniques, and new inspirations in every issue.
NOTE THAT OUR FIRST ISSUE WILL BE JAN/FEB 2026
You are using an out of date browser. It may not display this or other websites correctly.
You should upgrade or use an alternative browser.
You should upgrade or use an alternative browser.
Good morning, Mark. Well, I'm just discovering your magnificent Fly build. You are really on top of this one. The HMS Fly was my first build to share on this forum and am now looking forward to following your efforts.
Excellent, The looks of your planking is my wish for the ships I have yet to build. I wish I could find a person somewhat close to me to teach me. I have read all kinds of books and so much stuff just on planking the hull and its all jumbled up in my head. Now I am chasing how to make a planking fan.
I am a little bit late with my reaction, but the bulwarks with the red ochre looks great, Mark. And the lining of the gunports is nice.There was more to the inner bulwark planking than met the eye. Well my eye at least. The first bit was relatively straightforward, especially in the waist, stacking the 'quickwork' planks between the oar and portholes towards the top edge of the bulwarks.
View attachment 350319
Then I had to decide how high up the bulwarks to plank. Most examples I saw only went as far as the upper deck beam supports, and continued again after the upper decks had been installed. I opted to complete all the inner bulwark planking up front, although this required the bulkhead extensions to be trimmed to deck level in order to lay uninterrupted planks along the stern and bow sections.
View attachment 350333
Also, the support beam that marks the edge of the quarterdeck needed to be installed prior to planking all the way to the top. This beam is different from the others in that it extends into the bulwark planking, and would be awkward to fit with the planking already in place. Not to mention the rear main mast bit assembly which sits directly beneath the support beam. This, in turn, needed to be fixed in position before the beam could be installed.
View attachment 350334
I couldn't think of any other deck parts that might be compromised by this process and continued planking to the top of the bulwarks, using a needle file to clean out and make as square as possible all of the oar and portholes.
View attachment 350335
Painting the inner bulwarks in red ochre was a relatively straightforward process, but lining the gun ports was not. The instructions did not call for the explicit lining of the gun ports, but I did notice it in many of the HMS Fly and Pegasus builds and thought I'd give it a go using strips of the Tanganyika deck planking wood, sanded, and pre-painted in red ochre.
View attachment 350336
The gun port linings, I discovered, are only as good as the extent to which the gun ports are made square, and the edges of the lining invariably had to be cut at an angle to accommodate the shape of the gun port in an undulating bulwark. I don't think I got it exactly right but it was a bit of fun all the same
View attachment 350337
So that's the inner bulwark planking done and dusted. With the outer and inner planking now complete the hull as a whole feels far more a solid and robust than it did previously. I find it interesting that with each separate phase of building a model ship you tend to develop a system for the task at hand, especially repetitive tasks such as the lining of 18 gun ports. And just when you have it down pat, which in my case is when there are only two or three left to go, the phase ends and you move on to the next one, which again requires a whole new system and modus operandi. Wash, rinse, repeat...
View attachment 350338

Regard, Peter
I'm honoured Daniel, welcome on boardGood morning, Mark. Well, I'm just discovering your magnificent Fly build. You are really on top of this one. The HMS Fly was my first build to share on this forum and am now looking forward to following your efforts.
It'll be a slow journey though ...
Last edited:
Thanks Grant. Yes the Admiralty paints are very nice indeed. I think I was lucky when I included the 'paint set for HMS Fly' when I bought the kit from an outfit in Cornwall. I don't think we can get that kind of thing here in Oz and, like in SA no doubt, we are a bit reliant on overseas stock and online purchasesGood Morning Mark. You are owning this. Admiralty paints ( perfect colour ), beautiful wale and planking. Holding the SA flag high my friend.Cheers Grant
Thanks Jim, much apreciated. Although I know exactly how you feel about planking, and I have yet to be convinced that I have any real confidence in my ability to do it properly. The HMS Fly is my second model ship and I was determined to follow a more tried and tested method this time round, yet despite all the techniques, videos and instructions I pored over endlessly I was still crossing fingers and hoping for the best by the time I laid the final plank. I now suspect that hulls are not all born equal, and perhaps this is why there isn't a consistent and definitive method of planking them. The planking fan confused me no end, and in the end I simply started laying and tapering the planks as I saw fit for the purposes of this particular hull.Excellent, The looks of your planking is my wish for the ships I have yet to build. I wish I could find a person somewhat close to me to teach me. I have read all kinds of books and so much stuff just on planking the hull and its all jumbled up in my head. Now I am chasing how to make a planking fan.
I wish you all the best of luck with it. I know that next time I have to plank a hull I won't be stressing too much over the precision and perfection of it all
Thanks Peter, a compliment from you is a compliment indeedI am a little bit late with my reaction, but the bulwarks with the red ochre looks great, Mark. And the lining of the gunports is nice.
Regard, Peter
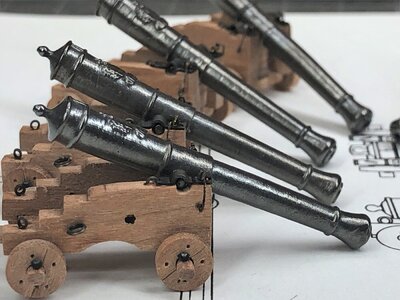
Before continuing work on the main and upper decks I turned my attention to the Fly's sixteen guns and carriages, some of which will need to be installed fore and aft on the gun deck before those areas are made inaccessible by the upper decks. To this end, Amati supplies a set of rather ungainly cast metal carriages to house the guns.
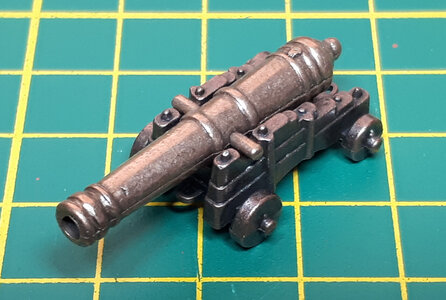
They do however also provide an upgrade kit, which among other things includes a more authentic set of unassembled wooden carriages, trucks, and insignia for the barrels. This was a far better option, given that I optimistically plan on using blocks and tackle to rig the guns to the deck and bulwarks which would be all but impossible with cast metal carriages.
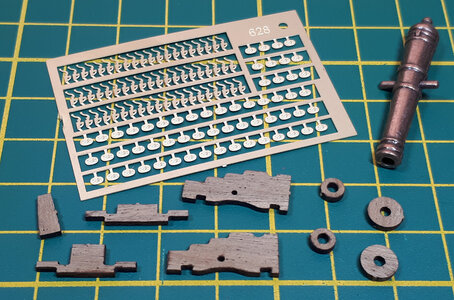
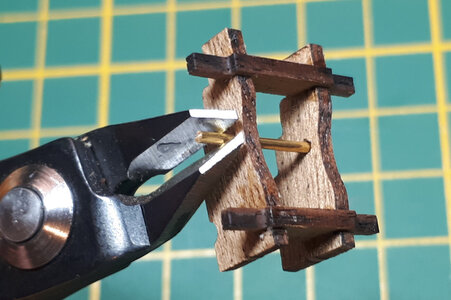
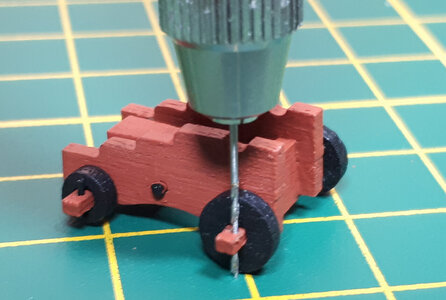
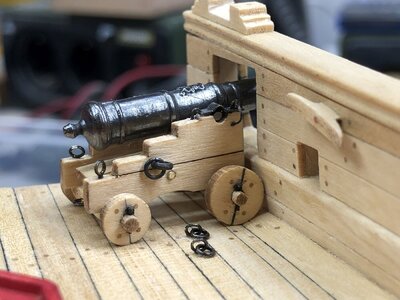
The carriage is easily assembled with glue, and lengths of 1mm wire to support the bed between the two side brackets. The wire is cut just a smidgeon proud of the bracket to resemble a rivet head, which will be painted black.
The carriages are painted red occhre in keeping with the general theme of the Fly, and the trucks a dull black. The axles can and probably should be rounded at the ends but I left them as is on account of their flimsiness and also because I wanted room to install the truck pins.
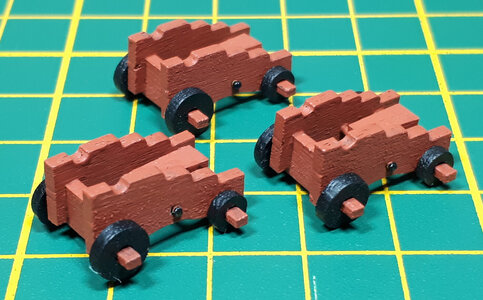
The truck pins are represented by lengths of .6mm black wire and proved more than just a decoration; they really do hold the trucks securely on the axle
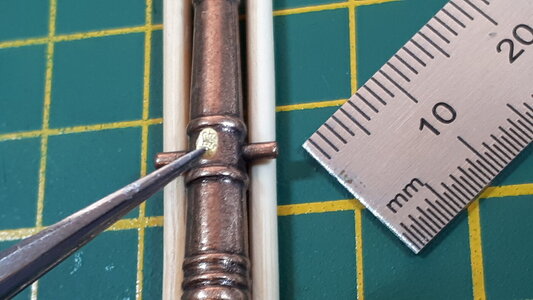
The brass insignia for each barrel is mindlessly tiny, and required serious magnification to ensure that the it was installed crown-side up. Even then I couldn't be too sure. It also has to be installed on the same side as the touch hole and vent situated just forward of the cascobal.
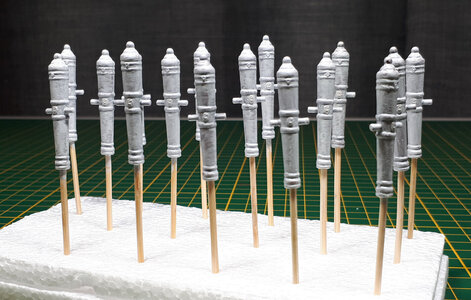
Many discerning ship modellers appear to purchase 'better' sets of barrels than those supplied by the kit, and also use various amalgamations of chemical processes to blacken the brass of each gun barrel. This was a bit beyond my limited knowledge of alchemy though, and I opted instead to paint them using Admiralty Paint's Ironwork Black range, preceded by a coat of primer, in this case Vallejo's acrylic grey surface primer. The primer contracts well as it dries and very little of the barrel or insignia detail is lost.
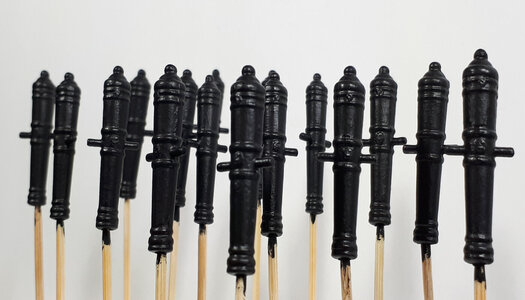
Two coats of Ironwork Black paint completed the blacking process and the gun barrels are ready to go
Of course this is only half the job, if that. There is still quite a bit more to be done. Cap squares to secure the trunnions to the carriage assembly are yet to be installed, while each of the sixteen gun carriages have yet to be fixed with eye bolts, blocks and tackle to rig them to the bulwarks and gun deck. I plan to rig the guns in a run-out fashion, which is probably the worst option in terms of the detail required, and it is yet to be seen if I have the fortitude to rig all of the guns in this way or only the ones that will be visible in the end. This will have to wait for now though as I am waiting on an order of appropriately scaled breeching rope and a stock of ridiculously small eye bolts to rig the tackle.
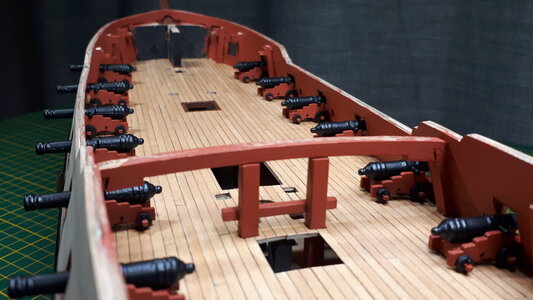
There was a lot of wash, rinse and repeat in assembling these gun carriages. Any fix or modification must be multiplied by sixteen before the job can be considered done, and I dread to think of the blood, sweat and damage to natural eyesight it must take to assemble and rig the guns of a 74-gun man-o-war

They do however also provide an upgrade kit, which among other things includes a more authentic set of unassembled wooden carriages, trucks, and insignia for the barrels. This was a far better option, given that I optimistically plan on using blocks and tackle to rig the guns to the deck and bulwarks which would be all but impossible with cast metal carriages.

The carriage is easily assembled with glue, and lengths of 1mm wire to support the bed between the two side brackets. The wire is cut just a smidgeon proud of the bracket to resemble a rivet head, which will be painted black.

The carriages are painted red occhre in keeping with the general theme of the Fly, and the trucks a dull black. The axles can and probably should be rounded at the ends but I left them as is on account of their flimsiness and also because I wanted room to install the truck pins.

The truck pins are represented by lengths of .6mm black wire and proved more than just a decoration; they really do hold the trucks securely on the axle

The brass insignia for each barrel is mindlessly tiny, and required serious magnification to ensure that the it was installed crown-side up. Even then I couldn't be too sure. It also has to be installed on the same side as the touch hole and vent situated just forward of the cascobal.

Many discerning ship modellers appear to purchase 'better' sets of barrels than those supplied by the kit, and also use various amalgamations of chemical processes to blacken the brass of each gun barrel. This was a bit beyond my limited knowledge of alchemy though, and I opted instead to paint them using Admiralty Paint's Ironwork Black range, preceded by a coat of primer, in this case Vallejo's acrylic grey surface primer. The primer contracts well as it dries and very little of the barrel or insignia detail is lost.

Two coats of Ironwork Black paint completed the blacking process and the gun barrels are ready to go

Of course this is only half the job, if that. There is still quite a bit more to be done. Cap squares to secure the trunnions to the carriage assembly are yet to be installed, while each of the sixteen gun carriages have yet to be fixed with eye bolts, blocks and tackle to rig them to the bulwarks and gun deck. I plan to rig the guns in a run-out fashion, which is probably the worst option in terms of the detail required, and it is yet to be seen if I have the fortitude to rig all of the guns in this way or only the ones that will be visible in the end. This will have to wait for now though as I am waiting on an order of appropriately scaled breeching rope and a stock of ridiculously small eye bolts to rig the tackle.

There was a lot of wash, rinse and repeat in assembling these gun carriages. Any fix or modification must be multiplied by sixteen before the job can be considered done, and I dread to think of the blood, sweat and damage to natural eyesight it must take to assemble and rig the guns of a 74-gun man-o-war
Last edited:
- Joined
- Jan 9, 2020
- Messages
- 10,566
- Points
- 938

Nice going Mark. I like your carriages and cannons - however, I am not a fan of process associated with rigging them at this scale. I wish you the best of luck with that endeavor. Judging by the overall appearance of your HMS Fly, I have no doubt that you will succeed admirably.
Good morning. Marky Mark….you are totally owning this! Have fun rigging those canons, fiddly stuff (have your swear jar readyBefore continuing work on the main and upper decks I turned my attention to the Fly's sixteen guns and carriages, some of which will need to be installed fore and aft on the gun deck before those areas are made inaccessible by the upper decks. To this end, Amati supplies a set of rather ungainly cast metal carriages to house the guns.
View attachment 352870
They do however also provide an upgrade kit, which among other things includes a more authentic set of unassembled wooden carriages, trucks, and insignia for the barrels. This was a far better option, given that I optimistically plan on using blocks and tackle to rig the guns to the deck and bulwarks which would be all but impossible with cast metal carriages.
View attachment 352871
The carriage is easily assembled with glue, and lengths of 1mm wire to support the bed between the two side brackets. The wire is cut just a smidgeon proud of the bracket to resemble a rivet head, which will be painted black.
View attachment 352872
The carriages are painted red occhre in keeping with the general theme of the Fly, and the trucks a dull black. The axles can and probably should be rounded at the ends but I left them as is on account of their flimsiness and also because I wanted room to install the truck pins.
View attachment 352873
The truck pins are represented by lengths of .6mm black wire and proved more than just a decoration; they really do hold the trucks securely on the axle
View attachment 352874
The brass insignia for each barrel is mindlessly tiny, and required serious magnification to ensure that the it was installed crown-side up. Even then I couldn't be too sure. It also has to be installed on the same side as the touch hole and vent situated just forward of the cascobal.
View attachment 352875
Many discerning ship modellers appear to purchase 'better' sets of barrels than those supplied by the kit, and also use various amalgamations of chemical processes to blacken the brass of each gun barrel. This was a bit beyond my limited knowledge of alchemy though, and I opted instead to paint them using Admiralty Paint's Ironwork Black range, preceded by a coat of primer, in this case Vallejo's acrylic grey surface primer. The primer contracts well as it dries and very little of the barrel or insignia detail is lost.
View attachment 352876
Two coats of Ironwork Black paint completed the blacking process and the gun barrels are ready to go
View attachment 352877
Of course this is only half the job, if that. There is still quite a bit more to be done. Cap squares to secure the trunnions to the carriage assembly are yet to be installed, while each of the sixteen gun carriages have yet to be fixed with eye bolts, blocks and tackle to rig them to the bulwarks and gun deck. I plan to rig the guns in a run-out fashion, which is probably the worst option in terms of the detail required, and it is yet to be seen if I have the fortitude to rig all of the guns in this way or only the ones that will be visible in the end. This will have to wait for now though as I am waiting on an order of appropriately scaled breeching rope and a stock of ridiculously small eye bolts to rig the tackle.
View attachment 352878
There was a lot of wash, rinse and repeat in assembling these gun carriages. Any fix or modification must be multiplied by sixteen before the job can be considered done, and I dread to think of the blood, sweat and damage to natural eyesight it must take to assemble and rig the guns of a 74-gun man-o-war
 ) but when done will look awesome. Cheers Grant
If I could (speaking now from my VAST experience  ), these can be fully rigged but create a working board/jig off the ship and do as much as you can there. You should only need to insert some ringbolts (or attach some hooks if you are using them) once you deliver the fully rigged gun to the ship. I'll be cheering you on! I hated this job.
a very good improvement
A small comment for maybe for the next project
Especially beacuse of the red colour in front of the black wheels we see the square cross section of the axles very much
with some small sanding you could try to get a circular cross section instead of the square
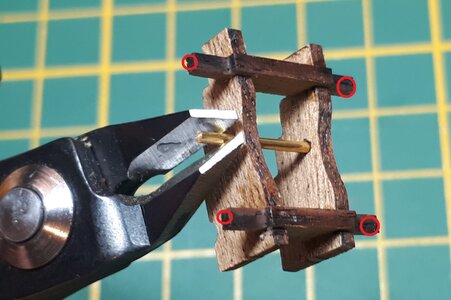
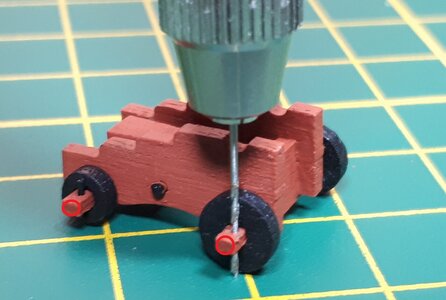
only to make clear what I mean a photo of the Coureur or Granado carriages from the kit - Here also the axles were original laser cut and square cross section
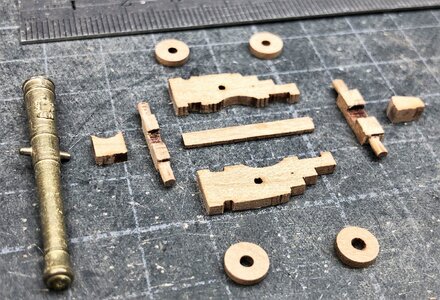
A small comment for maybe for the next project
Especially beacuse of the red colour in front of the black wheels we see the square cross section of the axles very much
with some small sanding you could try to get a circular cross section instead of the square


only to make clear what I mean a photo of the Coureur or Granado carriages from the kit - Here also the axles were original laser cut and square cross section


Thanks Heinrich. I agree, you have to draw the line somewhere. I suspect I'll be moving through stages that vary from 'rig them all', to 'just rig the guns that are visible', to 'don't rig them at all'Nice going Mark. I like your carriages and cannons - however, I am not a fan of process associated with rigging them at this scale. I wish you the best of luck with that endeavor. Judging by the overall appearance of your HMS Fly, I have no doubt that you will succeed admirably.

Thanks Grant. I agree completely.Good morning. Marky Mark….you are totally owning this! Have fun rigging those canons, fiddly stuff (have your swear jar ready) but when done will look awesome. Cheers Grant
Not with the 'will look awesome' bit, but certainly with the 'have your swear jar ready' bit

Agreed Paul. I can't imagine trying to rig them in place on deck with so little workspace. How many guns did your Vasa require, and did you rig the lot or just those you that are visible?If I could (speaking now from my VAST experience), these can be fully rigged but create a working board/jig off the ship and do as much as you can there. You should only need to insert some ringbolts (or attach some hooks if you are using them) once you deliver the fully rigged gun to the ship. I'll be cheering you on! I hated this job.
Good suggestion Uwe, and thanks for the additional photos. I agree, I need to shake off the laziness and round off those axle ends, it certainly will make a differenceEspecially beacuse of the red colour in front of the black wheels we see the square cross section of the axles very much
with some small sanding you could try to get a circular cross section instead of the square

There are 64 guns on the Vasa but only 14 (?) are visible on the weather decks. Those I fully rigged. The remaining guns on the two gun-decks received faux carriages and a few metal bits that might be visible through the port - but no ropes. For some reason I found rigging the guns with blocks/hooks to be marvelously frustrating and it took all the patience I could muster just to do 16. Kurt (@DARIVS ARCHITECTVS) is my hero as he is attempting EVERY gun fully rigged on his Sovereign. If I tried that they would need to clean the carpets to get all the scattered brain matter out of it...How many guns did your Vasa require, and did you rig the lot or just those you that are visible?
Last edited:
I concur with Heinrich , I leave the canons as they are because of the small scale , but every one is free to what they think is bestNice going Mark. I like your carriages and cannons - however, I am not a fan of process associated with rigging them at this scale. I wish you the best of luck with that endeavor. Judging by the overall appearance of your HMS Fly, I have no doubt that you will succeed admirably.
The dockyard has been a bit quiet lately (thank you work  ) and it seems the longer you step away from your model the longer it takes to work out where you left off. Still, I do manage to nip in every so often and have now turned my attention to the rails and frieze works on the upper sides of the hull. The decorations are a tight fit between the waist, sheer and drift rails and precise measuring is the watchword. The kit suggests installing the lower waist rail first and working your way up, and to position the waist rail correctly I found it best to first align the decorations as per their cut-outs at the top of each port hole, and then position the rail below the row of decorations accordingly.
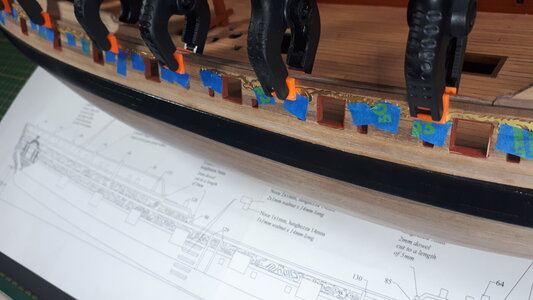
The waist rail is 2 x 1mm walnut and is interrupted throughout its length by each of the nine port holes. I chose to install each segment separately, which in terms of effort was perhaps marginally better than laying the rail as a whole and removing the port hole sections afterwards. The section above the waist rail is painted black, and the section between the rail and the top of the wales is left in its natural walnut state. That said, I have decided to leave the entire hull below the wales au naturale as well. I just haven't got the heart to paint over all those lovely strips of walnut
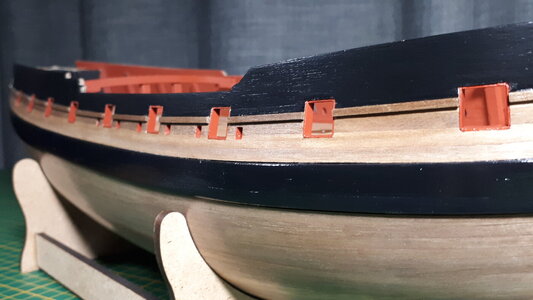
The stern quarter gallery windows also require attention at this stage. Having a gallery piece in place assists with the alignment of the rails along the hull and also indicates where the rails should terminate. It also made sense to paint the gallery pieces before installing them, so the carpenter was given a rest and the painter called up for a tour of duty in the dockyard.
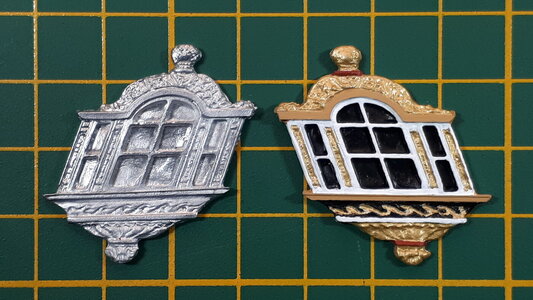
I can't believe how a lick of paint can transform an otherwise dull and lifeless chunk of metal. All you need are a few impossibly fine paint brushes, a rather decent magnifying glass and, most importantly, a set of hands that aren't prone to shaking. Otherwise it was a lot of fun. The colours I chose were gold (top, bottom and mullions), ochre red (that narrow strip), ochre yellow (head and cill), matt white (frames) and dull black (window panes)
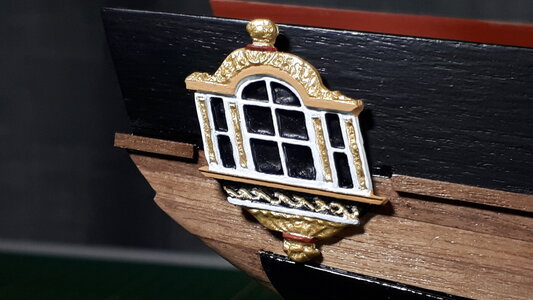
The quarter gallery piece just fits (thankfully) between the top of the wales and the top of the stern bulwarks. Some models use acetate glazing to give the window panes a more realistic look, and others to whom miniature painting must come naturally and have brought out all of the individual figurines buried in the metal moulding. Quite remarkable. For now at least, my Fly and it's dull black windows will have to do. I'll simply assume that it is night time and all the cabin doors are shut and the lanterns have run out of fuel

The waist rail is 2 x 1mm walnut and is interrupted throughout its length by each of the nine port holes. I chose to install each segment separately, which in terms of effort was perhaps marginally better than laying the rail as a whole and removing the port hole sections afterwards. The section above the waist rail is painted black, and the section between the rail and the top of the wales is left in its natural walnut state. That said, I have decided to leave the entire hull below the wales au naturale as well. I just haven't got the heart to paint over all those lovely strips of walnut

The stern quarter gallery windows also require attention at this stage. Having a gallery piece in place assists with the alignment of the rails along the hull and also indicates where the rails should terminate. It also made sense to paint the gallery pieces before installing them, so the carpenter was given a rest and the painter called up for a tour of duty in the dockyard.

I can't believe how a lick of paint can transform an otherwise dull and lifeless chunk of metal. All you need are a few impossibly fine paint brushes, a rather decent magnifying glass and, most importantly, a set of hands that aren't prone to shaking. Otherwise it was a lot of fun. The colours I chose were gold (top, bottom and mullions), ochre red (that narrow strip), ochre yellow (head and cill), matt white (frames) and dull black (window panes)

The quarter gallery piece just fits (thankfully) between the top of the wales and the top of the stern bulwarks. Some models use acetate glazing to give the window panes a more realistic look, and others to whom miniature painting must come naturally and have brought out all of the individual figurines buried in the metal moulding. Quite remarkable. For now at least, my Fly and it's dull black windows will have to do. I'll simply assume that it is night time and all the cabin doors are shut and the lanterns have run out of fuel

Last edited:


