HMS Victory - Caldercraft-Jotika - 1/72. Build log

Thanks Stuart - There was no implication of a 'connection' with Littlefair's, just a thank you for alerting me to them and the water stain product.

Interesting that you comment on the amount of CNC 'dust' in the box. I have often wondered why the manufacturers don't do this and blow out the dust before packing. I wouldn't have thought it was such a big process, yet they expect us to do it.

Regards,

PeterG
It was just me with tongue in cheek TRYING to make a joke! ROTF Thumbsup
At first, I thought the CNC hadn't cut enough, then I realised the kerf was still packed with the dust.
 
They do it because it would cost time and money to remove it so making an expensive kit even more out of reach
I would sooner have the dust than have to clean off laser char
I don't think it would cost much for a few seconds blast between loading each sheet, after all, the machine probably gets a blast of air. Actually, the CNC kerf is wider than laser cut, which makes the part removal that much easier using a HD knife, or scroll saw.Thumbsup
 
Great work Peter.
You are right about triple checking wood dimensions. It is easy to see a difference in width on the same piece!
I separated everything and still double check a few before pulling them out for use. Great, GREAT tip!

As for colors and wood color textures...I suppose the old adage, "your model....your choice" prevails.

I think I used a jocobean stain on my deck. It is has a very dark/black color and when diluted seemed to give a grayer 'weathered teak' look.

Again, a high mark for builder to strive for and one I'll never reach, but admire!
Chris
 
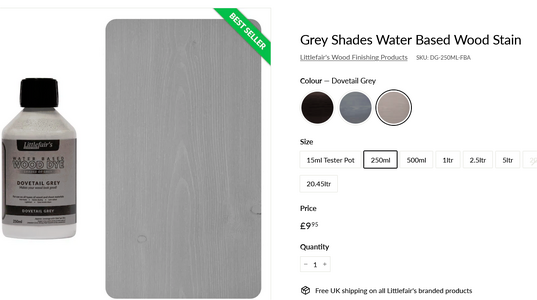
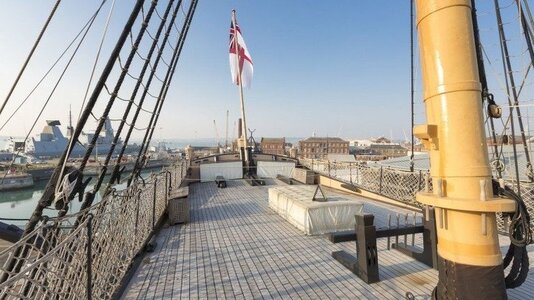
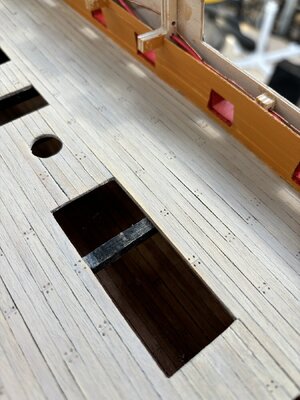
To Stuart Little, my order (through Australian Amazon), for 250 ml bottle of Littlefair's Dovetail Grey finally arrived!! It's an interesting product. It is certainly a grey stain however it is one in which its 'intensity' can be diminished by the addition of a bit of water before application. This is possible due to the stain being water based. Below is a photograph of the ship's deck and the lighter colour grey that I am seeking.

1722040405101.png

1722038186284.jpeg

Using the Dovetail Grey, this deck colour can be fairly closely matched. It is a much better method than the "two wash" bleach method I used previously which although lightening the colour of the original Tanganyika timber, still retains an overall brownish hue. I will post some photos (when I have them in my phone, soon).

Littlefair's also produce another water-based stain called Driftwood Sand or Driftwood Grey. These products appear to stain the timber a lighter grey still with them being described as:

"Our Driftwood Collection has been specially formulated to both penetrate and coat new or old bare sanded wood to create a textural ‘salty’, weathered effect. It can also be applied to pressure treated, rough sawn or smooth planed wood and on both indoor and outdoor wood such as garden buildings, fences and gates (or the decking of model ships - my words). The more detailed or ‘grainy’ the surface is the greater the effect. So, it's great for distressed or reclaimed wood, from small craft items to large structures."

So, in summary, a good way to go and much easier and safer to use than bleaching the timber. Many thanks Stuart Little. Thank you too for your comments Chris (team118), from Rochester in New York.

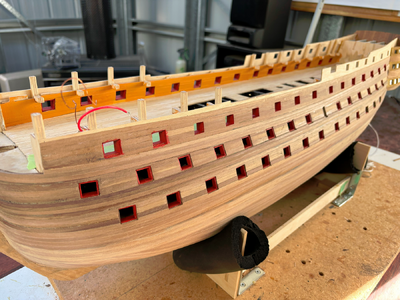
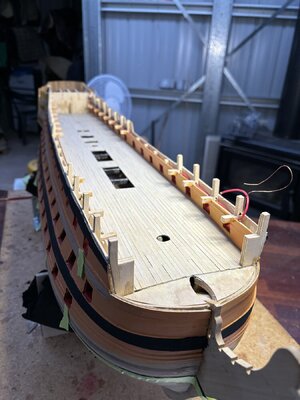
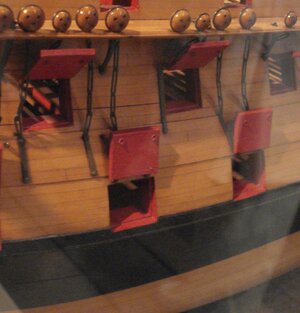
While I have been waiting for the deck stain to arrive, I have been moving ahead with the gun port linings. This is recommended in the Instructions and describe the technique they suggest as below:

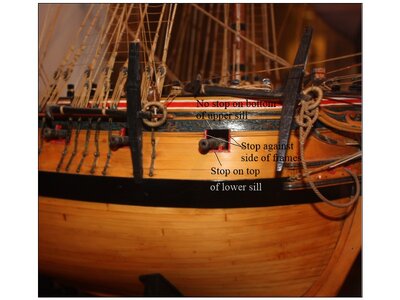
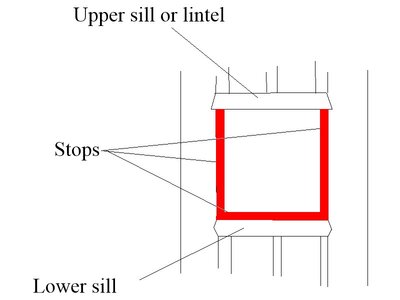
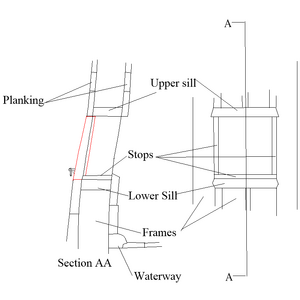
"Note: for all gunports, the linings are to be painted red ochre, it should be noted however that the gunports without lids should have red ochre applied to the whole inner surface. For gunports with lids, the linings are painted red ochre and the 1mm deep lip should be the colour of the surrounding ships side.

The lower and middle deck gunports can now be lined. The way in which these gunports are lined differs from those gunports without lids. Line them with 1x6mm walnut strip in the same way as the gunports without lids except the lining must be set back 1mm from the ships side, refer to Plan Sheet 2, ‘Gunports with lids’. It is of absolute importance that the linings are set back into the openings by 1mm."


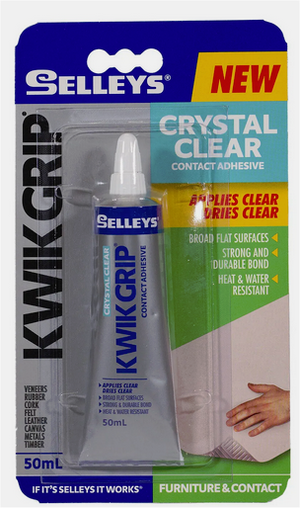
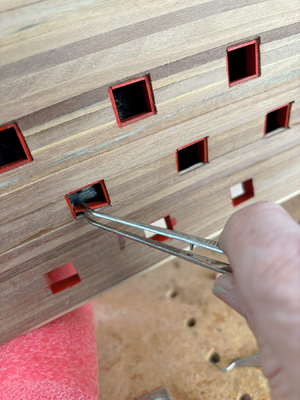
Placing the two side 1x6mm walnut timber is made difficult by only having the thickness of the plywood template hull thickness to glue onto, and once placed, there is a considerable amount of 'moving and positioning' of the piece to get it located correctly. The glue recommended is CA, but I have found a contact adhesive which sticks but takes time to harden a better approach. The glue I am using is KwikGrip which dries clear (see below):

1722040340617.png

As the gunports are all approximately the same size (with gun lids), I can use my guillotine to cut a large number of the same dimensions with slight oversize (about 0.2 mm) and then place these with the contact glue in to the openings and position effectively. I have pre-painted the 1x6mm walnut which makes the job a LOT easier for painting later. The same method is used for the upper and lower horizontal linings but this seems to go quicker as there is more surface area to glue the pieces to.

1722040872385.png

Interestingly too, you get quite good at placing these gunport linings. There are about 70 gunports which makes 70 x 4 = 280 gunport lining pieces. It takes a long time, but it does look effective when completed.

1722041012992.png

Next venture (apart from deck staining), is to move on to painting of the hull. Getting the right mix of Yellow Ochre is a challenge and will probably require a bit of experimentation to get the correct formula (as per the discussion previously). The 'right' colour is a difficult thing as the photographs and light conditions and 'period' of the colour the ship was painted has altered significantly over time.

POSTSCRIPT: It is now 2 weeks later and the above water based stain has arrived. I have used it on the decking and it is a much better solution than the two-application bleaching process. The final finish after applying the Littlefair's Dove Gray is as below:

IMG_2063.JPG

IMG_2021.JPG
Regards,

PeterG

Elapsed Time: 745 hours
 
Last edited:
Just love the 'lines' so crisp and clean!!!!

I see the pics above and just want to add a deep rich oil to your hull, rub it out and give it a nice few coats of fine varnish....it just seems like it would look so sweet!!!!

It's funny, but it seems that a better way for this model would have been to add some type of 1/4" (or mm equivalent) wood blocking to the backs of the gun port patterns before starting any of the hull planking.

Then there would be plenty of meat for the gun port liners to attach to. Even if was just blocking for the vertical port liners.

Eh, why make it easy!!!! Looks good brother....meanwhile back at my ranch I'm still struggling with cannon rigging. And for cannons that will be barely visible!

Thank you!
 
To Stuart Little, my order (through Australian Amazon), for 250 ml bottle of Littlefair's Dovetail Grey finally arrived!! It's an interesting product. It is certainly a grey stain however it is one in which its 'intensity' can be diminished by the addition of a bit of water before application. This is possible due to the stain being water based. Below is a photograph of the ship's deck and the lighter colour grey that I am seeking.

View attachment 461276

View attachment 461274

Using the Dovetail Grey, this deck colour can be fairly closely matched. It is a much better method than the "two wash" bleach method I used previously which although lightening the colour of the original Tanganyika timber, still retains an overall brownish hue. I will post some photos (when I have them in my phone, soon).

Littlefair's also produce another water-based stain called Driftwood Sand or Driftwood Grey. These products appear to stain the timber a lighter grey still with them being described as:

"Our Driftwood Collection has been specially formulated to both penetrate and coat new or old bare sanded wood to create a textural ‘salty’, weathered effect. It can also be applied to pressure treated, rough sawn or smooth planed wood and on both indoor and outdoor wood such as garden buildings, fences and gates (or the decking of model ships - my words). The more detailed or ‘grainy’ the surface is the greater the effect. So, it's great for distressed or reclaimed wood, from small craft items to large structures."

So, in summary, a good way to go and much easier and safer to use than bleaching the timber. Many thanks Stuart Little. Thank you too for your comments Chris (team118), from Rochester in New York.

While I have been waiting for the deck stain to arrive, I have been moving ahead with the gun port linings. This is recommended in the Instructions and describe the technique they suggest as below:

"Note: for all gunports, the linings are to be painted red ochre, it should be noted however that the gunports without lids should have red ochre applied to the whole inner surface. For gunports with lids, the linings are painted red ochre and the 1mm deep lip should be the colour of the surrounding ships side.

The lower and middle deck gunports can now be lined. The way in which these gunports are lined differs from those gunports without lids. Line them with 1x6mm walnut strip in the same way as the gunports without lids except the lining must be set back 1mm from the ships side, refer to Plan Sheet 2, ‘Gunports with lids’. It is of absolute importance that the linings are set back into the openings by 1mm."


Placing the two side 1x6mm walnut timber is made difficult by only having the thickness of the plywood template hull thickness to glue onto, and once placed, there is a considerable amount of 'moving and positioning' of the piece to get it located correctly. The glue recommended is CA, but I have found a contact adhesive which sticks but takes time to harden a better approach. The glue I am using is KwikGrip which dries clear (see below):

View attachment 461275

As the gunports are all approximately the same size (with gun lids), I can use my guillotine to cut a large number of the same dimensions with slight oversize (about 0.2 mm) and then place these with the contact glue in to the openings and position effectively. I have pre-painted the 1x6mm walnut which makes the job a LOT easier for painting later. The same method is used for the upper and lower horizontal linings but this seems to go quicker as there is more surface area to glue the pieces to.

View attachment 461277

Interestingly too, you get quite good at placing these gunport linings. There are about 70 gunports which makes 70 x 4 = 280 gunport lining pieces. It takes a long time, but it does look effective when completed.

View attachment 461278

Next venture (apart from deck staining), is to move on to painting of the hull. Getting the right mix of Yellow Ochre is a challenge and will probably require a bit of experimentation to get the correct formula (as per the discussion previously). The 'right' colour is a difficult thing as the photographs and light conditions and 'period' of the colour the ship was painted has altered significantly over time.

Regards,

PeterG

Elapsed Time: 745 hours
So good Peter.
 
Thanks for your comments Grant and Chris. Chris, you raise an interesting idea with the use of internal blocking to add support for the internal gunport sides. Probably not necessary for the top and bottom, as these have the sides to assist their support once installed. Hindsight is a wonderful thing but it is something that Caldercraft could consider!! I think they would however, take the view that there is enough 'meat' to glue the gunport sides. While it is fiddly and delicate job placing these small pieces, it did go as planned and once secured, the linings are quite sturdy.

Interesting comments about the application of oil or a finish which shows off the lovely timber and planking. While this would be attractive, it is of course not accurate to the ship. The outer hull topsides are a series of black and yellow ochre stripes and this apparently is as she was way back into Nelson's time. SO, to honour the painting scheme evident on the ship, I have commenced her hull painting.

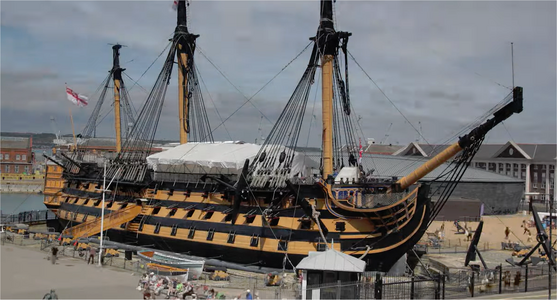
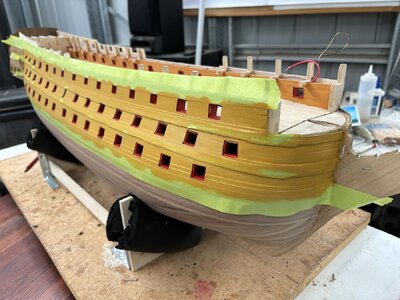
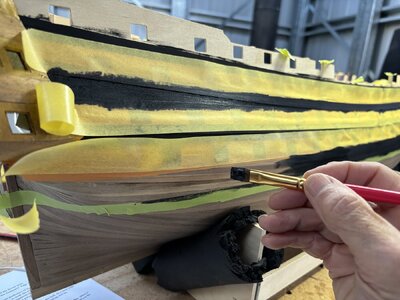
I have opted for the Yellow Ochre stripes to be painted first with some masking tape to guide the shape, but positioning oversize so when black is added, it will be over the ochre paint and a sharp boundary between the two should result. The alignment of the stripes is not as one might expect as the upper and lower edges do not line up with either the gunport openings entirely, or with the wales. You have no choice but to be guided by the photos in the Instruction Manual and the ship herself (see below image).

1722131459660.png

My painting below shows the use of masking tape, but as I said, not the final edging for the black, just outside the black strip borders.

IMG_2020.JPG

As you can see, a long way to go and I might have to adjust the paint colour a little bit to get the right hue of Yellow Ochre - I think there is a little red in the real ship which makes it a bit more orange than yellow. The above is only the first coat, so I can adjust as needed.

Best Regards,

PeterG

Elapsed Time: 762 Hrs
 
Chris, I am interested in your work on the cannons. I have done a little preliminary look at them and notice a few things in particular which relates to the gun carriage-mounted barrels only. For the inserted, below decks barrels it is not a concern as you cannot see their internal mountings.

Point 1
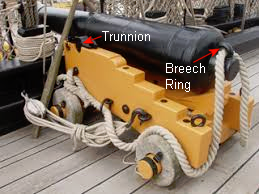
: I note that on the deck-mounted and carriage-mounted cannon barrels, at the breech end is a round ring (not sure what it is called (see below) through which the main recoil tackle is threaded. These rings are not on the supplied cannon barrels. I am thinking that if I cut some thin brass tubing, I could solder them to the breech and make them a little more realistic. What do you think?:

1722221203048.png

Point 2: The Trunnion is a required to be added to the barrels and a hole is drilled for that purpose. My concern is that when the brass wire of appropriate size is cut, it will be inserted in the hole and then could slide back and forwards. I was thinking (and I have seen it on another forum), that if you cut or file a thin groove in the brass wire and add a small bit of silver solder (or non-lead paste), then heat it up, once inserted, it would lock the trunnion wire in place. I guess you could also add a drop of CA glue too, if that were easier.

Point 3: How are you going to blacken your cannons? are you going to use something like Birchwood Casey's Brass Black, or were you going to use black paint? The Brass Black works well, but needs to be painted afterwards with a matt varnish to retain its black and not smudge (I have found). anybody have other ideas on this? Interestingly, in the photo above, a gloss/satin black finish appears to be used on the actual ship's guns.

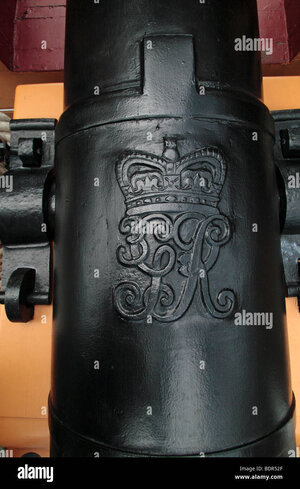
Point 4: On each gun, there is the Royal Crest (see below - Copyright to Alamy):

1722221920604.jpeg

Are you proposing to add this? I have been doing a bit of research on this, and to add it (as far as I can see) is quite difficult. The best way I can think of is to create a 'mould' stamp and then use some material added to the barrel which can then be stamped and leave the imprint of the crest. How do you create the stamp at such a small size? The surface is rounded (around the barrel), to make it more difficult.

Has anyone else attempted this? I know you can buy 3D CAD 'printed' resin cannons with this detail, but I am more interested in making my own with the materials I have got from the kit. Interesting subject!!

Best Regards,

PeterG
 
Are you proposing to add this?
Peter,
If you want to have the proper barrel pattern which is the Blomefield, which includes the cascabel ring and George 3 cypher and the proper amount of rings maybe consider 3D black resin printed barrels. If this of interest PM me and I can email you 3D drawings that you can email to any local 3D print shop. I have never paid more than $0.75US for these at 1:64, including freight in the US. It may be more or less by you.
Allan
 
Last edited:
Chris, I am interested in your work on the cannons. I have done a little preliminary look at them and notice a few things in particular which relates to the gun carriage-mounted barrels only. For the inserted, below decks barrels it is not a concern as you cannot see their internal mountings.

Point 1: I note that on the deck-mounted and carriage-mounted cannon barrels, at the breech end is a round ring (not sure what it is called (see below) through which the main recoil tackle is threaded. These rings are not on the supplied cannon barrels. I am thinking that if I cut some thin brass tubing, I could solder them to the breech and make them a little more realistic. What do you think?:

View attachment 461772

Point 2: The Trunnion is a required to be added to the barrels and a hole is drilled for that purpose. My concern is that when the brass wire of appropriate size is cut, it will be inserted in the hole and then could slide back and forwards. I was thinking (and I have seen it on another forum), that if you cut or file a thin groove in the brass wire and add a small bit of silver solder (or non-lead paste), then heat it up, once inserted, it would lock the trunnion wire in place. I guess you could also add a drop of CA glue too, if that were easier.

Point 3: How are you going to blacken your cannons? are you going to use something like Birchwood Casey's Brass Black, or were you going to use black paint? The Brass Black works well, but needs to be painted afterwards with a matt varnish to retain its black and not smudge (I have found). anybody have other ideas on this? Interestingly, in the photo above, a gloss/satin black finish appears to be used on the actual ship's guns.

Point 4: On each gun, there is the Royal Crest (see below - Copyright to Alamy):

View attachment 461773

Are you proposing to add this? I have been doing a bit of research on this, and to add it (as far as I can see) is quite difficult. The best way I can think of is to create a 'mould' stamp and then use some material added to the barrel which can then be stamped and leave the imprint of the crest. How do you create the stamp at such a small size? The surface is rounded (around the barrel), to make it more difficult.

Has anyone else attempted this? I know you can buy 3D CAD 'printed' resin cannons with this detail, but I am more interested in making my own with the materials I have got from the kit. Interesting subject!!

Best Regards,

PeterG
Hello Peter,
regarding point 1 breech rings: when I built the USF Confederacy I used turned brass cannons which had no breech rings. To realize them I ordered brass rings from a modelling shop which were 2 mm in diameter. I just glued them in place with CA, so I had no work with cutting rings from a tube and soldering....

Greetings Werner
 
Generated a few responses with my questions - Many thanks. Individually:

Alexander74 - Many thanks. I have some Tung Oil so I will try that. I have not tried this before, so will do some experimenting and see how it goes - Many Thanks.

AllanKP69 - Many thanks for your suggestion regarding the gunport linings. I can see how this works and the detail you provided is useful, in a framed ship. However the Caldercraft HMS Victory is a double planked ship with Planks on Bulkheads (POB), so the internal framing does not lend itself to you approach. For a fully framed model however, this would be an excellent method - Many thanks.

Regarding the cannon 3D printing, I have sent you a PM in reply.

Wernerweiss - Good suggestion. I will have a look online for some suitable rings. Clearly a CA attachment would be a lot easier than having to solder in place. May thanks.

Regards,

PeterG
 
Alexander74 - Many thanks. I have some Tung Oil so I will try that. I have not tried this before, so will do some experimenting and see how it goes - Many Thanks.
I don't think it's necessary to use tung oil. I just happen to have this oil on hand. Just soak a rag in the oil and rub it over the entire item. You'll get something like this
20240704_210233.jpg
 
I don't think it would cost much for a few seconds blast between loading each sheet, after all, the machine probably gets a blast of air. Actually, the CNC kerf is wider than laser cut, which makes the part removal that much easier using a HD knife, or scroll saw.
Actually a lot of CNC machines now make provision for blowing the dust away from the cut zone as it goes along. Improves cutter life too. But my experience suggests that the people who work the machines don't like the dust flying around, and often the dust extraction system that should be connected is not, or not very efficient so it escapes and the workshop air is full of it. And the UF glue used as a binder to make MDF (fiberboard) is carcinogenic as is oak dust....
 
Many thanks Alexander 74 - I will definately try the Tung Oil over the brass blackening and see how it goes.

Thanks too to Alan Smith regarding the CNC dust. I wasn't aware of the carcinogenic threat of the MDF binder and oak dust. That is VERY interesting and highlights the need for good dust extraction.

I have been in communication too with AllanKP69 and using some 3D STL files he has sent me, I have ordered some gun 3D printing from a service here in Australia. Interestingly, the cost is quoted as AUS$0.66 per unit which, given the exchange rate, is quite a bit cheaper than in the US!! We will see how it goes as it is a bit of an experiment. I have ordered enough 20 and 32 pounder gun barrels to populate the Quarterdeck and Upper Gun Deck (which is where most of the visible, gun carriage-mounted cannons are located and visible).

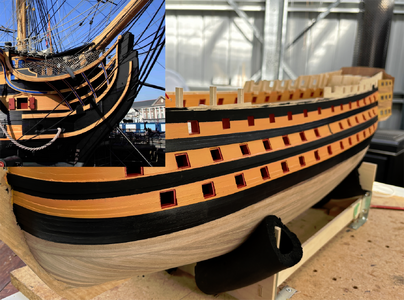
Painting of the hull continues and I am getting near to finished. There is some touch-up required, especially the red of the gunports as its not really possible to mask these while adding the Yellow Ochre and Black striping.

IMG_2043.JPG

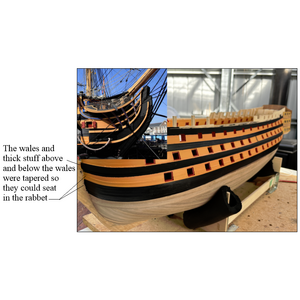
I have used a high density masking tape (similar to Tamiya tape), for the edges and it has in general given me sharp colour edges. Unfortunately where the edges of the stripes go across the wales, which happens at a few locations, some paint run is occurring and needs later touch up repair. One concern I had too was that the Yellow Ochre/Orange that I have selected might be too dark, with too much red in it. I had printed off some examples of the ship and made comparisons while mixing the paint, and I might have overdone it a bit, but in the image below, with the actual ship (prior the current lighter painting during current restoration), the final colour doesn't appear too far away from the way the real ship is.

1723085948939.png

You can see some overpainting in some of the gunports and this will be touched up without a lot of effort. I have used as many images plus the Instruction Manual to get the positioning and alignment of the stripes as close and accurate as possible.

Best regards,

PeterG

Time Estimate: 785 Hrs
 
One concern I had too was that the Yellow Ochre/Orange that I have selected might be too dark, with too much red in it. I had printed off some examples of the ship and made comparisons while mixing the paint, and I might have overdone it a bit, but in the image below, with the actual ship (prior the current lighter painting during current restoration), the final colour doesn't appear too far away from the way the real ship is.
Yes. But do you like it? I know you well enough to know that your personal esthetic trumps most everything (as it should in the case of the controversial subject of the current color(s) of the Victory)...
 
Many thanks Alexander 74 - I will definately try the Tung Oil over the brass blackening and see how it goes.

Thanks too to Alan Smith regarding the CNC dust. I wasn't aware of the carcinogenic threat of the MDF binder and oak dust. That is VERY interesting and highlights the need for good dust extraction.

I have been in communication too with AllanKP69 and using some 3D STL files he has sent me, I have ordered some gun 3D printing from a service here in Australia. Interestingly, the cost is quoted as AUS$0.66 per unit which, given the exchange rate, is quite a bit cheaper than in the US!! We will see how it goes as it is a bit of an experiment. I have ordered enough 20 and 32 pounder gun barrels to populate the Quarterdeck and Upper Gun Deck (which is where most of the visible, gun carriage-mounted cannons are located and visible).

Painting of the hull continues and I am getting near to finished. There is some touch-up required, especially the red of the gunports as its not really possible to mask these while adding the Yellow Ochre and Black striping.

View attachment 463566

I have used a high density masking tape (similar to Tamiya tape), for the edges and it has in general given me sharp colour edges. Unfortunately where the edges of the stripes go across the wales, which happens at a few locations, some paint run is occurring and needs later touch up repair. One concern I had too was that the Yellow Ochre/Orange that I have selected might be too dark, with too much red in it. I had printed off some examples of the ship and made comparisons while mixing the paint, and I might have overdone it a bit, but in the image below, with the actual ship (prior the current lighter painting during current restoration), the final colour doesn't appear too far away from the way the real ship is.

View attachment 463568

You can see some overpainting in some of the gunports and this will be touched up without a lot of effort. I have used as many images plus the Instruction Manual to get the positioning and alignment of the stripes as close and accurate as possible.

Best regards,

PeterG

Time Estimate: 785 Hrs
Very nice paint job. I too like your ochre selection.

Can you disclose the Australian source that is 3D printing your STL files? And can you post pictures of the delivered guns?

Great build log, I am enjoying the ride.

Michael
 
Back
Top