Hello Paul. I will be tossing those lumps of brass. If I can’t get a 3D option here I will have to spend some dollars and get the shapeway product. They look amazing. I have managed to use some of the decorations provided after much grinding and filing.
-

Win a Free Custom Engraved Brass Coin!!!
As a way to introduce our brass coins to the community, we will raffle off a free coin during the month of August. Follow link ABOVE for instructions for entering.
You are using an out of date browser. It may not display this or other websites correctly.
You should upgrade or use an alternative browser.
You should upgrade or use an alternative browser.
HMS Victory Mantua 1:78 (first build) by Grant Tyler
- Thread starter GrantTyler
- Start date
- Watchers 102
- Joined
- Sep 3, 2021
- Messages
- 5,071
- Points
- 738

Hard to miss today in the Netherlands that Max Verstappen beat Lewis Hamilton yesterday. A lot of dutchies were still not really amused about earlier incidents this season.Mercedes are such poor losers- most of the world (certainly here in Cape Town) wanted Max to win - we all partied some on Sunday.
View attachment 27EBF6DC-1382-439F-BE68-50C910DB835C.MP4
Last edited:
BrilliantHard to miss today in the Netherlands that Max Verstappen beat Lewis Hamilton today. A lot of dutchies were still not really amused about earlier incidents this season.
View attachment 275373


A fine good morning to everyone.
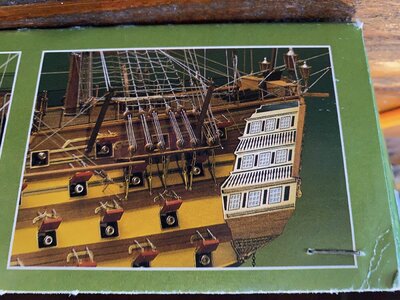
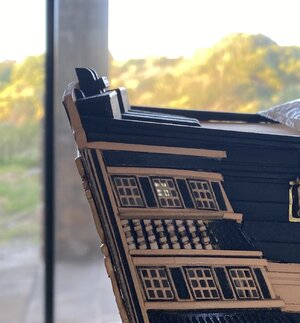
My stern- Pic from photo on kit box. Always going to be a challenge for first time builder to sort this.
I now know why I have left it for so long. Here are my results attempting to get this looking a little authentic and up to the standard of the rest of my build.
Filed the brass parts which I think I can use down 75% of thinkness,at least,and tried where I could to reduce the overall size - plenty brass filings all around my shipyard. Painted color per real Victory. Dry fitted. I think I can live with these. So glad I chopped the cabin supports and got the volume, look-through and the rounded shape on sides earlier in my build.
Fitted the lower side brass decorations- look nothing like the Victory but not bad on my model.
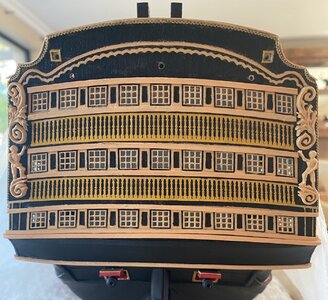
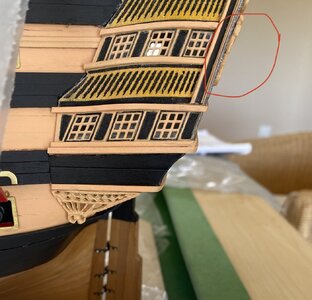
The thickness not shocking.
The balustrades -
I decided to just go for it and make them

 . Going for this:
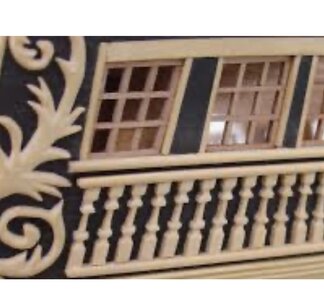
Painted the gold balustrade black and fitted my 9mm attempts. I turned these with my dremel and 2x2 birch wood which I bought from a local on line store (AL product). I have run out of wood from the kit. I used needle files to try achieve this column shape. Used a 1mm piece of walnut as a spacer between each column and on the top- as shown.On first look it was pretty cool, however close up these columns are at an angle and the shapes on each column need to follow that angle.
 . Will re do these- going to take a very long time to do all these on the stern.
I am going to finish my channels next - stern going into sabbatical for a while
Cheers all.
My stern- Pic from photo on kit box. Always going to be a challenge for first time builder to sort this.

I now know why I have left it for so long. Here are my results attempting to get this looking a little authentic and up to the standard of the rest of my build.
Filed the brass parts which I think I can use down 75% of thinkness,at least,and tried where I could to reduce the overall size - plenty brass filings all around my shipyard. Painted color per real Victory. Dry fitted. I think I can live with these. So glad I chopped the cabin supports and got the volume, look-through and the rounded shape on sides earlier in my build.
Fitted the lower side brass decorations- look nothing like the Victory but not bad on my model.


The thickness not shocking.
The balustrades -
I decided to just go for it and make them


 . Going for this:
Painted the gold balustrade black and fitted my 9mm attempts. I turned these with my dremel and 2x2 birch wood which I bought from a local on line store (AL product). I have run out of wood from the kit. I used needle files to try achieve this column shape. Used a 1mm piece of walnut as a spacer between each column and on the top- as shown.On first look it was pretty cool, however close up these columns are at an angle and the shapes on each column need to follow that angle.

 . Will re do these- going to take a very long time to do all these on the stern.
I am going to finish my channels next - stern going into sabbatical for a while

Cheers all.
This is looking great, Grant! Very impressive. The stern is my least favorite part of building a ship. Soooo many things can go wrong…and the errors are hard to fix.
- Joined
- Jan 9, 2020
- Messages
- 10,534
- Points
- 938

The fitted ornaments look good and not out of place at all. And as far as the balustrades go - no doubt the first steps to becoming an accomplished wood artist ("carver" sounds like you are working in the meat section of a buffet restaurant!).
T

Hello Heinrich- I think carving a steak may be easier- although I have heard this is an art as well. Yep - very baby step. “Wood artist” I feel may be a long way away- however as we South Africans are I will never stop going for it!The fitted ornaments look good and not out of place at all. And as far as the balustrades go - no doubt the first steps to becoming an accomplished wood artist ("carver" sounds like you are working in the meat section of a buffet restaurant!).

Thank you Vic. Yes the stern seems to challenge many of us. Part of the learning curve tho and we must keep moving.This is looking great, Grant! Very impressive. The stern is my least favorite part of building a ship. Soooo many things can go wrong…and the errors are hard to fix.
- Joined
- Sep 3, 2021
- Messages
- 5,071
- Points
- 738

First-timer, yeah right...A fine good morning to everyone.
My stern- Pic from photo on kit box. Always going to be a challenge for first time builder to sort this.
View attachment 275471
I now know why I have left it for so long. Here are my results attempting to get this looking a little authentic and up to the standard of the rest of my build.
Filed the brass parts which I think I can use down 75% of thinkness,at least,and tried where I could to reduce the overall size - plenty brass filings all around my shipyard. Painted color per real Victory. Dry fitted. I think I can live with these. So glad I chopped the cabin supports and got the volume, look-through and the rounded shape on sides earlier in my build.
Fitted the lower side brass decorations- look nothing like the Victory but not bad on my model.
View attachment 275468View attachment 275470
The thickness not shocking.
The balustrades -
I decided to just go for it and make them. Going for this:
View attachment 275473
Painted the gold balustrade black and fitted my 9mm attempts. I turned these with my dremel and 2x2 birch wood which I bought from a local on line store (AL product). I have run out of wood from the kit. I used needle files to try achieve this column shape. Used a 1mm piece of walnut as a spacer between each column and on the top- as shown.On first look it was pretty cool, however close up these columns are at an angle and the shapes on each column need to follow that angle.. Will re do these- going to take a very long time to do all these on the stern.
View attachment 275477
I am going to finish my channels next - stern going into sabbatical for a while
Cheers all.
This looks so good.

First-timer, yeah right...
This looks so good.
I couldn't be more impressed with your work Grant. That is a lot of angles and shapes that all need to fit together and I think you have accomplished everything beautifully. There are always re-do's and taking a break and working on something else is wise. You will return with renewed energy and end up with a great result. Love your perseverance!
Great work Grant! And I'm glad to learn that I'm not the only one who relies on their off-cut leftovers to patch or shape some other part of the shipI have also run out of 1x2 walnut (kit limited with wood) so the skylight made from left overs in my off cuts. I ensured I kept the last remnant of the wood so that I could line off the skylight. I did manage to finish it off. Stained the wood darker to match my ladders and achieve a little more authenticity. One coat of light Matt poly will be applied to finish it off.

That is indeed fine art Grant, good luck! But I wouldn't get Dean to carve up anything, he'll shape it into a lion with a crown in no time without batting an eyelidUsing photo below I attempted my first fine art project in my life....
The red circle brass lumps I can do nothing about and cannot be used on my ship. They are simple and maybe @Dean62 will carve them for me....
Ouch! And then there's always the off-chance of it not actually reaching your doorstep, the SA postal system being what it isShapeways does ship to SA- costs $84 +$34 dollars shipping fee. Hmm. My kit only cost $600..
Agreed, looks brilliant to me Grant, well doneThe fitted ornaments look good and not out of place at all. And as far as the balustrades go - no doubt the first steps to becoming an accomplished wood artist ("carver" sounds like you are working in the meat section of a buffet restaurant!).

That is indeed fine art Grant, good luck! But I wouldn't get Dean to carve up anything, he'll shape it into a lion with a crown in no time without batting an eyelid


Cheers MarkAgreed, looks brilliant to me Grant, well done
Hi Mark- always great to chat to fellow Saffer as we all understand this process or lack thereof. The reason why the delivery free is so much here is because of using private courier services.Ouch! And then there's always the off-chance of it not actually reaching your doorstep, the SA postal system being what it is
The port side channels for the main shrouds to the 3 masts have been installed. These channels hold the shrouds for the masts and clearly need to be fitted well and have strength for the tension of the many shrouds on this ship. My process:
Used the sheets provided to get the measurements for the brass supports on the hull and channel.
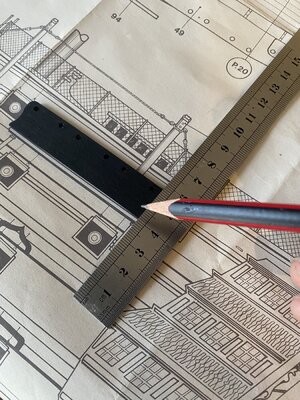
Dummy check the channel to hull and tappered where needed to ensure a clean fit to hull and no gaps. As you see below I had to tapper this channel.
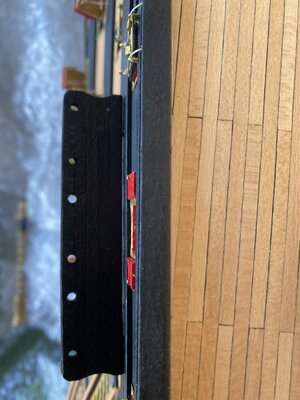
Drilled more holes and used more nails than the instructions recommended to strengthen the channels. I also added a nail (cut to size) on the brass support to the channel. I use a small drop of CA glue on all the nails.
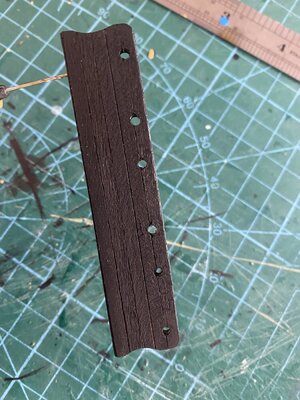
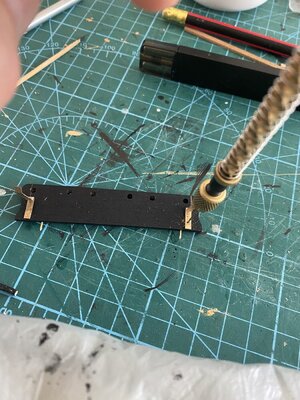
To ensure each Chanel fits exactly to the correct line along the wale I taped a 3mm plank along the correct line and then pressed my nails into hull to achieve correct place to drill the holes.
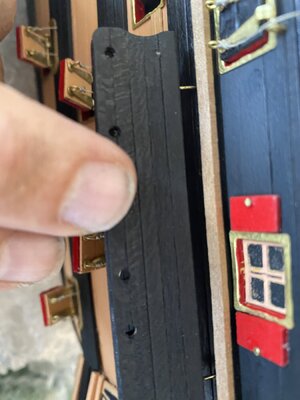
Fitted the dead eyes (previously shown here and already done). Used PVa glue and CA glue on the nails and fitted. Made sure the channels where at the 90• to the vertical. Touched up all the Indian ink and black paint where needed.
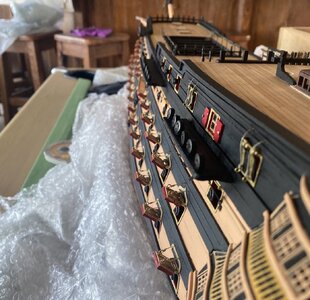
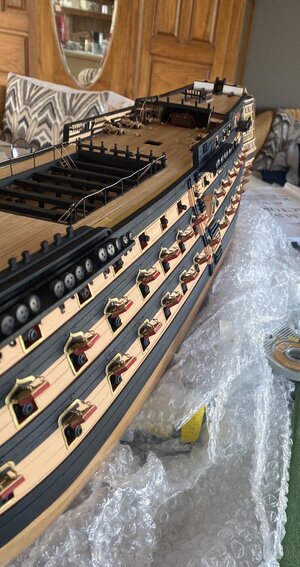
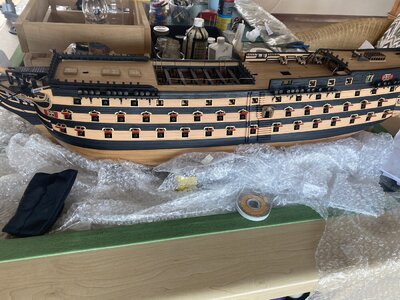
Used the sheets provided to get the measurements for the brass supports on the hull and channel.

Dummy check the channel to hull and tappered where needed to ensure a clean fit to hull and no gaps. As you see below I had to tapper this channel.

Drilled more holes and used more nails than the instructions recommended to strengthen the channels. I also added a nail (cut to size) on the brass support to the channel. I use a small drop of CA glue on all the nails.


To ensure each Chanel fits exactly to the correct line along the wale I taped a 3mm plank along the correct line and then pressed my nails into hull to achieve correct place to drill the holes.

Fitted the dead eyes (previously shown here and already done). Used PVa glue and CA glue on the nails and fitted. Made sure the channels where at the 90• to the vertical. Touched up all the Indian ink and black paint where needed.


I decided to keep the nail heads brass as they fit in with the Mantua brass gun port frames and decorations above the gun ports.
I circled my dead eye I put in wrong way around. These dead eyes (found out a little late) are not uniform and are directional in fitting. They are also not uniform in the placement of the actual holes in each dead eye- I’m not sure this will be noticed.
Blue circle I broke my cannon downward when placing the channel. This is the most difficult one to fit
 . Fun time ahead fixing this.
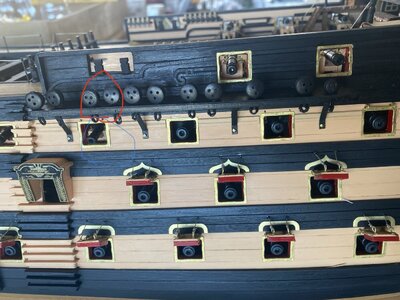
PS guys photos do change the angle of the supports. (and the channels in my previous post) - my heart sank when I re read my post but double checked and whew, they are good


I circled my dead eye I put in wrong way around. These dead eyes (found out a little late) are not uniform and are directional in fitting. They are also not uniform in the placement of the actual holes in each dead eye- I’m not sure this will be noticed.
Blue circle I broke my cannon downward when placing the channel. This is the most difficult one to fit

 . Fun time ahead fixing this.
PS guys photos do change the angle of the supports. (and the channels in my previous post) - my heart sank when I re read my post but double checked and whew, they are good


