Hello Daniel- you make a good point here. In desperation I look how John build his Victory Mizzen on You Tube. He is building a Deagostini 1:84. The real ship does have eight and I have still add a fair amount to the cap which the Mantua leaves out. Thanks for this and I will check my shroud line and second tier mast fitting prior to my second attempt.Hi Grant
I'm not sure why you needed the 8 cap supports in a vertical position. It seems like they would interfere with your shroud lines and second tier mast. I've attached a couple pictures of my HMS Fly, hope this might help. The tops appear very similar since they both are British ships.
View attachment 276133View attachment 276134
-

Win a Free Custom Engraved Brass Coin!!!
As a way to introduce our brass coins to the community, we will raffle off a free coin during the month of August. Follow link ABOVE for instructions for entering.
You are using an out of date browser. It may not display this or other websites correctly.
You should upgrade or use an alternative browser.
You should upgrade or use an alternative browser.
HMS Victory Mantua 1:78 (first build) by Grant Tyler
- Thread starter GrantTyler
- Start date
- Watchers 102
The crows nest needs to be 8mm lower and the section between crows nest and cap 8mm longer. I was being a clown. While the sheet plan is confusing I just can’t do basic fractionsYes you got me stumped as well. I have no idea why you say the measurements are wrong ???

Hello Daniel- you make a good point here. In desperation I look how John build his Victory Mizzen on You Tube. He is building a Deagostini 1:84. The real ship does have eight and I have still add a fair amount to the cap which the Mantua leaves out. Thanks for this and I will check my shroud line and second tier mast fitting prior to my second attempt.
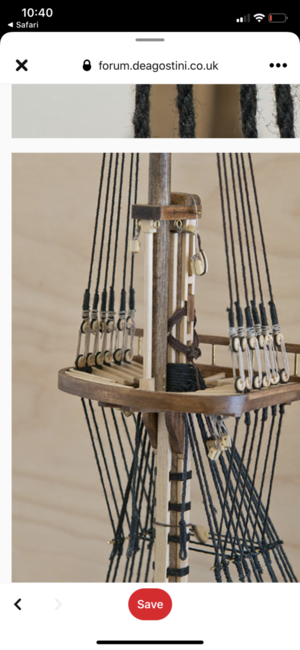
 Hi Daniel. This is what I am aiming for. - will use my plans and parts and make the extras if I can. Sort of my whole model process so far. Cheers.
This is really interesting Grant. It would certainly warrant further research; the lower vertical natural wood piece has slots cut out for the mast wooldings and it seems to run continuous (through the crow's nest) to the top of the lower portion of the main mast. The Amati version which I have does not show that.View attachment 276187View attachment 276187Hi Daniel. This is what I am aiming for. - will use my plans and parts and make the extras if I can. Sort of my whole model process so far. Cheers.
Good morning Daniel. I see what you are referring to here. I am going to look how the Caldercraft Victory suggests (This is the Kit I think is most accurate) and check that risks you refer to are covered before placement of the cap and mast fitment. Appreciate your advice here- Thank you.This is really interesting Grant. It would certainly warrant further research; the lower vertical natural wood piece has slots cut out for the mast wooldings and it seems to run continuous (through the crow's nest) to the top of the lower portion of the main mast. The Amati version which I have does not show that.
Remind me to never build a British ship! 
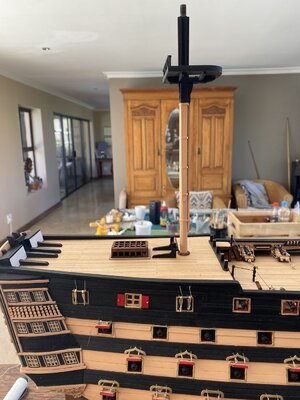
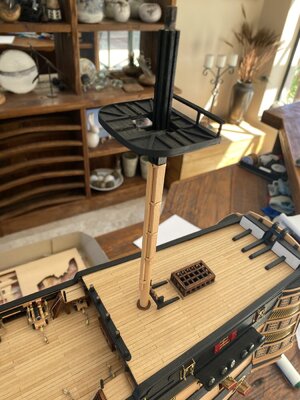
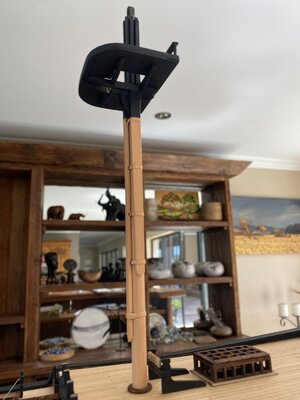
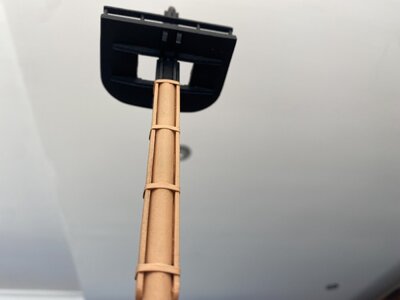
Hello everybody. The lower mizzen rebuild is on its way. Got my measurements right this time and I have checked Daniel advice- so far so good.
Couple of changes from plans: to go more authentic.
the railing on the crows nest. I changed to include a solid 3mm x 1.5mm rather than rope and the stanchions I used a 2mm dowel rather than brass fittings.
The forward cheek (doesn’t make sense to call cheek so I probably got the term incorrect) I made 4mm vs 3mm and increased width by 0.5mm.
As you know added the cap supports.
I beveled the collar so it is rounded at top and stained this with wood stain to keep in line with some of the other deck fittings.
The mast bands I left as per plan, however Victory has more . I will wait to see if I have enough copper(now painted) for all masts before I add more- may not anyway quite like the look.
Result so far:


- Joined
- Sep 3, 2021
- Messages
- 5,070
- Points
- 738

No, instead we build a Danish ship with a more than stubborn Lion as shipwright...Remind me to never build a British ship!
Grant your craftsmanship in your work is second to none. You really have a beautiful ship! Looking forward to your rigging.Hello everybody. The lower mizzen rebuild is on its way. Got my measurements right this time and I have checked Daniel advice- so far so good.
Couple of changes from plans: to go more authentic.
the railing on the crows nest. I changed to include a solid 3mm x 1.5mm rather than rope and the stanchions I used a 2mm dowel rather than brass fittings.
The forward cheek (doesn’t make sense to call cheek so I probably got the term incorrect) I made 4mm vs 3mm and increased width by 0.5mm.
As you know added the cap supports.
I beveled the collar so it is rounded at top and stained this with wood stain to keep in line with some of the other deck fittings.
The mast bands I left as per plan, however Victory has more . I will wait to see if I have enough copper(now painted) for all masts before I add more- may not anyway quite like the look.
Result so far:
View attachment 276338
View attachment 276339View attachment 276340View attachment 276341
This is a fantastically complex ship. I've heard good things of Mantua in the past. How do you find the brand, Grant?
First class work here Grant!
Thank you Heinrich, Paul, Daniel and Vic. Appreciate the compliments, advice and encouragement.
Thank Vic. This is the only model I have bought and in process of building so I don’t have much to compare to. The Victory I bought was designed and made many years ago. I think the original was made in 1973/4?. Consequently the etching and decorations are poor, but I just have to work around these. The instructions are really bad, (for first timer can be awkward) and offer little - translated from Italian and is humorous at times. HOWEVER the wood quality is good (walnut and lime). I have no missing parts(well todate) and they all work well and are good quality. The model design is not very authentic but I find this fun as it gives me a chance to try and build things more like the real ship. Also incentives me to research much more. -enjoy doing this.This is a fantastically complex ship. I've heard good things of Mantua in the past. How do you find the brand, Grant?
I don’t know if all kits do this but Mantua only give you just enough wood so you will need more if you start to “scratch build” certain items. The thread is not so good, however I see most modelers find this a problem with most kits. I guess we going to have to make thread like Paul and Daniel
It is massive value for money tho, is half the price of Caldercraft and I believe a good builder would make a brilliant ship from My Mantua Victory.Despite all the niggles I am enjoying building the Mantua Victory

Your mast looks great Grant! 
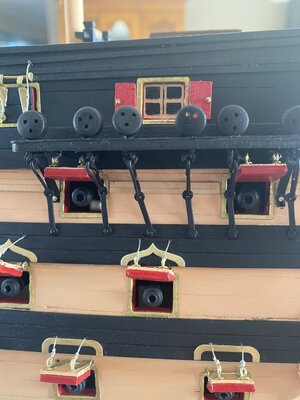
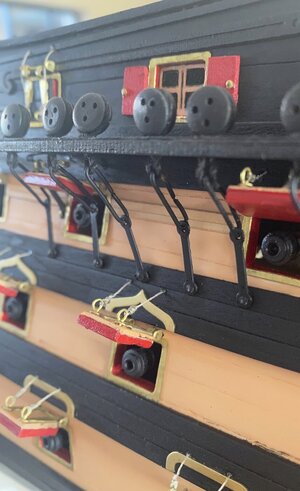
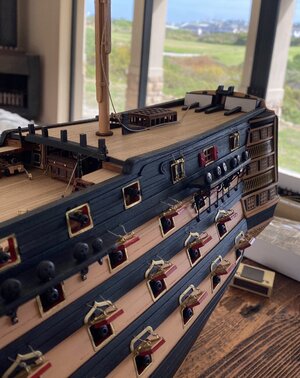
Good afternoon. The chain plates for the dead eyes for the mizzen shrouds where made. I build these per instructions. Not the best design and slightly off from the real Victory but came out good.
I did change the strops from brass to rope. I couldn’t get the brass to sit uniform across all the dead eyes.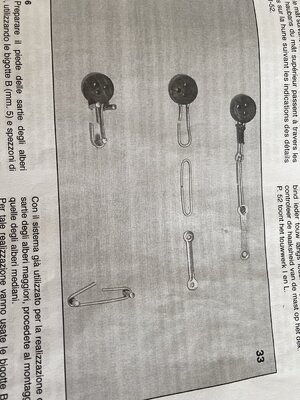
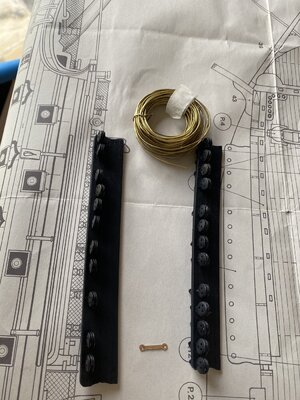
To get the line of the chain plates through the dead eyes up to mast position I taped some rope and set it to the position of lower chain plate.
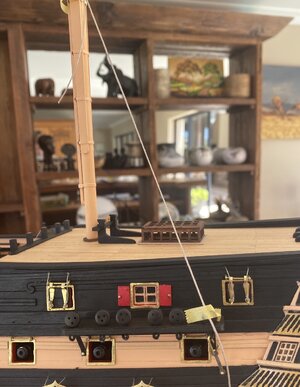
Each chain plate had to measured and bent individually as they are different lengths and I wanted the nail point to follow the wale.
This process differs from the instructions where the chain plates are made to fit more vertical (doesn’t follow line of shroud) and squeezed between ports.
I fitted the gun port lids in after.
I did change the strops from brass to rope. I couldn’t get the brass to sit uniform across all the dead eyes.


To get the line of the chain plates through the dead eyes up to mast position I taped some rope and set it to the position of lower chain plate.

Each chain plate had to measured and bent individually as they are different lengths and I wanted the nail point to follow the wale.
This process differs from the instructions where the chain plates are made to fit more vertical (doesn’t follow line of shroud) and squeezed between ports.


I fitted the gun port lids in after.

The gun ports invariably get in the way of a perfect alignment with the shrouds.Good afternoon. The chain plates for the dead eyes for the mizzen shrouds where made. I build these per instructions. Not the best design and slightly off from the real Victory but came out good.
I did change the strops from brass to rope. I couldn’t get the brass to sit uniform across all the dead eyes. View attachment 276623
View attachment 276624
To get the line of the chain plates through the dead eyes up to mast position I taped some rope and set it to the position of lower chain plate.
View attachment 276629
Each chain plate had to measured and bent individually as they are different lengths and I wanted the nail point to follow the wale.
This process differs from the instructions where the chain plates are made to fit more vertical (doesn’t follow line of shroud) and squeezed between ports.
View attachment 276626
View attachment 276627
I fitted the gun port lids in after.
View attachment 276628
Excellent work Grant!Hello everybody. The lower mizzen rebuild is on its way. Got my measurements right this time and I have checked Daniel advice- so far so good.
Couple of changes from plans: to go more authentic.
the railing on the crows nest. I changed to include a solid 3mm x 1.5mm rather than rope and the stanchions I used a 2mm dowel rather than brass fittings.
The forward cheek (doesn’t make sense to call cheek so I probably got the term incorrect) I made 4mm vs 3mm and increased width by 0.5mm.
As you know added the cap supports.
I beveled the collar so it is rounded at top and stained this with wood stain to keep in line with some of the other deck fittings.
The mast bands I left as per plan, however Victory has more . I will wait to see if I have enough copper(now painted) for all masts before I add more- may not anyway quite like the look.
Result so far:
View attachment 276338
View attachment 276339View attachment 276340View attachment 276341
Great job Grant! Everything looks very good!Good afternoon. The chain plates for the dead eyes for the mizzen shrouds where made. I build these per instructions. Not the best design and slightly off from the real Victory but came out good.
I did change the strops from brass to rope. I couldn’t get the brass to sit uniform across all the dead eyes. View attachment 276623
View attachment 276624
To get the line of the chain plates through the dead eyes up to mast position I taped some rope and set it to the position of lower chain plate.
View attachment 276629
Each chain plate had to measured and bent individually as they are different lengths and I wanted the nail point to follow the wale.
This process differs from the instructions where the chain plates are made to fit more vertical (doesn’t follow line of shroud) and squeezed between ports.
View attachment 276626
View attachment 276627
I fitted the gun port lids in after.
View attachment 276628


