I can only dream of such detailing without special tools)) but I have discovered an alternative) everything that I will paint I will model and print. As they say, the end justifies the means. But I am still for the classics. And your work is an ideal example of this.
You are using an out of date browser. It may not display this or other websites correctly.
You should upgrade or use an alternative browser.
You should upgrade or use an alternative browser.
Kingfisher 1770 1:48 POF
- Thread starter dockattner
- Start date
- Watchers 136
Thanks, Sergey. I'm learning how to use these tools more and more with each passing challenge...
Hello Alex,Paul
Awesome workmanship-you are an inspiration ! Could you tell me the brand name and color name/numbers for the blue and red inks you use on Kingfisher ? After sanding, do you primer prep the wood before applying the stain ? Hand brush or spray ? one layer or built-up layers ?
Thanks.
Alex Rosas
Thank you for your very kind assessment of my work.
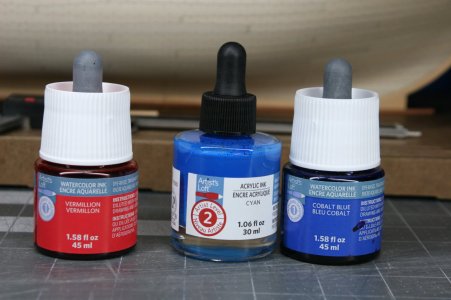
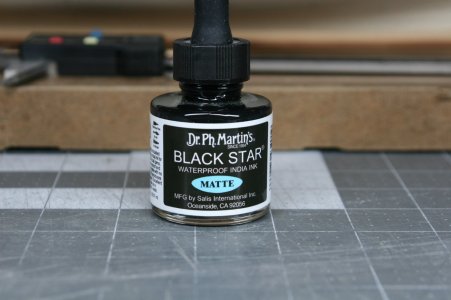
At the bottom of this post are some pictures of the ink I have been using but I'll add some explanation first.
For the red I used a watercolor ink. Watercolor ink doesn't have a lot of pigment, and this is what I wanted (I wanted to show the wood grain and treenails under the color). In this case I used two coats to give a more uniform red color - no primer - and I used brushes (ink doesn't have a brushstroke problem anyway).
For the blue I used two coats of a waterbased acrylic ink. Acrylic ink has much more pigment in it than watercolor ink. Again, this is what I wanted (I didn't like my tests with a transparent blue). Because I was adding swirlies over the top of it, everything looked cleaner on a more opaque background. It you wanted to show more wood grain then either use a watercolor ink or only one coat of acrylic ink.
The blue was a bit too bright, so I knocked it down with the Cyan blue watercolor ink shown below - very little ink on the brush almost like drybrushing...
You didn't ask about the black but here I wanted total opaqueness. To accomplish that I used a waterproof India Ink (like for a quill pen). This has more pigment than an ordinary ink.
Warning: you cannot paint waterbased paints (my swirlies are done in Vallejo acrylics) over the top of waterbased inks. The top color blends with the base color rather than sitting on top of it (I guess that could be a cool effect if you were going for that but I wasn't). You have to seal the undercoat. I used wipe on poly.
What I have shown are cheap and ordinary art supplies. Several of our international friends use Schmincke watercolors the same way I have used these. I wasn't able to source Schmincke here in the US without buying their full range of colors (or a sampler). You can find what I used at Michael's Craft Stores here in the US and still have money left over for lunch.
Hope this helps and I'll be happy to answer any other questions you might have.
Last edited:
Before I can continue with the drift rail I need to fabricate the vertical mounts for the swivel guns. Each mount is square for its lower half and octagonal for its upper half. It seems there is always another challenge to solve
Good afternoon! It was different on different ships. For example, on HMS Zebra (one of the medium Swans)
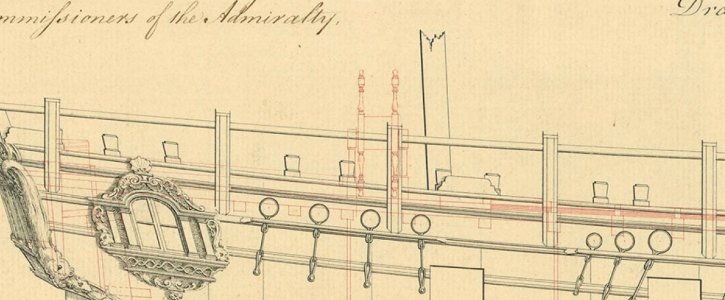

Thank you, Iutar! But I already figured out a way to make them according to Mr. Antscherl's designGood afternoon! It was different on different ships. For example, on HMS Zebra (one of the medium Swans)
View attachment 488451 View attachment 488452
Thank you, Mirek. Unfortunately, every new project requires another new jig...but once I realized that my output has improved incrementally.Welcome
Paweł, you are great with a milling machine, work POETRY. Greetings Mirek
Last edited:
- Joined
- Oct 15, 2017
- Messages
- 1,038
- Points
- 443

I know this is an old post Paul, but I just needed to ask. Are you holding down the carling workpiece with double-sided tape in your mill pic? If so, I need that tape link from Amazon. That is crazy tacky stuff. I'm assuming no movement maybe because of the smallness of the cut? Also assuming you are performing a vertical cut? Great stuff.Not much to report...work continues on the upper deck:
View attachment 455877
View attachment 455878
View attachment 455879
And a few bonus pictures to show how I have been cutting the table joint if (when) I ruin one of the kit-supplied parts...
With the piece turned 90 degree I mill to the preferred depth:
View attachment 455873
View attachment 455874
I then just square off the 'box' using a sharp chisel.
View attachment 455875
View attachment 455876
Honestly, apart from layout, its actually faster to mill the joints versus making the layered carlings from the kit. But using the kit-supplied parts does assure proper alignment of the carlings and ledges (as long as I'm careful trimming the pieces to fit).
I'm enjoying following so many of your wonderful builds! Thanks for sharing your work!
Here you go, Ken:I know this is an old post Paul, but I just needed to ask. Are you holding down the carling workpiece with double-sided tape in your mill pic? If so, I need that tape link from Amazon. That is crazy tacky stuff. I'm assuming no movement maybe because of the smallness of the cut? Also assuming you are performing a vertical cut? Great stuff.
I found that doubled-sided 'poster' tape didn't hold well enough. This is listed as 'permanent' and it is pretty reliable.
Best practices: use a metal base not a wood one, shallow cuts and/or slow advancement of the table, press down hard on the workpiece and then remove it from the metal plate using a razor blade (and then peel the tape from the workpiece).
Enjoy!
- Joined
- Aug 8, 2019
- Messages
- 4,826
- Points
- 688

you can also use blue tape and ca glue. Often used by people on the CNC machine. Just blue tape on both objects and then place them together with ca on the back of the blue tape. Works perfect and the correct blue tape is very thin.I know this is an old post Paul, but I just needed to ask. Are you holding down the carling workpiece with double-sided tape in your mill pic? If so, I need that tape link from Amazon. That is crazy tacky stuff. I'm assuming no movement maybe because of the smallness of the cut? Also assuming you are performing a vertical cut? Great stuff.
Paul,Hello Alex,
Thank you for your very kind assessment of my work.
At the bottom of this post are some pictures of the ink I have been using but I'll add some explanation first.
For the red I used a watercolor ink. Watercolor ink doesn't have a lot of pigment, and this is what I wanted (I wanted to show the wood grain and treenails under the color). In this case I used two coats to give a more uniform red color - no primer - and I used brushes (ink doesn't have a brushstroke problem anyway).
For the blue I used two coats of a waterbased acrylic ink. Acrylic ink has much more pigment in it than watercolor ink. Again, this is what I wanted (I didn't like my tests with a transparent blue). Because I was adding swirlies over the top of it, everything looked cleaner on a more opaque background. It you wanted to show more wood grain then either use a watercolor ink or only one coat of acrylic ink.
The blue was a bit too bright, so I knocked it down with the Cyan blue watercolor ink shown below - very little ink on the brush almost like drybrushing...
You didn't ask about the black but here I wanted total opaqueness. To accomplish that I used a waterproof India Ink (like for a quill pen). This has more pigment than an ordinary ink.
Warning: you cannot paint waterbased paints (my swirlies are done in Vallejo acrylics) over the top of waterbased inks. The top color blends with the base color rather than sitting on top of it (I guess that could be a cool effect if you were going for that but I wasn't). You have to seal the undercoat. I used wipe on poly.
What I have shown are cheap and ordinary art supplies. Several of our international friends use Schmincke watercolors the same way I have used these. I wasn't able to source Schmincke here in the US without buying their full range of colors (or a sampler). You can find what I used at Michael's Craft Stores here in the US and still have money left over for lunch.
Hope this helps and I'll be happy to answer any other questions you might have.
View attachment 488448 View attachment 488449
Thank you for taking the time to answer my questions with such a detailed explanation. Years ago, there was a stain/paint brand called Floquil. They produced a Railroad range and a Marine range, but they went out of business more than 10 years ago. I looked thru my stuff and found a box full of Floquil colors with some interesting shades. I used them years ago and then stopped for many years. I picked up the hobby again in 2019 after I retired. Unfortunately, the oil and the pigment have separated and don't mix readily. I'll try rescue them by opening the bottles and manually stirring the contents. I'll check my local art supply and craft stores to see what is available. Amazing what is hiding in plain sight.
Thanks
Alex
Hello Friends,
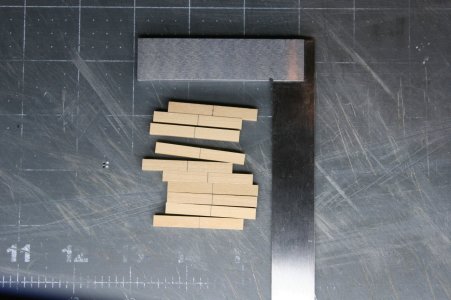
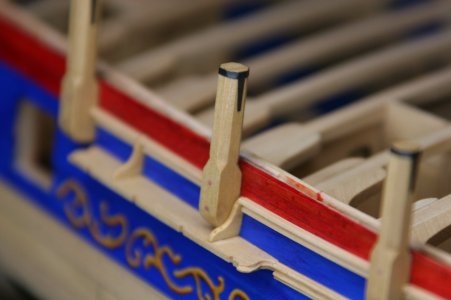
In order to continue with the drift rail (the uppermost molding on the side of the ship) I needed to fabricate and install the swivel gun mounts. There are eight of them and each one has to be custom fit in order to be vertical to the waterline (when viewed from the side of the ship) - with tops that follow the sheer-line lengthwise - and that are trimmed flat athwartships. None of these things are difficult - just tedious.
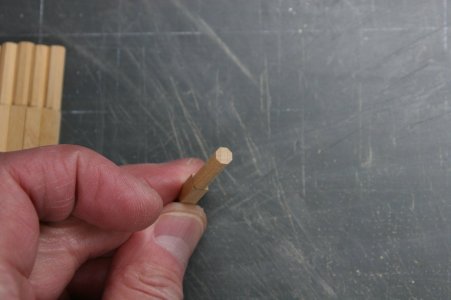
I started with stock that would have been 9 inches square on the full-scale ship. The upper half of the mount must be turned into an octagon. Here was my solution:
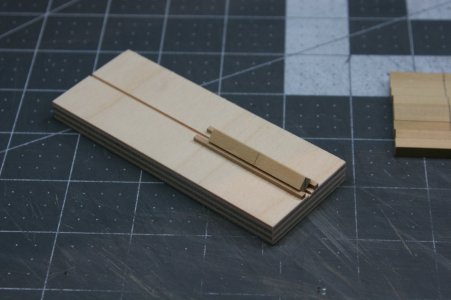
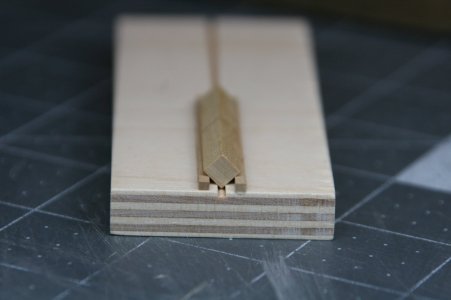
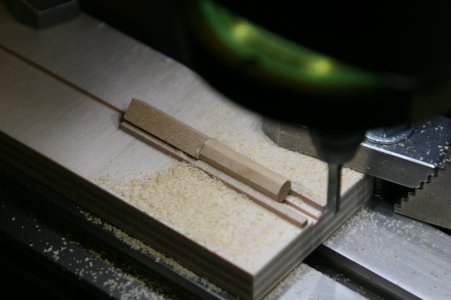
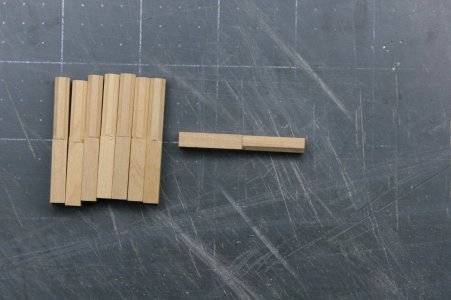
The lower portion was then shaped:
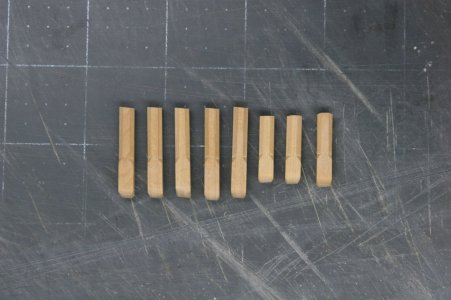
And now with some metalworks completed:
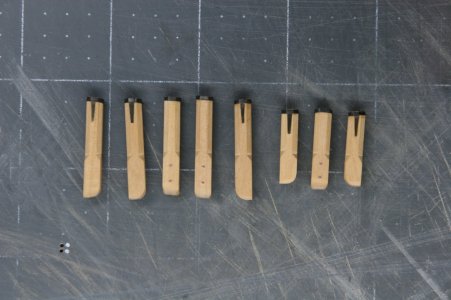
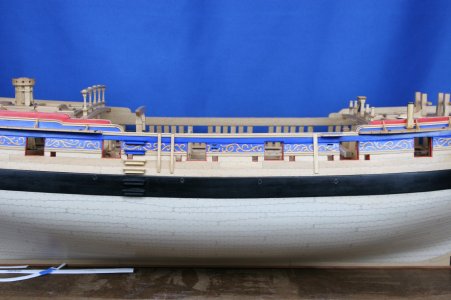
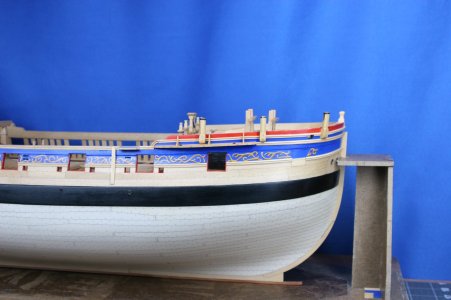
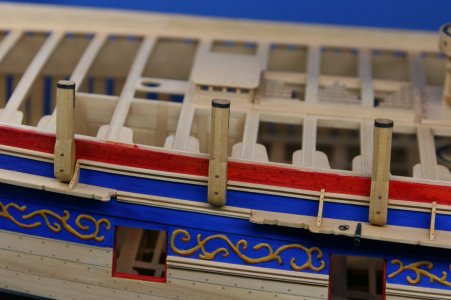
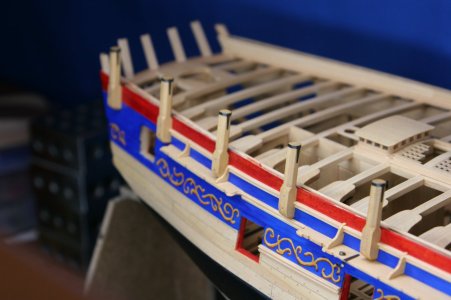
And finally, the swivel gun mounts were installed along with the remainder of the drift rail:
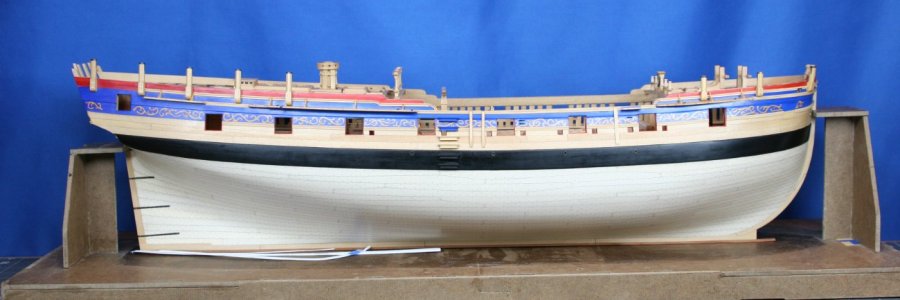
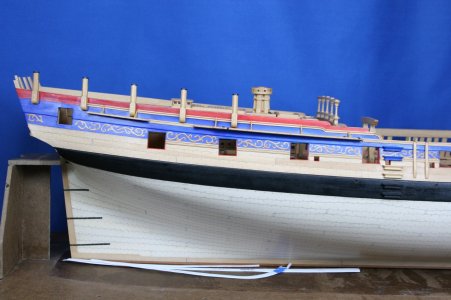
The final woodworking element on the side of the ship is the quarter badge. Its fabrication will require some thought:

And I do thank you very much for taking the time away from your own builds to see what I am working on.
In order to continue with the drift rail (the uppermost molding on the side of the ship) I needed to fabricate and install the swivel gun mounts. There are eight of them and each one has to be custom fit in order to be vertical to the waterline (when viewed from the side of the ship) - with tops that follow the sheer-line lengthwise - and that are trimmed flat athwartships. None of these things are difficult - just tedious.
I started with stock that would have been 9 inches square on the full-scale ship. The upper half of the mount must be turned into an octagon. Here was my solution:


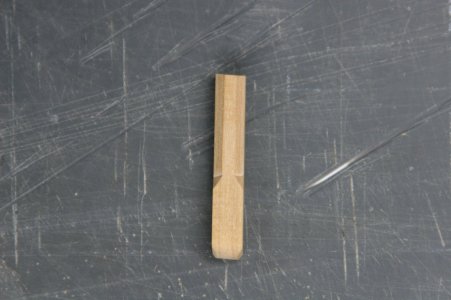
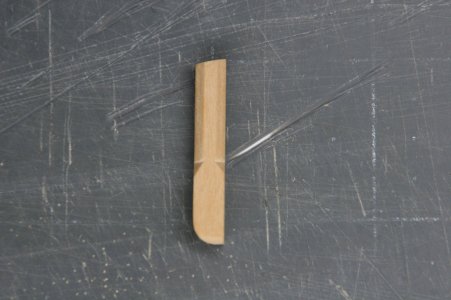
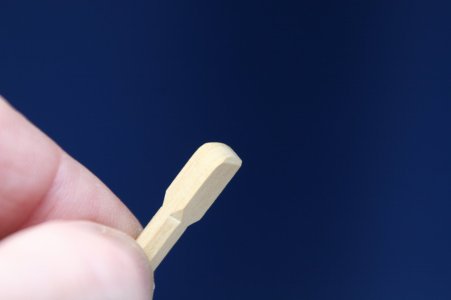
The lower portion was then shaped:


And now with some metalworks completed:

And finally, the swivel gun mounts were installed along with the remainder of the drift rail:


The final woodworking element on the side of the ship is the quarter badge. Its fabrication will require some thought:

And I do thank you very much for taking the time away from your own builds to see what I am working on.
Really impressive work! Going to take a while for me to catch up with this build 
- Joined
- Oct 23, 2018
- Messages
- 694
- Points
- 353

Hi Peter,
do you have the Knee of the Head forgotten? Antscherl shows the installation much earlier during the build. I am afraid that you will get some problems with the installation if you add more and mor details inside of the ship.
The other parts are looking really good. Can you please show us more regulary also pictures of the port side. The side is my favorite side of your build.
- Joined
- Sep 3, 2021
- Messages
- 4,857
- Points
- 688

Work of a true shipwright/artist. Very impressive and accurate work!Hello Friends,
In order to continue with the drift rail (the uppermost molding on the side of the ship) I needed to fabricate and install the swivel gun mounts. There are eight of them and each one has to be custom fit in order to be vertical to the waterline (when viewed from the side of the ship) - with tops that follow the sheer-line lengthwise - and that are trimmed flat athwartships. None of these things are difficult - just tedious.
I started with stock that would have been 9 inches square on the full-scale ship. The upper half of the mount must be turned into an octagon. Here was my solution:
View attachment 488572
View attachment 488573
View attachment 488574
View attachment 488575
View attachment 488576
View attachment 488577
The lower portion was then shaped:
View attachment 488578
View attachment 488579
View attachment 488580
View attachment 488581
And now with some metalworks completed:
View attachment 488582
And finally, the swivel gun mounts were installed along with the remainder of the drift rail:
View attachment 488583
View attachment 488584
View attachment 488585
View attachment 488586
View attachment 488587
View attachment 488588
View attachment 488589
The final woodworking element on the side of the ship is the quarter badge. Its fabrication will require some thought:
View attachment 488591
And I do thank you very much for taking the time away from your own builds to see what I am working on.
Thanks, Greg! You are welcome to journey back but this build report has become unhelpfully long (not that I haven't been guilty of that in the pastReally impressive work! Going to take a while for me to catch up with this build
Thank you, Johan. I'm having a lot of fun so maybe it shows...Work of a true shipwright/artist. Very impressive and accurate work!
Incredible and beautiful, Its incredibly beautiful!Hello Friends,
In order to continue with the drift rail (the uppermost molding on the side of the ship) I needed to fabricate and install the swivel gun mounts. There are eight of them and each one has to be custom fit in order to be vertical to the waterline (when viewed from the side of the ship) - with tops that follow the sheer-line lengthwise - and that are trimmed flat athwartships. None of these things are difficult - just tedious.
I started with stock that would have been 9 inches square on the full-scale ship. The upper half of the mount must be turned into an octagon. Here was my solution:
View attachment 488572
View attachment 488573
View attachment 488574
View attachment 488575
View attachment 488576
View attachment 488577
The lower portion was then shaped:
View attachment 488578
View attachment 488579
View attachment 488580
View attachment 488581
And now with some metalworks completed:
View attachment 488582
And finally, the swivel gun mounts were installed along with the remainder of the drift rail:
View attachment 488583
View attachment 488584
View attachment 488585
View attachment 488586
View attachment 488587
View attachment 488588
View attachment 488589
The final woodworking element on the side of the ship is the quarter badge. Its fabrication will require some thought:
View attachment 488591
And I do thank you very much for taking the time away from your own builds to see what I am working on.
Hmm. You are correct in the sense that Mr. Antscherl adds the quarter badge near the very end of the build - but otherwise I am tracking along with volume 2 in a somewhat orderly way. Next up in the book is the gangway and the planksheer in the waist, then the headworks.Hi Peter,
do you have the Knee of the Head forgotten? Antscherl shows the installation much earlier during the build. I am afraid that you will get some problems with the installation if you add more and mor details inside of the ship.
The other parts are looking really good. Can you please show us more regulary also pictures of the port side. The side is my favorite side of your build.
I'll need to modify the building jig to work on the bow and the stern sections so perhaps in my mind I am holding off on those a bit.
I am closing in on the two-year anniversary for this build and I'll post some overall images in a few weeks
Just like us...Incredible and beautiful, Its incredibly beautiful!


