Kingfisher 1770 1:48 POF

Hi Paul,

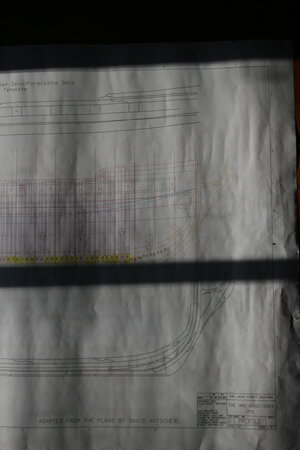
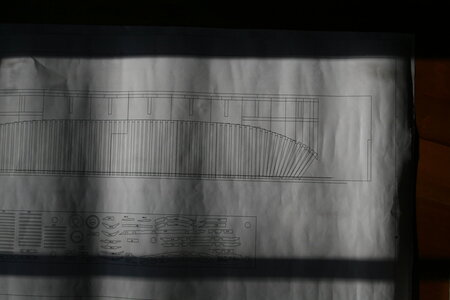
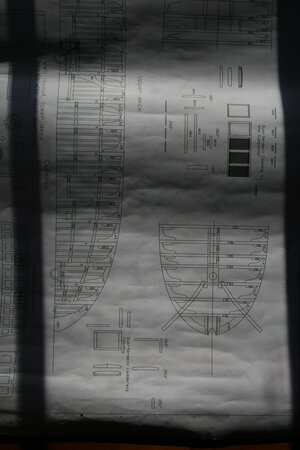
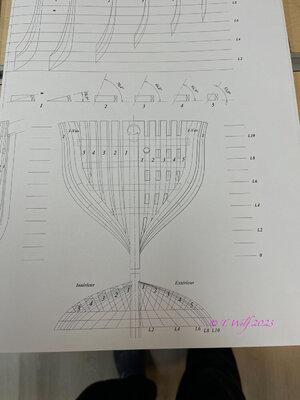
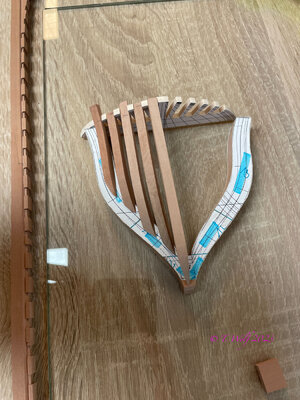
Here you have the template to fit in your hawser timbers. Start with hawser timber#1 and use your sanding disc to make small adjustments every time to create the perfect fit. This is a step by step process any way, sand, fit, sand, fit and another day passed by.
For the first hawser you use the stem post with rabbet as reference, for the second hawser you take the first hawser timber as reference. If you are not sure you can take a copy of the waterline drawing to double check the shape. You can temporary fit the timber with a small droplet of CA bafore finall fitment with PVA when all 4 timbers are finished. The filler piece F can be fitted afterwards.
The mirror timbers you can roughly copy across and fine tune before fitting.

Hope it helps.
Keep in mind this patient won't sue you when you make a mistake. :)
 
Last edited:
Tiny update...

Prepared the stem to receive the bowsprit:

View attachment 372665

And then I continued my commitment to parts that I still have only modest confidence will end up on my model (pending their potential re-do if they don't fit right). Here are the decorative tops on the bollard timbers...

Layout lines:

View attachment 372666

To represent the size...

View attachment 372668

And now a few viewing angles:

View attachment 372670

View attachment 372669

View attachment 372667

I'm probably going to shorten the bit at the very top - maybe it looks too tall now that I see these pictures. But I've run out of modeling time for today and I don't want to rush anything...

Thank you for taking the time away from your own builds to visit my build report.
Good morning Paul. These are so good they could pass as 3D printed...Cheers Grant
 
Paul you can use a copy of the template pictured and glue to some scrap timber a glue in place as I suggested.You need something to follow at the top of the timbers as well as the bottom.You do need the profile of the bow though adding to the top template.Is this not on the plan of the completed model?

Kind Regards

Nigel
 
Hi Paul,

Here you have the template to fit in your hawser timbers. Start with hawser timber#1 and use your sanding disc to make small adjustments every time to create the perfect fit. This is a step by step process any way, sand, fit, sand, fit and another day passed by.
For the first hawser you use the stem post with rabbet as reference, for the second hawser you take the first hawser timber as reference. If you are not sure you can take a copy of the waterline drawing to double check the shape. You can temporary fit the timber with a small droplet of CA bafore finall fitment with PVA when all 4 timbers are finished. The filler piece F can be fitted afterwards.
The mirror timbers you can roughly copy across and fine tune before fitting.

Hope it helps.
Keep in mind this patient won't sue you when you make a mistake. :)
A well thought out approach. My thanks!
 
Paul you can use a copy of the template pictured and glue to some scrap timber a glue in place as I suggested.You need something to follow at the top of the timbers as well as the bottom.You do need the profile of the bow though adding to the top template.Is this not on the plan of the completed model?

Kind Regards

Nigel
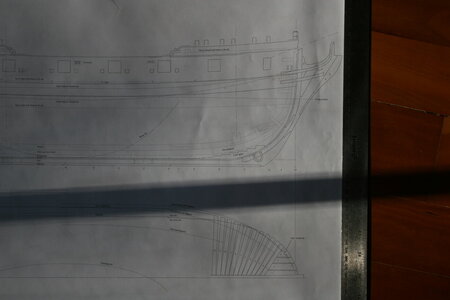
I guess I do also have a profile drawing but I don't get how that helps with installing the hawse timbers - it only shows the location of the bollard timber (?).
 
Paul, hard to believe these are not twins that were 3D printed. WOW to matching accuracy.
Thank you for noticing Kurt. They are as close as I could get them using files. There's probably a way to machine them but that is beyond me (and I was inspired by @Tobias and his handmade knightheads).
 
I guess I do also have a profile drawing but I don't get how that helps with installing the hawse timbers - it only shows the location of the bollard timber (?).

Paul the plan on the foredeck will give you the hull profile, minus planking thickness, minus cap rail overhang.You currently have nothing definitive to set the top of the timbers fore and aft??

Kind regards

Nigel
 
Paul the plan on the foredeck will give you the hull profile, minus planking thickness, minus cap rail overhang.You currently have nothing definitive to set the top of the timbers fore and aft??

Kind regards

Nigel
I'll look again when I get home later today. The kit does not come with the comprehensive set of drawings I have seen on other build logs. I also ordered some drawings from SeaWatch (Admiralty Models) but there were only two sheets and one of them was spars. I'll look again to see what the other sheet has on it. I wish I lived next door to someone (like yourself and others) who know how to interpret and apply plans...

This is a timely discussion as placing the hawse timbers is next in the line-up of things to do.
 
Do you plan on fitting the bollard timbers first then work outward ? I assume the bollard timbers are the innermost timbers? These are pretty much set in stone if they abut the stem as your bevelling should mate to the rabbet.I would not leave any surplus material on the face adjacent to the rabbet and flare the bevel on this timber forward to give you some room for sanding.Sanding the front face immediately next to the rabbet is very unforgiving and potential for mistakes are rife.
Hope this makes some sense, writing this down is much harder than showing you

Kind Regards

Nigel
The bollard timbers were glued in place last night precisely as you (and @Maarten) have described (finished leading edge of the bollard precisely matched with the bearding line/rabbet). It was my plan going forward to use the fixed positions of the bollard timber and the first of the cant frames as the 'constraints' for placing the hawse timbers. But if there is more information to be gained by having a better understanding of the drawings then I am enthused about that.
 
Hi Paul can you share pictures of the drawings that you do have next to the top view drawing?
 
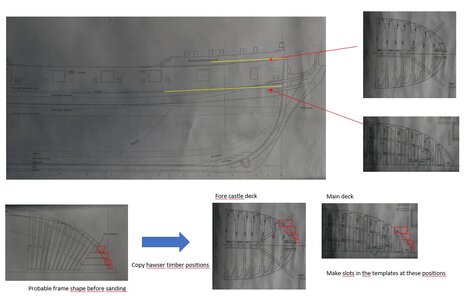
Paul the drawing on the far right gives you the forecastle deck framing but also the bow profile you need to make a pattern/template. Yes the bow timbers protrude above this but I would like to bet that the section above the deck is nigh on vertical.

Correction - this is the inside of the timbers, you would have to add the design thickness of the bow timbers to this outside line.However you can use the profile on the drawing to make a template for the inside of the timbers, just make the template slightly smaller to allow for your "green" (sanding allowance).Placing the template on top of your framing plan, the positions of the timbers can be drawn on the template and you should have the info you need to fit the timbers in situ.


Kind Regards

Nigel
 
Last edited:
Paul the drawing on the far right gives you the forecastle deck framing but also the bow profile you need to make a pattern/template. Yes the bow timbers protrude above this but I would like to bet that the section above the deck is nigh on vertical.

Correction - this is the inside of the timbers, you would have to add the design thickness of the bow timbers to this outside line.However you can use the profile on the drawing to make a template for the inside of the timbers, just make the template slightly smaller to allow for your "green" (sanding allowance).Placing the template on top of your framing plan, the positions of the timbers can be drawn on the template and you should have the info you need to fit the timbers in situ.


Kind Regards

Nigel
Thank you, Nigel. Why is that better than using the bottom drawing? (I'm sorry for not understanding all this.)
 
Paul,

You can use the two deck drawings, these give a reference profile of the inside of the hawser frames in a flat plain on two levels. The forecast level and the main deck level.
In the top drawing you can see the two levels of these decks.
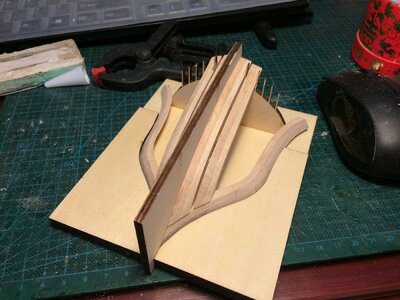
You can make a cartboard or plywood template of both and fit it on the inside of your hull on both levels. The you have a reference for your hawser timbers.

If you want to you can even make a dummy stem and first cant frame set up and build the hawser timbers in this dummy outside of the hull as one unit. The in the end fit it to the hull. You see this done in kits like the ones of Caf.

But as Nigel already phrased the more then true words, it is easier to show you than to write it.
We engineers visualize this in our head :)
 
Back
Top