
-

SUBSCRIBE TO SHIPS IN SCALE TODAY!
The beloved Ships in Scale Magazine is back and charting a new course for 2026!
Discover new skills, new techniques, and new inspirations in every issue.
NOTE THAT OUR NEXT ISSUE WILL BE July/August 2026 -

Win a Free Custom Engraved Brass Coin!!!
As a way to introduce our brass coins to the community, we will raffle off a free coin during the month of August. Follow link ABOVE for instructions for entering.
- Home
- Forums
- Ships of Scale Group Builds and Projects
- Le Coureur 1776 1:48 PoF Group Build
- Le Coureur 1776 1:48 Group Build Logs
You are using an out of date browser. It may not display this or other websites correctly.
You should upgrade or use an alternative browser.
You should upgrade or use an alternative browser.
LE COUREUR - french Lugger 1776 - POF kit from CAF in 1:48 by Uwe


.jpg")
LOL
Like in real life - No ghost, it is only an eyebolt with ring - but you never know......


Many Thanks for your kind wordsNice!
I really like the boudriot version better. Seems like there would not be enough space to fit the wider CAF version of the windlass?!
Cool details below deck with the axe and the firewood. Mabe You should paint the axehead black?
It is a pure question of taste with the windlass. Both types of bearings were used at this time. The CAF-version would also fit on the deck, with some smaller adjustments at the bearing-blocks.
The axe still needs some finetuning and painting, I agree. It was the first time I tried some "carving" works, with an acceptable result (acceptable, especially because she will be under deck and more or less not visible.....
")
I was just reading a post by @Dean62 which is fitting very good to such kits we are working on, if it is the Bluenose, the Alert or the Le Coureur (or all other of the hundreds of kits existing)
More all the time, I’m starting to see a kit as a blank canvas. Because you have boundaries to work within, but what you do within those boundaries, is up to you the builder! Happy modeling!
More all the time, I’m starting to see a kit as a blank canvas. Because you have boundaries to work within, but what you do within those boundaries, is up to you the builder! Happy modeling!
Bluenose 1/72 POF [COMPLETED BUILD]
Sometimes I wonder what I’ve got myself into! At this point I am spending more time studying rigging plans, than I am building…sigh. But I have to make sure I haven’t left anything off the mast I will need later. And all blocks have to be determined, as to whether they are single, double or...
shipsofscale.com
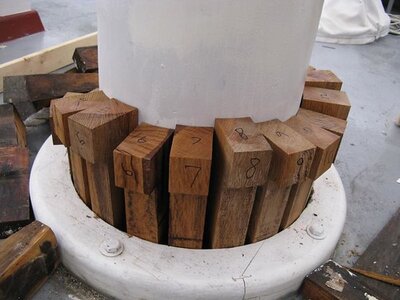
As mentione in an earlier post I like to show the cross section with the wedges of the masts shown in the Boudriot drawing
The foremast

and the main mast - esüecially here the wedges are slightly more complicated, due to the fact, that the mast is inclined compared to the deck

First of all I (more or less) finished the foremast ring of wedges - Due to the fact, that the diameter of mast plus ring of wedges is bigger, the hole inside of the partners had to be extended

and I am now working on the main mast wedges

still a lot of work to get this part into the form, which I need

Many Thanks for your interest .... to be continued ......
The foremast
and the main mast - esüecially here the wedges are slightly more complicated, due to the fact, that the mast is inclined compared to the deck
First of all I (more or less) finished the foremast ring of wedges - Due to the fact, that the diameter of mast plus ring of wedges is bigger, the hole inside of the partners had to be extended
and I am now working on the main mast wedges
still a lot of work to get this part into the form, which I need
Many Thanks for your interest .... to be continued ......

The wedges and their surroundings look very good.
The final works on the mast wedges
The main mast was also done

The total view on both masts

"By accident" the angles of the masts fit well with the drawings

and the view via the frames in the hold - also from this side the wedges are visible


What was missing are the imitation of the separated boards of the partner timbers and also the bolting


here I reduced also the visible height of the wedges slightly


The mast partners with wedges are finished

I am thinking about covering the wedges with a canvas to simulate the tarred mast coats.... maybe only one, or somehow half covered an a half open to see the wedges
Something like these


also shown on contemporary models

partly we discussed this already once a special topic
Here I "borrowed" one photo of a extremely good executed mast coat made by @archjofo on his beautiful La Creole


Johann, I hope it is ok for you to use your photos to show this detail?
The main mast was also done
The total view on both masts
"By accident" the angles of the masts fit well with the drawings
and the view via the frames in the hold - also from this side the wedges are visible
What was missing are the imitation of the separated boards of the partner timbers and also the bolting
here I reduced also the visible height of the wedges slightly
The mast partners with wedges are finished
I am thinking about covering the wedges with a canvas to simulate the tarred mast coats.... maybe only one, or somehow half covered an a half open to see the wedges
Something like these
also shown on contemporary models
partly we discussed this already once a special topic
odd question?
What is the name of the round piece that goes at the base of the mast to cover voids and get a snug fit? and where can I find various sizes.? Thank you.
shipsofscale.com
Here I "borrowed" one photo of a extremely good executed mast coat made by @archjofo on his beautiful La Creole
La Créole 1827 by archjofo - Scale 1/48 - French corvette
Hello, up to now I have also been represented in other forums. Due to the fact that many excellent model builders also present their building reports here, I have decided to show my building report on the model of the La Créole here in the future. At the end of this thread I will show you a...
shipsofscale.com
Johann, I hope it is ok for you to use your photos to show this detail?
Attachments
Before the fixing of the deck planking, also the funnel of the stove should be prepared
Included in the kit are small brass tubes, which have to be cut in a correct angle and length to get the final cranked form.
The wooden base is shown in the Boudriot drawings, otherwise only a hole in the deck would be visible. Somehow the passage of the funnel through the deck planking was covered, so I decided to make this block with the round notch. The funnel tube is going through the planking and is sitting on top of the oven.


Once more a check, if everything is fitting before the deck has to be "closed" and fixed on top of the beams


Included in the kit are small brass tubes, which have to be cut in a correct angle and length to get the final cranked form.
The wooden base is shown in the Boudriot drawings, otherwise only a hole in the deck would be visible. Somehow the passage of the funnel through the deck planking was covered, so I decided to make this block with the round notch. The funnel tube is going through the planking and is sitting on top of the oven.
Once more a check, if everything is fitting before the deck has to be "closed" and fixed on top of the beams
Hallo Uwe, looks perfectly coherent, I like it very much.

So fantastic……. I love it so

Good point! The gap is not with (or at) the waterway, it is the planking - as mentioned before, the planks on the photo are not fixed.The partial deck planking looks good - just one question though. What happens to the "waterway" gap? I see it is also left open at the port side.
View attachment 242627
The original curved plank is not wide enough at this area - I solved it with an additional piece "widening" the plank - it is hardly visible.
In short time I will show this detail, when the deck-planking is finaly fixed on top of the beams
I finally installed and fixed the deck planking.
But first only the center planking "sheet", so I had still some access (for fingers and tweezers) to fix the pump shafts with the iron rings around the shafts.


The following photos only to get a feeling what and how much these rings are visible - in my opinion it is worth to make them and install them also under the deck in the hold


view via the frames


The deck planking is now fixed on the beams,
the openings for the hatches are finally prepared and sanded smooth to corners of the beams
also the ladder is now fixed and installed


and refering the comment by @Heinrich in the following a closer photo showing how I solved this problem
The widening at the end of the plank is hardly visible - and in addition at this area the first gun will be installed and will cover most of this area

But first only the center planking "sheet", so I had still some access (for fingers and tweezers) to fix the pump shafts with the iron rings around the shafts.
The following photos only to get a feeling what and how much these rings are visible - in my opinion it is worth to make them and install them also under the deck in the hold
view via the frames
The deck planking is now fixed on the beams,
the openings for the hatches are finally prepared and sanded smooth to corners of the beams
also the ladder is now fixed and installed
and refering the comment by @Heinrich in the following a closer photo showing how I solved this problem
The partial deck planking looks good - just one question though. What happens to the "waterway" gap? I see it is also left open at the port side.
View attachment 242627
The widening at the end of the plank is hardly visible - and in addition at this area the first gun will be installed and will cover most of this area
What I forgot to mention in my yesterdays post.....
The plank marked with the arrow is scratch made to fit the wider space to the waterway - all other are the kit laser cut planks

The plank marked with the arrow is scratch made to fit the wider space to the waterway - all other are the kit laser cut planks
and this I wanted to show you also
I tried to fine-tune a little bit more the axe of the cook - but no blood - My Coureur is a "vegetarian ship"
The complete ship´s complement with all seamen inclusive the captain are not very happy about this and think about keelhaul the cook in short time

I tried to fine-tune a little bit more the axe of the cook - but no blood - My Coureur is a "vegetarian ship"
The complete ship´s complement with all seamen inclusive the captain are not very happy about this and think about keelhaul the cook in short time