Hello Uwe, I like the plain toothpick as well, bear in mind, if you will decide to oil the deck, it will actually emphasize the caulking effect (it will darken the around the hole). ")

 |
The beloved Ships in Scale Magazine is back and charting a new course for 2026! Discover new skills, new techniques, and new inspirations in every issue. NOTE THAT OUR NEXT ISSUE WILL BE July/August 2026 |
|
 |
As a way to introduce our brass coins to the community, we will raffle off a free coin during the month of August. Follow link ABOVE for instructions for entering. |
|
This I checked also already but did not make a photo right now.Hello Uwe, I like the plain toothpick as well, bear in mind, if you will decide to oil the deck, it will actually emphasize the caulking effect (it will darken the around the hole).


")
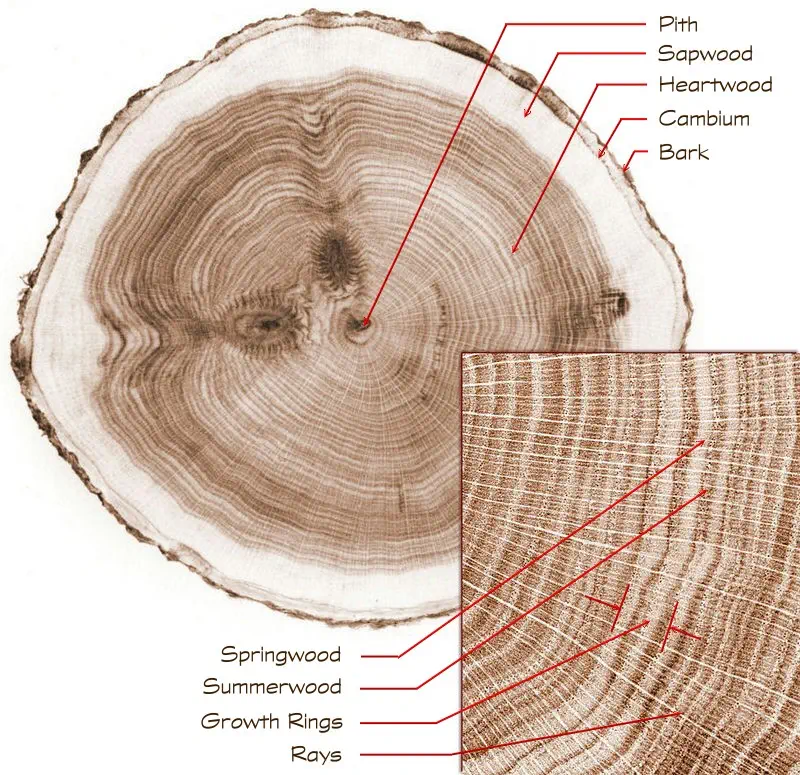
The end grain of wood always soaks up any finish, and requires more coats, and thus is naturally darker. But there are variables that would factor into that, such as the type of wood, and the direction the treenail was turned verses the direction of the wood grain. I am probably being rhetorical, but thought I would point out that they would most likely be somewhat darker if out of the same wood.This I checked also already but did not make a photo right now.
The treenails are getting slightly darker with oiling, but not because of the oiling effect.
The grain of the toothpicks are in 90° compared to the grain of the planks - so we see the face side or front end of the timber (of the toothpicks).
Timber is loosing f.e. the humidity mainly via this area, so it is also soaking all fluids much more towards the face sides.
Therefore the the treenails are getting slightly darker than the planking, although it is the same wood.
On real ships the treenails were made like this sketch is showing
View attachment 237934
Some of the still existing ships have such treenails
View attachment 237931
Than the neails are realy darker than the deck, although it is the same timber
Often they made on top of the treenail an additional plug with a bigger diameter, but the grain of the plug visible on the surface followed the grain of the deck planking
View attachment 237936
visible on this photo very good -> with this you can hardly recognize the treenail
View attachment 237930
Interesting is the fact, that when a deck was wet and getting dry - than the treenails are also more visible, because of humidety staying longer inside the contact areas between treenail, plug and plank
View attachment 237932
Realy - I think at the end it is a pure question of taste of the modeler - they should have only the correct size and not being outscale
When they are too dark compared to the planking, the modeler can every time say, that just before it stopped raining
I fully agree with your words.The end grain of wood always soaks up any finish, and requires more coats, and thus is naturally darker. But there are variables that would factor into that, such as the type of wood, and the direction the treenail was turned verses the direction of the wood grain. I am probably being rhetorical, but thought I would point out that they would most likely be somewhat darker if out of the same wood.
However wood plugs, used on schooners are cut to match the deck, and therefore do not have end grain exposed.

 workshopcompanion.com
 workshopcompanion.com

The hull planking was already done, which is shown in the posts beginning this year (i know there are a lot of posts in my log in the meantime)Your model is advancing quite fast I must say and with an astonishining accuracy. Always something interesting to read besides the model building itself.
To bad You are "covering up" all the hard work on the deck below. Maybe I missed or forgot, but do You plan opening a section in the frames on one side to be able to view the inside of the hold?


great progress looks amazing, well doneAfter the "positiv" testphase and the final decision I started the deck treenailing work on the aft
It is the work of 3 evening sessions, especially because I am drilling all the holes by hand and not with my Proxxon
- you know already my nickname "KILL DRILL"
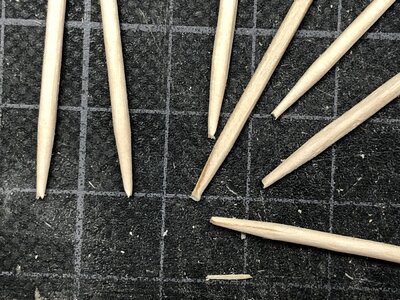
everything is prepared for pushing the toothpicks into the 0,5mm drilled holes
View attachment 238170
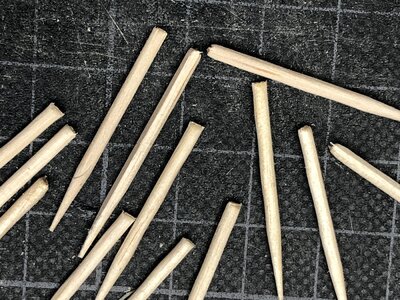
due to missing space (for all my fingers plus picks) I am making usually 50%, so every second treenail. When the glue is dry, I cut the toothpick with a side cutter and have enough space for the other 50%.....
View attachment 238171
I find it very helpful to prepare the deckplanking (caulking plus treenails) segments on the table and install them when they are more or less finished later on on top of the beams
View attachment 238172
50% of the treenails prepared
View attachment 238173
one close up photo of the nailing (not oiled)
View attachment 238175
afterwards it was possible to glue and fix the deck segments on top of the beams - here also the structures on top, to mark the correct size of the openings in the deck in order to sand them to the correct size (the timber is still not treated with oil)
View attachment 238174
and now the finsihed deck - fixed, openings in correct size (I hope), oiled and the endings (near the pumps) cut to the correct length
View attachment 238177
View attachment 238176
View attachment 238178
The top view - I will install in future one or two additional planks between the segments - but in moment it is not clear for me which one - so let us see
View attachment 238179
View attachment 238181
Hallo Donnie,Uwe,
wonderful !!
please respond. What tool did you use to cut off the toothpicks (Plier Cutters, knife, chisel?) When I used the toothpicks (after they are dry), I used a flush plier cutter, and unfortunately, it squeezes the toothpick and distorts it. It is good for your procedure as you have nice ROUND treenails.