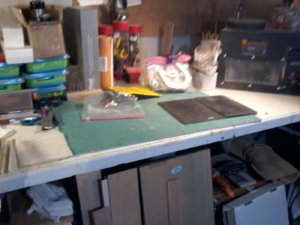
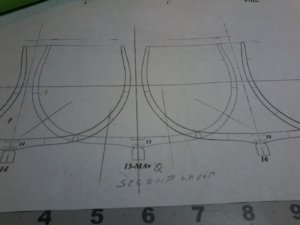
THERE ARE SOME REALLY GOOD, SUGESTIONS HERE GREAT, now this old brain has to function, excuse me NOT IGNORING THIS AT ALL REALLY GREAT THIS IS WHAT I AND I EXPECT GILLES TO WANTED, PARDON ME AS I HAVE TO DO A LOT OF STRAIGHTING UP TO DO IN MY WORK ROOM LOTS OF VAC. TO DO SO I CAN BREATH IN THERE THERE WILL BE ABIG OVERHALL REARAGING THE ROOM GILLES CHECK YOUR PM IN A COUPLE OF MINUTES utilizing space in living room for band saw and other itemes giving me more work room in there as i am awaiting the SMALLER BUILDING SLIP/JIG witch was on back order, WILL PM YOU GILLES. Don
-

Win a Free Custom Engraved Brass Coin!!!
As a way to introduce our brass coins to the community, we will raffle off a free coin during the month of August. Follow link ABOVE for instructions for entering.
-

PRE-ORDER SHIPS IN SCALE TODAY!
The beloved Ships in Scale Magazine is back and charting a new course for 2026!
Discover new skills, new techniques, and new inspirations in every issue.
NOTE THAT OUR FIRST ISSUE WILL BE JAN/FEB 2026
You are using an out of date browser. It may not display this or other websites correctly.
You should upgrade or use an alternative browser.
You should upgrade or use an alternative browser.
LE ROCHEFORT
- Thread starter donfarr
- Start date
- Watchers 37
-
- Tags
- ancre le rochefort
HI GILLES, THANK You and all back in it now, will have a lot of questions tomorrow, and may be need another go at it, as to your second point( PLEASE KNOW THAT I AM NOT COMPLAINING) I AM VERY GRATFUL FOR WHAT I HAVE AND NOT ON WHAT I DO NOT HAVE AS JESUS HAS GIVEN ME TODAY I ACCEPT WITH GRATITUDE,,,IF YOU WANT TO BE DRIVEN CRAZY CALL ME ON THE PHONE BE PREPARED TO HERE WHAT, WHAT, WHAT, OVER AND OVER AGAIN, AMONG OTHR PROBLES IS HEREING LOSS WEAR 2 HEARING AIDES (EXPENSIVE SUCKERS AND EVEN WIT THEM HAVE A VERY HARD TIME WHEN FACE TO FACE WITH PEOPLE I CAN READ LIPS VERY GOOD SO SORRY ABOUT THAT i have a land line that i only use in a emergency also have a emergency button it rings in my daughters hous and to EMS this saved my life almost 8 years ago ( TRIPLE BY PASS) hereing loss caused by when i was in my early 20s working on a pile driving crew as engineer no osha then so no earplugs for a macho man that was ready to cinquer the world it was the recoil ping not the thud sorry for the long poist speak tomorrow. Don
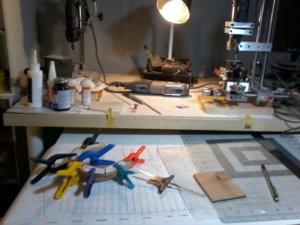
as to MAARTEN SUGESTIONS , are you talking about the whole fram complet the type of mill that i have right now i could not fit it in, see my picture of the mill it is not perfect by any means but serves OK for the time beeing, i might get a proxxon at some date in the future and i do have a mill vice harbor freight that i can use with my drillpress but not now need more experience in milling, also have and X Y TABLE DO NOT KNOW HOW TO WORK THAT ONE, do not want to mess with that yet,, back on point MARRTEN coul i do that with just the 2 floor timbers glued together the keel notches in have 2 different heights small on the 2nd layer and longer on the first layer th at would solve one problem but how do you line up the two floor timbers accuratly,,, another point people are expressing is keeping the patterns on or taking them off i asked a quest ion a long time ago and this is getting way ahead of myself but you got to think abut it with close frame spacing how do you and when do you put your finish on the main answer was and i use tounge oil is to finish thsides before installing, any other ideas not talking about the facframes that have to faired just the inside parts, that is it for me tonight, EVERYONE STAY SAFE PLEASE STAY SAFE. Don
OK AT IT AGAIN, one thing i want to do is take some beech that has been warped an don a sample frame the same frame no.27 that i showed, maybe tht will help a clutterd mind OK first question, in post No.536 using the center line is really super i do not know why i did not think of that, when checking this remembering the meat left i should measure this to the blue line on the pattern witch represents the completed frame, not to the rough meat left on, NEXT ONE when you say make blanks i do not quite understand what you mean are you talking about usin the blanks lik DAVE STEVENS SUGGESTED, but use the blanks for each one othe 2nd layer floor timber, futtocks, top timbers, just glueing the 2 parts togethe as a whole or as seperate having a little trouble comprhending that it sounds workable and doing the keel and keelson notches as i did the first layer, NEED HELP ON UNDERSTANDING THIS CONCEPT. Don
- Joined
- Feb 18, 2019
- Messages
- 717
- Points
- 353

Sorry, this is another long post.
You can use frame 27 if you really want to, but remember what I suggested from the very beginning:
THE MIDSHIP FRAME IS BETTER TO PRACTICE ON TO MAKE SURE YOU GET THE “TECHNIQUE” TO MAKE FRAMES BEFORE MOVING ON TO OTHER FRAMES. IT IS THE FRAME THAT DOES NOT NEED BEVELING: FRAME # 14.
THE REASON WHY IT IS AN EASIER FRAME TO PRACTICE ON: IT ONLY HAS ONE SET OF CONTOUR LINES: IT IS NOT CLUTTERED WITH BEVEL LINES SO YOU AVOID GETTING MIXED UP AS TO WHAT LINE BELONGS TO WHAT LAYER, AND IT MAKES ALIGNING PARTS OF THE FRAME EASIER.
This way it also prevents you from adding you pen line, which may make things more complicated as well: at least until you can produce a consistent frame.
The main purpose, in my view, is to practice on 1 frame until you understand the method, until you are familiar with the method, while adapting the method to fit your ability and more importantly until you can make this particular frame with accuracy.
If you have to make it once, twice or three times is better than jumping from one frame to the other and in the end, have to redo a whole series of frame.
Working on just that particular frame will allow you to figure out what best fits your limitations and adapt your technique accordingly.
Furthermore, if you can accurately produce the same frame twice, then you are on your way.
A) As for using the center line as a reference:
You can use the measurement representing the total spread between the inside edges of the 2 top timbers: as shown on the photo attached to post 536.
I am not sure how I can explain better how to use it. You definitely cannot use the edge of the extra meat as it is not constant from 1 side to the other.
B) Blanks for the 2nd layer
Here is a photo of a frame using the Hahn method: which you are familiar with.
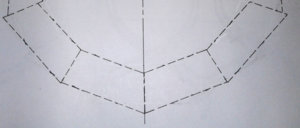
All you have to do is cut pieces while respecting the angled joints from your original frame pattern. Once cut, you just glue them to the 1st layer. You do not have to line them up with anything, but you have to make sure they cover the 1st layer.
_________________________
Now all this is quite straightforward, but I think that you should spend time re-reading all the explanations (from previous posts in the past few weeks), follow some of the steps while adapting them to your limitations.
To build frame with some accuracy, you need to begin with flat stable work space. A work space that will deter you from moving the assembly you are working on.
Although you can decide to them or not, my suggestions have been to:
1) Use the original frame template taped / secured to your worktable and keep it that way for the entire process.
2) Then on top, tape / secure a piece of tracing paper.
3) Cut your frame parts (for both layers), dry fit them one by one on the template to make sure the angled joints are accurate. Do this for the 1st layer then the 2nd layer. You can do this several times: look at it as a rehearsal before assembly.
4) When you are happy with the dry fit to confirm the alignment of each parts (again for both layers), then start gluing parts for the first layer. As explained earlier, you may glue each part onto the tracing paper using craft glue (or contact cement). As you line-up each part, apply your wood glue to the joints: you can use this method for the full 1st layer starting with the floor-timber and working your way up each side. As you build you first layer, you can keep checking the alignment, which should be fine as you should have worked it out during dry fitting.
5) From there let everything dry for a few hours. Leave everything laying flat on the worktable, please, no clamps holding anything.
6) Then you can remove the pins.
7) Start adding the second layer. Leave everything laying flat on the worktable to dry, no clamps holding anything.
For the sake of accuracy, you should not handle any glued assembly, until all is dry: and again, please no clamps.
All this can be done while comfortably sitting down, I do… Just have everything you need right by your work area or worktable.
If you have one of those desk-light magnifier glass use it in all stage. Do everything you can to be accurate.
Just my 10 cents.
G.
You can use frame 27 if you really want to, but remember what I suggested from the very beginning:
THE MIDSHIP FRAME IS BETTER TO PRACTICE ON TO MAKE SURE YOU GET THE “TECHNIQUE” TO MAKE FRAMES BEFORE MOVING ON TO OTHER FRAMES. IT IS THE FRAME THAT DOES NOT NEED BEVELING: FRAME # 14.
THE REASON WHY IT IS AN EASIER FRAME TO PRACTICE ON: IT ONLY HAS ONE SET OF CONTOUR LINES: IT IS NOT CLUTTERED WITH BEVEL LINES SO YOU AVOID GETTING MIXED UP AS TO WHAT LINE BELONGS TO WHAT LAYER, AND IT MAKES ALIGNING PARTS OF THE FRAME EASIER.
This way it also prevents you from adding you pen line, which may make things more complicated as well: at least until you can produce a consistent frame.
The main purpose, in my view, is to practice on 1 frame until you understand the method, until you are familiar with the method, while adapting the method to fit your ability and more importantly until you can make this particular frame with accuracy.
If you have to make it once, twice or three times is better than jumping from one frame to the other and in the end, have to redo a whole series of frame.
Working on just that particular frame will allow you to figure out what best fits your limitations and adapt your technique accordingly.
Furthermore, if you can accurately produce the same frame twice, then you are on your way.
A) As for using the center line as a reference:
You can use the measurement representing the total spread between the inside edges of the 2 top timbers: as shown on the photo attached to post 536.
I am not sure how I can explain better how to use it. You definitely cannot use the edge of the extra meat as it is not constant from 1 side to the other.
B) Blanks for the 2nd layer
Here is a photo of a frame using the Hahn method: which you are familiar with.

All you have to do is cut pieces while respecting the angled joints from your original frame pattern. Once cut, you just glue them to the 1st layer. You do not have to line them up with anything, but you have to make sure they cover the 1st layer.
_________________________
Now all this is quite straightforward, but I think that you should spend time re-reading all the explanations (from previous posts in the past few weeks), follow some of the steps while adapting them to your limitations.
To build frame with some accuracy, you need to begin with flat stable work space. A work space that will deter you from moving the assembly you are working on.
Although you can decide to them or not, my suggestions have been to:
1) Use the original frame template taped / secured to your worktable and keep it that way for the entire process.
2) Then on top, tape / secure a piece of tracing paper.
3) Cut your frame parts (for both layers), dry fit them one by one on the template to make sure the angled joints are accurate. Do this for the 1st layer then the 2nd layer. You can do this several times: look at it as a rehearsal before assembly.
4) When you are happy with the dry fit to confirm the alignment of each parts (again for both layers), then start gluing parts for the first layer. As explained earlier, you may glue each part onto the tracing paper using craft glue (or contact cement). As you line-up each part, apply your wood glue to the joints: you can use this method for the full 1st layer starting with the floor-timber and working your way up each side. As you build you first layer, you can keep checking the alignment, which should be fine as you should have worked it out during dry fitting.
5) From there let everything dry for a few hours. Leave everything laying flat on the worktable, please, no clamps holding anything.
6) Then you can remove the pins.
7) Start adding the second layer. Leave everything laying flat on the worktable to dry, no clamps holding anything.
For the sake of accuracy, you should not handle any glued assembly, until all is dry: and again, please no clamps.
All this can be done while comfortably sitting down, I do… Just have everything you need right by your work area or worktable.
If you have one of those desk-light magnifier glass use it in all stage. Do everything you can to be accurate.
Just my 10 cents.
G.
Last edited:
GOOD STUFF GILLES, I LIKE THE IDEA OF USING 2nd layer HAHN METHOD one question on that is how to handel notches, and idea just crossed my mind am going to PM YOU. Don
MIKE YOU STILL DO NOT KNOW MY METHOD YET, I HAVE MAYBE 8 or 9 DREMEELS MOST 395 type5, all the way to 2 8220s cordless and everthing in between, WHAT I DO IS GO ON EBAY ROTARY TOOLS, look at what is available and prices most of the time get them for under $20.00 some even less order it and when something happens to one at that price no need to worry just chuck it away this also enables me to keep a lot of different grits avaalible at all times do not have to fumble around changing back and forth just grab one start to work JUST ME. Don
Hi Don,as to MAARTEN SUGESTIONS , are you talking about the whole fram complet the type of mill that i have right now i could not fit it in, see my picture of the mill it is not perfect by any means but serves OK for the time beeing, i might get a proxxon at some date in the future and i do have a mill vice harbor freight that i can use with my drillpress but not now need more experience in milling, also have and X Y TABLE DO NOT KNOW HOW TO WORK THAT ONE, do not want to mess with that yet,, back on point MARRTEN coul i do that with just the 2 floor timbers glued together the keel notches in have 2 different heights small on the 2nd layer and longer on the first layer th at would solve one problem but how do you line up the two floor timbers accuratly,,, another point people are expressing is keeping the patterns on or taking them off i asked a quest ion a long time ago and this is getting way ahead of myself but you got to think abut it with close frame spacing how do you and when do you put your finish on the main answer was and i use tounge oil is to finish thsides before installing, any other ideas not talking about the facframes that have to faired just the inside parts, that is it for me tonight, EVERYONE STAY SAFE PLEASE STAY SAFE. Don
Putting only the two floor timbers is an option but then you have to alter building your frames and with all the work you and gilles put in would not recommend to do that.
THANK YOU MAARTEN, yes you are right, what is transpiring right now is like GILLES said is a process of how to build frames not only for the Le ROCHEFORT but for future builds, it is some trial and error procedures until i am cmfortable in doing the frames accuratly, now i am going to practise the use of blanks for the second layer, it sounds intrigingo me, i do have some concerns though it is up to me to see if i have the skills to do it this way i think so, right now i use my band saw for most of everything i do have a scroll saw it is the moto-tool(DREMELL but do not think it accurate enough, i will try it on my band saw and see what transpires suggestions on how to cut these and maintain th acceracy that i need is all important to us. THANKS FOR THE HELP. Don
- Joined
- Feb 18, 2019
- Messages
- 717
- Points
- 353

Although there is a way around the issue of the notches, because the layers have 2 different size notches for the keel, you could actually simplify the process by picking just one size notch for every frame.
That would mean, you may have to modify all your frames and corresponding keel area: But it is possible
More on that if you want........
None the less, it is possible to work the notches after the frame have been built. But the operation requires a level of precision that may not be feasible for you: working with your milling machine + a sharp blade.
Again, that is the reason why, from the beginning, I have suggested to stick to just one frame to practice on until you get it right: while getting an accurate symmetrical frame profile without worrying about the notches. Once you get the accuracy and symmetry required, then we can integrate working on either the 2 notches, or only one, for the keel.
The keelson notch can be bypassed altogether, but that is another issue.
For the time being, again, I would just recommend that you stick to the frame without notches. I am sure there is a way around that notch. Again, this is all improvisation at this point.
G.
- Joined
- Feb 18, 2019
- Messages
- 717
- Points
- 353

Now, when you start working on frame 14 or 15, just remember a few things.
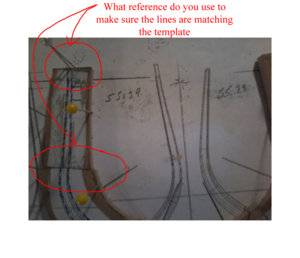
Because you need so much meat around the frame, you are basically working blind without much reference to the template.
So I would suggest you need to at least:
1) Extend the tip of the top timbers.
2) Extend the joint lines past the eventual frame contour line + extra maeat.
3) Then get the accurate joint line angle.
4) And then, use the frame template centreline at the foot and the top in conjunction with the spread measurement at the top.
as a reminder:
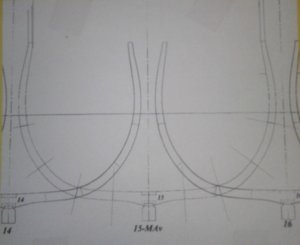
All these reference are constant throughout building your 1st layer (at least): use the template to build your frame without moving anything from it while you are in the process of building your entire frame. Please keep every part in place over the template until your frame is completely assemble and the glue is dry.
G.

Because you need so much meat around the frame, you are basically working blind without much reference to the template.
So I would suggest you need to at least:
1) Extend the tip of the top timbers.
2) Extend the joint lines past the eventual frame contour line + extra maeat.
3) Then get the accurate joint line angle.
4) And then, use the frame template centreline at the foot and the top in conjunction with the spread measurement at the top.
as a reminder:

All these reference are constant throughout building your 1st layer (at least): use the template to build your frame without moving anything from it while you are in the process of building your entire frame. Please keep every part in place over the template until your frame is completely assemble and the glue is dry.
G.
Last edited:
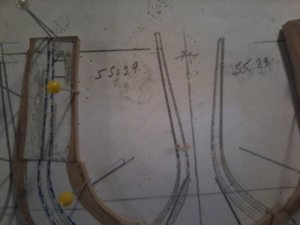
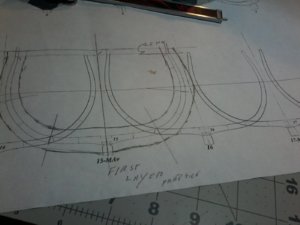
OK, a couple of answers and some questions, i have extended the top timbers by 6.5mm see pictures of my frame patterns, item 3 one the first layer i have been accurate see my reverse of first layrs the smear you see on the reverse is a dab of CA in the joints then sanded smooth, no 5 is a definate yes that is mandatory, now the difficult item 2 is a question do you mean on my pattern if so i do that and extend the joint line up for sanding to the exact line on pattern see pictures on placement of layer one pattern on wood, now questions if i do not use patterns on the second layer then i do not hve the proper lines witch is different then the first layer tried sketching out the blanks on plan sheet see picture it looks like a disaster also i am doing the horizant and vertical cuts on the bow and stern frames the notches i am thinking i could probally do on my mill or if need be even by hand as the 2nd layer notch is the shortest, also GILLES we are just not cioncered with the Le ROCHEFORT FRAME BUT ESTABLISHING A WAY TO DO THE FRAMES ON OTHER BUILDS JUST AS YOU HAVE DONE,,, making the blanks is the next thing i have to learn i also have to keep the blanks with in the parameters of my matrials witch is 2 inches wide, the reason is we have a big difference in temperutres changes in a 8 to 10 hour period coul be 40 degrees change playing havoc with my wood the beech is warping especially the 3 inch material the 2 inch not so much. AS ALWAYS LOOKING TO YOU FOR ANSWERS WE WILL GET IT TOGETHE. Don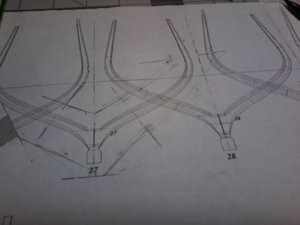

- Joined
- Feb 18, 2019
- Messages
- 717
- Points
- 353

OK, a couple of answers and some questions, i have extended the top timbers by 6.5mm see pictures of my frame patterns, item 3 one the first layer i have been accurate see my reverse of first layrs the smear you see on the reverse is a dab of CA in the joints then sanded smooth, no 5 is a definate yes that is mandatory, now the difficult item 2 is a question do you mean on my pattern if so i do that and extend the joint line up for sanding to the exact line on pattern see pictures on placement of layer one pattern on wood, now questions if i do not use patterns on the second layer then i do not hve the proper lines witch is different then the first layer tried sketching out the blanks on plan sheet see picture it looks like a disaster also i am doing the horizant and vertical cuts on the bow and stern frames the notches i am thinking i could probally do on my mill or if need be even by hand as the 2nd layer notch is the shortest, also GILLES we are just not cioncered with the Le ROCHEFORT FRAME BUT ESTABLISHING A WAY TO DO THE FRAMES ON OTHER BUILDS JUST AS YOU HAVE DONE,,, making the blanks is the next thing i have to learn i also have to keep the blanks with in the parameters of my matrials witch is 2 inches wide, the reason is we have a big difference in temperutres changes in a 8 to 10 hour period coul be 40 degrees change playing havoc with my wood the beech is warping especially the 3 inch material the 2 inch not so much. AS ALWAYS LOOKING TO YOU FOR ANSWERS WE WILL GET IT TOGETHE. Don
Not sure what you mean through your message.
You only have 1 photo (frame 27). On the photo the top timbers have not been extended.
.....And I thought you said you were going to do frame 15.... in post # 547
I am confused.
As for your questions, I will have to wait until I am not confused anymore...
I think we are going to take this one step at a time.
First step: modify the copy of the frame template your are going to use. Frame 15?
a) Extend the top timbers straight up 1 inch and parallel to the center line .
b) Extend the joint lines by 1 inch past the contour lines.
c) Extend the frames center line well past the keel and well past the top-timbers.
d) Draw an horizontal line between the tip of the top-timbers extension and measure the distance between the 2 inside edges.
Then prepare a sheet of tracing paper (if you have some) or a piece of wax paper (as long as you can see through it).
Basically we are looking at you doing something like this:
The measurement should be + - 120mm
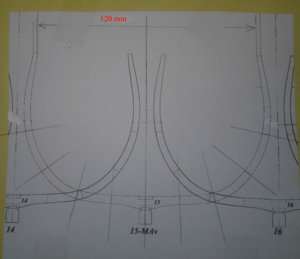
We will try to make this frame: one step at a time.
G.
OK MY BAD I DID NOT SHOW THE MASTER SHEET THAT I USE FOR PINNING PICTURES OF THE FRAMES SHOWING 6.5 mm extensions ao early frames i have to attach a piece at the top timber and add a piece it will be hidden a a plank on both sides sorry for the confusion, i used frame 27 on the plans just to see if i could do a blank so far bad, hope to get it right tomorrow i will start the process on frame 15 have to go into my timber pile and find the best pieces of beech a the correct thickness should have plenty, if not will use some othe species as long as is thge same thickness, SO SORRY FOR THE COFUSION. 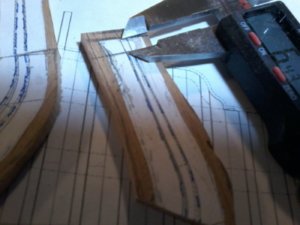
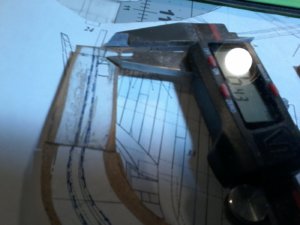


OK HAVE NO TRACING PAPER THAT I CAN FIND but I ALWAYS USE WAX PAPER ESPECIALLY WHEN I GLUE NO STICK EVEN CA. so we get started. Don PS remember i still have 7 more to 5 for stern am frames 1 and 2 at the bow and i still have to the cuts for vertical and horizantal on the bow frames should be able to do those without taking apart i tried it and the cuts were good on sample, will wait for your reply. Don
- Joined
- Oct 23, 2018
- Messages
- 886
- Points
- 403

Hi Don,
You can glue a complete paperframe on the prepared futtocks. If you use a glue that gives you a little time time for working, it's quite easy to get the correct position
You can glue a complete paperframe on the prepared futtocks. If you use a glue that gives you a little time time for working, it's quite easy to get the correct position
OK GILLES AND ALL, tonights prep work frame 15 first layer prep, should i just proceed as usual and do the notches i could do them by hand or mill it makes do difference but i think i need the notches to provide a starting point your thoughts bad day to day brighten up a great deal by truly blessed man, there are still nice people out there, LET ME HEREALL. Don


