• LUCZORAMA SHIPWRECK SCAVENGER HUNT GIVEAWAY. 4 Weeks of Fun • 1 Legendary Prize ((OcCre’s Fram Ship)) • Global Crew Welcome!
    **VIEW THREAD HERE**

Le Saint Philippe 1693 after Jean-Claude Lemineur (Ancre) in scale 1:48

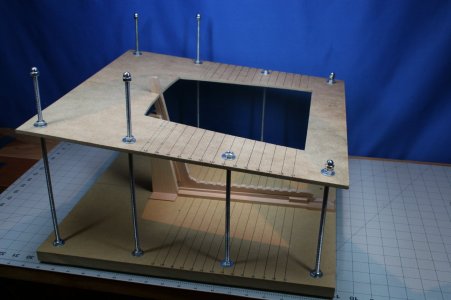
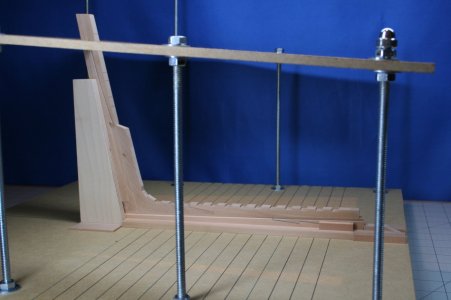
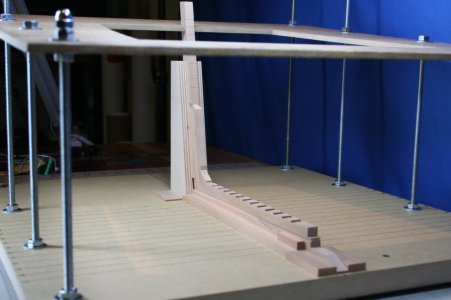
he following images also show my solution to the fact that the frames are not perpendicular to the keel (they tip forward 1.2 degrees). Under the keel you will notice a 1.2 degree ramp... Now I can erect the frames perpendicular to the build-board and when I remove the ramp I'll have a forward tip to the frames.
Good to see you have found your solution for the tilted frame, Paul. With one of the reasons for starting you log: you got input. Maarten and Nigel gave you the input that I also have used for my Balder. She has a lift of 1,5 dgr.
Without building in a jig the ramp is a good idea. I have tilted my base-plate and made a temporary set-square of 88,5 dgr. You can use your set square to check your frames.
Your scarf joints are razor sharp and the composite parts have a nice fit.
Regards, Peter
Thanks, Peter. Yes: good advice abounds on the forum. I did think about keeping the keel level and using a custom set-square, but my brain wants the frames to be perpendicular to the building board, so Maarten and Nigel's solution works better for the way I think (once I sorted out what they were suggesting).

I'll still be building inside a jig in order to constrain the frames laterally. MDF is presently on the workbench in the garage...and I'm studying a book by French modeler Bernard Frolich to help guide my design.

1750416101175.png
 
As I mentioned a moment ago, I was in a weird place where I was not going to post a build report. The reasons are complicated – but basically, I was finding myself annoyed by several individuals (a small group?) on the forum. Self-righteousness is always unattractive in my book, so I found the forum draining rather than life-giving.

On the other hand – there are some truly remarkable fellow modelers on the forum, so I’ll do my best to lean into those friends rather than allowing the others to take the joy out of my participation.

All this to say that the model has been on my workbench for a while now and I have not been diligent in taking pictures. The smattering that I have will have to suffice.

The Ancre monograph is epic in its breadth. But for those familiar with it you will understand it when I say that there are some difficulties. Perhaps the single most vexing is that Mr. Lemineur argues that the frames were not perpendicular to the keel – they tip ‘forward’ about 1.2 or 1.3 degrees. As you might expect, that makes the drawings uncharacteristically difficult to interpret.

At first I thought to simply ignore this feature – but eventually I decided that would be unwise. The construction solution is rather simple – but every time I look at a drawing it gives me a headache.

The one significant departure that I am taking (sorry @NMBROOK) is the way the frame pairs are joined. The Saint Philippe has morticed frames. Here are a few images from Nigel's build showing what I am talking about:

View attachment 525686
View attachment 525687

The purpose of these mortices was to lessen the tendency of the ship to hog (the bow and stern are less buoyant by volume, so they sag into the water).

I have chosen to ignore this distinctive feature of the SP. You might argue that omitting the mortices is tantamount to no longer building Le Saint Philippe. But I am fully planking the exterior so the mortices would not even be visible there. The interior of the framing WILL be visible – but is the added complication of morticed frame pairs justified for the little bit it would be visible on the inside of the hull? I have decided it would not be. My apologies to the historical purists.


In true scratch building form, I began with rough cut lumber. This is European pearwood purchased at great cost :rolleyes::

View attachment 525690

After some head-scratching I figured out how to use some of my shop tools to turn these into dimensional billets:

View attachment 525689

I chose to begin with the frames. For this stern section model I decided to build 15 frame pairs (30 single frames) in the typical manner. You know how it goes:

View attachment 525698

View attachment 525699

View attachment 525700

View attachment 525701

View attachment 525702

Here is the size of an SP frame compared to the Kingfisher (both are 1:48 scale):

View attachment 525705

View attachment 525706

The obligatory picture of a stack of rough frames:

View attachment 525703

View attachment 525704

For the Kingfisher I installed these frames in a build jig and commenced with the sanding/shaping. Here I chose to add some provisional bevels based on the frame drawings. I left some extra on the frames, but I won’t know if I left enough until it comes time for the final shaping...

The Kattner sanding center:

View attachment 525707

View attachment 525708

My thanks for your interest!
Very impressive looking frames. I am in awe. congratulations on a really nice job.

I haven't started my POF model yet but I am looking forward to it. I only hope I can do it justice like yourself.

Sort of going at a snails pace on my current build primarly because I want to do it right and I don't want to skip on anything.

I wish I could do a scratch build model, but the lack of raw materials and the cost of these is prohibitive. Therefore I am thinking that I would do some kit bashing instead. I have some good CNC tools, so I plan to concentrate on making parts to replace the britannia metal fittings which I absolutely despise.
 
I wish I could do a scratch build model, but the lack of raw materials and the cost of these is prohibitive. Therefore I am thinking that I would do some kit bashing instead. I have some good CNC tools, so I plan to concentrate on making parts to replace the britannia metal fittings which I absolutely despise.
You know, Cap'n Sparrow, I think kit bashing is an excellent way to go for most everyone. You have the advantage of prefabricated parts where you want to use them - and the option of upgrading those parts when you don't want to use them. Plus, kits have the advantage of build reports done by others - the value of which cannot be overstated.

I'm trying my hand at something new - but I don't think scratch building is a necessary landing spot in order to enjoy and thrive in this hobby.
Agreed. But I would still have liked to start with plans and built it myself.
I think the Constitution is an excellent build for me because it is the closest I can get to a scratch build without starting from zero.

I should also mention that I like your choice of wood. I think it will look really nice.
 
As I mentioned a moment ago, I was in a weird place where I was not going to post a build report. The reasons are complicated – but basically, I was finding myself annoyed by several individuals (a small group?) on the forum. Self-righteousness is always unattractive in my book, so I found the forum draining rather than life-giving.

On the other hand – there are some truly remarkable fellow modelers on the forum, so I’ll do my best to lean into those friends rather than allowing the others to take the joy out of my participation.

All this to say that the model has been on my workbench for a while now and I have not been diligent in taking pictures. The smattering that I have will have to suffice.

The Ancre monograph is epic in its breadth. But for those familiar with it you will understand it when I say that there are some difficulties. Perhaps the single most vexing is that Mr. Lemineur argues that the frames were not perpendicular to the keel – they tip ‘forward’ about 1.2 or 1.3 degrees. As you might expect, that makes the drawings uncharacteristically difficult to interpret.

At first I thought to simply ignore this feature – but eventually I decided that would be unwise. The construction solution is rather simple – but every time I look at a drawing it gives me a headache.

The one significant departure that I am taking (sorry @NMBROOK) is the way the frame pairs are joined. The Saint Philippe has morticed frames. Here are a few images from Nigel's build showing what I am talking about:

View attachment 525686
View attachment 525687

The purpose of these mortices was to lessen the tendency of the ship to hog (the bow and stern are less buoyant by volume, so they sag into the water).

I have chosen to ignore this distinctive feature of the SP. You might argue that omitting the mortices is tantamount to no longer building Le Saint Philippe. But I am fully planking the exterior so the mortices would not even be visible there. The interior of the framing WILL be visible – but is the added complication of morticed frame pairs justified for the little bit it would be visible on the inside of the hull? I have decided it would not be. My apologies to the historical purists.


In true scratch building form, I began with rough cut lumber. This is European pearwood purchased at great cost :rolleyes::

View attachment 525690

After some head-scratching I figured out how to use some of my shop tools to turn these into dimensional billets:

View attachment 525689

I chose to begin with the frames. For this stern section model I decided to build 15 frame pairs (30 single frames) in the typical manner. You know how it goes:

View attachment 525698

View attachment 525699

View attachment 525700

View attachment 525701

View attachment 525702

Here is the size of an SP frame compared to the Kingfisher (both are 1:48 scale):

View attachment 525705

View attachment 525706

The obligatory picture of a stack of rough frames:

View attachment 525703

View attachment 525704

For the Kingfisher I installed these frames in a build jig and commenced with the sanding/shaping. Here I chose to add some provisional bevels based on the frame drawings. I left some extra on the frames, but I won’t know if I left enough until it comes time for the final shaping...

The Kattner sanding center:

View attachment 525707

View attachment 525708

My thanks for your interest!
hi, i couldn't help but notice that you have a thickness sander. I was wondering if you are satisfied with it?
 
I have chosen to ignore this distinctive feature of the SP. You might argue that omitting the mortices is tantamount to no longer building Le Saint Philippe. But I am fully planking the exterior so the mortices would not even be visible there. The interior of the framing WILL be visible – but is the added complication of morticed frame pairs justified for the little bit it would be visible on the inside of the hull? I have decided it would not be. My apologies to the historical purists.
Paul, I find it a shame that you won't be showing off your exceptional woodworking skills on the 'outside' of your vessel's frames, at least a portion of them! Navy Board models, as well as a lot of Admiralty style models often exclude a lot of details (not necessary for their intended purpose) and in such are 'still' very fine works of art. Harold Hahn is a good example. He was a stickler for detail on his models, however. He also knew where to draw the line concerning intricate details. You won't find chocks on any of his models, despite the fact that they were very important, structurally, and quite visible on the real vessel(s). It's my personal opinion that you should omit the mortices, entirely, and plank only one side of the model 100%, and only plank down to the bottom of the wale on the 'other' side. Not only would that look absolutely gorgeous... but it would also save you about 40% of the work in planking while also showcasing your extremely fine skills! When you get tired of looking at the port side of the ship, just turn it 180 until 'that' view becomes 'old hat'. :)
 
Paul, I find it a shame that you won't be showing off your exceptional woodworking skills on the 'outside' of your vessel's frames, at least a portion of them! Navy Board models, as well as a lot of Admiralty style models often exclude a lot of details (not necessary for their intended purpose) and in such are 'still' very fine works of art. Harold Hahn is a good example. He was a stickler for detail on his models, however. He also knew where to draw the line concerning intricate details. You won't find chocks on any of his models, despite the fact that they were very important, structurally, and quite visible on the real vessel(s). It's my personal opinion that you should omit the mortices, entirely, and plank only one side of the model 100%, and only plank down to the bottom of the wale on the 'other' side. Not only would that look absolutely gorgeous... but it would also save you about 40% of the work in planking while also showcasing your extremely fine skills! When you get tired of looking at the port side of the ship, just turn it 180 until 'that' view becomes 'old hat'. :)
First of all, thank for the nice comments about my work, @MThomas (sorry, I don't think I know your name...).

I can't say I disagree with you about leaving some of the infrastructure visible. If you've not seen it - here is a link to my most recent ship model and you will see I sort of followed your suggestions on that one:


This current model has a slightly different emphasis - at least in my mind. This is primarily a carving/decor project. The only reason I am even doing all the framing is so I can learn to read drawings. I'm hoping to pick up enough that a more ambitious project can follow.

A few others have shared similar sentiments with regard to the planking, so you're not alone...
 
Back
Top