• LUCZORAMA SHIPWRECK SCAVENGER HUNT GIVEAWAY. 4 Weeks of Fun • 1 Legendary Prize ((OcCre’s Fram Ship)) • Global Crew Welcome!
    **VIEW THREAD HERE**

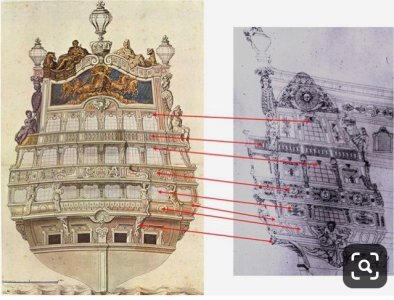
Le Saint Philippe 1693 after Jean-Claude Lemineur (Ancre) in scale 1:48

Well, Paul, to say that I’m excited to watch this one unfold would be an understatement! You are off to a brilliant start, and for a change - I’m not too far behind in your log. I will make more of a pointed effort to keep up with your progress.

That Frolich book is a gem. I got lucky last year and picked one up at The Strand for half of cover price.
 
Thanks, Chris. We'll see how well I did when I get to fitting frames.


I not so sure about the masterpiece part - but I have been enjoying myself up to this point.


Hi Jeff. Yup, these big ships must have been quite impressive in real life. At 1:48 the measurement from keel to top timber is about 16 inches.


Indeed. Grandchildren are a wonderful blessing!


Thanks for this nice post, Gunther. Your work is excellent - I'm confident you could build any ship you want.
Think about that - so in real life, if you were standing at the base of the stern-post, the ship would rise about 64’ in the air (roughly 43’ from the aft waterline) to the tafferal! Incredible.
 
As I mentioned a moment ago, I was in a weird place where I was not going to post a build report. The reasons are complicated – but basically, I was finding myself annoyed by several individuals (a small group?) on the forum. Self-righteousness is always unattractive in my book, so I found the forum draining rather than life-giving.

On the other hand – there are some truly remarkable fellow modelers on the forum, so I’ll do my best to lean into those friends rather than allowing the others to take the joy out of my participation.

All this to say that the model has been on my workbench for a while now and I have not been diligent in taking pictures. The smattering that I have will have to suffice.

The Ancre monograph is epic in its breadth. But for those familiar with it you will understand it when I say that there are some difficulties. Perhaps the single most vexing is that Mr. Lemineur argues that the frames were not perpendicular to the keel – they tip ‘forward’ about 1.2 or 1.3 degrees. As you might expect, that makes the drawings uncharacteristically difficult to interpret.

At first I thought to simply ignore this feature – but eventually I decided that would be unwise. The construction solution is rather simple – but every time I look at a drawing it gives me a headache.

The one significant departure that I am taking (sorry @NMBROOK) is the way the frame pairs are joined. The Saint Philippe has morticed frames. Here are a few images from Nigel's build showing what I am talking about:

View attachment 525686
View attachment 525687

The purpose of these mortices was to lessen the tendency of the ship to hog (the bow and stern are less buoyant by volume, so they sag into the water).

I have chosen to ignore this distinctive feature of the SP. You might argue that omitting the mortices is tantamount to no longer building Le Saint Philippe. But I am fully planking the exterior so the mortices would not even be visible there. The interior of the framing WILL be visible – but is the added complication of morticed frame pairs justified for the little bit it would be visible on the inside of the hull? I have decided it would not be. My apologies to the historical purists.


In true scratch building form, I began with rough cut lumber. This is European pearwood purchased at great cost :rolleyes::

View attachment 525690

After some head-scratching I figured out how to use some of my shop tools to turn these into dimensional billets:

View attachment 525689

I chose to begin with the frames. For this stern section model I decided to build 15 frame pairs (30 single frames) in the typical manner. You know how it goes:

View attachment 525698

View attachment 525699

View attachment 525700

View attachment 525701

View attachment 525702

Here is the size of an SP frame compared to the Kingfisher (both are 1:48 scale):

View attachment 525705

View attachment 525706

The obligatory picture of a stack of rough frames:

View attachment 525703

View attachment 525704

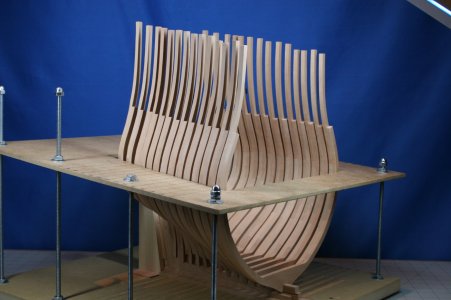
For the Kingfisher I installed these frames in a build jig and commenced with the sanding/shaping. Here I chose to add some provisional bevels based on the frame drawings. I left some extra on the frames, but I won’t know if I left enough until it comes time for the final shaping...

The Kattner sanding center:

View attachment 525707

View attachment 525708

My thanks for your interest!
Nice back yard! I don’t see how you have the time to keep it up. I don’t suppose the Admiral would allow sanding inside. Thanks for sharing this build.
 
Looks to be a wonderful project, Paul. Methinks it may exceed the 200+ pages on your Kingfisher. An advantage for me here is that I won't be punishing myself for not getting a Kingfisher kit when they were available. I'm sure your skills will translate perfectly to this scratch build, and look forward to spending a lot of time here. Hope you don't mind that I brought a recliner, instead of using one of Jim's chairs, but it's much easier on my back. Sleep
Let's try to keep this under 200 pages ROTF...
 
Paul, I popped into the "Scratch or from Plans" section of the forums and saw "Dockattner" author. Very happy to see, and certainly not surprised, as it seemed the natural progression for you. Also, it's no surprise that you gave a lot of thought to the type of project that would keep your interest and challenge your skill set.

Thank you for taking the time to share your work. So many of us benefit from your build logs. This is an area that challenges me: updating the build log. I find it so difficult that it almost seems like its own project sometimes. I need to work on this. So I appreciate your dedication in presenting your work at the level of detail that you do.

It seems you're off to a great start. Canting the jig's upper deck to align your frames is a great idea! I'll be here for the duration, so if someone would kindly share their popcorn...
Thanks for following along, Ken!
 
What Jim said. Thumbsup
Comparing the ship's frame in the same scale as the Kingfisher demonstrates what an enormous ship she was!:eek: and therefore what an enormous model she'd be if complete! looks like an enormous task at any rate. Kudos to you. I feel the same way about my own skills compared to yours as you do comparing yours to the masters you mention, so I guess it's all relative. At any rate I look forward to this next adventure, the learning experience, and diversion it provides.
Rock on, dude!ThumbsupThumbsup;)
Yer Humble and Obedient Servant, Pete G.
Much appreciated, Peter. Let's see how it turns out.
 
Well, Paul, to say that I’m excited to watch this one unfold would be an understatement! You are off to a brilliant start, and for a change - I’m not too far behind in your log. I will make more of a pointed effort to keep up with your progress.

That Frolich book is a gem. I got lucky last year and picked one up at The Strand for half of cover price.
Hi Marc, FYI - your SR model is why I didn't take these plans and try to build a Soleil Royal (which has an even more ornate stern section). The experts would have been all over me ROTF.

Think about that - so in real life, if you were standing at the base of the stern-post, the ship would rise about 64’ in the air (roughly 43’ from the aft waterline) to the tafferal! Incredible.
!!!!!!!!!!!!!!!
 
I suppose one could take these plans and build a stern model of the second Soleil Royal of 1693, with the fully closed quarters:

IMG_2315.jpeg

Nobody could argue too strongly that these two views don’t have strong synergy.

Whether or not SR2 had the wing transom still above the stern chase ports, or below as with the SP is anyone’s guess. My inclination, since the ship began on the stocks as the replacement Foudroyant, is that the WT would be below, and in accord with building practices of the Second Marine.
 
Dear Paul,
I am delighted to see the interesting and new project you have started.
We are all looking forward to seeing your amazing and beautiful work, so I will join you in the fan club.
Your eldest grandson is adorable, I have no doubt that it is a magical experience to build a model with him.
 
Dear Paul,
I am delighted to see the interesting and new project you have started.
We are all looking forward to seeing your amazing and beautiful work, so I will join you in the fan club.
Your eldest grandson is adorable, I have no doubt that it is a magical experience to build a model with him.
You are most welcome, Shota.

And building the model with Ethan was just as wonderful as you imagine it would have been...
 
Hi Paul, now that I finally found your new build adventure, I can rest easy knowing that I'm in for a treat, a feast for the eyes. According to the readers list below you still have 706 chairs left so make that 705. Like all the others I am delighted you decided to share your work so here we go!
Happy to have you join all the other friends! The crowd will thin once everyone discovers I'm forever in 'what does that part of the drawing mean?' mode.
 
'what does that part of the drawing mean?' mode.
Yes, I am all too familiar with that mode. I'm relying on Jean Boudriot's Monograph from ANCRE for all of my ship's dimensions and its very challenging since I have to physically measure the plans then translate onto the model it's certainly not scratch building though. Again, congratulations on your choice of a pure scratch build, you are sailing among the best builders around which in my opinion is where you belong.
 
Today's posting will bring this build report up to the current day...

The keel of the SP was of four segments joined in series via hooked scarf joints. Even though I am only building the stern section it happens that one of these hooked scarf joints fell within the scope of my work (I'm building a somewhat longer stern section than more typical examples).

I've made hooked scarfs by hand in the past - but have seen others fabricate them using a mill and a tilting table. I gave that a go...
While I was at it, I also milled a normal scarf into the knee of the sternpost...

View attachment 526429

View attachment 526430

View attachment 526431

An unexpected first-time success!

View attachment 526432

If you look carefully, you can see that I have also completed some preliminary shaping/tapering of the aft deadwood (and also created the rabbet at the keel and sternpost). The Saint Philippe has a (mostly) square tuck.

It is interesting to me that the monograph refers to the deadwood (edit - should have said rising wood) as a false keel. I'm not sure if this is a translation issue (my version of the monograph was translated from French) or if there was a different nomenclature in use at that time in history. I also learned that it was a known practice (late 17th century) to add a full keel (not a false keel) to the underside of an existing keel to mitigate hogging.

Anyway, here is the other side of the assembly with some of the details visible:

View attachment 526433

View attachment 526434

View attachment 526435

View attachment 526436

Where the rabbet is straight, I used my little mill. Where the rabbet is curved, I used a v-gouge (very carefully as not to ruin a piece with much already invested in it).


Finally (on the SP), the frames seat into notches along the rising wood. These were cut in with a mill - though there are two that will need to be done by hand because I can't get the mill where it needs to go because the sternpost is in my way).

The following images also show my solution to the fact that the frames are not perpendicular to the keel (they tip forward 1.2 degrees). Under the keel you will notice a 1.2 degree ramp... Now I can erect the frames perpendicular to the build-board and when I remove the ramp I'll have a forward tip to the frames.

View attachment 526437

View attachment 526438

Thanks for visiting!

P.S. My oldest grandson and I just finished his first ship model. Here we are showing off our work ROTF:

View attachment 526428
The angled keel riser is a brilliant thought! And hello to your partner.
 
Hello friends!

This weekend was spent getting the frames to fit the keel and the jig.

On my Kingfisher build that all just happened without fanfare as a product of the excellent kit design. In the case of this scratch build it required far more fiddling. I ended up needing to remake one (double) frame, and there are a few others I'll be keeping my eye on when the fairing of the hull begins. I also needed to re-do a few of the frame floors - in this case it was more of a patch job than a do-over. If you know where to look the patches are temporarily visible but this will all be covered by planking so eventually no one will know. I'm learning as I go...

As I was fitting each frame in turn, I also removed the paper templates, rubbed off the rubber cement residue, and did some light sanding on the fore and aft faces of the frames. All in all, a surprising amount of work to get to the point that I could take a few pictures:

IMG_1337.JPG

IMG_1338.JPG

IMG_1340.JPG

Obviously, everything is just sitting there loose.

I had the most marvelous epiphany this weekend: a scratch build does not come with instructions ROTF. There are a number of things I COULD do next, but no one to tell me what I SHOULD do next. Clearly, certain things need to happen before anything is glued and before frames can be faired - but my lack of experience is not easily ignored.

With all that said, it is enormously satisfying to look at the above images and know that I started with a few pieces of one-inch-thick lumber :) leaning against my work bench about two months ago.

Thanks for stopping by!
 
I had the most marvelous epiphany this weekend: a scratch build does not come with instructions ROTF. There are a number of things I COULD do next, but no one to tell me what I SHOULD do next.
Oh, I know exactly who always knows what to do next... but are you sure you want his help? You might end up needing a jeweler's lathe (actually, I want one myself), a microscope, and a PhD in shipworm psychology by the time he's done advising. :p:p:p:pROTFROTFROTFROTFROTFROTF
 
Back
Top