Thanks very much. For the flags, I cut narrow strips of paper, narrow enough to fit in the various compartments, and then folded them over with the end product being long enough to fit the depth of the locker. Applied various colors/patterns to the folded edge and then inserted the loose ends into the locker deep enough that the folds were flush with the front. I took a fair amount of artistic license with them, nothing official, just wanted to get some color in that locker.Your Victory looks amazingly beautiful. Congratulations on your achievement thus far.
Would love to see more details and photos.
How did you make the flags in the lockers? Looks great.
-

Win a Free Custom Engraved Brass Coin!!!
As a way to introduce our brass coins to the community, we will raffle off a free coin during the month of August. Follow link ABOVE for instructions for entering.
-

PRE-ORDER SHIPS IN SCALE TODAY!
The beloved Ships in Scale Magazine is back and charting a new course for 2026!
Discover new skills, new techniques, and new inspirations in every issue.
NOTE THAT OUR FIRST ISSUE WILL BE JAN/FEB 2026
You are using an out of date browser. It may not display this or other websites correctly.
You should upgrade or use an alternative browser.
You should upgrade or use an alternative browser.
My Swing at Caldercraft HMS Victory
- Thread starter Adiefenbach
- Start date
- Watchers 34
-
- Tags
- caldercraft jotika victory
If possible make sure the shrouds are tight as you can get them. Apply the ratlines ( i used to do 7-8 line at a time), try not to pull the shrouds out of shape. I then normally apply a wash of diluted PVA to the rats, it dries flat clear. This stiffens them up and locks any loose threads. As suggested draw cross lines to try and get the rats as evenly spaced horizontally. If you have a 1/72 scale figure ( old airfix army figures are 1.72) you can guess 1/3 or 1/2 a body lenght as the ratline spacing.
Thanks very much. Great advice. Will start the process tomorrow and see how it goes.If possible make sure the shrouds are tight as you can get them. Apply the ratlines ( i used to do 7-8 line at a time), try not to pull the shrouds out of shape. I then normally apply a wash of diluted PVA to the rats, it dries flat clear. This stiffens them up and locks any loose threads. As suggested draw cross lines to try and get the rats as evenly spaced horizontally. If you have a 1/72 scale figure ( old airfix army figures are 1.72) you can guess 1/3 or 1/2 a body lenght as the ratline spacing.
I have added a thread of how I clamp the shrouds, also Steef66, shows his version.
Thanks for the response. I don't see a link to a thread anywhere, will try to locate it in the files. Am open to any help I can getI have added a thread of how I clamp the shrouds, also Steef66, shows his version.
Found the link!! Genius idea. Thanks again for sharing.Thanks for the response. I don't see a link to a thread anywhere, will try to locate it in the files. Am open to any help I can get
I agree with Rick. The backing card is a great idea and help. It helps to ensure you have the proper spacing between lines. I tie an overhand knot on the first outside shroud with the knot facing inboard, then use clove hitches across to the opposite outside shroud and finish with another overhand knot. I little touch of CA on the two overhand knots will keep thins in place. Using clove hitches (as was the practice) allows you to adjust where the ratline you just tied on if it might be a bit tight or a bit loose. This also helps when you "finish" if you need to go back and balance everything out. Keep in mind some lower shrouds will not be "rattled."
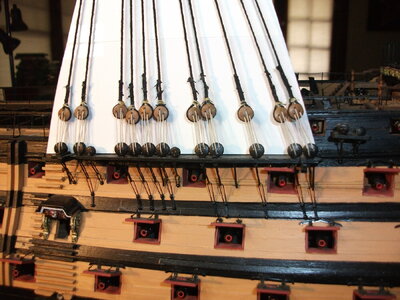
Just wanted to pass along some significant lessons learned from my perspective as a first time attempter of fully rigging (or getting as close as I can) a model ship. Just happens to be HMS Victory so no pressure there. I must say that I feel like a pilgrim in an unholy land the deeper I get into this. Anyway, the reason for this post is that I have just completed fore and main mast shrouds with associated deadeyes. Mizzen awaits. I had started on the ratlines on the starboard side of the mainmast and noticed that my shrouds were not as stiff as they probably should be. Difficult to keep straight. I tried putting some sealer on those shrouds to stiffen them, didn't help and not recommended. In a previous post, Paul V provided the right answer which is to make sure you get the shrouds tight enough using the deadeyes. When I shifted to the foremast shrouding, I did a much better job of snugging up those deadeyes to get the shrouds tight. This is where the lesson comes in. When attaching the channels to the sides of the ship weeks ago, the instructions call for glue and pinning. Seemed like overkill at the time but I did follow as written. Boy am I glad I did. When you start tugging on deadeye lines, you realize that you have 11 of them on each side and you are tightening a 1.3mm shroud. Takes a fair amount of tension to get a shroud relatively taut. Multiply that by 11 and I was very concerned that I would hear the crack of death as the channel with all the deadeyes broke free of the side of the ship. The chainplates underneath the channel helped prevent this in real life but not sure how much counter support they provide on a model. Anyway, this is the first time that I have had real structural concerns on a build, wanted to toss it out there. OBTW, ratlines are as tedious as advertised.
- Joined
- Nov 6, 2022
- Messages
- 243
- Points
- 113

where did you get the marklin railroad screws?Have been watching TraumaDoc's progress with great interest as he is just a few weeks ahead of me. Also see that Maddog Harry is also embarking on the same voyage. I have been learning a lot from Paul Vicker's videos/log as well. I started my build on 23 November and have gotten the first planking done and just starting on the stern quarter gallerys. Have been sanding, and sanding, ...... and sanding on the hull to smooth everything out, think I am just about there. I don't have the equipment or talent to take great photos so I will not do a full build log but will try to chime in with lessons learned when I figure out something useful. I have been very impressed with the quality`of the materials provided by Caldercraft as well as the quantity. The first planking material is 1.5 by 6mm lime and every piece was spot on 6 mm. This has been an issue for me with other kits (planking width variations). Also, they provided 70 pieces and I have 20 remaining after finishing up the planking. The fit and finish on all the keel and bulkhead pieces is first rate as you would expect. It is a beast though, and is getting heavy. Here are some shots of progress to date:
View attachment 348559View attachment 348560
+View attachment 348561View attachment 348562
View attachment 348563View attachment 348565
View attachment 348566View attachment 348568
Just started with the stern quarter gallerys, using the walnut ply pieces provided. Quite a bit of fitting and concern with this but Paul's videos help a lot.
View attachment 348570
Also, on a previous kit I discovered these Marklin railroad screws to use where you just can't get a clamp to hold well enough. They were invaluable as I did the first planking and I still recommend them.
View attachment 348572
Anyway, having a lot of fun with this one so far and I really appreciate the work of those ahead of me who have helped illuminate the way. Happy New Year to all.
I've just made mark II version of my clamps, using two 3 mm x 4 mm aluminium strips, one with threaded 2-56 holes, & the other with 2.3 mm clearance to accept 2-56 allen screws.Found the link!! Genius idea. Thanks again for sharing.
I would suggest trying William K.Walthers, they stock most items of model railroad stuff & are importers of Märklin.where did you get the marklin railroad screws?
I find that my shrouds tend to slacken, which I put down to my homemade ropes stretching. On my 'La Superbe' build, I tensioned the shrouds & stays, then put the build aside for a few weeks to let them 'settle', then retention before 'ratting down'.Just wanted to pass along some significant lessons learned from my perspective as a first time attempter of fully rigging (or getting as close as I can) a model ship. Just happens to be HMS Victory so no pressure there. I must say that I feel like a pilgrim in an unholy land the deeper I get into this.Anyway, the reason for this post is that I have just completed fore and main mast shrouds with associated deadeyes. Mizzen awaits. I had started on the ratlines on the starboard side of the mainmast and noticed that my shrouds were not as stiff as they probably should be. Difficult to keep straight. I tried putting some sealer on those shrouds to stiffen them, didn't help and not recommended. In a previous post, Paul V provided the right answer which is to make sure you get the shrouds tight enough using the deadeyes. When I shifted to the foremast shrouding, I did a much better job of snugging up those deadeyes to get the shrouds tight. This is where the lesson comes in. When attaching the channels to the sides of the ship weeks ago, the instructions call for glue and pinning. Seemed like overkill at the time but I did follow as written. Boy am I glad I did. When you start tugging on deadeye lines, you realize that you have 11 of them on each side and you are tightening a 1.3mm shroud. Takes a fair amount of tension to get a shroud relatively taut. Multiply that by 11 and I was very concerned that I would hear the crack of death as the channel with all the deadeyes broke free of the side of the ship. The chainplates underneath the channel helped prevent this in real life but not sure how much counter support they provide on a model. Anyway, this is the first time that I have had real structural concerns on a build, wanted to toss it out there. OBTW, ratlines are as tedious as advertised.
The Marklin part number is 7599. They are 1.4 x 10 mm, Phillips head. I see that Amazon, ebay, and Walmart have them along with a variety of RR hobby shops. The photo of the product that Amazon shows appears to be a flathead vice Phillips, would stay away from that given the small size.where did you get the marklin railroad screws?
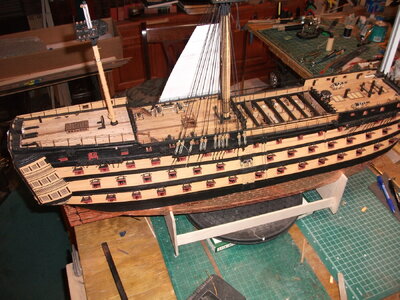
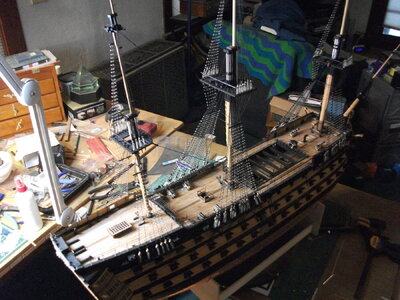
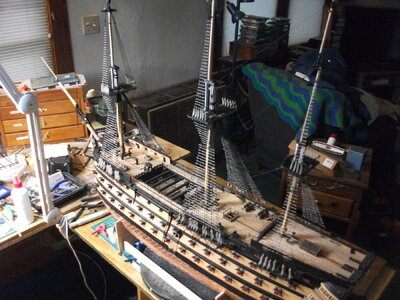
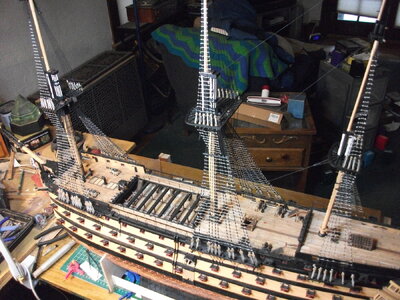
Have been plugging along with the ratlines. They are at least as tedious as the copper plating process. Have completed all the ratlines on the port side, still more to do on the starboard side. Have had minor issues with keeping the shrouds straight as I stitch the ratlines in place with the clove hitches. Have gotten a slight inward bow on the lead shroud (the leftmost one) (have threaded the ratlines from left to right throughout). As Paul V mentioned in an earlier post, having the shrouds as tight as possible does help with that. Have started installing the mast stays, starting with the mizzen mast and working forward per the instructions. The main mast stays required the bowsprit to be in place so I installed that, does make the project considerably more cumbersome. Also, I found that shifting from a chair to an adjustable height shop stool was a great help while installing the upper sets of ratlines.


- Joined
- Feb 20, 2022
- Messages
- 225
- Points
- 113

I've had the same problem every time I've rattled down shrouds! It was only after several frustrating attempts, I had an idea which worked very well for me on Le Superbe & the Sea Witch. On the backing card, I drew lines where the shrouds should be, then the ratlines. Knowing where they should go, I then tied the bottom-most line, then the top-most, followed by the middle-line. I kept splitting the spaces until I had everything rigged, & for me, this was much less of a headache, & the shrouds were straight & clean! Hope this helps!
Rick1011
Rick1011
Great idea, thanks for the info. Will give it a try on the remaining shrouds. Thanks
Hallo @AdiefenbachHave been watching TraumaDoc's progress with great interest as he is just a few weeks ahead of me. Also see that Maddog Harry is also embarking on the same voyage. I have been learning a lot from Paul Vicker's videos/log as well. I started my build on 23 November and have gotten the first planking done and just starting on the stern quarter gallerys. Have been sanding, and sanding, ...... and sanding on the hull to smooth everything out, think I am just about there. I don't have the equipment or talent to take great photos so I will not do a full build log but will try to chime in with lessons learned when I figure out something useful. I have been very impressed with the quality`of the materials provided by Caldercraft as well as the quantity. The first planking material is 1.5 by 6mm lime and every piece was spot on 6 mm. This has been an issue for me with other kits (planking width variations). Also, they provided 70 pieces and I have 20 remaining after finishing up the planking. The fit and finish on all the keel and bulkhead pieces is first rate as you would expect. It is a beast though, and is getting heavy. Here are some shots of progress to date:
View attachment 348559View attachment 348560
+View attachment 348561View attachment 348562
View attachment 348563View attachment 348565
View attachment 348566View attachment 348568
Just started with the stern quarter gallerys, using the walnut ply pieces provided. Quite a bit of fitting and concern with this but Paul's videos help a lot.
View attachment 348570
Also, on a previous kit I discovered these Marklin railroad screws to use where you just can't get a clamp to hold well enough. They were invaluable as I did the first planking and I still recommend them.
View attachment 348572
Anyway, having a lot of fun with this one so far and I really appreciate the work of those ahead of me who have helped illuminate the way. Happy New Year to all.
we wish you all the BEST and a HAPPY BIRTHDAY

- Joined
- Sep 17, 2023
- Messages
- 29
- Points
- 48

i am also a big fan of g-kip on yout tube who does the same vic but dig a lot deeper into the interior details ,and done a really good job with the deagostini sovereign
Happy birthday @Adiefenbach !


