Nikitin San Bartolome 1584 A.D. (Kit #35)

Hi Jan, just caught up on your blog. Great work sofar on this nice kit.
Btw if you don t like painting why not use bitumen of judea? This gives a nice warm and aged patina. You can dilute it with turpentine to give it the effect you want.
Hi Maarten, thanks for stoping by. Great suggestion. I'll have to look that up since I'm not familiar with "bitumen of judea".
 
Hi Maarten, thanks for stoping by. Great suggestion. I'll have to look that up since I'm not familiar with "bitumen of judea".
Good morning Jan. I hope you guys had a brilliant Christmas. Man that is some hectic weather you guys are experiencing. As Heinrich said, us South Africans cannot imagine what that is like. Cheers Grant
 
Good morning Jan. I hope you guys had a brilliant Christmas. Man that is some hectic weather you guys are experiencing. As Heinrich said, us South Africans cannot imagine what that is like. Cheers Grant
Hi Grant. It was a great Christmas even with what is being called “a once in decade” storm passing through. We were fortunate to have rain versus snow, the high gusting winds did a lot of damage inland and coupled with an abnormally high tide created havoc along the coastal area.
 
There has been some progress on the Port side, not much, but progress nonetheless.

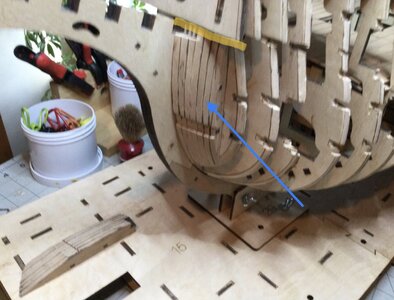
The bow filler (blue arrow) is comprised of seven piece laminated together and then sanded to shape.


EDFE479E-B2B7-4D0A-B493-CCB45459CC7E.jpeg


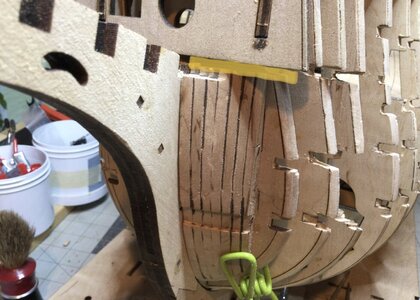
The next step is to rout out a 2.5 mm slot (yellow line) between the filler and the bulkhead wall. Scratching my head with that one.

It’s a slow process to frame the gunports. A lot of fitting and sanding.

9C0C5695-F35B-42CB-AFAB-239CD252F98A.jpeg

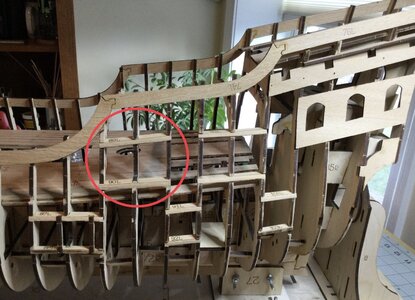
Most of the gunport frame pieces need to be bevelled and fit to the hulls frames. I did manage to bugger up one of the gunport frames (red circle), fortunately nothing is glued. Just a little fix.:rolleyes:
 
Last edited:
There has been some progress on the Port side, not much, but progress nonetheless.

The bow filler (blue arrow) is comprised of seven piece laminated together and then sanded to shape.


View attachment 348362


The next step is to route out a 2.5 mm slot (yellow line) between the filler and the bulkhead wall. Scratching my head with that one.

It’s a slow process to frame the gunports. A lot of fitting and sanding.

View attachment 348361

Most of the gunport frame pieces need to be bevelled and fit to the hulls frames. I did manage to bugger up one of the gunport frames (red circle), fortunately nothing is glued. Just a little fix.:rolleyes:
Hi Jan. I am glad to see that you secured some time for the shipyard by now. Old dogs like us should know that gunports are always fiddly things. Just stake your time and glue once you are ready.
 
Hi Jan. I am glad to see that you secured some time for the shipyard by now. Old dogs like us should know that gunports are always fiddly things. Just stake your time and glue once you are ready.
Indeed, I’ve been drafted by the Admiral to help with taking down all the Holiday decorations. So time in the shipyard is sporadic. The gunports are bit tricky. But I do get a lot of good information from Pavel‘s videos.
 
It took a “Eureka” moment but I’ve solved my problem.

I don’t have a Router or any of those type of bits, but I do have a combination belt and disk sander. After number of passes, fitting and keeping my fingers crossed I managed to grind about 2.6 or so millimeters off the top of the bow filler piece.

74D23021-F4E8-4D36-A236-06BA8F17446C.jpeg

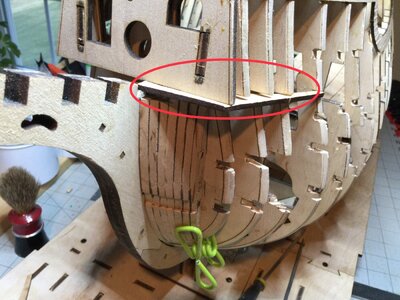
The final test was placing this piece

4FC0BB8C-FD09-4B6B-A2DB-C6D7DBC71719.jpeg

Now i’m off to repeat the process for the Starboard side.
 
i am glad that you have the one side sorted out. Now you can create a "good redo" on the starboard side.
Yes indeed, the starboard side will be a little easier to tackle now that I've figured out the method to use. That side will have to wait until I finish framing all the gunports on the port side. I'm about halfway done with that build step.
 
Indeed, I’ve been drafted by the Admiral to help with taking down all the Holiday decorations. So time in the shipyard is sporadic. The gunports are bit tricky. But I do get a lot of good information from Pavel‘s videos.
Good morning Jan. Sounds like you go big with Christmas decorations.… we have one tree- a rather cool one and it shall remain until the new year- 20min to pack away.ROTFCheers Grant
 
It took a “Eureka” moment but I’ve solved my problem.

I don’t have a Router or any of those type of bits, but I do have a combination belt and disk sander. After number of passes, fitting and keeping my fingers crossed I managed to grind about 2.6 or so millimeters off the top of the bow filler piece.

View attachment 348398

The final test was placing this piece

View attachment 348399

Now i’m off to repeat the process for the Starboard side.
I do like the way you have done the bow filler. Often wonder if I don’t have balsa how to do it. Nice. All looking very good Jan. Cheers Grant
 
Good morning Jan. Sounds like you go big with Christmas decorations.… we have one tree- a rather cool one and it shall remain until the new year- 20min to pack away.ROTFCheers Grant
Yup, the Admiral loves to decorate the house for the holidays. I enjoy giving her a helping hand. The only ornaments we hang on the tree (post #198) are ones we found in odd stores the first two to three years we were married. The red bulbs came from a variety of stores, we found one or two here and there but never a complete set. The snowflakes are extra special, all are crocheted by her favorite Aunt. She sends the Admiral one every year just before Christmas Day.
 
I want to wish a Happy, Healthy and Prosperous New Year to all of you who are following or have participated in my humble fumble fingered attempt at creating this build. Much like Grant’s Victory this is fast becoming Jan’s Galleon.

Thumbs-UpHappy New Year to allThumbs-Up
Welcome to 2023 Jan. May Jan’s Galleon progress magically during this year.Cheers Grant
 
Welcome to 2023 Jan. May Jan’s Galleon progress magically during this year.Cheers Grant
Yes indeed, Jan’s Galleon is progressing not by magic but in a very slow methodical way. Pavel’s videos show his progress on a build step in fifteen minutes. I’ve found that we humble fumblers need a LOT more time than that. His videos skip over the amount of prep work required before the final gluing starts.

The deck planking went quickly, not much adjustment required. But the framing of the gun ports is a different process. Almost all of the frame pieces need to be beveled and “fit” into their respective locations.
AC79F6F9-1E7D-40FF-9ED9-08E961DC4C26.jpeg
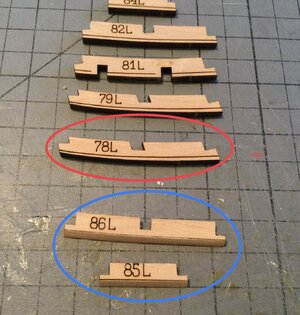
The red circled part shows the scribed line of the bevel. The blue circled parts show the completed bevel.

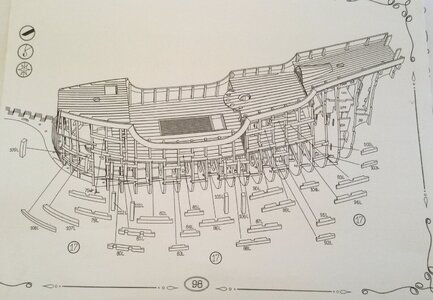
The build plan for this step.

1C5C2192-9910-4346-B253-C53B1CEC00BA.jpeg

I think I’ll be a bit doing this step for both the port and starboard side.

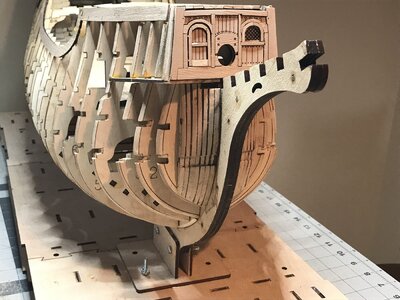
I did manage to finally glue in the two bow fillers, that was another fit, sand, fit and sand process. As a note for those who haven’t started their builds, watch Pavel’s video (#20) for this step. The slots in frame #1 need to be enlarged so the tabs on the bow filler fit.

9846E137-1ACB-46F4-983A-79CA2945719A.jpeg

It’s another sunny and almost warm (49F/9C) day here. Very unusual January weather for our part of the USA. I’m off to throw a couple of steaks on the barbecue and rock and sip on a Beerwhile they sizzle.

Jan
 
Yes indeed, Jan’s Galleon is progressing not by magic but in a very slow methodical way. Pavel’s videos show his progress on a build step in fifteen minutes. I’ve found that we humble fumblers need a LOT more time than that. His videos skip over the amount of prep work required before the final gluing starts.

The deck planking went quickly, not much adjustment required. But the framing of the gun ports is a different process. Almost all of the frame pieces need to be beveled and “fit” into their respective locations.
View attachment 348864
The red circled part shows the scribed line of the bevel. The blue circled parts show the completed bevel.

The build plan for this step.

View attachment 348865

I think I’ll be a bit doing this step for both the port and starboard side.

I did manage to finally glue in the two bow fillers, that was another fit, sand, fit and sand process. As a note for those who haven’t started their builds, watch Pavel’s video (#20) for this step. The slots in frame #1 need to be enlarged so the tabs on the bow filler fit.

View attachment 348867

It’s another sunny and almost warm (49F/9C) day here. Very unusual January weather for our part of the USA. I’m off to throw a couple of steaks on the barbecue and rock and sip on a Beerwhile they sizzle.

Jan
Good morning Jan. Nothing like a couple of steaks sizzling on a braai (barbecue) on a sunny day. I love that photo of your galleon! Cheers Grant
 
Back
Top