This ship is quite the puzzle-looking thing, isn't it! I'm glad you have those videos to assist - nothing strikes me as ordinary.
-

Win a Free Custom Engraved Brass Coin!!!
As a way to introduce our brass coins to the community, we will raffle off a free coin during the month of August. Follow link ABOVE for instructions for entering.
-

PRE-ORDER SHIPS IN SCALE TODAY!
The beloved Ships in Scale Magazine is back and charting a new course for 2026!
Discover new skills, new techniques, and new inspirations in every issue.
NOTE THAT OUR FIRST ISSUE WILL BE JAN/FEB 2026
You are using an out of date browser. It may not display this or other websites correctly.
You should upgrade or use an alternative browser.
You should upgrade or use an alternative browser.
Nikitin San Bartolome 1584 A.D. (Kit #35)
- Thread starter Pathfinder65
- Start date
- Watchers 85
I’m finding that as I progress the hull seems to be getting a defined shape. The kit may look like an advanced “Erector Set” with pieces that just fit neatly together but that’s not the case. I‘ve spent a lot of time sanding, shaping and fitting before gluing. I’m really looking forward to placing the first plank.Good progress, Jan, Visually the gunports make a big difference to the overall appearance of the ship!
Absolutely right, it’s a three box puzzle just begging to be assembled. The videos are are a plus, there is a lot of information in the videos that does not show on the build plans. The funny part is that a build step in one of the videos takes about 15 to 20 minutes, the same build step takes me a week and half if not more.This ship is quite the puzzle-looking thing, isn't it! I'm glad you have those videos to assist - nothing strikes me as ordinary.
Last edited:
True storyThis ship is quite the puzzle-looking thing, isn't it! I'm glad you have those videos to assist - nothing strikes me as ordinary.
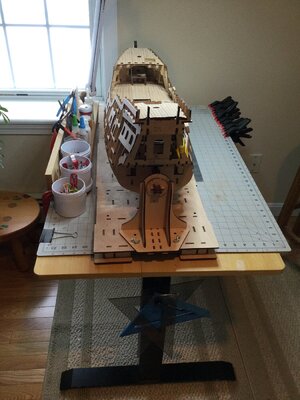
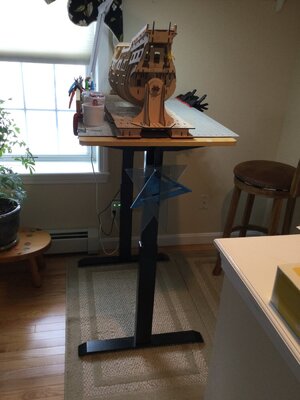
I have to admit that without the building jig or something similar I would have had a terrible time getting the build this far. Being able to have the ships frame secured vertically or horizontally while working on various sections is great. The whole jig structure is very stable and I can quickly adjust the angle I want to work at. My modeling bench allows me to raise or lower the hull to a comfortable work position. Some days I sit and work other days I stand.


Workbench all the way down

Workbench all the way up.


Workbench all the way down

Workbench all the way up.
- Joined
- Jan 9, 2020
- Messages
- 10,566
- Points
- 938

Lovely workbench and jig. I am sure it makes life easier.I have to admit that without the building jig or something similar I would have had a terrible time getting the build this far. Being able to have the ships frame secured vertically or horizontally while working on various sections is great. The whole jig structure is very stable and I can quickly adjust the angle I want to work at. My modeling bench allows me to raise or lower the hull to a comfortable work position. Some days I sit and work other days I stand.
View attachment 353997
View attachment 354010
Workbench all the way down
View attachment 354011
Workbench all the way up.
Good evening Jan. That is one nifty work bench. She is looking good in those photos and it’s just frames.I have to admit that without the building jig or something similar I would have had a terrible time getting the build this far. Being able to have the ships frame secured vertically or horizontally while working on various sections is great. The whole jig structure is very stable and I can quickly adjust the angle I want to work at. My modeling bench allows me to raise or lower the hull to a comfortable work position. Some days I sit and work other days I stand.
View attachment 353997
View attachment 354010
Workbench all the way down
View attachment 354011
Workbench all the way up.
Oh yeah, that bench is a back saver. No more hunching over and bending while I work away. Thanks for the build compliment, the galleon is slowly taking shape.Good evening Jan. That is one nifty work bench. She is looking good in those photos and it’s just frames.
Last edited:
A quick update.
The last of the gunport frames have been sanded and fit in their respective places on this side of the hull.
The plan. Note the shape symbol (File) and do not glue symbol on the plan.

The work so far.

The next step is to sand and shape the bottom row of gunport frames so the frames fit flush between the hull frames. Since they are not to be glued I numbered the backs to go with the framed enclosure they will eventually fit in. (Sigh) More sanding fitting, sanding, etc.
The last of the gunport frames have been sanded and fit in their respective places on this side of the hull.
The plan. Note the shape symbol (File) and do not glue symbol on the plan.

The work so far.

The next step is to sand and shape the bottom row of gunport frames so the frames fit flush between the hull frames. Since they are not to be glued I numbered the backs to go with the framed enclosure they will eventually fit in. (Sigh) More sanding fitting, sanding, etc.

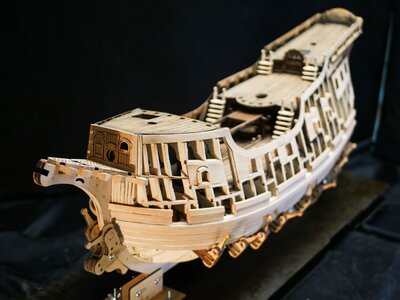
One of Pavel's build pictures. You can see the frame openings for the lower gunport frames are left open. Note that on the upper decks the midship gunport "housing/enclosures" are not installed. Being a novice on this kind of buildi I think this has a lot to do with his planking technique. I'm looking forward to the video.
Another teaser.

(Pavel's Photo)
I can only hope to duplicate his terrific paint job.
Jan
Last edited:
Well I’m going to have to learn a new skill. I’m gathering information for Airbrush 101 because the Galleon paint kit arrived in today’s mail. Any and all help will be appreciated,

I think this is going to be a one time event (I really do not like to paint) so in my airbrush research I settled on the kit below. Not top of the line but I think it will be adequate for “aging” the Galleon.

There are three airbrushes, and other “stuff”, etc. Yup, this will be interesting

I think this is going to be a one time event (I really do not like to paint) so in my airbrush research I settled on the kit below. Not top of the line but I think it will be adequate for “aging” the Galleon.

There are three airbrushes, and other “stuff”, etc. Yup, this will be interesting
Indeed, I’m not familiar with this type of painting, so it’s going to be a learning curve, I’m going to use my pile of kindling as test pieces. My Tug and Lobster boat builds were Rattle can paint jobs. I spent a lot of time masking, painting, toning down the paint gloss, etc. It took a bit of time and and effort until I was satisfied with my results.All I can say, is good luck with the painting my friend. That is as far as my expertise with an airbrush goes.


We shall see if I can accomplish the same result for the Galleon I’ll be happy.
Jan
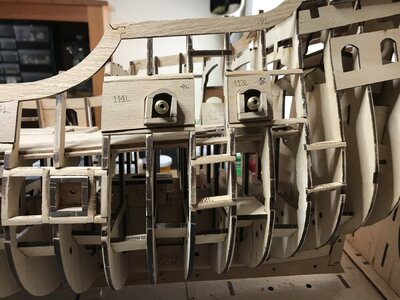
Interesting note for those of you at the cannon port stage of this build.

I got curious how the cannon inserts would fit and look. The backs of all the gunport have a small hole drilled in them, BUT the cannon insert has a small shaft that is approximately 11/64" in diameter. So All the gunports except for the four on the main deck will have to be drilled or reamed out to that diameter before they are permanently installed.

I got curious how the cannon inserts would fit and look. The backs of all the gunport have a small hole drilled in them, BUT the cannon insert has a small shaft that is approximately 11/64" in diameter. So All the gunports except for the four on the main deck will have to be drilled or reamed out to that diameter before they are permanently installed.
Last edited:
Thanks . . .Interesting note for those of you a the cannon port stage of this build.
View attachment 354862
I got curious how the cannon inserts would fit and look. The backs of all the gunport have a small hole drilled in them, BUT the cannon insert has a small shaft that is approximately 11/64" in diameter. So All the gunports except for the four on the main deck will have to be drilled or reamed out to that diameter before they are permanently installed.
Good morning Jan. Man this is an interesting kit. I will not be embarking on such a challenge however I am enjoying watching you build this- awesome log Jan. Cheers GrantInteresting note for those of you a the cannon port stage of this build.
View attachment 354862
I got curious how the cannon inserts would fit and look. The backs of all the gunport have a small hole drilled in them, BUT the cannon insert has a small shaft that is approximately 11/64" in diameter. So All the gunports except for the four on the main deck will have to be drilled or reamed out to that diameter before they are permanently installed.
I might have to find another spot to work for that bit. I’ve created a sanding dust emporia in my little shipyard just doing some of the smaller parts. The Admiral isn’t to charmed about my carefree work effort. I might have to wait until I can work outside. Not this weekend though, we’re in the path of a Polar Vortex, Saturdays and Sundays temperature forecasts are incredible. With wind chill the forecast is to -20F to -40FI can just imagine that it is no easy feat to fair that hull properly.
Glad to help.Thanks . . .
Hi Grant. Glad to have you following along. I’ve been doing the little build steps while waiting for the material to do the the BIG one. (PAINTING the decks and bulkheads)Good morning Jan. Man this is an interesting kit. I will not be embarking on such a challenge however I am enjoying watching you build this- awesome log Jan. Cheers Grant

