The double beading is magical, Russ. Now that you have more planks in place it is fantastic to look at the hull and appreciate the subtle detail.
-

Win a Free Custom Engraved Brass Coin!!!
As a way to introduce our brass coins to the community, we will raffle off a free coin during the month of August. Follow link ABOVE for instructions for entering.
-

PRE-ORDER SHIPS IN SCALE TODAY!
The beloved Ships in Scale Magazine is back and charting a new course for 2026!
Discover new skills, new techniques, and new inspirations in every issue.
NOTE THAT OUR FIRST ISSUE WILL BE JAN/FEB 2026
You are using an out of date browser. It may not display this or other websites correctly.
You should upgrade or use an alternative browser.
You should upgrade or use an alternative browser.
- Joined
- Sep 10, 2024
- Messages
- 1,025
- Points
- 393

Thank you Paul,The double beading is magical, Russ. Now that you have more planks in place it is fantastic to look at the hull and appreciate the subtle detail.
The beech doesn't take detail as well as pear or boxwood, but I'm hoping to get a dark (black) dye into the grooves so that they will really pop.
What did get for a spray booth. I've been looking a various models and can't figure out what is what, etc.I just received a 24" spray booth,
I also need to practice and get used to using a airbrush.
Jan
I was thinking the same thing about the beech. A bit of chip-out that would go away with another species. You are overbuilding the kitThank you Paul,
The beech doesn't take detail as well as pear or boxwood, but I'm hoping to get a dark (black) dye into the grooves so that they will really pop.
 .
.- Joined
- Sep 10, 2024
- Messages
- 1,025
- Points
- 393

Perhaps, but one could say the same thing about what you have done with your Kingfisher.I was thinking the same thing about the beech. A bit of chip-out that would go away with another species. You are overbuilding the kit.

- Joined
- Sep 10, 2024
- Messages
- 1,025
- Points
- 393

I will post photos and links once I have everything assembled.What did get for a spray booth. I've been looking a various models and can't figure out what is what, etc.
I also need to practice and get used to using a airbrush.
Jan
Thanks, I did order the helmet magnifier that you showed on your log. Tried it out this morning. Happy CAMPER.I will post photos and links once I have everything assembled.
Jan
- Joined
- Sep 10, 2024
- Messages
- 1,025
- Points
- 393

Those are oar port covers, used to keep from shipping water through the oar ports when heeled over under sail. They were found in other ships such as Gokstad, but none were ever found with Oseberg, nor were there any signs of them ever having been used, such as holes for fasteners, ropes, etc. That is why archeologists believe the Oseberg was used primarily on calmer, inland waters rather than on open seas. I will not be using them. In fact, as I've mentioned, I have ordered some beech sheets to make my own oar strakes from and I will be putting more accurate oar ports in them.RussF my man , What is plate 29 shown on pg 61 of instructions? hope not what I think
Thanks that's what I thought. I probably won't use either. Don't think I'll go that extreme with the holes. I am going to use simulated nails tho planks and deck. Actually they were located on the inside in a position that they could swivel into closure so might do that but don't want them in. the hole.
Last edited:
- Joined
- Sep 10, 2024
- Messages
- 1,025
- Points
- 393

I can't say for sure which is better, although I'm leaning towards Pavel's method. I believe Olha built hers before version 3 and Pavel's videos came out, so she was no doubt following the instruction manual. I think there may be more room for fitting (inserting and removing) the floorboards without the strakes in the way. Your mileage may vary.Pavel did the decking before planks 11 and 12 Olha did it after plank 12 was in , which do you think is better. ???
I hope you don't mind me asking, what kind of magnifier are you talking about? I've been wanting/needing some kind of magnifier for a while now, I've looked online several times but never came across one that jumped out at me.Thanks, I did order the helmet magnifier that you showed on your log. Tried it out this morning. Happy CAMPER.
Jan
Thanks,
Steve
- Joined
- Sep 10, 2024
- Messages
- 1,025
- Points
- 393

Steve, see this post.I hope you don't mind me asking, what kind of magnifier are you talking about? I've been wanting/needing some kind of magnifier for a while now, I've looked online several times but never came across one that jumped out at me.
Thanks,
Steve
Thanks Russ, I just checked out the link.Steve, see this post.
Since you and Pathfinder both like them I'm sure I'll be happy with them as well. Just placed my order, $27.06 with tax.
Steve
Thanks Russ, I just checked out the link.
Since you and Pathfinder both like them I'm sure I'll be happy with them as well. Just placed my order, $27.06 with tax.
I hope you don't mind me asking, what kind of magnifier are you talking about? I've been wanting/needing some kind of magnifier for a while now, I've looked online several times but never came across one that jumped out at me.
Thanks,
Steve
Thanks Russ, I just checked out the link.
Since you and Pathfinder both like them I'm sure I'll be happy with them as well. Just placed my order, $27.06 with tax.
Steve
I've been using this magnifier for the last couple of days, so far I really like it. It's really helping these aging eye's of mine, the light really helps. The only problem now is I don't have an excuse for any mistakes!Steve, see this post.
- Joined
- Sep 10, 2024
- Messages
- 1,025
- Points
- 393

Shading the bitis
I know, it's been a while since I've posted. Been a little busy, plus I've been setting up my new spray booth, compressor and airbrush.
I picked up this spray booth at Ama$on. I chose it primarily because of its size, 24" (610mm) wide x 16" (406mm) high x 16" (406mm) deep. The price when I purchased it was $80 US. It's a little flimsy and I'm neither endorsing it or panning it, but it works for me.
The box...
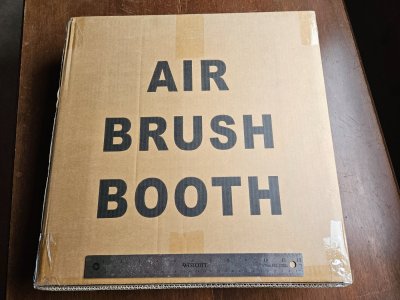
The contents...
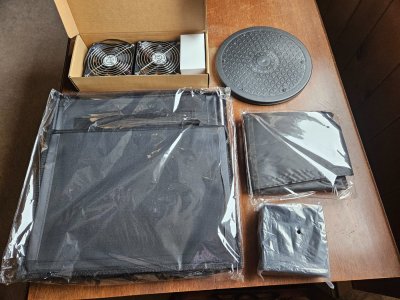
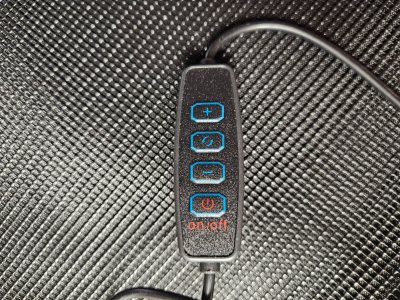
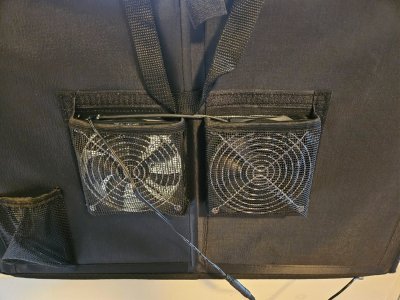
It has two 5" exhaust fans with speed control that plugs directly into the mains (the polarity of the wiring was reversed, so I had to turn the fans around - no biggie), a turntable and 2 LED light rings with a 3 step temperature control and a 10 step brightness control. This is powered by USB. They provide a 1 amp charger and I found that you only get 8 steps of brightness. A 2 amp charger gives you 10. There is a pack of 6 filters (only 2 used at a time. It also has a screen that drops down to cover the front. I'm not sure what it is really for, but it keeps the curious cat out.
Everything is held together with velcro. It's a little wobbly, but it works. I can't obviously fit the Oseberg into it, but the suction of the fans keeps spray headed into the booth if I spray right at the front opening.
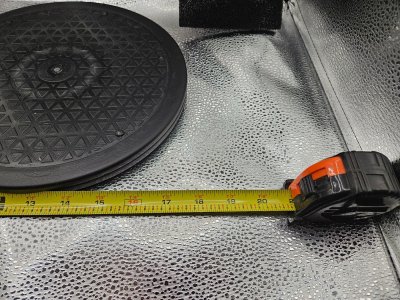
Color temperature/brightness control and different effects (as best as my camera can pick up)...
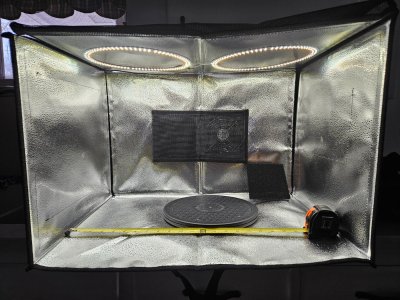
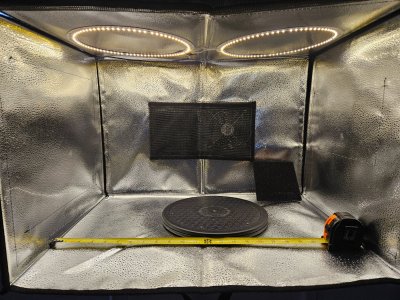
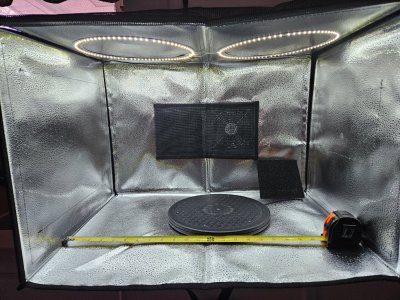
Fan speed control...
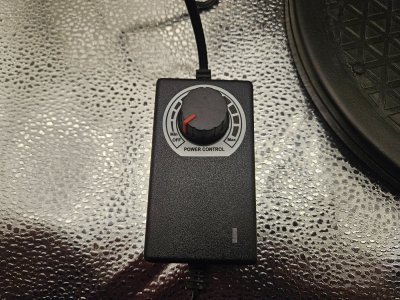
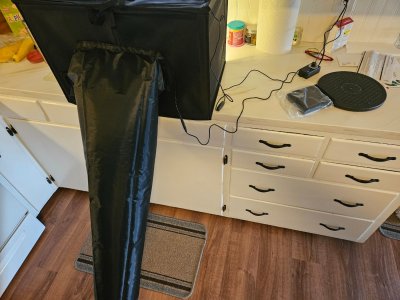
There is a nylon fabric exhaust duct that seems to work better than I expected. Full fan speed keeps it inflated.
On to the spraying!
I mixed up an ounce of each color I got based on the recommendations from Transtint - 16 drops per ounce of solvent. The Transtint is pretty versatile as far as solvents go - you can use water, alcohol, lacquer thinner of a combination. The only thing they say it won't work in is oil based finishes. Water works, but it will raise the grain of the wood. Lacquer thinner will be the slowest to dry (for more penetration), but it also stinks pretty badly. 50/50 alcohol will speed up the drying, but still give it time to penetrate. I was looking for low penetration (I wanted to be able to sand it off easily), low odor and fast drying, so I chose alcohol. Plus, it just makes the room smell like a doctor's office rather than a paint shop. I have access to 100% isopropyl alcohol at work, so I used that. Typical IPA sold in the pharmacy (chemist for you Brits) is around 70% and 90%. The balance is water. They will work, but may cause some grain raising.
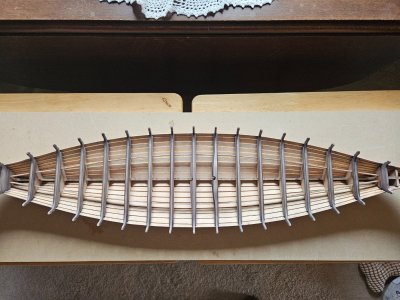
I first sprayed the bitis with black. The nice thing about the airbrush is the amount of control you have with color. The more you apply, the darker it gets, but not so quickly that you lose control.
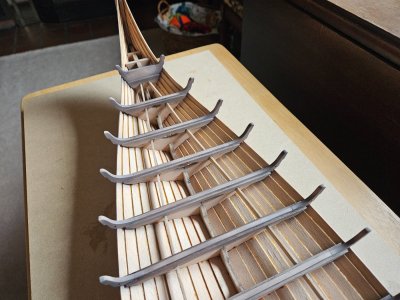
Then I sanded with P320, slighly rounding the edges and creating highlights.
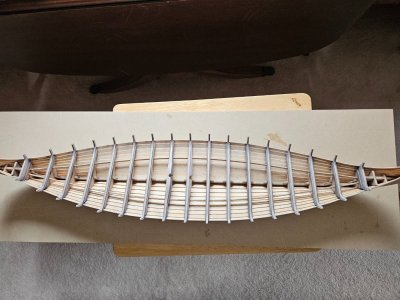
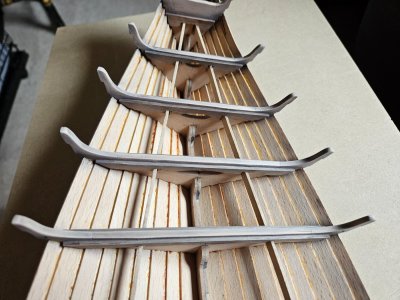
Finally, I sprayed walnut over the top. Here's the result...
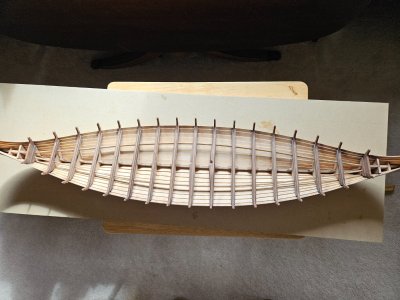
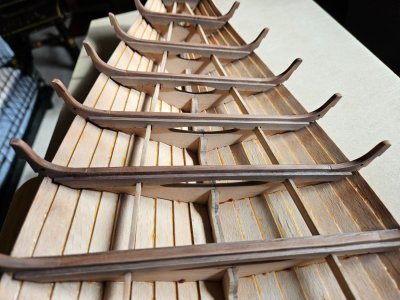
Next, per Pavel's videos, I will start in on the deck boards.
Reading through the book The Oseberg Ship, I'm learning quite a lot. Almost every visible surface had one of about 8 different moldings along the edges. The bitis and deck boards had the same profile as the strakes. The scratch stock I made for that is just slightly larger than scale (limitations of my tools and skills). It looks okay on the strakes, but the profiles would overlap on the bitis, so I decided not to use it on them. I'm debating about putting the profile on the deck boards.
There's a lot of work to be done on the deck boards, sanding, profiling (if I decide to), shading, sanding again, coloring, etc. I'll post progress as I make it.
I know, it's been a while since I've posted. Been a little busy, plus I've been setting up my new spray booth, compressor and airbrush.
I picked up this spray booth at Ama$on. I chose it primarily because of its size, 24" (610mm) wide x 16" (406mm) high x 16" (406mm) deep. The price when I purchased it was $80 US. It's a little flimsy and I'm neither endorsing it or panning it, but it works for me.
The box...

The contents...

It has two 5" exhaust fans with speed control that plugs directly into the mains (the polarity of the wiring was reversed, so I had to turn the fans around - no biggie), a turntable and 2 LED light rings with a 3 step temperature control and a 10 step brightness control. This is powered by USB. They provide a 1 amp charger and I found that you only get 8 steps of brightness. A 2 amp charger gives you 10. There is a pack of 6 filters (only 2 used at a time. It also has a screen that drops down to cover the front. I'm not sure what it is really for, but it keeps the curious cat out.

Everything is held together with velcro. It's a little wobbly, but it works. I can't obviously fit the Oseberg into it, but the suction of the fans keeps spray headed into the booth if I spray right at the front opening.

Color temperature/brightness control and different effects (as best as my camera can pick up)...


Fan speed control...

There is a nylon fabric exhaust duct that seems to work better than I expected. Full fan speed keeps it inflated.


On to the spraying!
I mixed up an ounce of each color I got based on the recommendations from Transtint - 16 drops per ounce of solvent. The Transtint is pretty versatile as far as solvents go - you can use water, alcohol, lacquer thinner of a combination. The only thing they say it won't work in is oil based finishes. Water works, but it will raise the grain of the wood. Lacquer thinner will be the slowest to dry (for more penetration), but it also stinks pretty badly. 50/50 alcohol will speed up the drying, but still give it time to penetrate. I was looking for low penetration (I wanted to be able to sand it off easily), low odor and fast drying, so I chose alcohol. Plus, it just makes the room smell like a doctor's office rather than a paint shop. I have access to 100% isopropyl alcohol at work, so I used that. Typical IPA sold in the pharmacy (chemist for you Brits) is around 70% and 90%. The balance is water. They will work, but may cause some grain raising.
I first sprayed the bitis with black. The nice thing about the airbrush is the amount of control you have with color. The more you apply, the darker it gets, but not so quickly that you lose control.


Then I sanded with P320, slighly rounding the edges and creating highlights.


Finally, I sprayed walnut over the top. Here's the result...


Next, per Pavel's videos, I will start in on the deck boards.
Reading through the book The Oseberg Ship, I'm learning quite a lot. Almost every visible surface had one of about 8 different moldings along the edges. The bitis and deck boards had the same profile as the strakes. The scratch stock I made for that is just slightly larger than scale (limitations of my tools and skills). It looks okay on the strakes, but the profiles would overlap on the bitis, so I decided not to use it on them. I'm debating about putting the profile on the deck boards.
There's a lot of work to be done on the deck boards, sanding, profiling (if I decide to), shading, sanding again, coloring, etc. I'll post progress as I make it.
It looks great, nice job Russ!Shading the bitis
I know, it's been a while since I've posted. Been a little busy, plus I've been setting up my new spray booth, compressor and airbrush.
I picked up this spray booth at Ama$on. I chose it primarily because of its size, 24" (610mm) wide x 16" (406mm) high x 16" (406mm) deep. The price when I purchased it was $80 US. It's a little flimsy and I'm neither endorsing it or panning it, but it works for me.
The box...
View attachment 509982
The contents...
View attachment 509983
It has two 5" exhaust fans with speed control that plugs directly into the mains (the polarity of the wiring was reversed, so I had to turn the fans around - no biggie), a turntable and 2 LED light rings with a 3 step temperature control and a 10 step brightness control. This is powered by USB. They provide a 1 amp charger and I found that you only get 8 steps of brightness. A 2 amp charger gives you 10. There is a pack of 6 filters (only 2 used at a time. It also has a screen that drops down to cover the front. I'm not sure what it is really for, but it keeps the curious cat out.
Everything is held together with velcro. It's a little wobbly, but it works. I can't obviously fit the Oseberg into it, but the suction of the fans keeps spray headed into the booth if I spray right at the front opening.
View attachment 509984
Color temperature/brightness control and different effects (as best as my camera can pick up)...
View attachment 509985
View attachment 509986
View attachment 509987
View attachment 509988
Fan speed control...
View attachment 509989
There is a nylon fabric exhaust duct that seems to work better than I expected. Full fan speed keeps it inflated.
View attachment 509990
View attachment 509991
On to the spraying!
I mixed up an ounce of each color I got based on the recommendations from Transtint - 16 drops per ounce of solvent. The Transtint is pretty versatile as far as solvents go - you can use water, alcohol, lacquer thinner of a combination. The only thing they say it won't work in is oil based finishes. Water works, but it will raise the grain of the wood. Lacquer thinner will be the slowest to dry (for more penetration), but it also stinks pretty badly. 50/50 alcohol will speed up the drying, but still give it time to penetrate. I was looking for low penetration (I wanted to be able to sand it off easily), low odor and fast drying, so I chose alcohol. Plus, it just makes the room smell like a doctor's office rather than a paint shop. I have access to 100% isopropyl alcohol at work, so I used that. Typical IPA sold in the pharmacy (chemist for you Brits) is around 70% and 90%. The balance is water. They will work, but may cause some grain raising.
I first sprayed the bitis with black. The nice thing about the airbrush is the amount of control you have with color. The more you apply, the darker it gets, but not so quickly that you lose control.
View attachment 509992
View attachment 509993
Then I sanded with P320, slighly rounding the edges and creating highlights.
View attachment 509994
View attachment 509995
Finally, I sprayed walnut over the top. Here's the result...
View attachment 509996
View attachment 509997
Next, per Pavel's videos, I will start in on the deck boards.
Reading through the book The Oseberg Ship, I'm learning quite a lot. Almost every visible surface had one of about 8 different moldings along the edges. The bitis and deck boards had the same profile as the strakes. The scratch stock I made for that is just slightly larger than scale (limitations of my tools and skills). It looks okay on the strakes, but the profiles would overlap on the bitis, so I decided not to use it on them. I'm debating about putting the profile on the deck boards.
There's a lot of work to be done on the deck boards, sanding, profiling (if I decide to), shading, sanding again, coloring, etc. I'll post progress as I make it.
Steve
- Joined
- Sep 10, 2024
- Messages
- 1,025
- Points
- 393

Thank you Steve!It looks great, nice job Russ!
Steve


