Oseberg - Ver. 3 - Pavel Nikitin - 1:25

Would be interested in what boards were not nailed, I only have a general idea. Also I wanted to ask if you had any idea on the possibility of how to show the rove that would be visible on the inside of 11 and 12th plank ? Scale size would be 1 mm square.

Until I can get permission to post drawings from the book, I will describe the locations as best as possible.

Each "room" is a space between bitis. The locations are based on the position of the mast. I have moved my mast forward one room as it is located in the full sized ship, therefore you will have to decide where you want to place the un-nailed boards based on where you are placing the mast.

The rooms immediately forward and immediately aft of the mast are unfastened. Then, going aft, there are 3 rooms of fastened boards and then 1 room of unfastened boards. The rest aft are fastened. Forward, the last two full length rooms at the stem are unfastened. So, if you moved your mast forward there are 4 rooms of fastened boards forward. If you left your mast in the center, there would be 5. I hope that is clear enough, but please ask if not.

As for the roves, well, I've been thinking about that a lot. Most were square, but some were rhombic. I thought about cutting small squares of black construction paper, gluing them on and drilling through it to place a nail with a smaller head than those used for the rivet heads.

I really want to use some of the nails from Dry-Dock Models and Parts, but I'm still on the fence a bit. For one, the quantity needed to represent actual scale would be quite expensive - I'd have to file a special requisition with the Admiral. Second, by the looks of it, at this particular moment, they are out of stock of all but one size.

Olha used a black putty and wiped it into the holes. There would inevitably be some left in the surrounding wood grain, but I suppose if your finish were dark enough, that would be hidden.

Another idea I have entertained is to drill the holes and use a 3D pen to push black molten plastic into them, then sand it flush, although you wouldn't get the effect of a rivet head. With either of these last two methods, you could drill a hole and with a small diameter rod that has been ground to a square taper, you could push it into the holes and effectively make them square. The filler would then take on that shape, giving the illusion of roves.

As I said, still working it out in my head.
 
Deck boards (prepping)

Ok, I won't keep you in suspense any longer. ROTF The deck boards are going to take a lot of work because, after all, they are one of the most visible parts on the model. I'll outline here what my plans are and then keep everyone updated on the progress as it happens. Of course, to quote Robby Burns, "The best laid plans of mice and men ..."

The first thing I did was take the cradle pieces that Pavel provided and made my own work stand. He has you attach them to the building jig, but that requires that you make the keel slots in the jig wider and also elevates the model to an uncomfortable working height. I lined the edges with packing foam to protect the hull and designed it so that I could clamp it in my PanaVise to tilt it for easier access. I also cut notches in the underside for rubber bands to hold the model securely when necessary.

View attachment 510528

View attachment 510529

View attachment 510530

On to the deck boards...

The majority of the provided deck boards are exactly the same size and shape. This becomes important in a moment. The first step will be to mark the faces of those that are different with the identification numbers from the "sprue" (for lack of a better term). I'm marking the faces because I will install them all face down. Pavel has laser-engraved the treenails in all the boards. On the Oseberg, 16mm treenails were used to fasten the boards down. This equates to 0.64mm in scale. The outside of the laser-engraved simulated treenail ring is about 1.6mm, the inside about 1mm. It's just not right.

Using the markings as a guide (while everything is still in the "sprue"), I'll drill 0.8mm holes, staying on the inside (towards the center of the plank) of the markings. This is because the original boards have the same double bead profile along the edges as the strakes do. I plan to put this profile along the long edges of each board and I want to miss the treenails. I'm not going to profile the short grain edges because I fear it will tear out too much. I could drill 0.6 holes, but I want all this work to at least be visible! ROTF

I bought a new toy (don't tell the Admiral) for drilling all these holes - the Arrowmax micro drill press.

View attachment 510526

I was going to do a full write-up on it, but found several on SOS already, so decided not to. There are mixed reviews - some, like @Corsair love it, others not so much. I'll let you know how it works. I like the fact that the drill motor is cordless and comes off the frame to be used as a handpiece. This will come in handy if I decide to rivet the strakes (you know I will :rolleyes:). I don't like the fact that there is no depth stop and that the bit is not centered in the clearance hole - in fact, it just hits the edge of it. I can easily see some broken bits if I'm not careful. Yeah, I'll probably come up with some sort of depth stop. ROTF

View attachment 510527

After drilling, I'll flip the sheets and sand the whole back face (now the upper, visible) face to remove laser char and get ready for staining. I like the look Of Pavel's model where the boards are dark around the edges, as though the centers were worn away by feet. So I'll spray black dye along the ends of the boards, it will be easier while they are still in the "sprues". Then, glue in a million toothpicks, cut and sand them flush. Then, I think, a coat of golden oak over the whole thing and then the walnut to fade the black in from the ends to the lighter center.

Now I can remove the pieces from the "sprues". The next step will be to put the profiles on the edges with the scratch stock I made. Then sand a slight round-over on all the edges and lightly spray walnut along the entire long edge. I may make a u-shaped mask to hold over them that will cover the treenails so I don't darken them too much with this color. I don't know - we'll see how the tests turn out.

Finally, all the pieces that are identical will be placed in a container, mixed up and pulled at random for assembly. One thing that I really don't like on some models are these one-piece, laser engraved decks. All the simulated joints and caulk lines in the world will never hide that natural dark streak in the wood that traverses diagonally across the entirety of your deck. I want my deck boards to be randomized, just as they were in the real thing.

Well, that's my plan and I'm sticking to it ... probably ... maybe ... we'll see. ;)
Wow Russ, you're definitely taking your model to the next level! All of the extra detail you're adding is impressive! I can't wait to see how it turns out.

Steve
 
Wow, that is an ambitious plan. Very interesting.

Jan

I have moved my mast forward one room as it is located in the full sized ship, therefore you will have to decide where you want to place the un-nailed boards based on where you are placing the mast.

So that means that the mast is no longer placed at the widest point of the ship. I guess people have to prioritize what they feel is most important.
 
So that means that the mast is no longer placed at the widest point of the ship.

That is correct, just as the mast in the actual Oseberg is not at the widest part of the ship. It is one frame forward. While Pavel's model has an equal number of frames both fore and aft of the mast frame, the actual ship has has two more frames aft of the mast than forward - the result of the mast being off-center.

I guess people have to prioritize what they feel is most important.

I'm not sure if that was a shot or not, but everyone has their own reasons and goals when they build a model. Some people strive to build a perfect scale model (as perfect as existing documentation allows), down to having the correct number of fibers and the right twist in their rigging lines. Others build a model kit just as it is supplied simply for the enjoyment of the build. Most of us fall somewhere in the middle. I'd like to build this model as close as is practically possible to the actual ship without really going overboard. These are my goals for building and how I derive enjoyment from the hobby.

The hull is pretty well documented. Information on the sail and rigging is virtually non-existent, so therefore must be built on best-guess conjecture. Everything in life is a compromise. Remember, this ship was found buried and broken under tons of earth, so we do the best we can.

I'm also not forcing anyone to follow my lead, nor will I ever criticize or shame anyone who doesn't and just wants to build the kit as is. I'm simply providing information on the actual ship and documenting what I am doing. Your mileage may vary.
 
That is correct, just as the mast in the actual Oseberg is not at the widest part of the ship. It is one frame forward. While Pavel's model has an equal number of frames both fore and aft of the mast frame, the actual ship has has two more frames aft of the mast than forward - the result of the mast being off-center.


I'm not sure if that was a shot or not, but everyone has their own reasons and goals when they build a model. Some people strive to build a perfect scale model (as perfect as existing documentation allows), down to having the correct number of fibers and the right twist in their rigging lines. Others build a model kit just as it is supplied simply for the enjoyment of the build. Most of us fall somewhere in the middle. I'd like to build this model as close as is practically possible to the actual ship without really going overboard. These are my goals for building and how I derive enjoyment from the hobby.

The hull is pretty well documented. Information on the sail and rigging is virtually non-existent, so therefore must be built on best-guess conjecture. Everything in life is a compromise. Remember, this ship was found buried and broken under tons of earth, so we do the best we can.

I'm also not forcing anyone to follow my lead, nor will I ever criticize or shame anyone who doesn't and just wants to build the kit as is. I'm simply providing information on the actual ship and documenting what I am doing. Your mileage may vary.
No I was not criticizing. I just thought the the hull wasn’t symmetrical around the center of the ship. I thought the widest part was closer to the bow and not midship. Therefor people have to choose if they want to keep the mast at it’s widest point or move it forward but then have the geometry wrong.

If the hull is actually symmetrical around the center of the ship then my comment is void.

According to the book, the centermost biti (the one behind the mast) is 468cm long. The ones immediately forward and aft of the central one (including the one the mast is stepped against) are each 464cm long. The lengths obviously decrease as you move toward the stems. So, yes, the ship is symmetrical around the central frame, but the mast is stepped one frame forward.
 
Sooooooo, remember that part about the best laid plans? After more careful measurements, it seems that the frames are NOT all exactly equidistant and consequently, the deck boards are not all equal length. They can vary 1-2mm in length. Sigh. However, the spaces between frames are symmetrical, meaning that the boards either side of the central frame are rows 1. The next spaces toward the stems are rows 2, etc. All the same numbered rows are the same length, so I will simply mix up the boards within a given row number rather than mix them all up. It's all good. :D
 
Until I can get permission to post drawings from the book, I will describe the locations as best as possible.

Each "room" is a space between bitis. The locations are based on the position of the mast. I have moved my mast forward one room as it is located in the full sized ship, therefore you will have to decide where you want to place the un-nailed boards based on where you are placing the mast.

The rooms immediately forward and immediately aft of the mast are unfastened. Then, going aft, there are 3 rooms of fastened boards and then 1 room of unfastened boards. The rest aft are fastened. Forward, the last two full length rooms at the stem are unfastened. So, if you moved your mast forward there are 4 rooms of fastened boards forward. If you left your mast in the center, there would be 5. I hope that is clear enough, but please ask if not.

As for the roves, well, I've been thinking about that a lot. Most were square, but some were rhombic. I thought about cutting small squares of black construction paper, gluing them on and drilling through it to place a nail with a smaller head than those used for the rivet heads.

I really want to use some of the nails from Dry-Dock Models and Parts, but I'm still on the fence a bit. For one, the quantity needed to represent actual scale would be quite expensive - I'd have to file a special requisition with the Admiral. Second, by the looks of it, at this particular moment, they are out of stock of all but one size.

Olha used a black putty and wiped it into the holes. There would inevitably be some left in the surrounding wood grain, but I suppose if your finish were dark enough, that would be hidden.

Another idea I have entertained is to drill the holes and use a 3D pen to push black molten plastic into them, then sand it flush, although you wouldn't get the effect of a rivet head. With either of these last two methods, you could drill a hole and with a small diameter rod that has been ground to a square taper, you could push it into the holes and effectively make them square. The filler would then take on that shape, giving the illusion of roves.

As I said, still working it out in my head.
1mm square seems almost impossible
 
Sooooooo, remember that part about the best laid plans? After more careful measurements, it seems that the frames are NOT all exactly equidistant and consequently, the deck boards are not all equal length. They can vary 1-2mm in length. Sigh. However, the spaces between frames are symmetrical, meaning that the boards either side of the central frame are rows 1. The next spaces toward the stems are rows 2, etc. All the same numbered rows are the same length, so I will simply mix up the boards within a given row number rather than mix them all up. It's all good. :D
I was wondering about that, when I measured between my frames while still in the slipway/jig I saw the same variance. I thought maybe I didn't have everything lined up the way it should be, although the jig puts the frames where it want's to. Since you moved the mast one frame forward, I'm anxious to see how the deck boards work out for you.

Steve
 
Deck boards (prepping)

Ok, I won't keep you in suspense any longer. ROTF The deck boards are going to take a lot of work because, after all, they are one of the most visible parts on the model. I'll outline here what my plans are and then keep everyone updated on the progress as it happens. Of course, to quote Robby Burns, "The best laid plans of mice and men ..."
The first thing I did was take the cradle pieces that Pavel provided and made my own work stand. He has you attach them to the building jig, but that requires that you make the keel slots in the jig wider and also elevates the model to an uncomfortable working height. I lined the edges with packing foam to protect the hull and designed it so that I could clamp it in my PanaVise to tilt it for easier access. I also cut notches in the underside for rubber bands to hold the model securely when necessary.

View attachment 510528

View attachment 510529

View attachment 510530

On to the deck boards...

The majority of the provided deck boards are exactly the same size and shape. This becomes important in a moment. The first step will be to mark the faces of those that are different with the identification numbers from the "sprue" (for lack of a better term). I'm marking the faces because I will install them all face down. Pavel has laser-engraved the treenails in all the boards. On the Oseberg, 16mm treenails were used to fasten the boards down. This equates to 0.64mm in scale. The outside of the laser-engraved simulated treenail ring is about 1.6mm, the inside about 1mm. It's just not right.

Using the markings as a guide (while everything is still in the "sprue"), I'll drill 0.8mm holes, staying on the inside (towards the center of the plank) of the markings. This is because the original boards have the same double bead profile along the edges as the strakes do. I plan to put this profile along the long edges of each board and I want to miss the treenails. I'm not going to profile the short grain edges because I fear it will tear out too much. I could drill 0.6 holes, but I want all this work to at least be visible! ROTF

I bought a new toy (don't tell the Admiral) for drilling all these holes - the Arrowmax micro drill press.

View attachment 510526

I was going to do a full write-up on it, but found several on SOS already, so decided not to. There are mixed reviews - some, like @Corsair love it, others not so much. I'll let you know how it works. I like the fact that the drill motor is cordless and comes off the frame to be used as a handpiece. This will come in handy if I decide to rivet the strakes (you know I will :rolleyes:). I don't like the fact that there is no depth stop and that the bit is not centered in the clearance hole - in fact, it just hits the edge of it. I can easily see some broken bits if I'm not careful. Yeah, I'll probably come up with some sort of depth stop. ROTF

View attachment 510527

After drilling, I'll flip the sheets and sand the whole back face (now the upper, visible) face to remove laser char and get ready for staining. I like the look Of Pavel's model where the boards are dark around the edges, as though the centers were worn away by feet. So I'll spray black dye along the ends of the boards, it will be easier while they are still in the "sprues". Then, glue in a million toothpicks, cut and sand them flush. Then, I think, a coat of golden oak over the whole thing and then the walnut to fade the black in from the ends to the lighter center.

Now I can remove the pieces from the "sprues". The next step will be to put the profiles on the edges with the scratch stock I made. Then sand a slight round-over on all the edges and lightly spray walnut along the entire long edge. I may make a u-shaped mask to hold over them that will cover the treenails so I don't darken them too much with this color. I don't know - we'll see how the tests turn out.

Finally, all the pieces that are identical will be placed in a container, mixed up and pulled at random for assembly. One thing that I really don't like on some models are these one-piece, laser engraved decks. All the simulated joints and caulk lines in the world will never hide that natural dark streak in the wood that traverses diagonally across the entirety of your deck. I want my deck boards to be randomized, just as they were in the real thing.

Well, that's my plan and I'm sticking to it ... probably ... maybe ... we'll see. ;)
Hey Russ, I don't want to rain on you parade but I think the admiral might know about you buying the Arrowmax micro drill press. If my guess is correct she's sitting in the background of your pic! ROTF
 
Deck boards (cont'd)

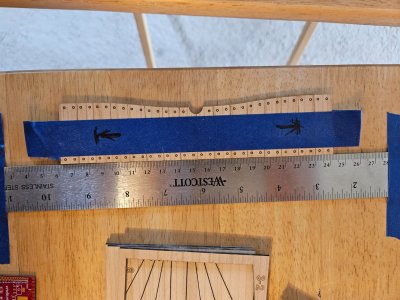
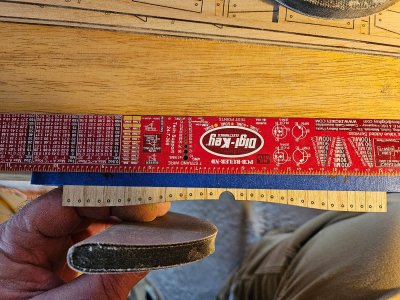
My "best laid plans" of keeping all the deck boards in the "sprues" while I performed several operations kind of fell apart - literally. ROTF Sanding the back sides of the three sheets with all the boards in situ worked well since I could support everything on the flat table. After that, I decided to work on one "room" at a time, removing the boards and sanding the nibs off the edges while keeping everything in proper order. I'm less concerned now about mixing up the boards because they were arranged on the sheets in such a way so that grain lines don't really continue from one room to another. Aligning all the boards against a ruler, I placed some painter's tape across all of them to keep them together. I was then able to hang the group over the edge of the table while trapping them with a ruler so that I could sand the edges for a proper fit on the bitis.

Since you moved the mast one frame forward, I'm anxious to see how the deck boards work out for you.

When I read this, Steve, my pucker meter edged up into the yellow and I thought, "Oh yeah, how am I going to do that?" As it turns out, it was simpler than you (or I) thought! :D

Pavel has the mast stepped against the central frame. That means that the rooms on either side of that frame are identical, except that the taper at the strakes is reversed. Putting the mast forward one frame means that all the specially-shaped boards could simply be shifted forward. The outer two boards on each end (4 total) have a slight taper, so by swapping ends and turning those boards around, I was able to match the different taper at the sides. Easy-peasy - pucker meter back in the green!

The lines drawn on the tape below show the boards I swapped and reversed.

20250330_111430.jpg

20250330_111515.jpg

20250330_120016.jpg

Despite my best efforts to shape the thickened biti against Pavel's template, it didn't quite match up with the curve of the boards. It's not too far off, though, so it should be fine. The misalignment of the mast clearance in the boards is simply parallax error caused by the angle of the photo.

So, lots of sanding, taping and fitting to go. :rolleyes:
 
Deck boards (cont'd)

My "best laid plans" of keeping all the deck boards in the "sprues" while I performed several operations kind of fell apart - literally. ROTF Sanding the back sides of the three sheets with all the boards in situ worked well since I could support everything on the flat table. After that, I decided to work on one "room" at a time, removing the boards and sanding the nibs off the edges while keeping everything in proper order. I'm less concerned now about mixing up the boards because they were arranged on the sheets in such a way so that grain lines don't really continue from one room to another. Aligning all the boards against a ruler, I placed some painter's tape across all of them to keep them together. I was then able to hang the group over the edge of the table while trapping them with a ruler so that I could sand the edges for a proper fit on the bitis.


When I read this, Steve, my pucker meter edged up into the yellow and I thought, "Oh yeah, how am I going to do that?" As it turns out, it was simpler than you (or I) thought! :D

Pavel has the mast stepped against the central frame. That means that the rooms on either side of that frame are identical, except that the taper at the strakes is reversed. Putting the mast forward one frame means that all the specially-shaped boards could simply be shifted forward. The outer two boards on each end (4 total) have a slight taper, so by swapping ends and turning those boards around, I was able to match the different taper at the sides. Easy-peasy - pucker meter back in the green!

The lines drawn on the tape below show the boards I swapped and reversed.

View attachment 510762

View attachment 510763

View attachment 510764

Despite my best efforts to shape the thickened biti against Pavel's template, it didn't quite match up with the curve of the boards. It's not too far off, though, so it should be fine. The misalignment of the mast clearance in the boards is simply parallax error caused by the angle of the photo.

So, lots of sanding, taping and fitting to go. :rolleyes:
Hi Russ,

It's great news that the deck boards are the same length so they could be swapped, I'm really glad it's working out. When I saw you had moved the mast one frame forward that was my biggest concern.

Sorry about getting your pucker meter upset. ;)

Steve
 
Hi Gents I have been trying to get a copy of The Ship Oseborg since last October. I ordered a copy from Pen and Sword and it was out of stock. Contacted the museum and they did not have any and reffered me back to Pen and Sword. I got a reply last week that they had no idea when it would be printed again. Unfortunate
 
Hi Gents I have been trying to get a copy of The Ship Oseborg since last October. I ordered a copy from Pen and Sword and it was out of stock. Contacted the museum and they did not have any and reffered me back to Pen and Sword. I got a reply last week that they had no idea when it would be printed again. Unfortunate

Welcome to the forum Eric!

I feel your pain. I've been trying to get one since the first of the year. Another member alerted me to Pen and Sword on Friday. When I went to the web site, it said that it was available, so I ordered it. I received a confirmation and my CC charge is pending. I notice that their web site does not say "available" anymore, but it still lets you add the book to your cart. So either I got the last one or I'll be getting a disappointing email soon.

I don't know why this book is so hard to find. It's not that old. Perhaps they had a very limited printing run. Good luck in your quest!
I was on the fence about buying this book, as it's kind of pricey. I decided to look online, after three or four web search links I found it not listed out of stock. They charged my cc and sent me a conformation email so I assume it's in stock. I'm shocked that 57L turned into $98.59 with shipping! I'm with Russ, I hope I don't get a disappointing email soon.
 
I was on the fence about buying this book, as it's kind of pricey. I decided to look online, after three or four web search links I found it not listed out of stock. They charged my cc and sent me a conformation email so I assume it's in stock. I'm shocked that 57L turned into $98.59 with shipping! I'm with Russ, I hope I don't get a disappointing email soon.

Yeah, the $20 shipping was high, but better than the $90 to get the kit from Kiev!

Yesterday, I emailed Dr. Vibeke Bischoff, the author of the book, asking permission to post selected images from her book. I received an automated response saying that she was busy publishing and was only responding to select messages. Let's hope mine is selected. It will make it much easier to illustrate some of the things I have been describing here for those who can't find a copy of the book.
 
Following up on my order to Pen and Sword for The Oseberg Ship, I received an "invoice" today stating that due to insufficient quantities, the book had been backordered. :oops:

When I ordered it, the web site said it was available. Then sent me an order confirmation. They charged my credit card. I don't know if things work differently in the UK, but around here, unless you are knowingly placing a backorder or special order, your card is not charged if the item is not in stock and usually, for backorders, it is not charged until the product ships.

I sent them an email asking if they are expecting an imminent shipment of the books, and if not, how long they plan on holding on to my money. Sigh.
 
Oh no, that is definitely a BIG disappointment.

Jan

Yup.

I received a reply from Pen and Sword. apparently it is their standard practice to exact full payment for any item ordered, whether they have it in stock or not. It irks me a bit that their page said "available" when I placed the order. Perhaps others saw the posting here and edged in moments before me, taking the last copies. Who knows.

I replied, saying that if they could get positive confirmation from the publisher that they can get it, I will wait, otherwise I want a refund.

In the mean time, I have renewed the loan of my copy from Cornell for another 4 weeks. I'll keep doing that until they tell me there is a limit on renewals. I don't suppose there is unless someone specifically requests that book from them. We'll see.
 
Back
Top