Thanks, Nigel!!! Just to clarify who is Dr, Mike (Mikhail Bezverhniy) Rusian ship models builder GuruJust for clarity,a pic of a flexicurve or 'plastic snake' as Dr Mike calls it.
-

Win a Free Custom Engraved Brass Coin!!!
As a way to introduce our brass coins to the community, we will raffle off a free coin during the month of August. Follow link ABOVE for instructions for entering.
-

PRE-ORDER SHIPS IN SCALE TODAY!
The beloved Ships in Scale Magazine is back and charting a new course for 2026!
Discover new skills, new techniques, and new inspirations in every issue.
NOTE THAT OUR FIRST ISSUE WILL BE JAN/FEB 2026
You are using an out of date browser. It may not display this or other websites correctly.
You should upgrade or use an alternative browser.
You should upgrade or use an alternative browser.
Saint-Philippe 1693-POF to the Monograph by Jean-Claude Lemineur by NMBrook-1/36
- Thread starter NMBROOK
- Start date
- Watchers 81
-
- Tags
- ancre saint-philippe 1693
Sorry Jim,Dr Mike is much easier for me as I can never remember how to spell Mikhail's surname
Kind Regards
Nigel

Kind Regards
Nigel
...this is more for everyone else, as you well know Mike and his work.Sorry Jim,Dr Mike is much easier for me as I can never remember how to spell Mikhail's surname
I agree with Jim - with this wood, it will be a beautiful hull - Great work and thanks for sharing with us your steps
Thanks Uwe,yes this Pear is beautiful.That does come at a price.Good job this is a very long build as working the cost out roughly based on how many frames I can get out from one sheet,the framing alone is going to be a considerable amount of money.That is the price of going with this scale.However I am sure the cost per hour from a hobby point of view shall still be fairly modest.
Kind Regards
Nigel
Last edited:
Hi Nigel, agree with you about the Dr Mike's videos. I have about 10 of his videos on model ship construction.
Hi Nigel, agree with you about the Dr Mike's videos. I have about 10 of his videos on model ship construction.
Sadly Brian I can no longer find the videos on YouTube that covered his work and techniques.His work is now shown on the Russian Modelsworld Forum though and he does partcipate.He did use to say he had far too many models to build to have time to post his work but it is mainly Alexander Dobrenko who is responsible for the posts.
Kind Regards
Nigel
Nigel, its a pity as I was downloading the series on Y tube and then it abruptly ended.
here is the full list Dr Mike's videos
Hello,...
Slightly unrelated,but I wonder if anyone can point me in the right direction regarding the connection of the two frame halves.After hours scouring the French forum I have found that the futtocks were secured with 4 bolts driven from one side and 2 bolts driven from the other.
...
Nigel
Sorry, I did not see that question.
In French construction, three bolt are placed to tie each scarph between the two pieces. These studs are square, the head is a little bigger (1/12 more) and they are riveted on a square ring (ferrule ?) embedded in the wood.
Here is a diagram based on the drawing of JC Lemineur:
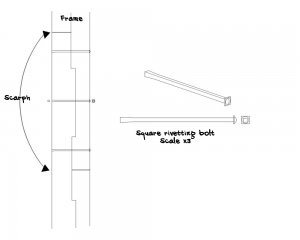
Regards,
GD
I knew, that you know it - ThanksHello,
Sorry, I did not see that question.
In French construction, three bolt are placed to tie each scarph between the two pieces. These studs are square, the head is a little bigger (1/12 more) and they are riveted on a square ring (ferrule ?) embedded in the wood.
Here is a diagram based on the drawing of JC Lemineur:
View attachment 90430
Regards,
GD
BTW: Interesting detail - question is than only, if these bolt-heads are visible later on - will depend on the space between the two frames
Hello,
Sorry, I did not see that question.
In French construction, three bolt are placed to tie each scarph between the two pieces. These studs are square, the head is a little bigger (1/12 more) and they are riveted on a square ring (ferrule ?) embedded in the wood.
Here is a diagram based on the drawing of JC Lemineur:
View attachment 90430
Regards,
GD
Thankyou Gerard that is most helpful.Do you know if there is a set rule between frame thickness and the bolts diameter?
Kind Regards
Nigel
here is the full list Dr Mike's videos
Thanks Zolly
There's several hours gone watching all these again
 I recommend to anyone who hasn't seen these to take the time and watch them.There are some great techniques shown in the footage.I almost forgot the one about using a kitchen toaster to bend planks!
Kind Regards
Nigel
I am sure Gerard will answer this question .....Thankyou Gerard that is most helpful.Do you know if there is a set rule between frame thickness and the bolts diameter?
Kind Regards
Nigel
I checked the information given by Jean Boudriot in the 74 gun ship book (younger than your vessel), maybe it is helping also.
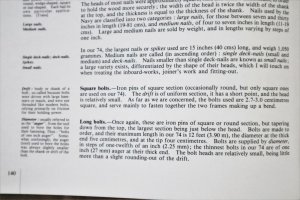
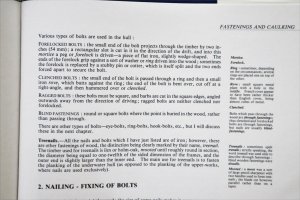
If you do not have this book I would like to recommend it as an additional basis for the hull construction
Link to the Book Review:
Book review - THE 74-GUN SHIP - Volume 1 - HULL CONSTRUCTION" (Set of 4 Volumes) - by Jean Boudriot
Book Review: THE 74-Gun SHIP / THE SEVENTY-FOUR GUN SHIP A Practical Treatise on the Art of Naval Architecture 4 Volume Set (Set of 4 volumes) Overview of the Content of all 4 Volumes Here: Volume 1 - HULL CONSTRUCTION by Jean Boudriot english translation by David H. Roberts...
shipsofscale.com
Here are the Look Inside views from the Book Review related to bolts, nails etc
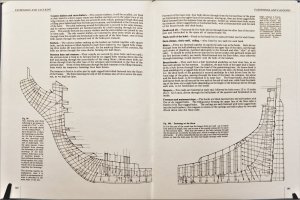
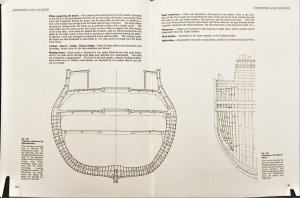
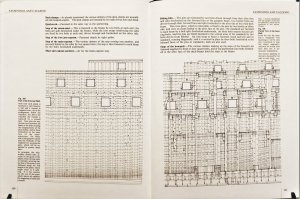
I am sure Gerard will answer this question .....
I checked the information given by Jean Boudriot in the 74 gun ship book (younger than your vessel), maybe it is helping also.
View attachment 90474 View attachment 90475
If you do not have this book I would like to recommend it as an additional basis for the hull construction
Link to the Book Review:
Book review - THE 74-GUN SHIP - Volume 1 - HULL CONSTRUCTION" (Set of 4 Volumes) - by Jean Boudriot
Book Review: THE 74-Gun SHIP / THE SEVENTY-FOUR GUN SHIP A Practical Treatise on the Art of Naval Architecture 4 Volume Set (Set of 4 volumes) Overview of the Content of all 4 Volumes Here: Volume 1 - HULL CONSTRUCTION by Jean Boudriot english translation by David H. Roberts...shipsofscale.com
Here are the Look Inside views from the Book Review related to bolts, nails etc
View attachment 90476View attachment 90477View attachment 90478
Thanks Uwe.Yes I have heard it been said that the 74 gun ship book can be used as a 'blueprint' of information on the finer details as it illustrates the standard practices.My only reservation is the time period is much later and may not apply to the period that Saint-Philippe was built.
Kind Regards
Nigel
Of course, there is a rule that is based on the width of the keel which is the absolute reference in the construction..Thankyou Gerard that is most helpful.Do you know if there is a set rule between frame thickness and the bolts diameter?
Kind Regards
Nigel
This rule says: The bolt for the frame will have in square 2/3 of the thickness of the keel, reduced in line.
This means that if you have for example a 12-inch keel wide (starboard -> port) the bolt have 8 lines in square.
So keel 12 French inches = 325 mm and 8 French lines = 18 mm.
GD
Thank you again Gerard.
Kind Regards
Nigel
Kind Regards
Nigel
Hi All
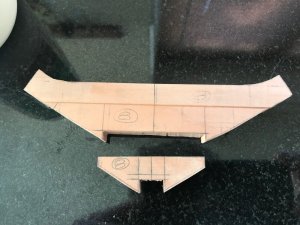
I have given my new bandsaw a work out this afternoon.I spent half an hour setting the guides up as Instructions and off I went.Some head scratching as to the sequence of cutting parts out as the throat is smaller than that of a scroll saw but I have to say I am well impressed.The 6TPI blade cut through the Pear cleanly and effortlessly.Only booboo was on my part.I hadn't allowed space between two parts hence the bottom floor timber number 9 in the pics.I will trace another one out to cut tomorrow.
As I had hoped,the results are much tighter than a scroll saw and cutting is quicker.You will see the floor timbers comprise of three pieces scarphed together.The smallest piece and its notch will be faced on the miller.I have glued two segments of one floor timber together.The face touching the granite table mat is the outside of the frame the side facing the camera will be milled down 1,5mm
leaving what will become the tenons.
Kind Regards
Nigel
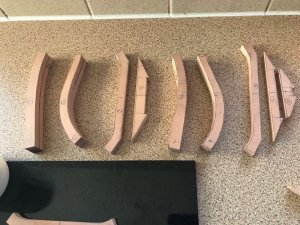
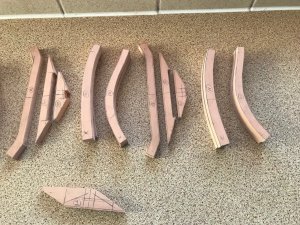


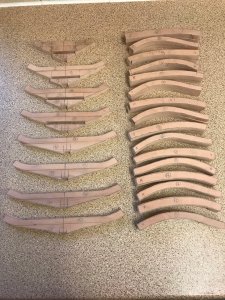
I have now cut the components for the tenon side of 8 frames.The other side will be cut from 9mm sheet as it has mortices rather than tenons.The frames I have cut finish short of the top of the hull the other halves run right to the top.The frames are huge when assembled and I am considering building the hull upside down similar to the Hahn approach.This will be more accurate I feel as it will support these big frames better rather than using a waterline jig the right way up.
I will need to add a datum and frame positions relative to a base line on the drawing in order to do this.I will also need to detail the frame extensions on the cross sections.To complicate matters the hull is higher in the water at bow than stern and the keel has a downward bow in the middle to counteract hogging.
One option is to build a jig that includes several levels to minimise the length of the extensions however this will make things more complex,decisions,decisions.
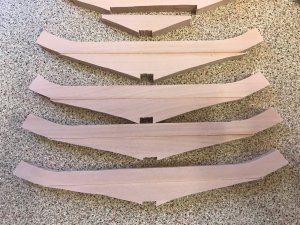
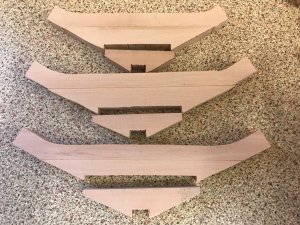
Some pics of the first 8 frame 'halves' with the main scarphs of the floor timbers glued up.That is as far as I am going because I will be using the Proxxon mill to finish the important faces.I need a need vice as the one I have has been used and abused for a number of years and some new cutters wouldn't go amiss.
The profile is roughed out oversize,I focused on getting tight glue joints to the scarphs.You can hardly see them in real life but the look prominent in photos.Just how visible these will be on the complete model I don't know,but I have made as per the original.
Kind Regards
Nigel


Nigel, if you could, could you show pictures of how you use your MILL, still trying to figure out how to use my X=Y table since not being mechanicaly inclined would like to see mill in operation. THANKS Don
Hi Don
Yes will do when I get to that stage.Lots of my tools are boxed away for when I move house so I am leaving the milling bit until we have settled in to the new house and got my workshop sorted.All that isn't boxed away is my planer,bandsaw and Proxxon disc sander.I am treading water in the meantime,but if I don't do something on a weekend while we are in limbo,I will go stir crazy
Kind Regards
Nigel


