Soleil Royal- Re-engineering Artesania Latina's New Kit by NMBROOK

Thanks Paul

I have two new "secret weapons" to speed the process.Super glue Gell from the bargain shop and Mantua's own Aliphatic wood glue.The wood glue grabs and dries quicker than any other I have used.The Gell I use on the bow area, and allows me to hold the planks in place by hand until it sets.I will however resort to temporary pins and solely Aliphatic when "laminating" the next layer to ensure strength.

Kind Regards

Nigel
 
At the pace you’re going, we’ll see soon enough. Have you thought much about which route you will go with the frieze for the upper bulwarks?

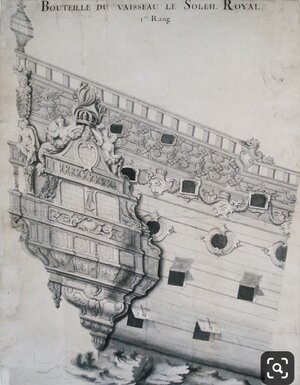
There is what I believe to be the refit version, which is a great space-filler:

03D86466-6A15-4917-9AE7-E1310E07971C.jpeg

I have to admit that, lately, I have begun to wonder if this isn’t the original 1670 decor. The thrust of my argument has always been that the earliest QG structures were terraced and completely open, but the androgynous nature of the way the Africa figure is drawn, here, makes me wonder.

I have one source dating from the mid-1800’s that includes a description of the stern decor of 1670, as refined by Puget. It is very similar to what Berain drew “D’apres un dessin de Puget,” but it differs in several notable ways. Chiefly, the figures of Africa and the Americas are male figures, and the camel of Asia is, instead, a docile tiger, which frankly makes more sense. Anyway, not to get too far into the weeds, here.

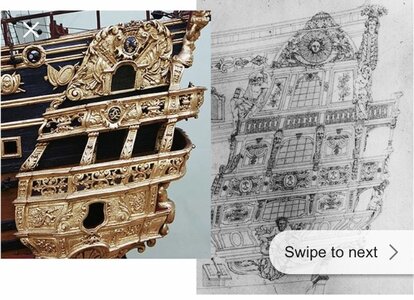
The alternative is what I believe to be the much reduced and simplified frieze decor of 1693:

A99DD0A5-E443-48DA-8C1D-A4D32590480E.jpeg

All the same elements are there, just not in the same profusion. Interestingly, Michel incorporated both.
 
I have only got as far as thinking how to produce the recessed panels with borders adjacent to the circular ports and given thought to how I am going to manufacture the rails.I have thought a little about the frieze work but really need to refine the aft sheer lines of the rails on the model to ascertain how much room I have.It is one thing drawing out the side view but reality in 3D is a little different due to the tumblehome.

The kit quarter galleries share so many similarities to Michel's rendition, his route may be the preferred option.
 
Yes, I know it. I have about two PARTS downloaded -in german, which are perfect for me -, but as I am not building anymore I stopped. I agree with you, that there are many mistakes in this build and many failures.
In the ad, DeAgostini are saying it is of Museum quality, but THET cannot be father away
I AM A BID OF ENENY of DeAgostini. Alone or together with Altaya too. My last build was in fact the SOLEIL ROYAL -MANUFACTURED BY Occre. This new one is apparently from Artesania Latina-Spain too and sold as a complete packet
I have been asked by some in the management to publish the Occre model together with some of my experience of 55 years building from KIT. why only from KITS. the reason is that I am a PURE amateur, meaning that my tools are gown to a minimum. the only mechanical and electric tools I have are 4 Dremels. one fixed upside down, another vertical and then two batteries driven ones. on my mother's side they were all fishermen -6 uncles with one with there own Kutter in North Denmark. the port where they lived had even its own boat building factory, so from an early stage, I learned well to use steam. my father and little brother were carpenters with a nice tool room
Sorry for the long stoory- el capi
I have remade the text. too many failures.
 
IMG_0354.jpgIMG_0352.jpgIMG_0355.jpgIMG_0356.jpg

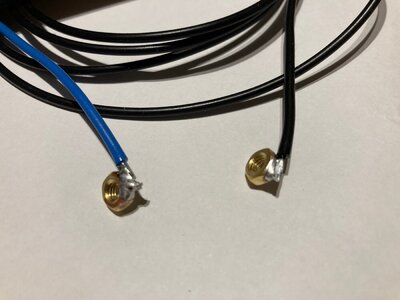
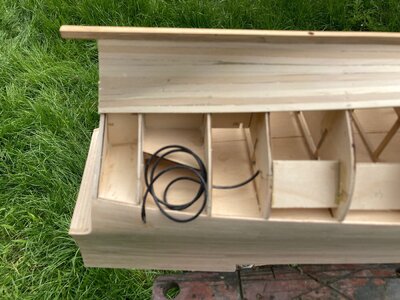
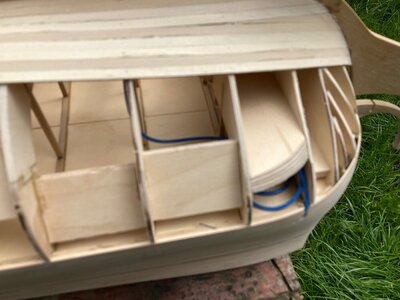
I have completed the above deck inner planking on the other side of the model.I then drilled holes through the keel to take M4 brass threaded rod that will go through the mounting pedestals and secure the model to the case. Captive brass nuts have been epoxied in place after first soldering electrical wire to them.The threaded rod will provide power feed for the LED lighting.The blue wire will be the positive bus and the black the negative.

Apologies for the poor focus on the last pics, the wind had got up and was panicking the model would be blown over. These just show the ends of the cables glued into slots in the inner planking.When the interior structure has been removed, these cables will be pulled through hence the little coils under the deck.

Kind Regards

Nigel
 
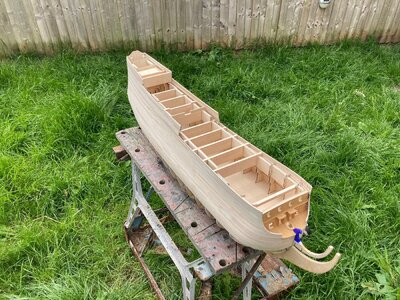
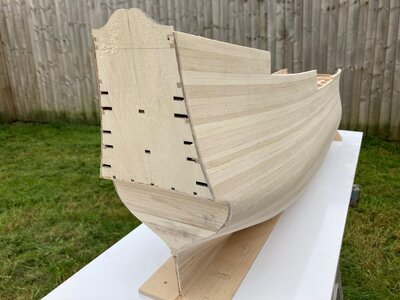
Wow - so, this is really some progress! If I’m understanding what I’m looking at, you have not only completed the first planking, but have begun the second planking from the garboard strake, on-up. I’m glad you have neglected the lawn; grass is far less interesting.
 
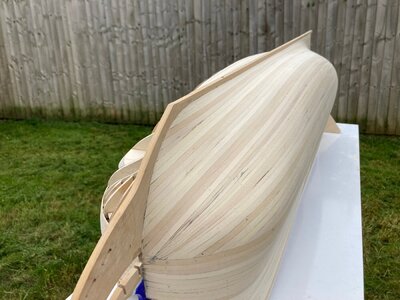
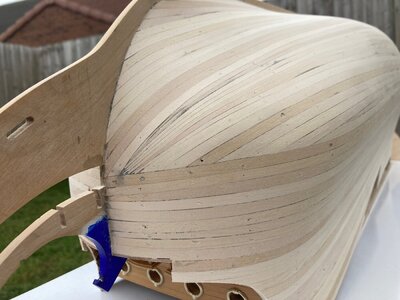
Marc,this is true ( the planking progress and grassROTF).Working Keel up to gundeck level on the next layer.Completely disregarding general planking rules and going "freestyle" due to the unusual bow form.This is very similar to the shape of Michel's model and also has a resemblance to L'Ambiteux.To do correctly, all the bow planks would have to be spilled which to me is a waste of time and material as this is the first layer.I doubt I will spill the veneer final layer either as it will be painted.
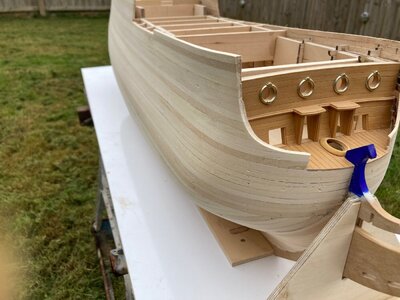
The bulkheads worked out OK but there are some flat spots which are also there in the standard kit which I will build up to get a more flowing upward flare to the bow.
 
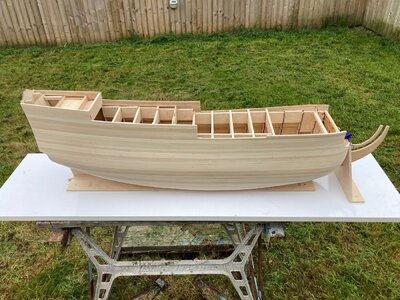
After what it equates to a four day planking marathon, the next layer of the Starboard side is done:rolleyes:At 62 strakes per side,I think I may need some more lime strips to complete the Port side.Everything is very much in the rough, the Rabbet needs cleaning out for the veneer strip final layer and there are one or two flat spots that need building up.As I said earlier planking rules have been disregarded in favour of no clinkering at the bow.

Kind Regards

Nigel

IMG_0364.jpgIMG_0365.jpgIMG_0366.jpgIMG_0367.jpgIMG_0368.jpg
 
This is great because we can now ascertain the full volume of the hull, particularly at mid-ships. The standard AL version is fat like a Yellowfin tuna. The lengthening you did allows for that volume, but in a drastically more realistic length to breadth ratio. We already knew this experiment was a success, but this absolutely confirms it.

I can see what you are referring to, with the flat spot. No biggie. What do you like to use for these circumstances? Would autobody filler be a good choice, here?
 
I’d have no place to put it, but your efforts are making me want to build this model, as well. Perhaps AL should consider a re-design. Someone from the company is very likely watching your build, so maybe they will take that under consideration.
 
I will use two part wood filler by UK brand Cuprinol.It is very similar to Auto bondo but adheres to wood better.The Facets are only 1mm deep so it will be ok.Any more than that and I would glue a layer of scrap planking over the depression then sand to a fair line.

It is uncanny how much the stretched hull form matches that of Michel's model.Hard to tell from the pics with the planking runs I have chosen, but in the flesh it is strikingly similar.

Before I continue planking the other side,I will measure my new bulkhead positions and post a drawing.If anyone is as mad as me and wants to follow suit, then it will give them a start point;).I changed soooo much on Sovereign of the Seas and kept no record.Wish I had a pound everytime time I got asked about the dimensions of the revisions but unfortunately I am unable to answer.

I suspect Artesania have a given criteria of what they perceive as a maximum model size to appeal to the most amount of potential buyers.I would be surprised if they will redesign the kit.

Go on Marc,you know you want to ROTFROTFROTFROTF
 
As it stands, my wife tolerates the Heller version, which is quite large at 1:96. If I were to bring this beast into our small apartment, I’m sure she would consider divorce ROTF

To display something of that size, I’d have to suspend it from our 9’ living room ceiling, cathedral style!

I won’t live here forever, though.
 
I know what you are saying about manufacturers’ calculus is true - there are no shortage of ZHL SRs in-process that attest to that fact, but it seems like such a wrong-headed approach.

Design it correctly, and buyers will line-up to buy it, or so I would think. Well, in a way, I suppose your build can be thought of as a sort of focus group that will appeal to a certain segment of the market. Over time, we’ll see what that market has to say about it.

Cheers!
M
 
Back
Top