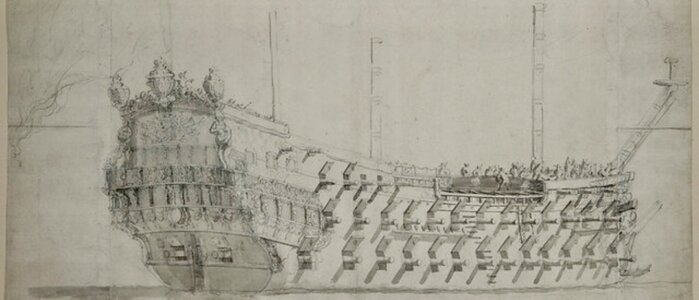
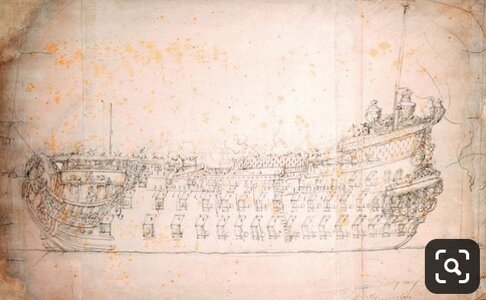
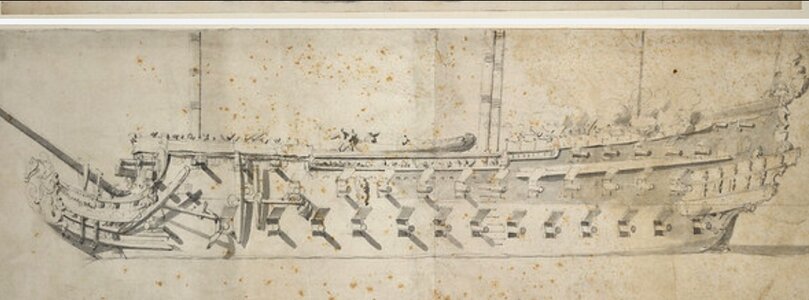
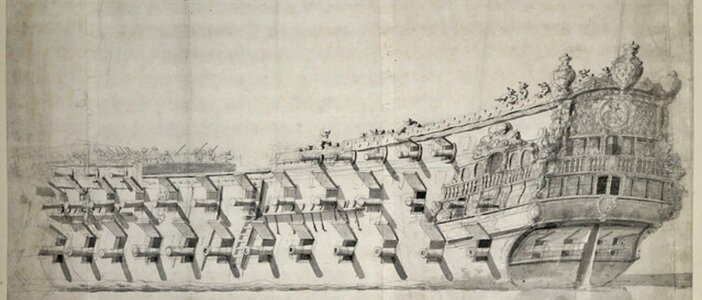
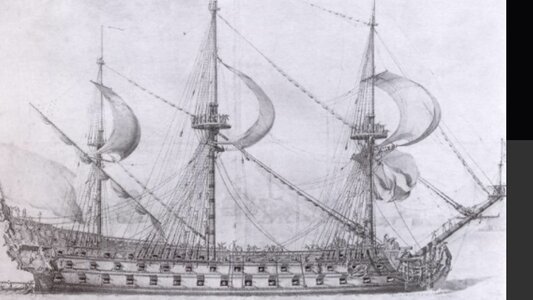
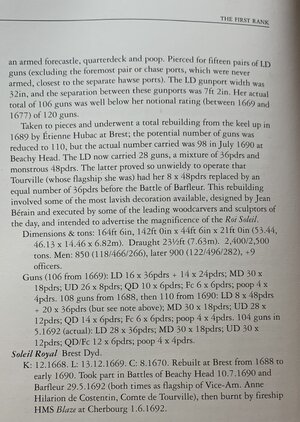
The one lesson I have absorbed about the Royal Reglements is that the first generation of shipwrights, such as Laurent Hubac, were generally more inclined to ignore many of these decrees. The sons of these men go-on to construct the Second Marine, by which time nascent academies dedicated to the science of naval architecture have begun to be established at each arsenal. Only at this point, does a level of consistency finally take root in the French navy.
-

Win a Free Custom Engraved Brass Coin!!!
As a way to introduce our brass coins to the community, we will raffle off a free coin during the month of August. Follow link ABOVE for instructions for entering.
-

PRE-ORDER SHIPS IN SCALE TODAY!
The beloved Ships in Scale Magazine is back and charting a new course for 2026!
Discover new skills, new techniques, and new inspirations in every issue.
NOTE THAT OUR FIRST ISSUE WILL BE JAN/FEB 2026
You are using an out of date browser. It may not display this or other websites correctly.
You should upgrade or use an alternative browser.
You should upgrade or use an alternative browser.
Soleil Royal- Re-engineering Artesania Latina's New Kit by NMBROOK
 , so I'm just hoping to clarify for my understanding of your method, here; from just below the lower gun-deck, upwards, you have reduced the bulkhead outer dimensions by the thickness of the first planking layer - to which your deck clamps will be glued to, but which are only temporarily affixed to the bulkheads, themselves. The next layer of intermediate planking will extend all the way from the keel to the top-sheer, and together with the first layer, will fix the hull shape in a rigid form. At this point, you could waste away the bulkheads, from the lower gun deck, upwards, so that you can begin building out your lower deck interiors. The third, finish layer of planking will establish wales and sheer strakes, and the widest dimension of the gunport openings. Is that the lay of the land, or the motion of your ocean?
That's how I understand his method. It creates two layers to hold the hull shape instead of one. So, when you remove the bulkheads, the shape is not as susceptible to warping. The way my current build went, I had to remove the supporting interior bulkheads to make room for the interior planking, risking warps in the single ply hull, then reinforce with interior planks. If the hull had warped (and I'm sure some areas lost their transverse symmetry to a small degree), gluing the interior planking would freeze those warps in place permanently., so I'm just hoping to clarify for my understanding of your method, here; from just below the lower gun-deck, upwards, you have reduced the bulkhead outer dimensions by the thickness of the first planking layer - to which your deck clamps will be glued to, but which are only temporarily affixed to the bulkheads, themselves. The next layer of intermediate planking will extend all the way from the keel to the top-sheer, and together with the first layer, will fix the hull shape in a rigid form. At this point, you could waste away the bulkheads, from the lower gun deck, upwards, so that you can begin building out your lower deck interiors. The third, finish layer of planking will establish wales and sheer strakes, and the widest dimension of the gunport openings. Is that the lay of the land, or the motion of your ocean?
Marc,you have it exactly right.The are some minor exceptions is that part of the upper transom will remain and the fact I will insert the aftermost deck beams in one by one removing sections of the transom.This is to ensure I keep the shape exactly right otherwise it will cause issue with the photo etch panels.The other thing is that there will be a layer of internal boxwood blanking of varying thickness.
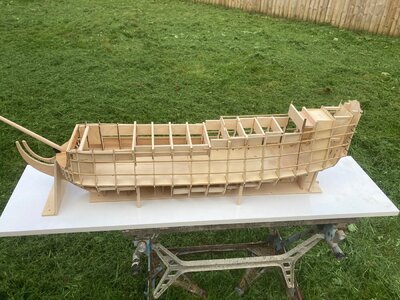
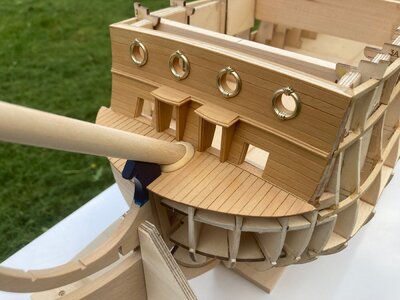
A further update,
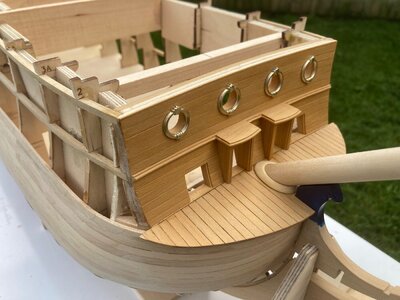
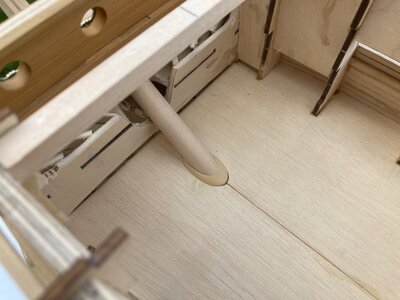
I have fitted the Portside deck stringers and the Beak deck.The deck is 0.8mm Birch ply in two halves planked with 0.6mm Boxwood veneer strips.Caulking is done with a Derwent watercolour chocolate brown pencil.The trim around the bowsprit is boxwood.The 12mm hole is machined using a 12mm end mill with the piece epoxied to the end of a piece of softwood stock to get the angle.The piece is then removed by bandsawing the item from the stock and sanding off the remaining softwood.The item is then shaped.Whilst I had the mill set up,I produced another trim for the lower gundeck which is not glued and will be fitted later once the deck is planked.Neither the deck nor trim have been varnished yet and the front edge of the deck needs trimming back.
The blue is the one I have purchased and I am sat on the fence as to whether I may change the shade.It is a lot darker than the artwork but at the same time would look really sharp against the other colours on the model.
Kind Regards
Nigel


Hey, Nigel. I had no doubt that it would be any other way...great progress, and as always accurate with precision! Will you treenail or imitate or?
I like this dark blue - it will make maximum contrast with your gold effect and the model will be very striking.
I won’t re-hash the discussion about ultra-marine and the likelihood that it was used sparingly. That all seems beside the point, here, as you grapple with artistic choices that emphasize the splendor of the ship. What is interesting though, if one looks at the Vary portraits, is that there appear to be two slightly different shades of blue:
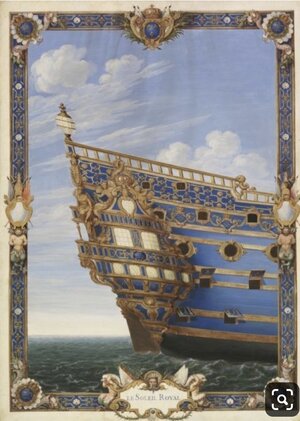
.. the darker blue being reserved for the friezework of the upper bulwarks, which also coincides with the tafferal backdrop of Apollo, on the stern.
Whatever route you decide to go, I am in full support of your choices! This model is so tantalizing because, even at this stage, we can see the bones of what it will become. The child in me just wishes for you to get-on with it and burn through the project, at record pace. Of course, the model-maker craves maximum detail, careful execution and fascinating problem-solving sequences.
I will content myself to watch patiently as the ship rises It is brilliant work, and a fun read!
I won’t re-hash the discussion about ultra-marine and the likelihood that it was used sparingly. That all seems beside the point, here, as you grapple with artistic choices that emphasize the splendor of the ship. What is interesting though, if one looks at the Vary portraits, is that there appear to be two slightly different shades of blue:

.. the darker blue being reserved for the friezework of the upper bulwarks, which also coincides with the tafferal backdrop of Apollo, on the stern.
Whatever route you decide to go, I am in full support of your choices! This model is so tantalizing because, even at this stage, we can see the bones of what it will become. The child in me just wishes for you to get-on with it and burn through the project, at record pace. Of course, the model-maker craves maximum detail, careful execution and fascinating problem-solving sequences.
I will content myself to watch patiently as the ship rises
Last edited:
Hey, Nigel. I had no doubt that it would be any other way...great progress, and as always accurate with precision! Will you treenail or imitate or?
Hi Jim
Thankyou and you may be surprised to hear I have no intention to treenail on this model in contrast to my other builds.My reasoning is that, in smaller scales I feel it jars with the aesthetic of a model with fully painted hull.
When building a model with modest amounts or no paint , the eye is drawn to the beauty of the materials.With this build,I want the model to predominantly demonstrate the opulence and ostentatious characteristics of the original.With that in mind,I am going for a crisp and uncluttered appearance.I even thought about not representing caulking but deemed that was perhaps a step too far.You would not even see the deck planks given the monotone appearance of the boxwood.
On this build,I feel less is indeed more.
Kind Regards
Nigel
Last edited:
I like this dark blue - it will make maximum contrast with your gold effect and the model will be very striking.
I won’t re-hash the discussion about ultra-marine and the likelihood that it was used sparingly. That all seems beside the point, here, as you grapple with artistic choices that emphasize the splendor of the ship. What is interesting though, if one looks at the Vary portraits, is that there appear to be two slightly different shades of blue:
View attachment 307453
.. the darker blue being reserved for the friezework of the upper bulwarks, which also coincides with the tafferal backdrop of Apollo, on the stern.
Whatever route you decide to go, I am in full support of your choices! This model is so tantalizing because, even at this stage, we can see the bones of what it will become. The child in me just wishes for you to get-on with it and burn through the project, at record pace. Of course, the model-maker craves maximum detail, careful execution and fascinating problem-solving sequences.
I will content myself to watch patiently as the ship risesIt is brilliant work, and a fun read!
I do agree with your point Marc regarding the blue to the stage that I am going to run with it.Yes this blue will make the ornamentation pop, we are back to that art thing, where colours look different when placed against different background colours.Less so, if I went for a paler, lighter blue.
As I touched on with my reply to Jim,and as you also mention, this is all about the aesthetics and less about being a stickler to history.The primary goal of this build is to create a model that conveys the fact that this vessel was a self indulgent statement by the King,not unlike Sovereign was for Charles I.
I have a dilema,I have drawn the model out to have ports whose cills follow the sheer.This is correct for French naval architecture of the period as the lower cill is notched through the Spirketing.My issue is that the parallelogram port lids may look less pleasing than square ones, given they will be fully open to show the gold Fleur de Lys as your pic above, at this point I can't find a head scratch Emoji
I am also struggling to find anything that points in the direction of exactly what armament this later vessel carried.I have ideas, but they are based on a best guess rather than research results.
Kind Regards
Nigel
Last edited:
They are Parallelograms,not only on Saint Philippe but also on the other monographs including the 74 gun ship.How noticeable they are depends on the deck Sheer.The deck sheer on this ship is more than a typical 74.If you put a square against the aft and forward ports on the Saint Philippe drawing, you will see what I mean.
Looking at the above illustrations, there doesn't seem to be any deck sheer apart from on the last illustration.
Looking at the above illustrations, there doesn't seem to be any deck sheer apart from on the last illustration.
I have the SP monograph, so I will take a look at that.
Hey Nigel,
I had my doubts about how important correcting the length of the model was, but I have officially had my mind changed. The lines on this new version are stunning.
And perhaps booked under the same "I reserve the right to have my mind changed" - I would not be carrying my weight as someone who owes you a mountain of debt for saving my floundering build 18 months ago - if I did not share that I have some doubts about your choice of blue. Perhaps it is simply because what you show is shadowed, but I believe this blue is so deep that it runs the risk of looking blacker than you intend. Yes, you will advantage the contrast with the gold adornments the darker you go - but there is something very elegant about a more 'french blue' tone that you will have forfeited. The gold you have selected is actually a pastel gold - I would love to see what that would look like on a more pastel blue. What you lose in contrast you may gain in elegance.
Even as I write this, I appreciate this is like me pointing out to Michelangelo that he might want to use a different ochre as he paints the Sistine Chapel - but I wanted to at least raise the question - even if the final decision has already been made. Thanks for patiently hearing my thoughts.
Having taken a look at the SP plans, now I can see what you are talking about. The ports definitely do parallelogram, fore and aft. This is something I had not noticed before.
Hello Nigel,
you are making rapid progress with this build.
you are making rapid progress with this build.
- Joined
- Jan 9, 2020
- Messages
- 10,566
- Points
- 938

I really appreciate the planning that you have put into this. Nothing is an afterthought or a spur of the moment kind of thing. This also allows you to finish a component when installing it - without the need of having to come back to it later to carry out adjustments. The hull extension has given the ship so much more of an elegant look - it's now right up there with the flowing lines of La Renommee, which I regard as the most beautiful of the French ships.
Mozart - "too many notes.."Hi Jim
Thankyou and you may be surprised to hear I have no intention to treenail on this model in contrast to my other builds.My reasoning is that, in smaller scales I feel it jars with the aesthetic of a model with fully painted hull.
When building a model with modest amounts or no paint , the eye is drawn to the beauty of the materials.With this build,I want the model to predominantly demonstrate the opulence and ostentatious characteristics of the original.With that in mind,I am going for a crisp and uncluttered appearance.I even thought about not representing caulking but deemed that was perhaps a step too far.You would not even see the deck planks given the monotone appearance of the boxwood.
On this build,I feel less is indeed more.
Kind Regards
Nigel
Modeling - "too many dots.."
Zillions of high contrast trenails should not be visible beyond a certain distance from the hull, especially for smaller model scales. Large iron bolts may be visible at the distance we typically look at when viewing the model. The best balance of detail with the most bolts I have yet seen lately is Paul's Wasa. Your Sovereign model has so much effort in the trenails, but it's more a demonstration of the your skill than how the ship would look. I wish I had the patience to make that many trenails, but to same time and effort, I will fake them burning tiny ring marks in the wood using a hit iron instead.
Thanks everyone for your encouraging words.
Marc,thankyou, I have also found listing for the armament in Lemineur's book for the later vessel, not in the armament section which I had read three times but towards the back of the book( which is why I didn't find it before).The figures don't tie in with the number of ports, even when disregarding the front chase ports.
he gives;
1st battery- 28 bronze 36 pounders
2nd battery - 30 bronze 18 pounders
3rd battery - 28 bronze 12 pounders
Quarterdeck - 10 bronze 6 pounders
Forecastle - 8 bronze 6 pounders
This would not give me any cannons in the stern ports and only two in the front chase ports.This also does not allow for any armament on the deck below the Poop (four cannons in total here on Michel's and Marc's models)
Paul,I am going back to the art shop this morning to see what alternatives there are,I have slept on this and you are quite right in saying that the hull may appear black in certain light.Afterall this is to be displayed inside, not in my back garden The blue does appear much darker on timber than on the tube despite being the actual paint applied to the tube.I think this has a lot to do with the silver background.
Heinrich,spending time preplanning saves lots of time in the execution.I have done the bashing "on the fly" many times before and you do end up with spending extensive amounts of time reworking parts as you go.I hope to keep this to a minimum on this build and in doing so, reduce the amount of unnecessary work carried out.Stretching the hull has paid off, the hull no longer looks like a doorstop.
Brian,progress has been helped by the fact I have just had two periods of holiday.Things will slow a little as I am back to work tonight for the foreseeable.However,I have got past the what I would describe as the "prototype" stage and moving forward it is now just straight forward building.
Kurt,I worked on Sovereign @ten years ago and my taste and ability have both changed.This is, in part why I haven't progressed as there are some things I love about the model and somethings I hate.If I were to do it all again, the prominent treenails and caulking would not be there.
Kind Regards
Nigel
Marc,thankyou, I have also found listing for the armament in Lemineur's book for the later vessel, not in the armament section which I had read three times but towards the back of the book( which is why I didn't find it before).The figures don't tie in with the number of ports, even when disregarding the front chase ports.
he gives;
1st battery- 28 bronze 36 pounders
2nd battery - 30 bronze 18 pounders
3rd battery - 28 bronze 12 pounders
Quarterdeck - 10 bronze 6 pounders
Forecastle - 8 bronze 6 pounders
This would not give me any cannons in the stern ports and only two in the front chase ports.This also does not allow for any armament on the deck below the Poop (four cannons in total here on Michel's and Marc's models)
Paul,I am going back to the art shop this morning to see what alternatives there are,I have slept on this and you are quite right in saying that the hull may appear black in certain light.Afterall this is to be displayed inside, not in my back garden
 The blue does appear much darker on timber than on the tube despite being the actual paint applied to the tube.I think this has a lot to do with the silver background.
Heinrich,spending time preplanning saves lots of time in the execution.I have done the bashing "on the fly" many times before and you do end up with spending extensive amounts of time reworking parts as you go.I hope to keep this to a minimum on this build and in doing so, reduce the amount of unnecessary work carried out.Stretching the hull has paid off, the hull no longer looks like a doorstop.
Brian,progress has been helped by the fact I have just had two periods of holiday.Things will slow a little as I am back to work tonight for the foreseeable.However,I have got past the what I would describe as the "prototype" stage and moving forward it is now just straight forward building.
Kurt,I worked on Sovereign @ten years ago and my taste and ability have both changed.This is, in part why I haven't progressed as there are some things I love about the model and somethings I hate.If I were to do it all again, the prominent treenails and caulking would not be there.
Kind Regards
Nigel
your are reight.I believe the planking will make a considerable difference as to whether the stem needs any rework or not.
hey, are you aware, that you can download the build -DeAgostine.de - until today. I downloaded it until the hull, was panked totally- horrible look. As I am not building anymore, I have stopped doing it the download. I have until the Bauphase 84- op tp page 500.Thanks everyone for your encouraging words.
Marc,thankyou, I have also found listing for the armament in Lemineur's book for the later vessel, not in the armament section which I had read three times but towards the back of the book( which is why I didn't find it before).The figures don't tie in with the number of ports, even when disregarding the front chase ports.
he gives;
1st battery- 28 bronze 36 pounders
2nd battery - 30 bronze 18 pounders
3rd battery - 28 bronze 12 pounders
Quarterdeck - 10 bronze 6 pounders
Forecastle - 8 bronze 6 pounders
This would not give me any cannons in the stern ports and only two in the front chase ports.This also does not allow for any armament on the deck below the Poop (four cannons in total here on Michel's and Marc's models)
Paul,I am going back to the art shop this morning to see what alternatives there are,I have slept on this and you are quite right in saying that the hull may appear black in certain light.Afterall this is to be displayed inside, not in my back gardenThe blue does appear much darker on timber than on the tube despite being the actual paint applied to the tube.I think this has a lot to do with the silver background.
Heinrich,spending time preplanning saves lots of time in the execution.I have done the bashing "on the fly" many times before and you do end up with spending extensive amounts of time reworking parts as you go.I hope to keep this to a minimum on this build and in doing so, reduce the amount of unnecessary work carried out.Stretching the hull has paid off, the hull no longer looks like a doorstop.
Brian,progress has been helped by the fact I have just had two periods of holiday.Things will slow a little as I am back to work tonight for the foreseeable.However,I have got past the what I would describe as the "prototype" stage and moving forward it is now just straight forward building.
Kurt,I worked on Sovereign @ten years ago and my taste and ability have both changed.This is, in part why I haven't progressed as there are some things I love about the model and somethings I hate.If I were to do it all again, the prominent treenails and caulking would not be there.
Kind Regards
Nigel


