Syren 1803 1:64 Model Shipways

Hey RogerD:
Check out my latest post I did just for you. LOL
 
2F8433F4-59F1-4BCF-B795-A1590E67BDB2.jpeg879DFF66-0FA9-44DF-AD79-18190846589E.jpeg

Looking for some planking advice please.

I am just about finished my first of three planking belts. Call it Belt 1 of the three belts. The kit planks are 1/8” wide, at 1:64, equating to 8” upscaled.

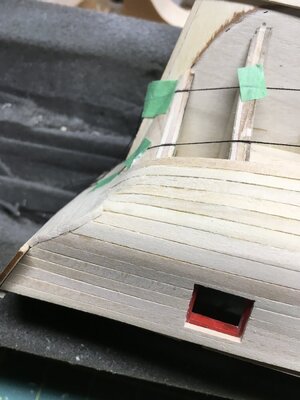
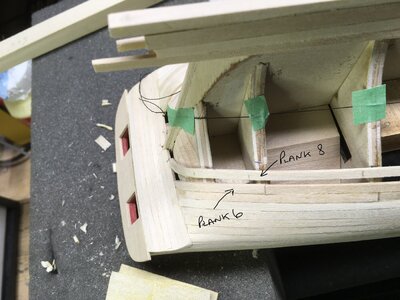
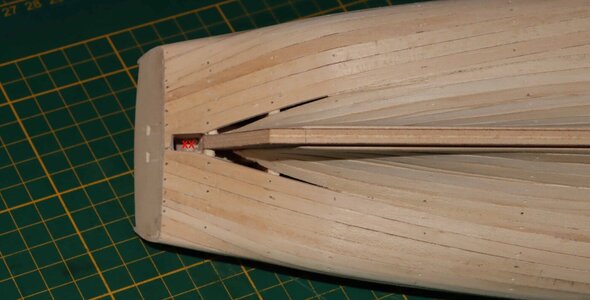
I tried to adjust the gap at the stern, where the last two planks (of Belt 1) are to be fitted, by firstly laying the last plank (call it plank 8) so that it lines up with my 1/3rd mark on the counter. I glued it into position leaving me space for plank 7, as can be seen in the photo. I did this because I am trying to line up the planks on my measured marks along the entire hull.

Plank 7, when fitted, will narrow then as expected widen at the stern. Scaled up at 1:64 it means the plank measures about 6” in real width to, yikes, about 14” width aft. I have a number of options but I’m hoping for some advice please.
  1. On this size of vessel is it realistic to have a 14” tapered plank, going from about 6” to 14” aft? The plank would be an actual ship size length of 24 feet. If so, it fills the gap nicely, problem solved.
  2. If not, do I run plank 7 at 6” width all the way aft. Then use a stealer, which I am trying to avoid.
  3. Do I remove plank 8 with possible damage to the counter and lay plank 7 first? I am trying hard to avoid ungluing that. I think that means a stealer too.
  4. This single plank hull will be covered in copper plates. I realize I can just “plank the gap” any which way but I am trying to learn from this.
  5. Option 5 is a beer :)
Thanks for any advice, input and help.
 
Hi Roger, I can't answer your question because I'm a rookie - but I can say that this is some really nice work you on doing (notwithstanding the present challenge).
Hi Paul, for a rookie your work is a wonderful example for all us rookies to follow!

If this was a double plank job I’d just move on. I think my calculations went awry, I’ll see when the advice hopefully flows in :)
 
Last edited:
I'd go with option 5! :) Just kidding. Plank 8 follows natural bend, but it does not look right. Up to and including plank 6, looks great. I'd either bend plank 7 and subsequent ones sideways or cut them to shape from sheet of wood. Very nice job so far.
 
Hello Gennaro, thanks for replying. I just started Option 5 after mowing the lawn :D

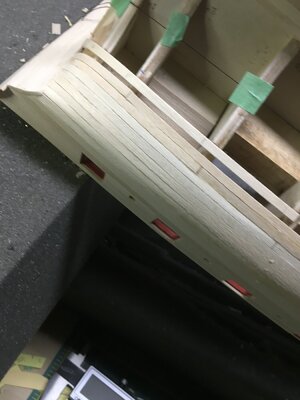
I agree plank 8 looks odd. It suddenly diverges and doesn’t “feel” right. It might be the camera angle so this fuzzy shot below may be a better angle. Your idea cutting from a sheet is worth thinking about. It follows my thoughts too. I was going to try with a 7/32” plank, reducing to scaled 6” back up to 14”, but wasn’t sure about how realistic that was in ship construction.

Thanks, I really appreciate the help.

3CC071FE-4464-4B72-BF98-590C3BE38746.jpeg
 
Roger let me show you how the problem should be tackled. These pictures are from a Dutch modeler @pietsan Piet Sanders's build of the Swedish Yacht Amphion. The advice I am about to give you may not be the easiest but if you are serious about planking correctly ....

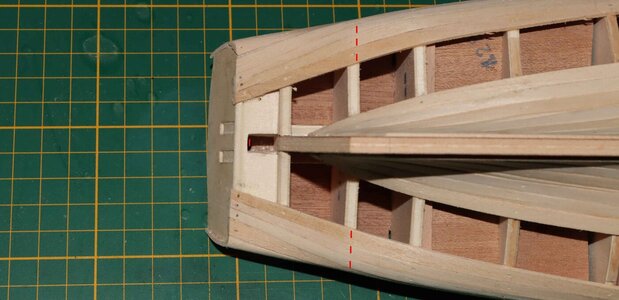
First off, you can see that the Amphion has very much the same curve at the stern as the Syren. Thus ... we are comparing apples to apples.

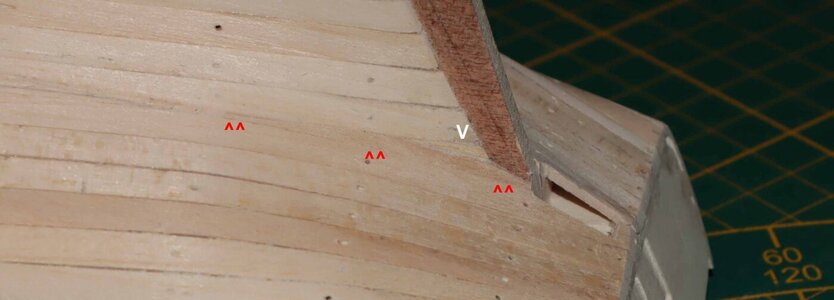
Secondly, just as you would narrow planks at the bow to create a continuous flow, it is sometimes necessary to do it at the stern as well. The red lines indicate from where Piet has started to narrow the planks.

IMG_0003_7023_bewerkt-1.jpg

IMG_0001_7021_bewerkt-1.jpg

Thirdly, after the first 6 planks or so, you also need to start planking from the keel as that also has a major influence on the "line" that you visually see the planks follow. That is why I don't like the "band" or "zone" method - it does not allow for the individual character of each hull.

IMG_0019_7032_bewerkt-1.jpg

Now REMOVE PLANK 8 and place it directly adjacent and butting firmly against Plank #7. After the hull has been closed up, this will be what you will theoretically be left with.

IMG_0004_7047_bewerkt-1.jpg
Then you can pinpoint the exact size and shape of the stealers that you need and insert them.

IMG_0007_7087_bewerkt-1.jpg

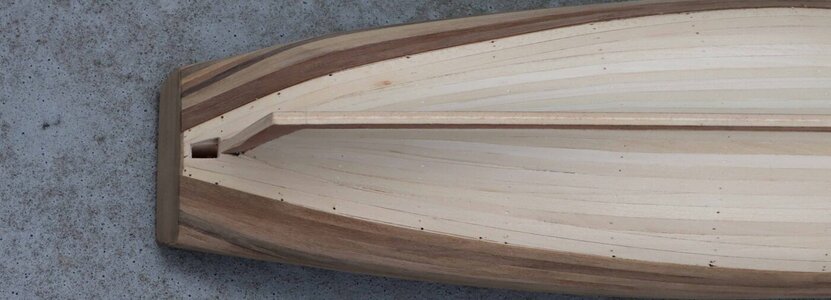
And when all is said and done this is what it should look like. This picture shows the second layer of planking being applied (not applicable in your case, I know) but it does show you the overall effect.

I hope this helps.
 
Hello Heinrich,

Thank you so much for your response and excellent advice. What you say makes a great deal of sense and will certainly ease the roadblock I am facing.

I spent quite some time attempting to follow the “band” method, which had me more confounded as the days went by. Your photos and clear “instructions” provide me with a way forward. Sometimes we don’t see the forest for the trees.

The good news is I only have one plank to remove as well as those now annoying cotton belts.

Thank you for your time and help, it is very much appreciated. I am eager to restart in the morning.

Best wishes,
Roger
 
Just a small update as I see the time between posts increasing a little.

I am continuing the hull planking and gradually closing the gap. I am still cutting my planks to manageable lengths and find it easier for glueing (gluing) and clamping. The disadvantage I find is that some planks tend to lay slightly flatter between bulkheads. As each successive strake is completed there is sometimes a small dip or bump between the bulkhead planks longitudinally. I know these will sand and fill out but it shows me the benefits of POF instead of POB.

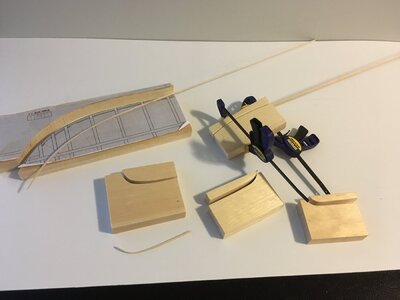
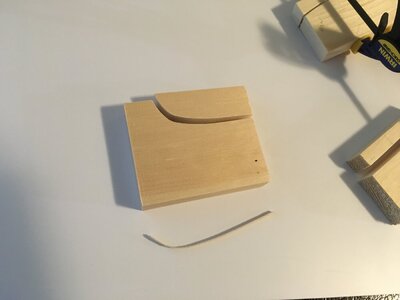
To assist myself in plank bending I am using small lengths of 1/32 x 5/32 basswood to form templates for jigs. After soaking I clamp them to the curved surface of the hull at bow or stern and let dry to shape. Being only 1/32” thick they take the shape easily. Then using them as a template I draw the relevant curves onto pieces of 3/4” pine. Using the bandsaw or scroll saw I cut along the line and end up with two pieces of matching wood. I then soak my actual planks for a couple of hours, lay them between the pieces of cut pine and clamp till dry. They are usually bent to shape enough so that I do not have to steam and bend. I have made a few templates so far, as seen below. Obviously no two planks have consistent bends on each side of the hull but I can get near enough. Time consuming yes, but it works for me. I also have a pile of jigs (templates) for the future or as excellent fire starters :rolleyes:

D1E0C197-360C-4DFD-96BE-748B07813FAE.jpegB4FF38EE-E613-4506-8A47-A21A96E08DC2.jpeg
 
Hi Roger. If I may comment:

You say: " As each successive strake is completed there is sometimes a small dip or bump between the bulkhead planks longitudinally. I know these will sand and fill out but it shows me the benefits of POF instead of POB."

You need to see the bumps and sips as messengers of whistleblowers. The bump tells you that you have taken enough material away from the bulkhead. I.e. you have NOT FAIED IT ENOUGHT.

NOTE: The bump and/or dip does not necessarily occur at the offending bulkhead. That can sometimes happen one. two or even three bulkheads earlier.

Where there is a dip, you have taken too much material away from the bulkhead. I.e. you faired it TOO MUCH. Then you have to glue a thin strip of wood back onto the bulkhead and start the fairing process again.

NOTE: This is why it is always a good idea to run a full-length plank alongside your faired bulkheads to see if it lays completely flat against the bulkheads and if its face is in full contact with the bulkhead.

AS exactly the same process has to be done on a POF hull, I would not say a POF build is superior to a POB one. Start getting into the bread and butter mode, where you fill the spaces between the bulkheads with balsa wood or something similar. Then you can basically plank a solid hull.
 
@Heinrich
Hello Heinrich,

Thanks for your valued input and always constructive comments.

The dips and bumps are few and small but I have found, as planking progresses, that I have to make minor adjustments. A little bulkhead sanding here and a thin strip there, as you suggest. I mutter to myself as I work away that I should have spent more time fairing. I spent quite some time on that part of the build though. I did use a thin full length batten to look for those fairing anomalies but obviously a little more care was needed. I cannot change much at this stage but the relatively thick 1/16” (1.65mm) planks should be somewhat forgiving when I start sanding. Overall I think the hull will be ok but I am quite critical of my own work.

Your suggestion about filling between bulkheads to provide a solid hull arrangement makes sense. It brings up the question though of why we don’t start off with a solid hull in the first case. I have no doubt that debate is as old as model kits :) .

Thanks for your help, always well appreciated.
 
Roger it is great that you are critical of your own work. That is the only way we move forward and develop. I have no doubt that your hull will come out beautifully after sanding. I also know when I see a build and modeller who have huge potential and I believe that I am witnessing such a combination right now. \\As to why we don't start off with a solid hull - well that may be just the way that model building is progressing. If you look at Kris Szkutnik's thread "Hull for Impatient Modellers" (or something to that effect) in the new Kits and Development section, you will see what I mean.
 
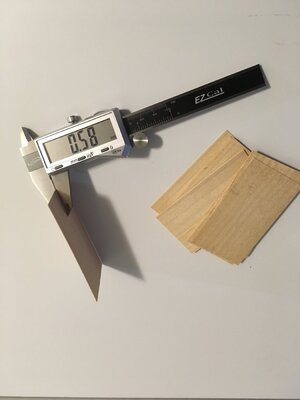
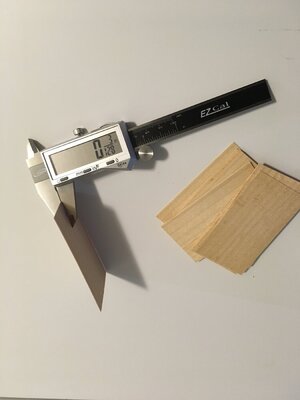
Following on from Heinrich’s advice I thought a product from Lee Valley in Canada may be of use and save some people a little time. These are wood business card veneers at 3/128” or 0.58mm. Yes, we use both measures in Canada!

They bend to shape on a bulkhead and sand very easily to get a smooth transition. A simple product with lots of little uses I find.


1CA2ABC6-7C53-455B-9CF1-2A02442D3C56.jpegBB92982E-1186-43C9-934B-56680DA2AC94.jpeg
 
Time seems to fly by so quickly, it surely must be a function of age or is it panic? :).

I feel I haven’t done much on the Syren in the past ten days or so but I’ve been working away on the hull, slow but steady. By the time I measure, cut, soak, let dry, glue and wait it seems the day disappears. Then of course there is the wifely call “Roger, can you….” :D

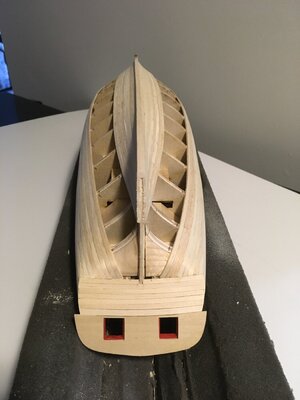
I have continued my efforts at laying realistic plank lengths for each strake. As I said before I am also following a sort of mixed butt pattern. To recap, I am only doing this as a practice exercise knowing it will get covered up with copper plates. Time consuming yes but I am actually learning a lot. I read a lot and follow many of the builds on this site by some very accomplished modellers.

A couple of things that I have learned. Heinrich gave me some advice (see earlier) on how to lay the planks and not get overly befuddled (my expression) on measurements and bands. I am doing that but still find I am measuring the space left to fit my estimate of planks needed. As I “close the gap” I’ll get a better idea but his advice is sound.

The kit is supplied with 1/8” by 1/16” wood for the hull planking. At a scale of 1:64 I can understand that the upper hull planks need to be a realistic 8”, but my goodness does it ever take a long time to plank this hull with those 1/8” strips. Since the hull is copper plated I think if I was to do another similar model I’d exchange and use wider strips for the mid and lower hull to speed up the build.

Continuing on from that, I know kit suppliers must think of cost but basswood is not my favourite wood to work with. I am starting to call it “crumblewood” ;) .

Anyway, a photo of progress. It really isn’t much but it shows other newbie builders that it all takes time. Hopefully I’ll get the hull planked in a week or so. Thanks for following my build.
07E6AE6E-8A8D-4BF3-9842-087ADFF2582B.jpeg
 
Hi Roger. In the final analysis there are only a few things that count. Does the execution look good / does it work / is it correct and functional. On all these counts, your planking is coming along great. I admire the fact that even though the hull will be coppered, you are still trying to plank this layer as if it is the final one. This will stand you in great stead in future and if you ever do a single-layered hull. How long it takes, simply does not count. so enjoy the journey and the process - sometimes destinations are not all that they are made out to be! :)

PS. Also appreciate and treasure the wifely calls - you will be amazed at how empty life becomes without them.
 
Hello again Heinrich,

As always your response, help, advice and support is so welcome. Thank you so much for your comments.

(I know what you mean by your postscript.)
 
Hello Roger,

Your work is first rate - keep at it.

I resonate with your thoughts about how long stuff takes. For myself, it helps if I think along the lines of: I'm getting to spend time on a hobby rather than I'm never going to get this thing done. A round of golf takes 4 hours or more but I rarely think - I wish this part was over - I simply enjoy the activity. The honey-do list is another matter!
 
Hi Paul,

Thanks for your support, it’s people like yourself who make the hobby, through this site, so enjoyable.

I agree with your sentiment that time spent building our models is an enjoyable activity not a race in time. Unless the glue is drying faster than you can position the part :D.

I think this little plaque (an unintended dental pun if ever I saw one) says it all:

D768DA7C-A2B0-45A6-853A-3E8237D6E7F9.jpeg
 
Back
Top