Syren 1803 1:64 Model Shipways

The slow progress continues with accompanying mistakes and attempts at recovery.

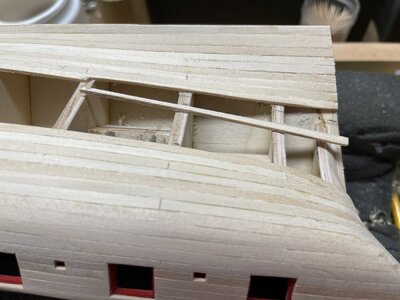
The Syren manual says that the first three strakes against the keel should be the garboard, then two broad strakes. I did this some while back and have since continued with lower hull planking. I laid the next five strakes working up the hull but didn’t really notice a problem developing when that fifth plank aft was glued in position. (Counting up from the keel that would be the eighth plank). There is a small, but to me, noticeable droop as the planks lay at the stern.

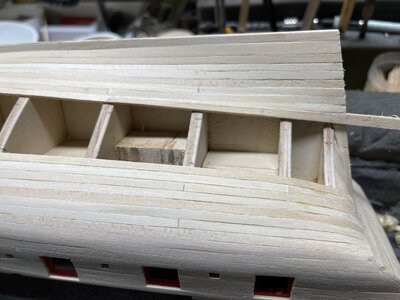
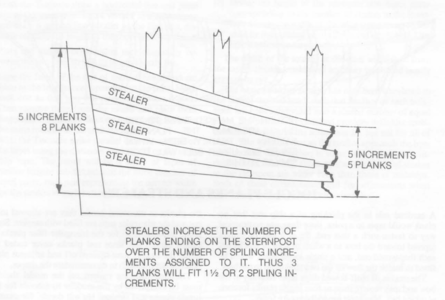
I realised I had to straighten things up. So I temporarily laid the next plank against that fifth one and found a classic wedge shaped gap became evident. As I sighted along the already fitted strakes I could see that I should have used a stealer earlier. Probably around the time I laid the third or fourth line of planks up from the broad strake. Rather than rip off those planks I decided it was time for a stealer and some reading on how to do it. A bit of head scratching and I thought if I increased the size of a stealer to 3/16” at the aft end it might solve my problem. That would be a 12” plank in full scale, which I thought realistic. So I trimmed, I fitted and sanded, and glued my first stealer in place. The stealer and adjacent plank is no less than 50% of plank width. Unfortunately it does have to twist very slightly so I soaked and clamped it to shape first.

Laying a sixth test plank against the stealer it runs fairly but I can see how yet another stealer will be necessary as planking progresses up the hull. So my mistakes? I should have used a stealer earlier. I should have used a full stealer (not sure) instead of a half stealer because I think it might save me some issues later. I should have temporarily laid the two adjacent planks where the stealer was to be fitted, making it far easier to cut the shape out.

The for’d end of my stealer lands on a bulkhead above a previous butt. Would this be done in actual practice?

Yes it will all get covered up but the learning continues….:)

A7A955F6-6173-4ADD-A53E-F395E9D8C5FE.jpeg90F6162A-D2CC-4C31-86BA-44B9B5D3BF37.jpeg
 
Hello, Roger. Yes, the stealers, are very common in real practice, they are not necessary ended on the next but, they may end up on the next farme, thought.

View attachment 255491
Ok, thank you Jim, that helps a lot.
I hadn’t much choice with the butts since the end of the stealer needed to be on a bulkhead. Any shorter and it would have left gaps, any longer to the next bulkhead and it would have been 28 feet long in full scale.
 
No worries there Roger. I think I was more or less in the same position on the Haarlem's hull when I used my one stealer. I would always advise to fit the stealers in such a way that one bulkhead width is spread between the two adjoining planks. That way you ensure that both can be securely fitted to the hull. You are going to have a beautifully planked hull and that is what matters.
 
No worries there Roger. I think I was more or less in the same position on the Haarlem's hull when I used my one stealer. I would always advise to fit the stealers in such a way that one bulkhead width is spread between the two adjoining planks. That way you ensure that both can be securely fitted to the hull. You are going to have a beautifully planked hull and that is what matters.

Hello Heinrich, thanks for your input and generous words about my ongoing hull construction.

I wondered about the stealer and adjacent plank becoming a weak point. Rather than redo it I think I am going to strengthen that area internally. I have some of that stinky 5-minute epoxy on my bench. My thoughts at the moment are to use a small plastic dental applicator, bent to 90 degrees, and “paste” the epoxy where the stealer and adjacent plank meet the bulkhead inside the hull. The mess will not be seen and hopefully provides me the confidence that the planks will not spring off the bulkhead in months or years to come.

I took a look at your truly excellent build log of the Batavia. I chuckled when reading your comments in the early stages (April 28, 2020) of your build. Your comments about the slowness of planking are something I can certainly relate to. As you and others have said though, it is the outcome that is important.
 
Of course you can use the epoxy. Even if it is not really necessary, I will still you advise you to do it. Why? It will put your mind at ease and provide you with the added confidence of going your already-excellent way!
 
With just a few strakes to go on the never ending hull planking process a quick update.

I recently lost a week or so of modelling due to dust and CA glue intake, which was definitely not deliberate! I had spent half a day planking, trimming, sanding, glueing and fitting planks without a mask on. The result was the sniffles, tired eyes and a cough due to a combination of fine dust and CA. I should have known better because now there’s a wifely voice regularly calling out “do you have a mask on?”. Well, halloween is approaching but I know that is not what she meant :)

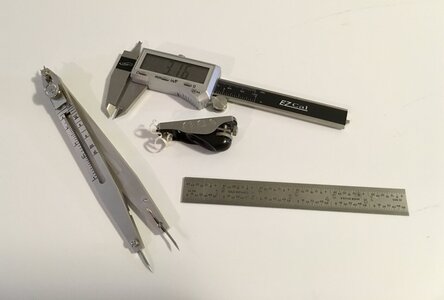
I find the planking very slow because of the way I am approaching it. The constant measuring with little strips of card, to ensure I can get all my plank widths reduced to fit, is a nuisance. After spending some time reading of other methods, on a variety of sites, I decided to buy a proportional divider and try that. What a difference! Once I got used to the instrument it has cut my measuring time in half. Add in a miniature block plane and a fractional caliper to check widths and things are now moving steadily along. So no ship photos for this post, just useful instruments.

Fractional caliper from leevalley.com
Miniature block plane from leevalley.com
Proportional divider from micromark.com
6” steel ruler stolen from wife’s craft box.

47AFB967-D117-4064-9E16-86EF73309A26.jpeg
 
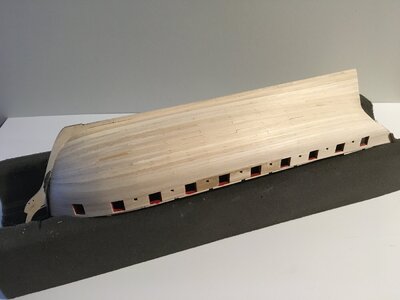
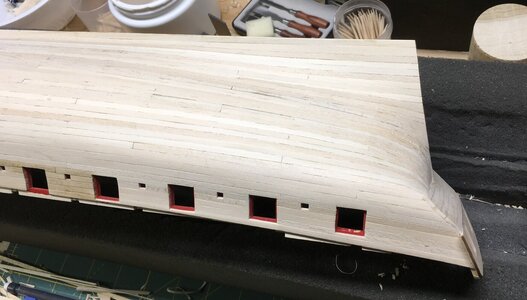
A slow month due to other priorities but the hull planking is now mostly completed. I know that photographs show even the smallest errors but I was surprised to see what appear to be so many tiny gaps in my planking. I tried really hard to get the planking tight. So I held the hull up to a bright light and looked at what I could see of the hull internally. It turns out the apparent gaps are actually where I used CA glue giving small translucent areas between planks. I mentioned before that I have been using carpenters PVA but also spots of CA glue as a form of “tack welding”.

A couple of shots of the hull. Lots of sanding and some filling is now necessary. I think for a first planking filling is normal but I tried really hard to lay the planks as if this was a single layer without the need for too much fill.

I have no doubt many of you have also noticed my really stupid error. The keel extension that supports the stern post is no longer there. I used my tiny hand saw to cut away planks at the stern and without even thinking also cut away the extension. Since the lower hull will be covered in copper plates I can get away with some options:
  • Add a piece to the keel and pin it. Probably a weak point.
  • Use the supplied laser cut stern post but extend it the equivalent amount of the keel. That means adding a piece.
  • Cut a new extended stern post on my scroll saw.
That will be tomorrows decision after I stop cursing. Thanks to you all for following my log, I always appreciate the comments and likes.

2B0812AF-20FC-45A7-BDBE-09C57C2D0403.jpegC2D08D57-1925-4680-ADAD-7F3BADF408C5.jpeg
 
First off, Roger - congratulations on closing up the planking! Thumbsup I hope you had a nice helping of whiskey (or in my case, coffee) when you had finished. That planking looks absolutely perfect for a first layer.

I know that you have said that you really treated it as the only layer (and I know that you did), but if you are going to do a single-layer planked hull for real, there are a few other tips and tricks that you can follow.

I have an absolute aversion to CA glue and during planking, I will not touch the stuff. White PVA glue will always do the trick even though patience is required. Also bear in mind that certain wood-types are not ideal for single-layer planking.
Thanks Heinrich, a little whiskey in a coffee or even a little coffee in a whiskey will work :D

I gained some valuable experience doing this hull but know there’s a lot more to it as the learning continues. So now it’s on to smoothing the hull, filling where necessary, then the wales and stern construction.

I’m also thinking ahead to replacing the basswood decking material for pear. I just have to source a supplier, @Dave Stevens (Lumberyard) possibly?
 
The best pear wood comes from Russia my friend - from Sergey at Bibigon. They are advertisers on our forum. Have a look at @Alexander74 Sasha's build on the HMS Victory - he has just taken delivery of some wood from Bibigon - and you can see what I mean by quality. The downside is that the delivery may take quite some time. If the time factor is a huge issue then - by all means - send Dave a PM.
 
The best pear wood comes from Russia my friend - from Sergey at Bibigon. They are advertisers on our forum. Have a look at @Alexander74 Sasha's build on the HMS Victory - he has just taken delivery of some wood from Bibigon - and you can see what I mean by quality. The downside is that the delivery may take quite some time. If the time factor is a huge issue then - by all means - send Dave a PM.
I ordered some boxwood and black hornbeam from Sergey last summer. It took only 3 weeks from placing the order to receiving the package in Canada. More than reasonable time and quality is outstanding.
 
I ordered some boxwood and black hornbeam from Sergey last summer. It took only 3 weeks from placing the order to receiving the package in Canada. More than reasonable time and quality is outstanding.
@Gennaro or @Heinrich I see his link on this site is to email. Does he send a list of prices, types of wood etc when you contact him?
Thanks.
 
The best pear wood comes from Russia my friend - from Sergey at Bibigon. They are advertisers on our forum. Have a look at @Alexander74 Sasha's build on the HMS Victory - he has just taken delivery of some wood from Bibigon - and you can see what I mean by quality. The downside is that the delivery may take quite some time. If the time factor is a huge issue then - by all means - send Dave a PM.
Thanks again Heinrich. I just checked out @Alexander74 Sasha's log and the pear does indeed look great.
 
@Gennaro or @Heinrich I see his link on this site is to email. Does he send a list of prices, types of wood etc when you contact him?
Thanks.
Contact him via message ('conversations') on the SoS site. He is very prompt to reply (less than 24 hours). Describe what you are looking for and he will send prices. Noteworthy will be the shipping costs.
 
Back
Top