Syren 1803 1:64 Model Shipways

Brilliant Roger! Problem solving lies at the heart of our work. And all this without a power tool!
hey, don't knock power tools. they are the bread and butter of my world. better stronger faster- queue theme from 6 million dollar man. lol

but seriously, i think it's a personal preference. I love power tools so I try to use them as much as possible.
 
Hi Roger. It is great to see you back, I have never used Cedar or Boxwood so I cannot help you there. For deck planking you can obviously use Pear while Maple and Beech are popular as well. Holly makes for a beautiful deck as well. Check out the Abachi that I used on my Willem Barentsz. It has a yellowy color, is rich in texture and very easy to work with.
 
Hi Roger. It is great to see you back, I have never used Cedar or Boxwood so I cannot help you there. For deck planking you can obviously use Pear while Maple and Beech are popular as well. Holly makes for a beautiful deck as well. Check out the Abachi that I used on my Willem Barentsz. It has a yellowy color, is rich in texture and very easy to work with.
Thanks Heinrich, I am shortly going to be able to start actual building again. Yes, I was checking out your already impressive WB build yesterday and the Abachi does look good.

I had read somewhere that boxwood can burn somewhat if dull equipment is used, which makes sense but I think that is operator error too with the small but thin saw blades. Looking at wood colours I think pear might suit the Syren decking and at the moment it’s easier for me to source.

I don’t have any yellow cedar so cannot test acrylics but I was hoping someone might be able to tell me if painting that wood is an issue. I have it in my head it’s an oily wood but maybe I misread that somewhere.

Thanks for your valued input.
 
I am going to replace some of the basswood (crumblewood :D) on my Syren build. I’d like to use a better quality wood.

I am considering either boxwood or swiss pear for the decking. I also want to replace the inner bulwark planking. However, I feel it a waste to use the boxwood or pear on the bulwarks because they will be painted that reddish colour. So I am thinking of yellow cedar for that area. The supplied basswood just does not paint well.

The cedar comes in a lot cheaper but I have never used it before in model making. I will be using Vallejo acrylics for the paintwork. I might be wrong but I believe yellow cedar is a little oily? Does anyone know if acrylic paint “takes” well on yellow cedar?

Thanks for any help, comments and advice.
Roger,
I've never tried to paint alaskan yellow cedar, but I've seen beautiful models made of it and painted. Passaro has built a particularly nice one (HMS Winchelsea) - take a look: https://syrenshipmodelcompany.com/hms-winchelsea-1764.php
 
Roger,
I've never tried to paint alaskan yellow cedar, but I've seen beautiful models made of it and painted. Passaro has built a particularly nice one (HMS Winchelsea) - take a look: https://syrenshipmodelcompany.com/hms-winchelsea-1764.php
Thanks Gennaro, that is the confirmation I needed. I'll get a sheet or two to try out some test planks for those bulwarks. Definitely going with pear for the deck planking though but Heinrich's Abachi is now noted for a future build.
 
Hi Jack, the kit wood is mostly basswood. I find it doesn’t hold an edge well, especially trying to get good cuts around the gun ports. It dents easily, sands somewhat rough and is a pain for painting. It sounds as though I don’t like the kit but, except for the wood, overall the kit is excellent. The included instruction manual is a pleasure to follow.

I used the supplied basswood for the hull and struggled with it. The hull will mostly be covered with copper plates and black paint so no major issues really. However, for the deck planking and bulwarks I want to try different woods. It will be a good learning exercise for me but there is, of course, extra cost. I guess that means smaller Christmas gifts for my wife (oh I forgot, jewellery fits in smaller packages :D ).
 
Last edited:
Hi Jack, the kit wood is mostly basswood. I find it doesn’t hold an edge well, especially trying to get good cuts around the gun ports. It dents easily, sands somewhat rough and is a pain for painting. It sounds as though I don’t like the kit but, except for the wood, overall the kit is excellent. The included instruction manual, written by Chuck Passaro, is a pleasure to follow.

I used the supplied basswood for the hull and struggled with it. The hull will mostly be covered with copper plates and black paint so no major issues really. However, for the deck planking and bulwarks I want to try different woods. It will be a good learning exercise for me but there is, of course, extra cost. I guess that means smaller Christmas gifts for my wife (oh I forgot, jewellery fits in smaller packages :D ).
All good reasons to change to a better quality wood. Thanks for the information. About the wife issue, you are on your own sir. I have to "justify" that I bought a new boat last month. lol
 
It makes sense and saves some money. Just remember, a LOT of your wood turns into sawdust. The kerf width of the sawblade determines how much....do you have a bandsaw too?
Hi Phil, thanks for your timely advice. I did measure the blade kerf width and calculated out the approximate loss due to cutting the strips. Then calculated how many strips I’d get and then priced what those same ones would cost if I purchased them already milled. I reckon I can save roughly 30% by doing my own. There’s also the fun of doing them myself and getting to play with the wood.

I do have a bandsaw, it’s a 10” Rikon. I was thinking of using that to reduce larger billets to smaller sizes, then the Byrnes for final strips. Sanding the saw marks away for model ship planking would then possibly be an issue. Of course a Byrnes sander would solve that but I think my allowance this decade is used up :) .
I guess it may depend somewhat on what you are trying to do. Strips? Resawing? A bandsaw is best for it. And there is a plethora of resaw blades. And they typically have a thinner kerf. Bandsaws are used for sawing veneers. (I have a Proxxon tablesaw with tiny 3" blades I use for cutting stock for grates). Since I have a full woodshop, I can create any size or cut I want but keeping in mind, lumber prices have gone through the roof.
 
I guess it may depend somewhat on what you are trying to do. Strips? Resawing? A bandsaw is best for it. And there is a plethora of resaw blades. And they typically have a thinner kerf. Bandsaws are used for sawing veneers. (I have a Proxxon tablesaw with tiny 3" blades I use for cutting stock for grates). Since I have a full woodshop, I can create any size or cut I want but keeping in mind, lumber prices have gone through the roof.
I use my bandsaw for quite a few different projects, including intarsia. I used to make toys for kids and had a Laguna quite some years back. I also used that bandsaw for making large piece jigsaws for handicap children. Each piece had a little knob on it so the kids could grip it easier. All that was quite a long time ago but good memories.
 
I decided to go with two battens each side giving me three planking belts. I tried using the wood 1/16” battens I cut two days ago but trying to pin them into plywood bulkheads was awkward. I found the pins would not hold well, especially as I had to keep adjusting the lay of the battens. So I resorted to black cotton and masking tape after all. With patience it has worked reasonably well.
I divided up the midships frame into three equal parts and laid the first cotton batten at the lower point mark. Then ran the cotton to the stern post at the 1/3rd mark as well. For’d I let it run in a fair line to the rabbet. Then the tweaking started. That’s when my wife called out and asked what I was doing, “tweaking”, I said. There was just silence from upstairs :D

Back to tweaking. The lay of that lower cotton batten just didn’t look right so I kept adjusting it and actually ended up dropping the lower midships mark. By luck the measurement at that point gives me seven 1/8” (3.21mm) planks. More tweaking and adjustments and I think it’s ok. Since I knew I needed 23 planks that meant 16 to fit in the two top belts. I marked the middle point on the midships frame and ran the cotton aft to the other 1/3rd upper mark on the counter/stern post. More tweaking and so on and after a while I think I have a reasonable looking run.

I took a couple of photos but the lens angle doesn’t show the lines of the cotton too well. The result is three belts. At the midships frame the lower is 7 planks, then the upper two, 8 planks each. Aft will require stealers unless I increase the plank widths but then I’m into a different problem. For’d along the rabbet I have for the top belt 12.56mm for 8 planks gives me 1.57mm for each plank end taper. The middle belt is 16.40mm for 8 planks giving 2.05mm. The bottom belt works out at 16.84 for 7 planks, taper of 2.41mm each. The tapering for’d to all those dimensions still keeps me within the “no less than 50%” of the plank width rule. Therefore avoiding pointy ends.

This is my first attempt at laying belts. Different sources give different methods of doing it but I think I have it basically correct. I hope so anyway. I might be seriously overthinking this!

Can anyone see any glaring errors or future problems in my method?

Thanks.

View attachment 240853View attachment 240854View attachment 240855
Awesome planking thus far. Single layer planking Is daunting- never tried but know what I did on my first layer;)
 
The slow progress continues with accompanying mistakes and attempts at recovery.

The Syren manual says that the first three strakes against the keel should be the garboard, then two broad strakes. I did this some while back and have since continued with lower hull planking. I laid the next five strakes working up the hull but didn’t really notice a problem developing when that fifth plank aft was glued in position. (Counting up from the keel that would be the eighth plank). There is a small, but to me, noticeable droop as the planks lay at the stern.

I realised I had to straighten things up. So I temporarily laid the next plank against that fifth one and found a classic wedge shaped gap became evident. As I sighted along the already fitted strakes I could see that I should have used a stealer earlier. Probably around the time I laid the third or fourth line of planks up from the broad strake. Rather than rip off those planks I decided it was time for a stealer and some reading on how to do it. A bit of head scratching and I thought if I increased the size of a stealer to 3/16” at the aft end it might solve my problem. That would be a 12” plank in full scale, which I thought realistic. So I trimmed, I fitted and sanded, and glued my first stealer in place. The stealer and adjacent plank is no less than 50% of plank width. Unfortunately it does have to twist very slightly so I soaked and clamped it to shape first.

Laying a sixth test plank against the stealer it runs fairly but I can see how yet another stealer will be necessary as planking progresses up the hull. So my mistakes? I should have used a stealer earlier. I should have used a full stealer (not sure) instead of a half stealer because I think it might save me some issues later. I should have temporarily laid the two adjacent planks where the stealer was to be fitted, making it far easier to cut the shape out.

The for’d end of my stealer lands on a bulkhead above a previous butt. Would this be done in actual practice?

Yes it will all get covered up but the learning continues….:)

View attachment 255489View attachment 255490
Awesome
 
Hi Grant, thanks for your encouraging words.
Doing the hull as though it would be a single layer gained me some valuable experience but, as mentioned before, it mostly gets covered up.
 
As the dust free environment ban for me continues I needed a project today to keep me building for the short term but without sanding etc. Looking ahead for my build I decided to try my hand at making trunnels (treenails) for the first time.

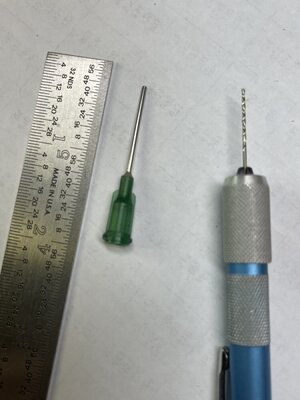
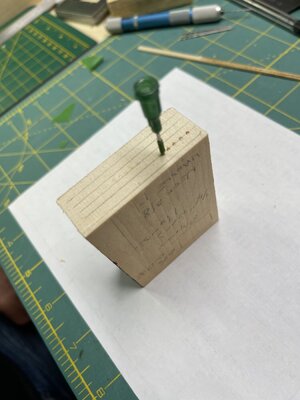
I initially split lengths of bamboo skewers and pulled pieces through a drawplate, but what a tedious chore that was with multiple splinters in my fingers. Then I tried a method Bernard Frolich suggests in his book “The Art of Ship Modeling”. An interesting method but I couldn’t see the tiny “wedges” too well plus they were not consistent. Then on to a variation of another method I had seen, on different model making sites, using a sharpened syringe needle in a drill press.

I hunted around my little work space and found a hollow but blunt glue “needle” I have had for years.

679F6CFB-7A0D-4502-BB41-7BF3ACA2F110.jpeg


1C9A3A68-8D03-43CB-BD83-F30138C71C87.jpegEE47E0E5-3704-4395-A873-85E66D63E1E7.jpeg

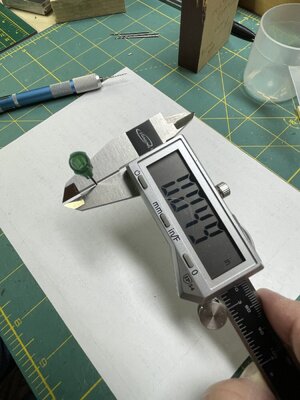
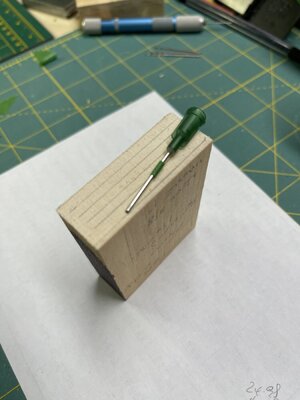
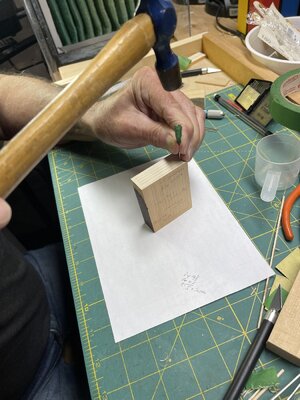
I sharpened the end a little and using a small hammer drove the needle carefully into pine end grain. It went in straight and looked like it might work. The photo sequence shows the method I used - hit it with a hammer :D. Well gentle taps really but it drove in solidly.

36B06E26-904C-4A64-A144-ACB2F982A649.jpeg6AD4B8EA-DB38-4904-AF4D-510F1FA44E96.jpeg

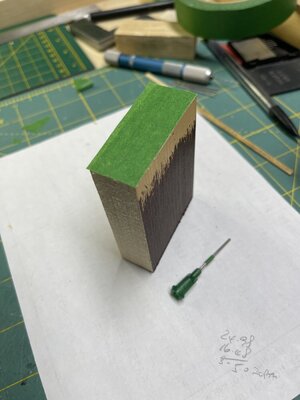
Lots of trial and error and eventually I found a depth I could drive the needle into the end grain without bending the shaft. I marked the needle with masking tape as a depth stop because I needed to know where to the cut the block on the bandsaw. When I used the bandsaw I covered the end of the block of wood with tape to stop the trunnels disappearing into the lower reaches of the bandsaw bilges.

7CD7C163-2401-4334-93A7-1DEC0F036194.jpeg

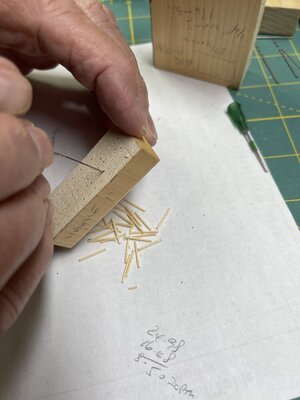
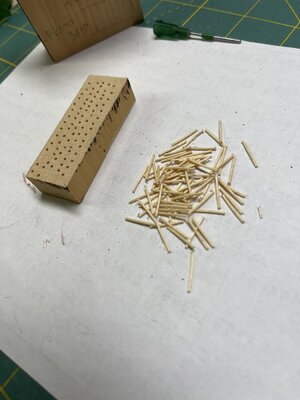
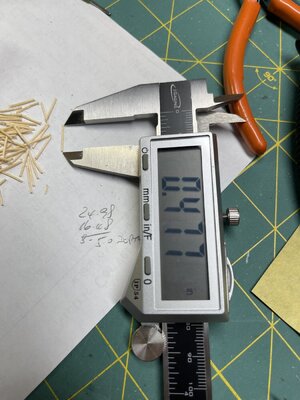
I think the photos are self explanatory, I can get about three trunnels from each piece of wood so in this case I get about 240 or so when I cut them. They measure at about 2” diameter real size, which I think is realistic. I have yet to stain and practice on a piece of spare hull planking to see the outcome. If it doesn’t work then at least it was a fun experiment.

B2B2D7F5-D6F8-468B-86E8-A51FE417A98C.jpeg6704A665-BF32-4A5C-AF97-8ECEBC55357D.jpegEA145703-749D-4D2E-8A8D-37C1E5049666.jpeg9A37C9F1-E0BD-4B70-AF24-2EE156679541.jpegC6F72F3B-AFD2-4EF6-9E43-0A15E4E20506.jpeg

I have another eye surgery on the other eye soon so again it’s slow delayed frustrating progress for a few weeks.

I keep saying “aye aye” to my wife but she doesn’t think it funny :cool: .
 
That is a very good way of creating real treenails instead of simulations. If my memory serves me correctly @Ondras71 Ondras uses a very similar method on his superb build of the Roter Lowe.

 
That is a very good way of creating real treenails instead of simulations. If my memory serves me correctly @Ondras71 Ondras uses a very similar method on his superb build of the Roter Lowe.

Thanks Heinrich, I hadn’t seen his build before but saw other similar treenail concepts before attempting this myself. I find it a great time saver and it just shows how the exchange of ideas from experienced modellers is so helpful to some of us lesser mortals :).
 
As the dust free environment ban for me continues I needed a project today to keep me building for the short term but without sanding etc. Looking ahead for my build I decided to try my hand at making trunnels (treenails) for the first time.

I initially split lengths of bamboo skewers and pulled pieces through a drawplate, but what a tedious chore that was with multiple splinters in my fingers. Then I tried a method Bernard Frolich suggests in his book “The Art of Ship Modeling”. An interesting method but I couldn’t see the tiny “wedges” too well plus they were not consistent. Then on to a variation of another method I had seen, on different model making sites, using a sharpened syringe needle in a drill press.

I hunted around my little work space and found a hollow but blunt glue “needle” I have had for years.

View attachment 273212


View attachment 273214View attachment 273215

I sharpened the end a little and using a small hammer drove the needle carefully into pine end grain. It went in straight and looked like it might work. The photo sequence shows the method I used - hit it with a hammer :D. Well gentle taps really but it drove in solidly.

View attachment 273220View attachment 273221

Lots of trial and error and eventually I found a depth I could drive the needle into the end grain without bending the shaft. I marked the needle with masking tape as a depth stop because I needed to know where to the cut the block on the bandsaw. When I used the bandsaw I covered the end of the block of wood with tape to stop the trunnels disappearing into the lower reaches of the bandsaw bilges.

View attachment 273222

I think the photos are self explanatory, I can get about three trunnels from each piece of wood so in this case I get about 240 or so when I cut them. They measure at about 2” diameter real size, which I think is realistic. I have yet to stain and practice on a piece of spare hull planking to see the outcome. If it doesn’t work then at least it was a fun experiment.

View attachment 273223View attachment 273224View attachment 273225View attachment 273226View attachment 273227

I have another eye surgery on the other eye soon so again it’s slow delayed frustrating progress for a few weeks.

I keep saying “aye aye” to my wife but she doesn’t think it funny :cool: .
Hi Roger. That is good to know and great work .As you say the sharing of these ideas is a really good way to learn new techniques. Aye aye Captain....so funny can’t stop laughing ROTF.All the best with your next surgery.
 
Back
Top