Thank you, Peter.That is looking very beautiful, Daniel. A nice deep blue paint.
Regards, Peter
-

Win a Free Custom Engraved Brass Coin!!!
As a way to introduce our brass coins to the community, we will raffle off a free coin during the month of August. Follow link ABOVE for instructions for entering.
-

PRE-ORDER SHIPS IN SCALE TODAY!
The beloved Ships in Scale Magazine is back and charting a new course for 2026!
Discover new skills, new techniques, and new inspirations in every issue.
NOTE THAT OUR FIRST ISSUE WILL BE JAN/FEB 2026
- Home
- Forums
- Ships of Scale Group Builds and Projects
- Bluenose PoF Group Build
- Bluenose Group Build Logs
You are using an out of date browser. It may not display this or other websites correctly.
You should upgrade or use an alternative browser.
You should upgrade or use an alternative browser.
The Schooner Bluenose 1921, POF Yuanqing Models 1:72 [COMPLETED BUILD]
Success!
Thank you, Paul and Dom.Magnifique cette coque ! Je suis très inspiré
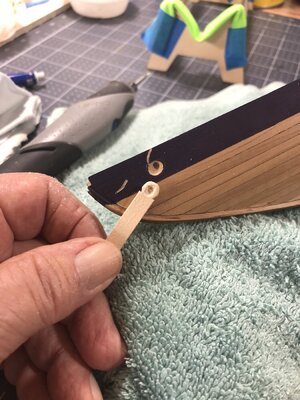
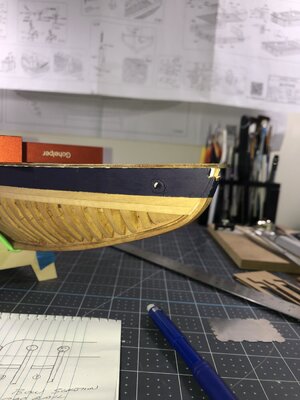
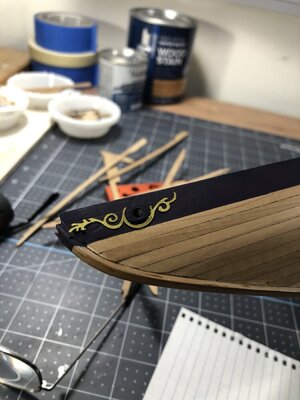
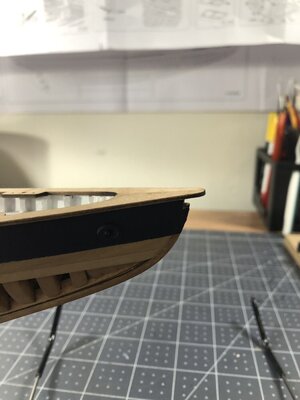
Hello again, I have a little more progress developing the Haws holes in the bow nose. There are some really fine examples on this forum and mine look rather bland in comparison, but they will work. I should have installed them prior to the dark blue paint, had a lot of touch up to do around the holes. The idea was to achieve the oval shape and with my awful carving skills this is the result. If someone wants to shame me into doing a better job, I may consider it.
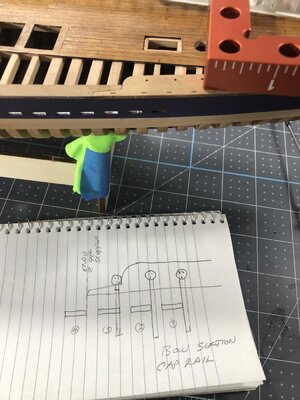
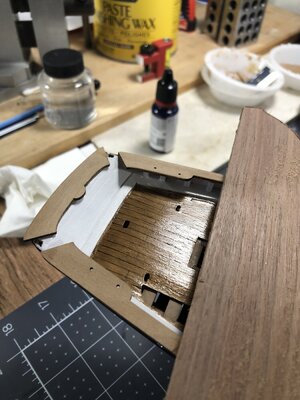
Next up I spent quite some time trying to dry fit the rail cap boards and realized there is only one position which will afford the shroud strap assemblies to miss the drain scuppers (except for one). I believe the 1:1 plans are incorrect on this but my solution will work. When this situation is combined with my slightly longer hull, I will have to insert an extension piece on each side at 7mm each. I will do this on the rear rail caps in the narrow section just before it widens out
at the aft piece. All of the main mast shroud straps will miss the drain scuppers. This adjustment will allow for at least a 1 to 2 mm cap rail overhang.
For all of you BN builders out there who had a perfect build without adjustments, my hat is off to you.
Till next time.


Next up I spent quite some time trying to dry fit the rail cap boards and realized there is only one position which will afford the shroud strap assemblies to miss the drain scuppers (except for one). I believe the 1:1 plans are incorrect on this but my solution will work. When this situation is combined with my slightly longer hull, I will have to insert an extension piece on each side at 7mm each. I will do this on the rear rail caps in the narrow section just before it widens out
at the aft piece. All of the main mast shroud straps will miss the drain scuppers. This adjustment will allow for at least a 1 to 2 mm cap rail overhang.


For all of you BN builders out there who had a perfect build without adjustments, my hat is off to you.
Till next time.
Beautiful job Daniel! The white line will make it pop, which can be coated with clear on it and above and below to seal it into place. 
Hawse holes look fine Daniel, especially after paint. The only improvement would be to use a rat tail file and as you spin it in the hole, start to angle it towards the long side of the ellipse on both sides so you end up with an equal width surround on all sides. Hope that makes sense. 
Thanks Dean, another great tip I shall apply. A thinner more equal looking flange around the Hawse holes.Hawse holes look fine Daniel, especially after paint. The only improvement would be to use a rat tail file and as you spin it in the hole, start to angle it towards the long side of the ellipse on both sides so you end up with an equal width surround on all sides. Hope that makes sense.
- Joined
- Sep 3, 2021
- Messages
- 5,198
- Points
- 738

Awesome looking dark blue paint! IMHO spot on.Well its Friday and I am excited to post success with the midnight blue accent hull painting Whew!!
I started with the masking proceedure and remembered something Dean @Dean62 told me a long time ago to seal off your masking tape to prevent underruns. So I mixed a small batch of 50% water, 50% clear poly and painted a thin line along the masking line which acts as a seal, it worked perfectly!
View attachment 383454View attachment 383455
Being concerned with brush marks I mixed the paint at 11:1, 11 drops of paint and 1 drop of water. I hit it just right the first time and after two coats with very little or no brush marks here are the results.
View attachment 383456View attachment 383457View attachment 383458View attachment 383459
A major concern put to rest so now just need to place the 1/16" pin stripe tape I bought which I think will be a little more forgiving since I should be able to manipulate it into place.
Hope you enjoy and have a great weekend.
For the pinstripe: mark the waterline with a pencil and you'll be showing a very crisp waterline in no time.
- Joined
- Sep 3, 2021
- Messages
- 5,198
- Points
- 738

Be aware, the chainplates, going through those tiny slotted holes, will cover (part) some of the scuppers.Next up I spent quite some time trying to dry fit the rail cap boards and realized there is only one position which will afford the shroud strap assemblies to miss the drain scuppers (except for one). I believe the 1:1 plans are incorrect on this but my solution will work. When this situation is combined with my slightly longer hull, I will have to insert an extension piece on each side at 7mm each. I will do this on the rear rail caps in the narrow section just before it widens out
at the aft piece. All of the main mast shroud straps will miss the drain scuppers. This adjustment will allow for at least a 1 to 2 mm cap rail overhang.
Make use of these slotted holes when aligning your rails relative to the hull and to one another (main mast chain plates). I used some strips of copper with the same width and thickness as the chainplates to align the railing parts.
- Joined
- Sep 3, 2021
- Messages
- 5,198
- Points
- 738

Hey Dan, when you aim for a 2mm overhang on your rails, you might want to have a look at the overhang at the bow; if you want, you could reduce that overhang also to 2mm, giving you less issues with your longer than nominal hull.This adjustment will allow for at least a 1 to 2 mm cap rail overhang.
View attachment 383680View attachment 383681View attachment 383682
For all of you BN builders out there who had a perfect build without adjustments, my hat is off to you.
Till next time.
PS: I also had to modify my railings...

I'm glad you brought this up Johan, your right I do have too much overhang at the bow which at first, I thought was necessary to miss all but one scupper. I've since studied photos of the BN II which clearly shows some of bands partially covering some the scuppers. Because of this I will reduce the bow overhang which will reduce the filler length required on the cap rail. I'll do another dry fit to determine a best fit scenario. Also, great idea about making a couple dummy straps to hang down while dry fitting an alignment, thanks.Hey Dan, when you aim for a 2mm overhang on your rails, you might want to have a look at the overhang at the bow; if you want, you could reduce that overhang also to 2mm, giving you less issues with your longer than nominal hull.
PS: I also had to modify my railings...
- Joined
- Sep 3, 2021
- Messages
- 5,198
- Points
- 738

You’re welcome!I'm glad you brought this up Johan, your right I do have too much overhang at the bow which at first, I thought was necessary to miss all but one scupper. I've since studied photos of the BN II which clearly shows some of bands partially covering some the scuppers. Because of this I will reduce the bow overhang which will reduce the filler length required on the cap rail. I'll do another dry fit to determine a best fit scenario. Also, great idea about making a couple dummy straps to hang down while dry fitting an alignment, thanks.
Here is a quick hawsehole update. Using @Dean62, Deans suggestions with the rat tail file, I modified the hawseholes as shown. Also, for better contrast I made a gray paint by mixing black and white and painted the inside of the pipes which I think presents fairly well. The port side photo is a bit closer in than the starbord. They both look better from a standard viewing distance.
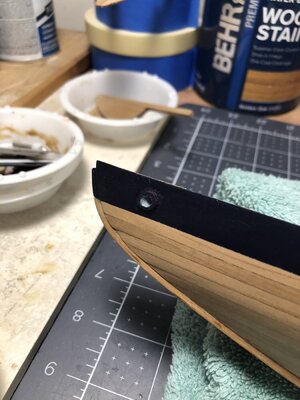
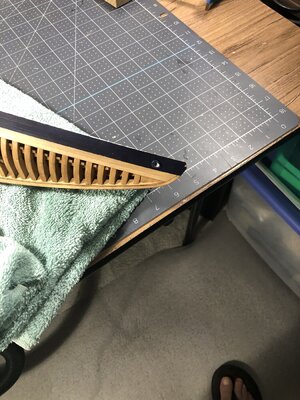
I noticed how easily the dark blue paint would peel off from the poly undercoating so I overcoated it with matte finish poly and now it is quite durable.
Till next time.


I noticed how easily the dark blue paint would peel off from the poly undercoating so I overcoated it with matte finish poly and now it is quite durable.
Till next time.
- Joined
- Sep 3, 2021
- Messages
- 5,198
- Points
- 738

Those hawseholes separates the men from the boys...Here is a quick hawsehole update. Using @Dean62, Deans suggestions with the rat tail file, I modified the hawseholes as shown. Also, for better contrast I made a gray paint by mixing black and white and painted the inside of the pipes which I think presents fairly well. The port side photo is a bit closer in than the starbord. They both look better from a standard viewing distance.
View attachment 383856View attachment 383854
I noticed how easily the dark blue paint would peel off from the poly undercoating so I overcoated it with matte finish poly and now it is quite durable.
Till next time.
The hawse holes looks now very fine, Daniel. You have managed Dean’s suggestion very well. And the gray inside gives them the needed spot view.Here is a quick hawsehole update. Using @Dean62, Deans suggestions with the rat tail file, I modified the hawseholes as shown. Also, for better contrast I made a gray paint by mixing black and white and painted the inside of the pipes which I think presents fairly well. The port side photo is a bit closer in than the starbord. They both look better from a standard viewing distance.
View attachment 383856View attachment 383854
I noticed how easily the dark blue paint would peel off from the poly undercoating so I overcoated it with matte finish poly and now it is quite durable.
Till next time.
About the railing: don’t hang to much on that 2 mm. It’s more everywhere the same distance of overhang. The chainplates are leading because they have to come flat to the hull. And at the bow and stern: there they must be in ‘eyeview balance’ with the rest.
Take your time for this, measure and fit over and over, it’s a big ‘spot-on’ part. But I am sure you will fix this!
I replaced it 3 times before my eyes say yes.
Regards, Peter
Thank you, Peter.That dark blue really pops in contrast with the pearwood. Great job Daniel.
Thank you very much Johan.Those hawseholes separates the men from the boys...
Indeed, it is Peter. The openings in the cap rail for the straps dictate the amount of overhang at least at the shroud locations. I shall study on this until a practical solution can be reached that accommodates at least the important parameters.Take your time for this, measure and fit over and over, it’s a big ‘spot-on’ part.
- Joined
- Sep 3, 2021
- Messages
- 5,198
- Points
- 738

I used those slotted holes with the copper strips inserted through them to locate the fwd rails against the hull, thus determining the offset of the rail and fiddled around with the offset at the bow to be give or take 2mm. Once satisfied, I installed the aft rails, using the same copper strap-method. These two rails did require trimming/adjustment though in order to make the stern piece fit properly. The monkey rails are much the same; use the slots with straps to locate against the skin ánd to locate the monkey rail in fwd/aft direction, relative to the earlier installed aft rails. Like @Peter Voogt said, take your time to ensure everything sits "right" before applying any adhesive.Indeed, it is Peter. The openings in the cap rail for the straps dictate the amount of overhang at least at the shroud locations. I shall study on this until a practical solution can be reached that accommodates at least the important parameters.


