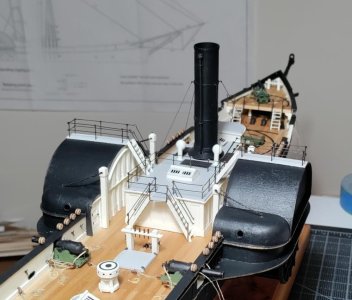
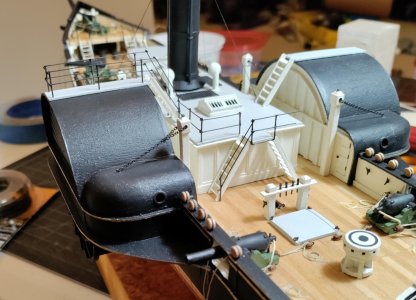
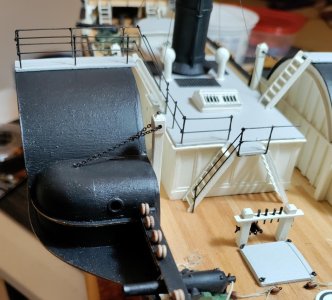
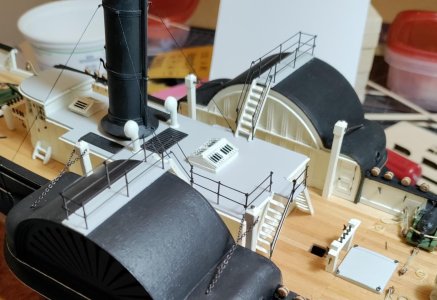
USRC Harriet Lane Model Shipways 1:96 scale circa 1863

Thanks for the info. I Have a hardback copy of the 1866 Naval Ordnance Manual. (A University of Michigan reprint, much better than the usual overseas efforts) I’ll see what it says. Many years ago, I began a series of warships boats of different periods all built to 1:32 scale. Over the years I finished three examples: an early Eighteenth Century Royal Navy Longboat, a US Navy Standard 40ft Steam Cutter (1900), and a late 1930’s US Navy 26ft Motor Whale Boat. If I live long enough, my fourth model in the series will be a Civil War era US Navy Launch in diorama setting; ship’s deck and Dahlgren Boat Howitzer on a field carriage. All models in this series include one or more 54 mm painted naval figures, so far standing on the nameplate. These are painted by me from kits. Otherwise, the models are entirely scratch built.

Roger
Please! Post pics!
 
A PDF of the 66 manual is at:
You can search it for 'carriage' or 'olive'
On page 88 you'll find; "scraping and staining gun-carriages, or keeping them bright, is prohibited. They should be kept well painted."
There wasn't much else painted olive on board ship, but there was plenty painted black or white. While on station, if there wasn't sufficient olive to be had, it's easy to imagine them switching to black.
Harriett was reconditioned and received her final armament at the major Naval depot at Norfolk/Gosport where I'll wager getting the "prescribed" paint wasn't an issue ~ to bring the conversation back to the thread's theme ;)
 
Last edited:
Just catching up Chuck, this is really taking shape very nicely! I like this ship, very unique and interesting. Look forward to the completion.
Dean! Thank you for catching up on my build and the kind words! I feel the same way :p. Getting there. I think it will be December or early January. There are a lot of things that my Admiral wants me to take care of at Shangri-la when Christmas break comes. But I think I can do it.

Right now, I'm in a hotel room in Brooklyn supervising 8 law students who I have been training in the noble art of trial advocacy for 10 weeks. We have an advocacy competition staring tomorrow. In short, I'm exhausted. But your post gave just enough of a boost . . .

Blessings.
Chuck
 
Last edited:
What ho, shipmates!

Now that I got the ladders built and installed, it was time to move to the next daunting project - railings. The kit comes with brass PE that probably looks great in the hands of a skilled modeler, who knows how to work with delicate large pieces of PE and who has all of their fingers. I don't have any of those qualifications. Moreover, I needed railings for the raised foredeck which don't come with the kit. Double moreover, I changed the heights of objects such that the kit supplied railings no longer fit at all.:eek:

Also - the instructions explicitly direct the builder to leave the railings until you've rigged the ship. Because my rigging plans are meant to show significantly more detail than the kit calls for, I decided to do it now. Also - there would be no way for me to install the railings once the ship has her masts and rigging complete. When I post about the aft railing project you'll see what I mean.

Background - I knew I would have to make railings when I decided to emulate Pete Gutterman's Harriet Lane build. I even sourced a soldering set, rosin and flux. The closest experience I have to soldering is sweating copper plumbing. I thought the experience would transfer. It didn't. The missing fingers turn out to be a bit of a problem when I'm working very small. Moreover, based on my attempts, I concluded that annealed steel wire cannot be soldered. At least I couldn't do it. Any experts out there - please school me.

As we all know, there's always another way! Enter Gorilla Gel super glue. This man's best friend.

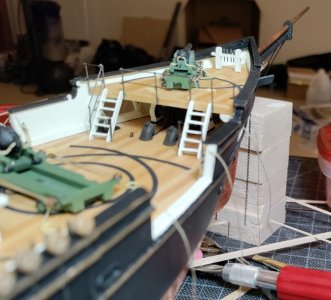
Here are some shots of the fore deck railings. I used 24 gauge annealed steel wire for the posts and 28 gauge for the rails. The scale height of the railing is 3.5 feet. I think I measured the kit supplied railing for that dimension. You may notice this, but just in case you don't I'll make it clear. I worked from left to right with the bow pointed away from me. The work on the left is less proficient than the work on the right - I was literally learning as I went along.

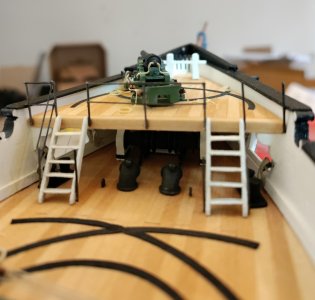
In this pic, I had most of the railing done and I discovered that I needed to do the ladder railing from left to right as I was doing the upper railing - the space was too small for me to treat the ladder railing as a separate process. What you don't see is how many times I knocked the center railings off the posts and had to reglue them.

Forward railing 1.jpg

Better shot. I thought of putting the posts into the deck, but I was too worried about messing up the deck to drill holes in it. I couldn't imagine having to redo the whole foredeck. So, I CAd the posts to the aft end of the deck. In person the glue looks more like a bracket that holds the posts.

Forward railing 2.jpg

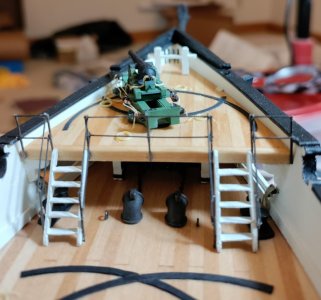
Finished. It is a bit fragile held together with only super glue. I thought about this for a day or so and decided to use some Titebond 2 to make it look like the parts are welded together with the added benefit of stiffening the structure. It worked. Hopefully, I'll be able to post about the more complicated project of the aft railings this weekend and you'll be able to see what I did.

Forward railing 3.jpg

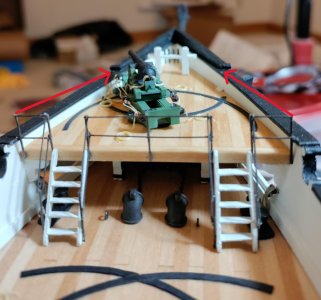
I was left with a question in my mind. Did I need to extend the railing's forward at the bulwarks for the safety of the gun crew and hands working on that deck?
I'm sure that I will, but I'd appreciate your thoughts. Here's a pic to help you help me. Also, if you really want to help me send me a pic of a Civil War era ship with this kind of railing. I'll be doing research too;)

Forward railing 3a.jpg


Blessings.
Chuck
 
Last edited:
What ho, shipmates!

Now that I got the ladders built and installed, it was time to move to the next daunting project - railings. The kit comes with brass PE that probably looks great in the hands of a skilled modeler, who knows how to work with delicate large pieces of PE and who has all of their fingers. I don't have any of those qualifications. Moreover, I needed railings for the raised foredeck which don't come with the kit. Double moreover, I changed the heights of objects such that the kit supplied railings no longer fit at all.:eek:

Also - the instructions explicitly direct the builder to leave the railings until you've rigged the ship. Because my rigging plans are meant to show significantly more detail than the kit calls for, I decided to do it now. Also - there would be no way for me to install the railings once the ship has her masts and rigging complete. When I post about the aft railing project you'll see what I mean.

Background - I knew I would have to make railings when I decided to emulate Pete Gutterman's Harriet Lane build. I even sourced a soldering set, rosin and flux. The closest experience I have to soldering is sweating copper plumbing. I thought the experience would transfer. It didn't. The missing fingers turn out to be a bit of a problem when I'm working very small. Moreover, based on my attempts, I concluded that annealed steel wire cannot be soldered. At least I couldn't do it. Any experts out there - please school me.

As we all know, there's always another way! Enter Gorilla Gel super glue. This man's best friend.

Here are some shots of the fore deck railings. I used 24 gauge annealed steel wire for the posts and 28 gauge for the rails. The scale height of the railing is 3.5 feet. I think I measured the kit supplied railing for that dimension. You may notice this, but just in case you don't I'll make it clear. I worked from left to right with the bow pointed away from me. The work on the left is less proficient than the work on the right - I was literally learning as I went along.

In this pic, I had most of the railing done and I discovered that I needed to do the ladder railing from left to right as I was doing the upper railing - the space was too small for me to treat the ladder railing as a separate process. What you don't see is how many times I knocked the center railings off the posts and ad to reglue them.

View attachment 483030

Better shot. I thought of putting the posts into the deck, but I was to worried about messing up the deck to drill holes in it. I couldn't imagine having to redo the whole foredeck. So, I CAd the posts to the aft end of the deck. In person the glue looks more like a bracket that holds the posts.

View attachment 483033

Finished. It is a bit fragile held together with only super glue. I thought about this for a day or so and decided to use some Titebond 2 to make it look like the parts are welded together with the added benefit of stiffening the structure. It worked. Hopefully, I'll be able to post about the more complicated project of the aft railings this weekend and you'll be able to see what I did.

View attachment 483036

I was left with a question in my mind. Did I need to extend the railing's forward at the bulwarks for the safety of the gun crew and hands working on that deck?
I'm sure that I will, but I'd appreciate your thoughts. Here's a pic to help you help me. Also, if you really want to help me send me a pic of a Civil War era ship with this kind of railing. I'll be doing research too;)

View attachment 483037


Blessings.
Chuck
I probably would have CA glued small tubing at the aft end of the deck for the railing posts to sit in. However I would not be shy about drilling into the deck if you use a hand drill and go slowly. Use a punch first, so your bit doesn’t wonder when you start.
That said, what you have done looks fine. I too have used Titebond in the past on wire to simulate welds. Once painted it looks convincing. ;)

Keep up the good work. I know these tedious tasks involving tiny parts are a challenge. I find you have to be good with tweezers and have steady hands. And ship rigging is for surgeons! ROTF
 
Last edited:
I probably would have CA glued small tubing at the aft end of the deck for the railing posts to sit in. However I would not be shy about drilling into the deck if you use a hand drill and go slowly. Use a punch first, so your bit doesn’t wonder when you start.
That said, what you have done looks fine. I too have used Titebond in the past on wire to simulate welds. Once painted it looks convincing. ;)
I am not familiar with civil war era ships, but I have seen upright metal posts with holes for either chain or rope. These are small details that require research to see which way it was done on the ship you are building. Looks like your approach was metal bars. That may or may not be correct. In addition, unless you’re aiming for being historically correct, you can use artistic license. ;)
Keep up the good work. I know these tedious tasks involving tiny parts are a challenge. I find you have to be good with tweezers and have steady hands. And ship rigging is for surgeons! ROTF
Thank you, Dean! Unfortunately, there are no pictures or other reliable images that I know about of Harriet Lane at this point in her career. I will be looking at my reference books. Thank you for the encouragement! I just have to remember not to drink a pot of coffee and then go work with tiny parts :p
 
Chuck,

Nice work, up to your usual standards! Looking at the chronology of your posts, have you figured out how to be at two places at the same time?. Or, do you have a traveling ship modeling kit?

Roger
Very kind of you to say so, Roger. Thank you!

Well, Roger, I'll tell you. I have super powers. I can be in two places at the same time by giving the appearance of being in two places at the same time. :cool:

Ha! Chuck, you are so funny!

To top it all off, Roger, also no traveling ship modeling kit either. I knew I would have expanses of down time. I did my job training them. It's their turn to work now. Happily, I took the pics last week knowing that I wanted to spend time visiting with my shipmates. So, email the pics from phone to computer, edit, attach, post and no one is the wiser:p.
 
Grant! Thank you! Hope all's well for you. You've probably said it already, but what's next after the amazing Grant's Xebec?

Blessings.
Chuck
Good afternoon Chuck. I have been redoing an old Bounty model. It been pretty fun although the past few weeks have been more work than shipyard time
your detail is just wonderful!
true story

Wow Chuck you are building a fabulous Harriet Lane. To repeat BMT “your detail is just wonderful.” Way to go.
Cheers Grant
 
A link to Grant's Bounty:

 
What ho, shipmates!

First, if you've gotten this far and have not checked @GrantTyler for his Bounty restoration, you're depriving yourself. It's awesome!

Second, back in the bosom of Shangri-la exhausted from my labors with my students. Nevertheless, here's the rest of the railing construction. Please enjoy!

Blessings. Peace. Gratitude.

Chuck
 
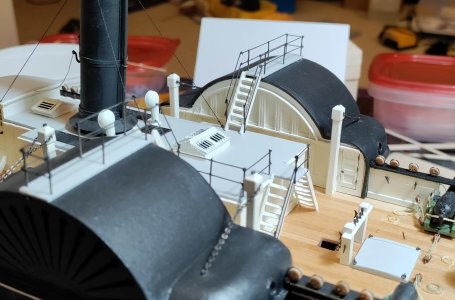
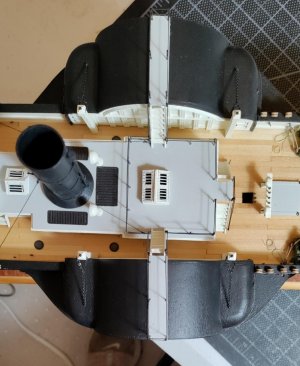
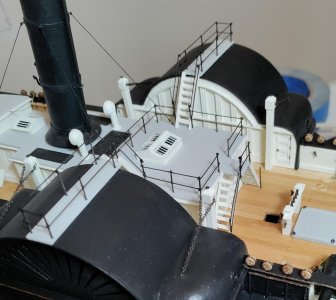
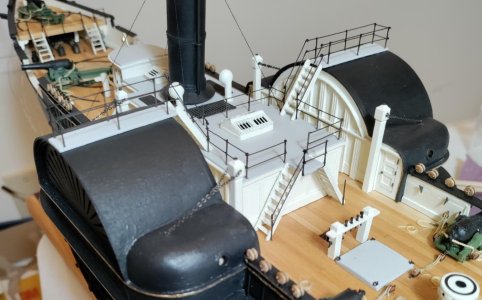
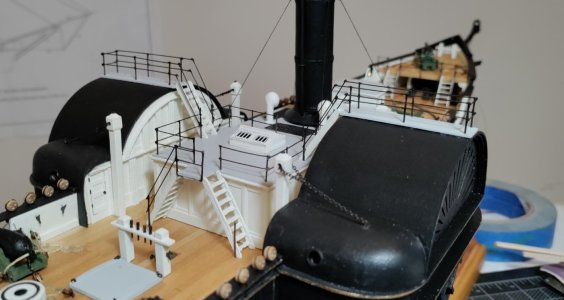
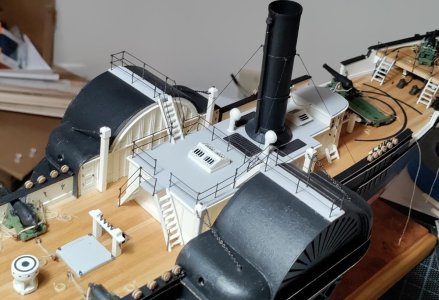
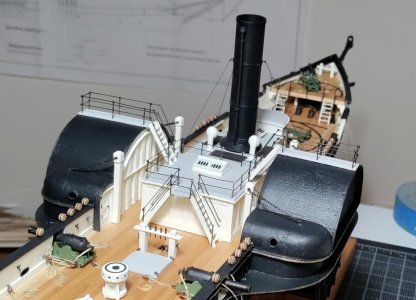
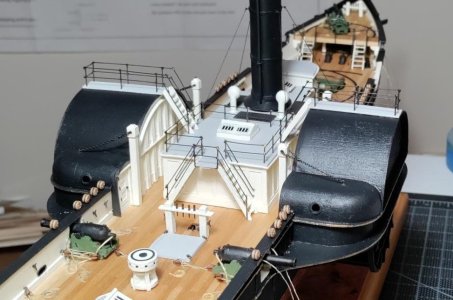
When I first posted about the foredeck railings, I pointed out that I was building from port to starboard, learning and improving, I hope, from port to starboard. The same is true on the aft railings. You'll see it because (I have no shame) I made sure to edit the pictures so that you could see that the railings to port are slightly wonky, particularly the bridge railings.

Aft Railings 1.jpg
Aft Railings 2.jpgAft Railings 3.jpgAft Railings 4.jpg
 
I should note that the kit provides for railings from the deck to the top of the main deckhouse and then from the top of the main deckhouse to and around the bridges. You can already see that I started adding railings around the top of the main deckhouse. I just couldn't see how it made sense from a safety perspective (OSHA is always on my mind - the Occupational Safety and Health Administration responsible for the oversight of workplace safety) to have the sailors and officers rambling around on the top of the main deckhouse with nothing to keep them from pitching off to the main deck. What if a sea were to get up?

When I first added the additional safety railings, I only did so aft. Then I looked at it and thought, in for a penny, in for a pound, and continued the railing all the way around the area.

Aft Railings 5.jpgAft Railings 6.jpgAft Railings 7.jpg
 
Here are the final pics. No doubt you noticed that if you are climbing the stairs to the top of the deckhouse, there are no inboard hand railings. :eek: Unsafe! Unsafe!

Never fear, I noticed it too. It was a pain in the butt to add after the fact on the port side, but I got her done. You can see them in the last two pics. The hand rail to starboard looks more bent than it actually is ;). The yellowish globs on the joints, particularly visible on the starboard side deckhouse top posts, are my Titebond II glue welds.

You might have asked yourself "Why didn't Chuck take the deckhouse top safety railings forward to the tip of the pilot house?" Chuck thought about it and just decided not to do it. :p

Aft Railings 8.jpgAft Railings 9.jpgAft Railings 10.jpgAft Railings 11.jpgAft Railings 12.jpg
 
Back
Top