Wow, wow, wow! These railings make the ship!
-

Win a Free Custom Engraved Brass Coin!!!
As a way to introduce our brass coins to the community, we will raffle off a free coin during the month of August. Follow link ABOVE for instructions for entering.
-

PRE-ORDER SHIPS IN SCALE TODAY!
The beloved Ships in Scale Magazine is back and charting a new course for 2026!
Discover new skills, new techniques, and new inspirations in every issue.
NOTE THAT OUR FIRST ISSUE WILL BE JAN/FEB 2026
You are using an out of date browser. It may not display this or other websites correctly.
You should upgrade or use an alternative browser.
You should upgrade or use an alternative browser.
USRC Harriet Lane Model Shipways 1:96 scale circa 1863 COMPLETED
- Joined
- May 25, 2020
- Messages
- 1,104
- Points
- 443

Ok, Paul, coming from you - I just felt my head swell up.Wow, wow, wow! These railings make the ship!

Thank you kind sir! I'm pleased with the result. Should the motto be: "As Much Detail as Possible" (in Latin of course). Now that I've started to dip my toes into the water of adding detail, I just can't stop. It's a strange addiction. I saw a build of the @Model Shipways Fair American a few weeks ago and the builder had included all of the head sail running rigging. I have been thinking of taking Lovely Renee out her case and adding them. Am I nuts? We'll see. It's got to be a lot less audacious than Grant's Bounty transformation. Right?
Your encouragement is priceless Paul.
Blessings.
Chuck
Last edited:
- Joined
- Jun 29, 2024
- Messages
- 1,443
- Points
- 393

Here are the final pics. No doubt you noticed that if you are climbing the stairs to the top of the deckhouse, there are no inboard hand railings.Unsafe! Unsafe!
Never fear, I noticed it too. It was a pain in the butt to add after the fact on the port side, but I got her done. You can see them in the last two pics. The hand rail to starboard looks more bent than it actually is. The yellowish globs on the joints, particularly visible on the starboard side deckhouse top posts, are my Titebond II glue welds.
You might have asked yourself "Why didn't Chuck take the deckhouse top safety railings forward to the tip of the pilot house?" Chuck thought about it and just decided not to do it.
View attachment 483998View attachment 483999View attachment 484000View attachment 484001View attachment 484002
Good afternoon Chuck. I am with Paul here- wow your railings are brilliant. Simply put - you are owning this ship. Cheers Grant
- Joined
- May 25, 2020
- Messages
- 1,104
- Points
- 443

Thank you, Grant! I'm about to get started on furnishing the masts and turning the spars. I've been meaning to post about my method of turning masts and spars with stone age tech - Maybe I'll finally get around to thatGood afternoon Chuck. I am with Paul here- wow your railings are brilliant. Simply put - you are owning this ship. Cheers Grant
Blessings.
Chuck
- Joined
- May 25, 2020
- Messages
- 1,104
- Points
- 443

What ho, shipmates!
I can hardly believe that I haven't posted my progress for so long. Apologies!
I did start furnishing the masts, in case you were wondering .
.
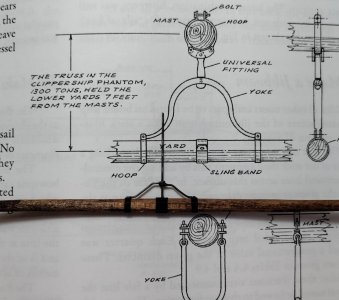
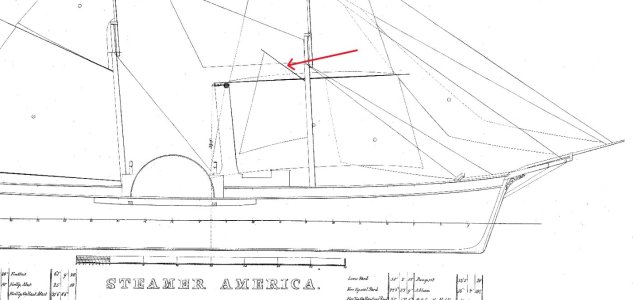
As you know, I got the sail and spar plans of Harriet Lane's sistership the America that Webb built for the Russian government. I made an executive decision to follow the Webb plans rather then the kit in many particulars. I also decided to follow period practice to attach the spars to the masts - I'll return to this subject over the course of the next several posts.
As shown below, America's sail and spar plan called for a gaff on the foremast. That gaff is not in the kit plans.
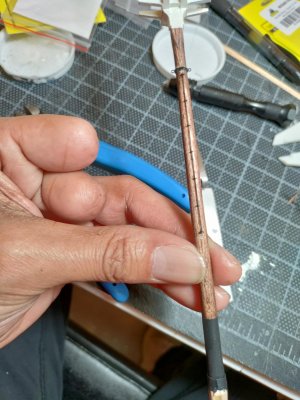
Rather than mast hoops for the sail, I decided to add a jackstay to the aft side of the foremast. The eyebolts are spaced 3' apart at scale. I'm sure one of our shipmates knows how far apart the eyebolts should be, so please share. (Fact is that I've already made the foreyard and added the eyebolts at 3 foot intervals for a total of 18 eyebolts. So I'm gong to live with the error, if one exists, and enjoy the art )
)
I can hardly believe that I haven't posted my progress for so long. Apologies!
I did start furnishing the masts, in case you were wondering
As you know, I got the sail and spar plans of Harriet Lane's sistership the America that Webb built for the Russian government. I made an executive decision to follow the Webb plans rather then the kit in many particulars. I also decided to follow period practice to attach the spars to the masts - I'll return to this subject over the course of the next several posts.
As shown below, America's sail and spar plan called for a gaff on the foremast. That gaff is not in the kit plans.

Rather than mast hoops for the sail, I decided to add a jackstay to the aft side of the foremast. The eyebolts are spaced 3' apart at scale. I'm sure one of our shipmates knows how far apart the eyebolts should be, so please share. (Fact is that I've already made the foreyard and added the eyebolts at 3 foot intervals for a total of 18 eyebolts. So I'm gong to live with the error, if one exists, and enjoy the art


Last edited:
- Joined
- May 25, 2020
- Messages
- 1,104
- Points
- 443

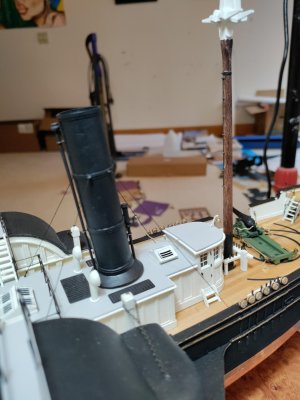
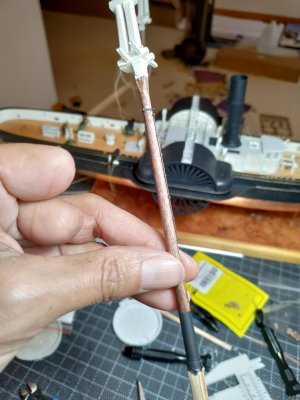
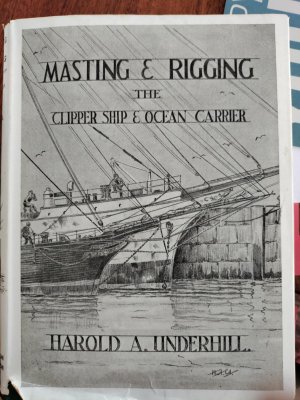
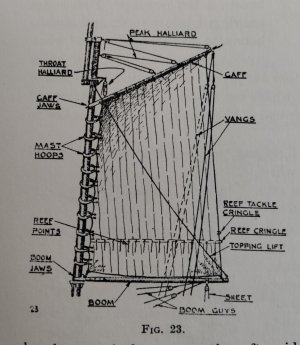
If you've built, or are building this lovely ship, you'll notice that I decided to arrange the gaff halliards differently than the kit plan. The kit calls for three blocks evenly spaced on the aft side of the main mast where it doubles with the maintop mast. First pic. I've decided to go with the arrangement shown in Underhill's "Masting and Rigging the Clipper ship & Ocean Carrier." Second and third pics. Why? I like it better and there is a period accurate reference for the rig. But mainly I like it better  Also, the kit plan does not show boom guys. I plan to add that detail to the main boom rigging.



- Joined
- May 25, 2020
- Messages
- 1,104
- Points
- 443

A while back, I promised a description of my stone-age method for turning spars. Here's how I made the foremast gaff and all other spars ever.
First take drill and chuck-up the dowel. Have your circle gauge handy. The Spencer gaff actual dimensions run from slightly less than 1/8" at the fat end to slightly less than 1/16" at the skinny end. The dowel is 1/8" to start. I hold the drill on in one hand and use the other to shape the dowel with a strip of sand paper. I started with 220 and went all the way to 800 grit. Final pic is the finished product. Word to the wise - When I'm in a hurry, I might even start with 120 grit if the dowel is significantly wider than the finished spar - the fore yard started as a 1/4 inch dowel and ended up at 1/8" in the middle tapering to 1/16" at the ends - DON'T DO THIS. The low grit paper leaves very deep marks on the soft wood that show up with staining even after polishing up with 800 grit. You just can't be in a hurry.


First take drill and chuck-up the dowel. Have your circle gauge handy. The Spencer gaff actual dimensions run from slightly less than 1/8" at the fat end to slightly less than 1/16" at the skinny end. The dowel is 1/8" to start. I hold the drill on in one hand and use the other to shape the dowel with a strip of sand paper. I started with 220 and went all the way to 800 grit. Final pic is the finished product. Word to the wise - When I'm in a hurry, I might even start with 120 grit if the dowel is significantly wider than the finished spar - the fore yard started as a 1/4 inch dowel and ended up at 1/8" in the middle tapering to 1/16" at the ends - DON'T DO THIS. The low grit paper leaves very deep marks on the soft wood that show up with staining even after polishing up with 800 grit. You just can't be in a hurry.


- Joined
- May 25, 2020
- Messages
- 1,104
- Points
- 443

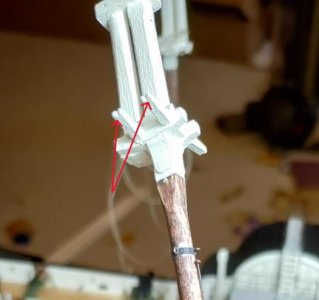
One last thing for now - I advise anyone building this lovely model to ignore the directions in the kit regarding attachment of the lower deadeyes for the top mast shrouds. The instructions say to file notches into the ends of the crosstrees to receive the futtock shrouds. Pic 1 red arrows. My initial instinct was to ignore this instruction and drill holes through the crosstrees. I could then thread the futtock shrouds through the holes after having attached the deadeyes and it would save a lot of fiddling with stiffening thread with glue or using wire. I wish I had followed my instincts. After trying the wire method, the lower dead eyes were still not secure enough. So, I drilled the holes and am a much happier sailor!


- Joined
- Jun 17, 2021
- Messages
- 3,184
- Points
- 588

Nice progress! I should get cracking!Thank you for the likes, shipmates! Now it's time to go to the shipyard and make some more progress!
Blessings. Peace. Gratitude.
Chuck
- Joined
- May 25, 2020
- Messages
- 1,104
- Points
- 443

What ho, shipmates!
Thank you Pete and Barry! The brotherhood of the Harriet Lane abides.
First, a thousand thanks to all of you who work very hard to find how it actually looked on the real ship! You have been an inspiration since I began this log thirteen months ago. But for you I might have followed the instructions supplied in the kit.
Second, had I followed those instructions in the current phase of my build, I would be producing something very different from how the masts and yards were likely rigged. So, if you are building, I'll keep saying it, this wonderful @Model Shipways kit of a heroic ship - turn your own masts and yards and ignore all of the instructions about how the fore, fore topsail, and fore topgallant yards attached to the masts. Also ignore the dire warnings in the instructions about the masts being too thin to make an adequate hole for the top and topgallant halliard tyes. Balderdash!
Third, if you are building this ship, do yourself a favor and get Crothers "The Masting of American Merchant Sail in the 1850s"
In post #466, I discussed the jackstay I put on the aft side of the foremast and noted the distance between the eyebolts was a guess at 36". Well, go figure - again, read the book Chuck, don't just look at the pictures! Crothers gives the spacing for the jackstay eyebolts at 30". I'm not going to redo the jackstays already in place for the Spencer or the foreyard. I did, however, use the 30" interval on the top and topgallant yards.

Here's what comes in the kit. If you zoom in a bit, you can see the fore and froe topsail have the eyebolts FIVE FEET APART! Also, in an effort to simplify something that is not that complex the yards are pre-drilled all the way through to receive the eyebolts.

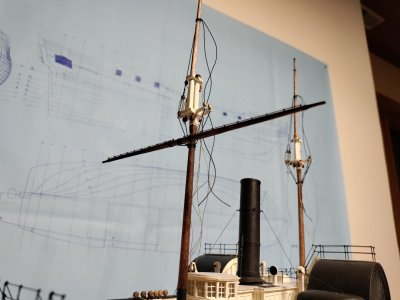
Here's what I did: I turned my own yard using Crothers description of a lower yard from a single tree. The slings are 8-sided for 1/8th the length of the yard forward and 8 sided for 50% of the length of the yard aft. I actually managed to do it, but it's really hard to see - no, really


Thank you Pete and Barry! The brotherhood of the Harriet Lane abides.
First, a thousand thanks to all of you who work very hard to find how it actually looked on the real ship! You have been an inspiration since I began this log thirteen months ago. But for you I might have followed the instructions supplied in the kit.

Second, had I followed those instructions in the current phase of my build, I would be producing something very different from how the masts and yards were likely rigged. So, if you are building, I'll keep saying it, this wonderful @Model Shipways kit of a heroic ship - turn your own masts and yards and ignore all of the instructions about how the fore, fore topsail, and fore topgallant yards attached to the masts. Also ignore the dire warnings in the instructions about the masts being too thin to make an adequate hole for the top and topgallant halliard tyes. Balderdash!
Third, if you are building this ship, do yourself a favor and get Crothers "The Masting of American Merchant Sail in the 1850s"
In post #466, I discussed the jackstay I put on the aft side of the foremast and noted the distance between the eyebolts was a guess at 36". Well, go figure - again, read the book Chuck, don't just look at the pictures! Crothers gives the spacing for the jackstay eyebolts at 30". I'm not going to redo the jackstays already in place for the Spencer or the foreyard. I did, however, use the 30" interval on the top and topgallant yards.

Here's what comes in the kit. If you zoom in a bit, you can see the fore and froe topsail have the eyebolts FIVE FEET APART!

Here's what I did: I turned my own yard using Crothers description of a lower yard from a single tree. The slings are 8-sided for 1/8th the length of the yard forward and 8 sided for 50% of the length of the yard aft. I actually managed to do it, but it's really hard to see - no, really


- Joined
- May 25, 2020
- Messages
- 1,104
- Points
- 443

That's a tidy bit of work, my friend! Impressed!
- Joined
- May 25, 2020
- Messages
- 1,104
- Points
- 443

BTW, even at an interval of 36", I had to make 20 tiny eyebolts to hold the 28 gauge jackstay. (On the kit supplied yard I would have only needed 12 ) So, back to the shipyard to make 30 tiny eyebolts for the top and topgallant yards.
Blessings. Peace. Gratitude.
Chuck
 ) So, back to the shipyard to make 30 tiny eyebolts for the top and topgallant yards.
Blessings. Peace. Gratitude.
Chuck
- Joined
- May 25, 2020
- Messages
- 1,104
- Points
- 443

Thank you kindly, Paul! Now my hats won't fit at allThat's a tidy bit of work, my friend! Impressed!

I'm sure you noticed that I ran the "universal fitting" arm through the yoke into the aft side of the yard. I wanted the assembly to be stable and secure and easily pushed into place on the mast when the time comes.
- Joined
- Jun 17, 2021
- Messages
- 3,184
- Points
- 588

Nice work making facsimile yoke. A tricky bit of legerdemain to pull off at 1:96 


