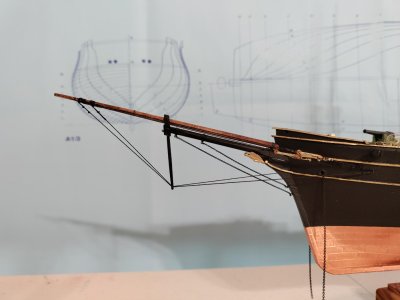
USRC Harriet Lane Model Shipways 1:96 scale circa 1863

Thank you, Pete! Nothing compared to your work on Flying Cloud!
Thanks, but I haven't gotten to the yokes (iron yard supports) yet, If I ever do. My FC build is taking so long, what with all my backtracks, do overs, dithering over ship's boats and just plain procrastination :rolleyes: I may only do some rudimentary partial masting and rigging, and present it basically as a "dockyard model", declare victory and move on. Also, that will have the added benefit of greatly reducing the amount of real estate required for a cased display!;)

Pete
 
Say it ain't so! Well, good that you found a silver lining for your Flying Cloud :D . I was looking forward to seeing the wonderful complexity of her rigging.

Speaking of do-overs - I got the bowsprit rigging in on my build and my martingale spar is a scale foot too long:eek:. Crazy what 1/8" can do to mess up a mans life.

Blessings.
Chuck
 
Last edited:
Great job! Given that kits are marketed to people that don’t want to do extensive research (present company excluded!) the goof about rope slings and jeers is inexcusable. This is eighteenth century technology. Harriett Lane’s builder, William H. Webb was up to date with the advances in shipbuilding technology generated by the nineteenth century Industrial Revolution and regularly incorporated them in the vessels that he built.

The kit was designed by a guy who is capable of meticulous research and has written excellent books about building Nelson Era warship models. He apparently didn’t research the rapid advances in shipbuilding technology during the next few decades.

Roger
Thank you, Roger! Yup, I'm regularly checking all of my resources to try to find drawings or pictures of how the masting an rigging was done during that era. That said, for the sake of detail (and failure to really think ahead ;) ) I'll have some archaic rigging just to show the viewer that they didn't do it by tying a knot here and another one over there.
 
Good morning Chuck. Wonderful details and presentation. I really do like the way you did the truss and chain sling for the yard. Cheers Grant
Thank you, Grant! I'm finding that there is so much more to building a nice model than following the instructions ROTF.

BTW - LOVE how your HMAS Bounty rehab is coming along. I'm on the verge (almost) of setting up a go-fund-me so you you have a slush fund for the zero cost work.

Blessings. Peace. Gratitude.
Chuck
 
What ho, shipmates!

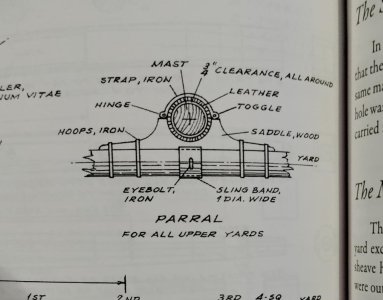
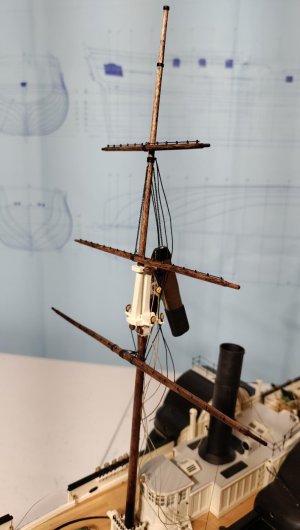
Here are some pics of the fore mast yards. As you know, I decided to go with period correct placement of the jack stay eyebolts and parrals and the use of chain for slings for all yards. I won't repeat the information about chain slings from post #476. The first pic is from Crothers depicting period correct parrals. The next pics show all of the yards crossed (temporarily) and how I plan to use the smaller gauge chain for the topsail and t'gallant yards.

Parrals Reference.jpg

I did not take very good pictures of my parrals, but I assure you that the sling bands are "1 DIA. WIDE" as described by Crothers. On the other hand, I omitted the iron hoops at least for the time being.

Fore yards w chain sling.jpg

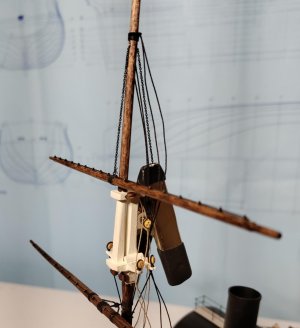
I had no problem making a hole through the topmast that was big enough to accommodate the chain sling. You won't either!
Fore topmast yard chain sling closeup.jpg

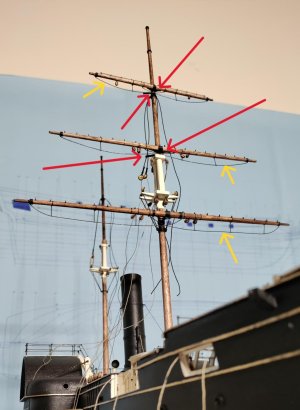
In the next pic the red arrows point to the parrals and if you look closely you'll notice some black tags - those are the "iron straps" that I will strap down with CA at the appropriate time. The yellow arrows point out the footropes. I tried to use line for the foot ropes, but I could not get the line to hang with weight no matter what I did. I didn't have this issue at 1:48 scale. So, I went with 28 gauge wire. It is a little more pronounced than I would prefer in a perfect world, but my world isn't perfect so, in the words of our esteemed shipmate @Peter Gutterman, I declared victory!

Fore yards parrals.jpg

Blessings.
Chuck
 
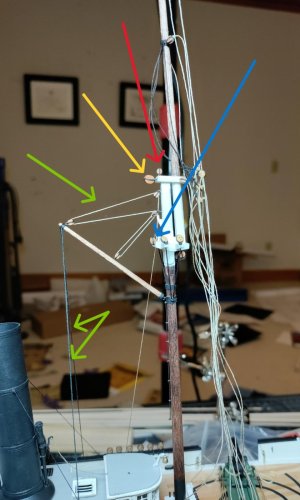
At post #446, I talked about adding a Spencer gaff on the foremast because of the historical basis for the rig is present and it is absent from the kit. I made the gaff, and then in making the gaff I made a gaff. If you look at post #470 you see the gaff I had "finished." It's a bare stick that I was actually going tie a line to and call it good.:eek: Happily, I got to thinking. I went back through my reference books, particularly Canney's "The Old Steam Navy: Frigates, Sloops and Gunboats1815-1885." Turns out the Spencer gaff was common and every picture showed it rigged the same way. So here's what it will look like on my Harriet Lane:

Green arrows: Spencer gaff and vangs (temporary).
Yellow arrow: block for main top mast stay.
Blue arrow: block for fore top sail yard halliard tye.
Red arrow: block for fore t'gallant sail yard halliard tye.

The tye blocks do not appear to be historically accurate (more of that later). I could not find a picture in my resources showing them. I went with it anyway.

Spencer gaff rigged.jpg
 
Hello Chuck,

I appreciate the thoughtful approach you are taking and the high-level execution. This is going to be a fantastic ship model!
Thank you, Paul! I'm learning that it takes a lot of research and planning BEFORE I start building. As you know my log is littered with taking a couple of steps backward at the risk of doom and destruction:p. My great hope is that others will build this amazing ship with the benefit of my mistakes. It really is a great kit for a moderately experienced modeler (like me) to take to a higher level. I can only imagine what someone with real skill and better-than-stone-age-tools would do with her. (Looking at you - and you know who you are!)

Blessings.
Chuck
 
The instructions call for rigging the bowsprit and jib boom before the heavy lifting on the masts. So, I followed the instructions and the plans - mainly. ;)

As you know, the bowsprit had to be stepped, IMHO, early in the build because of the raised foredeck configuration Harriet Lane had in late 1862. AT post #334 I had the bowsprit stepped and the chain bobstays attached. Again, the instructions tell the builder that accurately rigging the bowsprit shrouds will be too difficult at 1:96 scale. Again, IGNORE the instructions! In fact ignore any instruction that says "this is too difficult to do."

Also, the instructions have you work from the attachment points outside to inside. If you do it that way, you'll be confined to the space left between the outermost attachment - martingale stay - as you set up the outer jib stay and then further confined by the attachment of the inner jib stay. I decided to work from inside to outside particularly because I was adding detail.

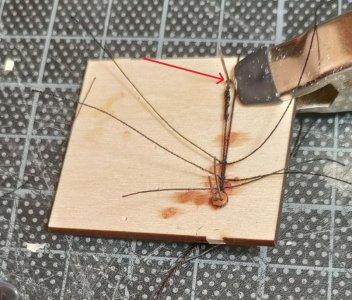
I sourced some 3/32 deadeyes, set up a jig to attach a short shroud to the innermost dead eye and used the lovely tiny hooks from @Dry-Dock Models & Parts. BTW I got the deadeyes I used for the topmast shrouds from Dry-Dock. Those guys are the truth! I wish I had sourced all of my dead eyes and blocks from them! Red arrow: tiny hook from Dry-Dock!

Jib shroud jig.jpg
Jib shroud 1.jpg

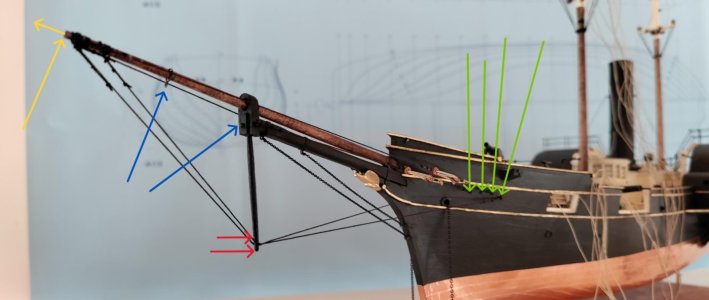
You'll notice that the martingale boom and stays are also aboard. When I got done I thought "ain't I the cheese" until I looked and saw that the martingale stays created an odd geometry and that any kind of head sea would really bury the martingale boom. Then I remeasured the martingale boom against the plans and found I was a scale foot too long :eek: - red arrows.

The yellow arrows point out the fact that I shorted the jib boom - on purpose to give more room for the detail of the jib stay outhaul - which as it turns out is historically inaccurate but I'm keeping it because I made a really nifty part - see blue arrows.

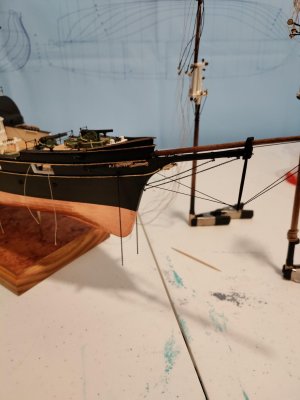
The four green arrows are the attachment points on the hull. You can see how difficult it would have been to rig the shrouds if I had first rigged the martingale stays. The plans call for 3 eyebolts. I had to skip one of them after setting up the inner shrouds because there was no room between the inner and outer shrouds if I followed the plan. I simply added another, fourth, eyebolt for the martingale stays.
Jib shroud 2.jpg


Yes, of course I cut the stays and used a razor saw to remove the boom!!!! This final pic shows the revised version of the martingale rigging. I managed to add back the tip of the jib boom at least to my satisfaction.

Jib shrouds complete.jpg

Blessings.
Chuck
 
Thank you, Grant! I'm finding that there is so much more to building a nice model than following the instructions ROTF.

BTW - LOVE how your HMAS Bounty rehab is coming along. I'm on the verge (almost) of setting up a go-fund-me so you you have a slush fund for the zero cost work.

Blessings. Peace. Gratitude.
Chuck
Funny Chuck ROTF . It is going very slowly at the moment.......I don't have motivation to play with her at the moment, a little too much fine weather in Cape Town to stay indoors. Cheers bGrant
 
This AM it was in the teens below Zero F here in Duluth, MN. The Duluth harbor (Lake Superior) is frozen solid. This coming week it is supposed to “warm up” into the upper twenties. When our friends back East ask smugly how we can withstand the cold, I tell them that it won’t be so bad once we get inside plumbing !

Roger

Roger
 
What ho, shipmates! As you know I am using period accurate methods for slining the yards on the foremast: Chain. The chain sling for the lower yard is supposed to be leathered as shown below. BTW I chose option A. Any thoughts on how I might accomplish that? Please share!

Underhill chain sling.jpg
 
Back
Top